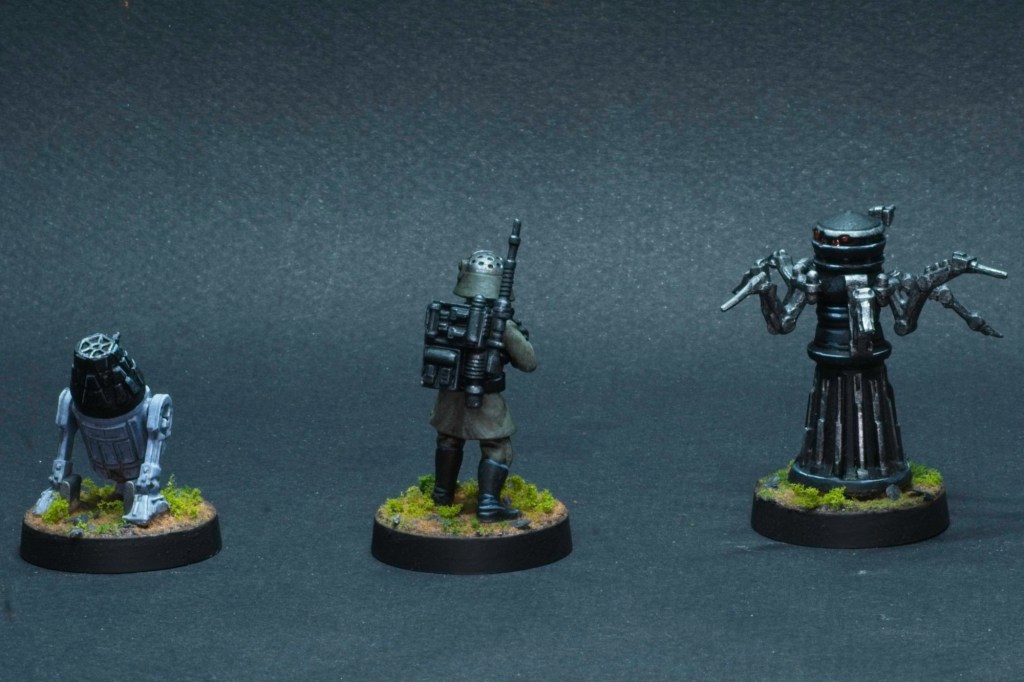
This has wound up being a nice and quiet weekend, so that means more painted models! These three models are the remainder of the Imperial Specialists set (I painted the officer from the set back in Febuary), and also the last three models in need of painting in my current imperial collection (I have some spare storm trooper models but I have more than I need already painted).
From left to right, we have an R4 astromech droid, a comms specialist, and an FX-9 medical droid. That medical droid is rather sinister looking I must say, not sure I’d be very excited to have that hovering over me if I was injured!
I ended up using the same recipe on the trooper as for the Grenadiers I painted last week, it looks about right for Imperial uniforms which isn’t surprising, the influences for the designs of the costumes are pretty clear!
With these three done, I probably have enough for two standard games’ worth of models (i.e. way more than I need 😉 ) but I’ve thoroughly enjoyed painting Star Wars models and I’m sure there will be more coming my way in the future.
My friends have been talking about playing Star Wars legion again, and that motivated me to finish up some models that have been built and primed for probably close to a year: the three members of Inferno Squad, a commando unit of the Empire.
Gideon Hask, ID10 Droid, Iden Versio, and Del Meeko
Inferno Squad made up some of the protagonists of the single player campaign of the Battlefront II video game that I enjoyed a lot when I played through it last year some time. I got excited when I saw that there were models of them for the Star Wars Legion game, and doubly so when I found them under the tree last Xmas! The kit for Iden Versio comes with a selection of weapons that match what she can use in the game, so I kitted her out they way I enjoyed playing the most, which I thought was a neat thing to let players do.
Painting-wise there is not much new here, they were painted with the same black recipe I’ve used for all the black models in the army (i.e. build up highlights using Vallejo Dark Sea Blue and Vallejo Ghost Grey, with shiny materials – the armour, boots, and gloves – highlighted brighter than the cloth elements).
This was a nice break from larger projects, a quick two-session paintjob (one this morning and one tonight!). It’s nice to be able to have these done, they made up most of my remaining Legion models needing to be painted. Left now are a couple of droids and a comms trooper!
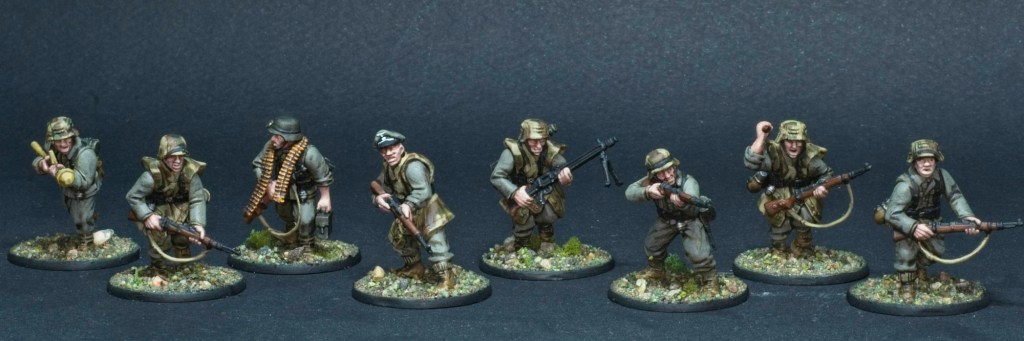
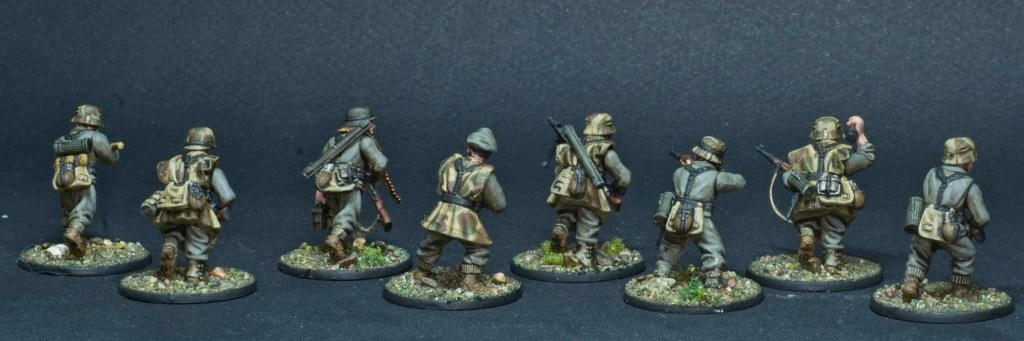
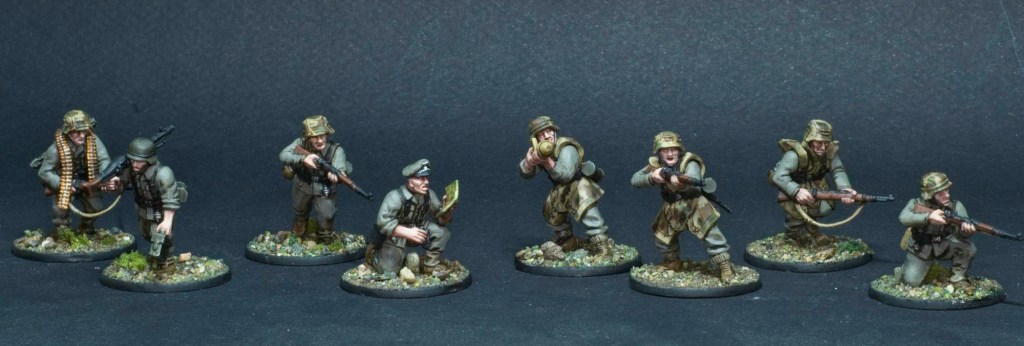
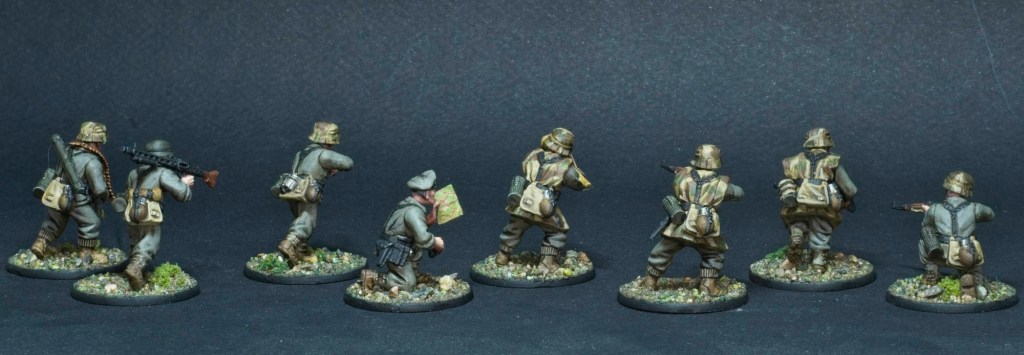
The WW2 bug is still very much around and I’ve now started painting the infantry in the German collection that was given to me. Starting with the Grenadiers, from Warlord Games’ plastic kit line.
I have 2 squads of these in the 1000pt list I’ve written up, both imaginatively armed in the exact same manner! 8 men, two as an MG team, one with Panzerfaust, and the rest with rifles.
I painted these using Duncan Rhodes’ guide, following the steps exactly up until some of the more detailed highlights that I skipped.
These were based with more base ready materials, this time the Scrublands mix. I think it looks quite nice, especially given the low amount of effort required!
I’ve been on a bit of a journey with these models, building and painting models that are evil in fantasy and sci-fi settings is one thing, but these are miniature representations of an organisation that caused harm in an unprecedented scaled to real people. I’ve had serious misgivings about painting and posting about this army, but at the end of the day I think historical wargaming can have a positive role in helping us and others keep in mind what happened in the past.
This is a bit more of a serious tone than usual on the blog, but I did want to address this as I think it’s important. I’ll probably talk some more about all this when I get to the troops of a more political nature…
After my foray into 1944 armoured warfare, time to come back to my Skaven project! This is the second unit of clan rats for the army, and the last I’m painting for the first 1000pts. I haven’t quite decided if I will add more as I grow the army, it will likely depend on how much I feel like painting more of them!
There isn’t much to discuss painting wise, I followed the guide I wrote for the first unit pretty much to the letter, the only exception being that I replaced the basecoat of the teal cloth with Scale 75 Arphen Jade. I’d used Lupercal Green on the first unit but found I didn’t get very good coverage over my ochre undercoat.
I’m not too far from having painted the 1000 point list, just needing to paint two characters and a unit of 20 stormvermin. I’ve been getting excited by all kinds of games lately so who knows if the next post will be more Skaven or another distraction!
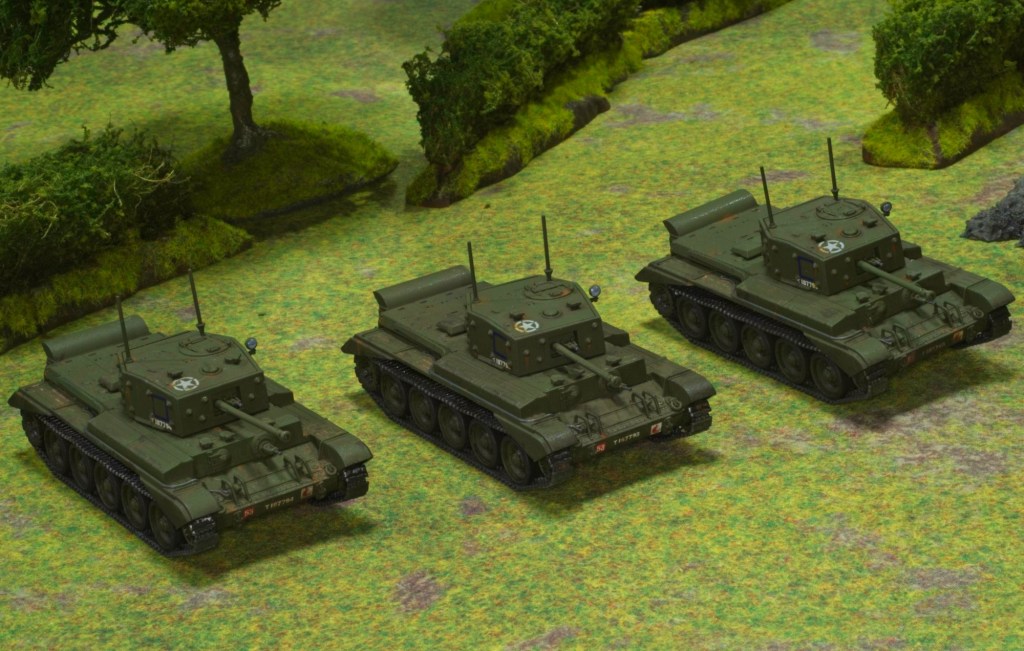
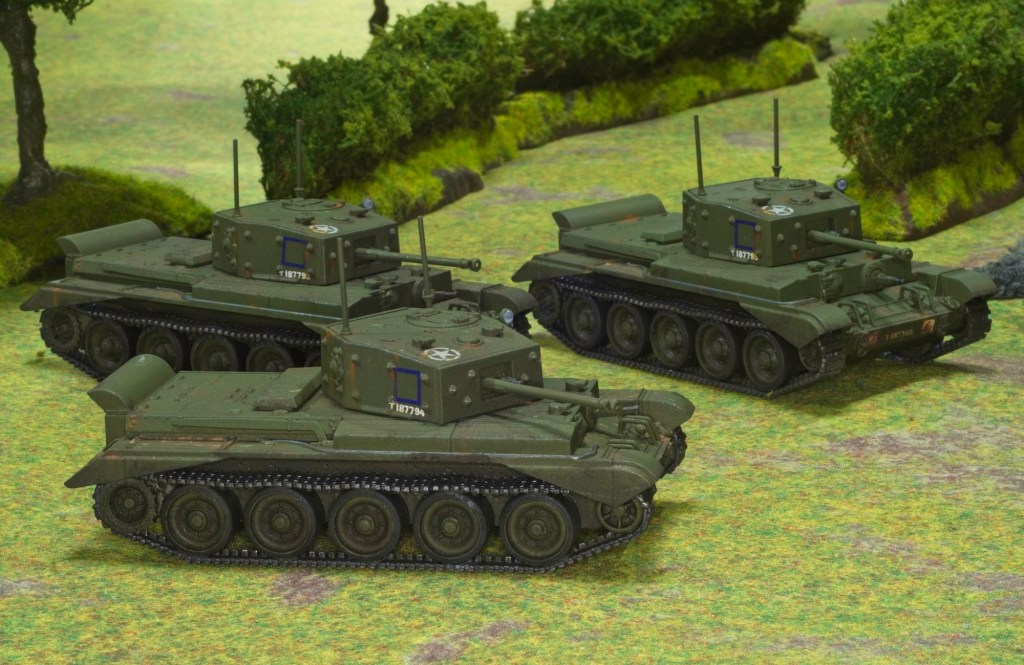
I decided that while the motivation to paint tanks is there, it should be fully utilised! I still had 3 Cromwell tanks to paint up before we could play this big tank battle, so after finishing up the last post, I decided to keep going.
I decided to paint them as 7th Armoured tanks, as North Africa is also a campaign I’m fond of and the Desert Rats are hard to pass by! The kits came with decals for the 7th which made life easier, although I don’t believe the regimental number decals are correct, as all the reference photos I could find had them with a stag head in the top half and the number in the bottom half. Still I’m not enough of a stickler to let get in the way of finishing these!
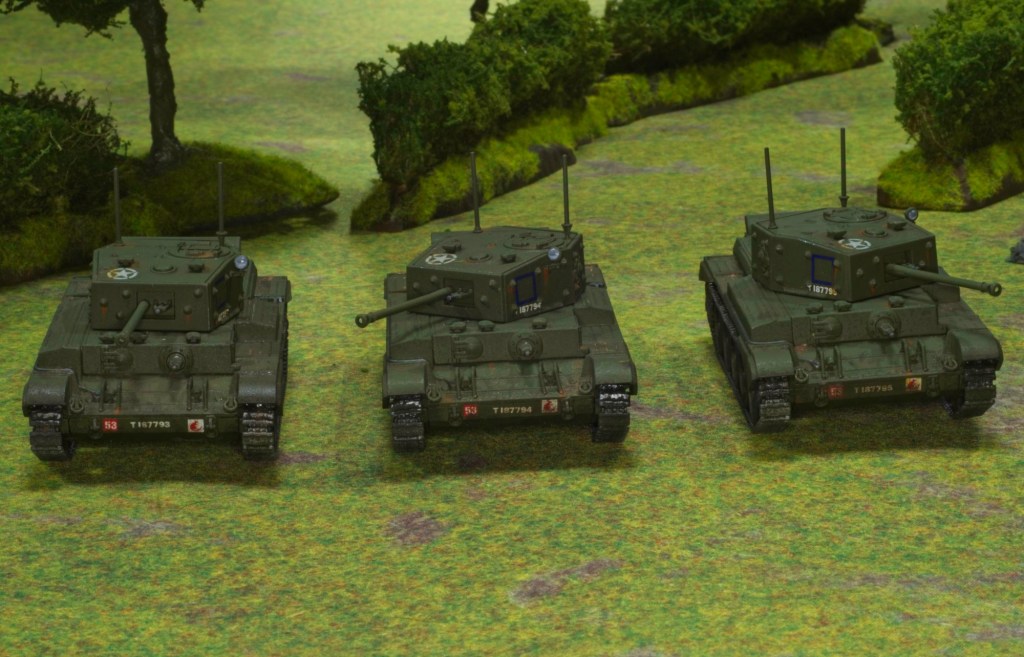
British tanks are somewhat simpler to paint than the German camo, being simply a single colour all over, but I otherwise replicated the process I used on the German tanks last post. The decals are a mix of the ones that came with the warlord kits (the regimental numbers, the unit symbols), the allied star warlord decal sheet for the stars on the turrets, and the registration numbers from the Italeri version of the same kit (while these are Warlord branded, Italeri produces them, and sell their own version of the kit). I’m glad I had all these on hand, I think together they make a pretty complete picture, and am a little disappointed that all the decals I think are needed are not just in the box.
Some of the decals aren’t the straightest but then I remember that a lot of these were hand stenciled on, so some variation may be somewhat more realistic (at least it’s a useful excuse 😉 )
These were fun and very quick to paint, now I just have to figure out how and when to have this big tank battle!
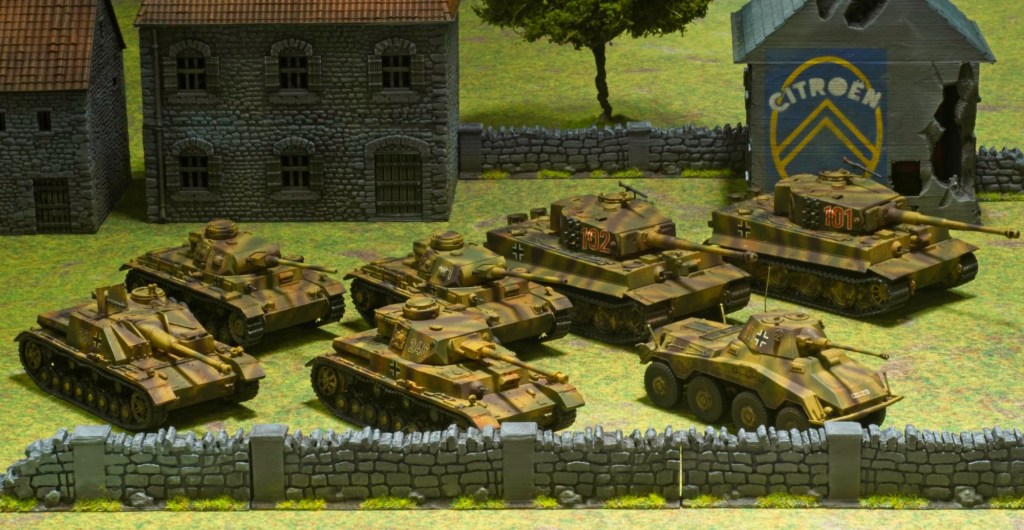
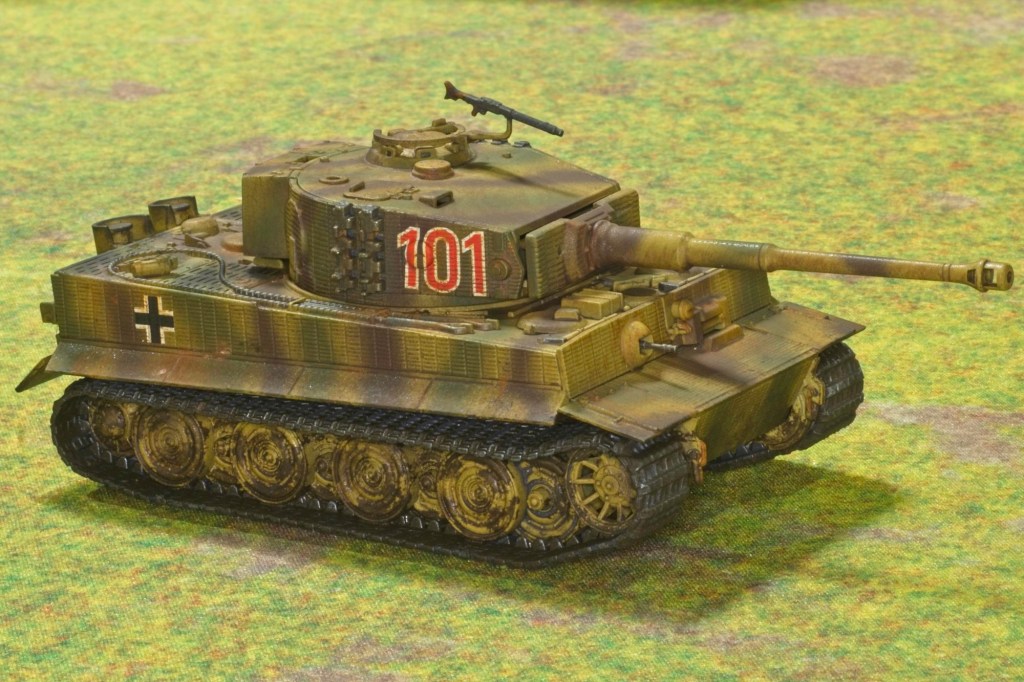
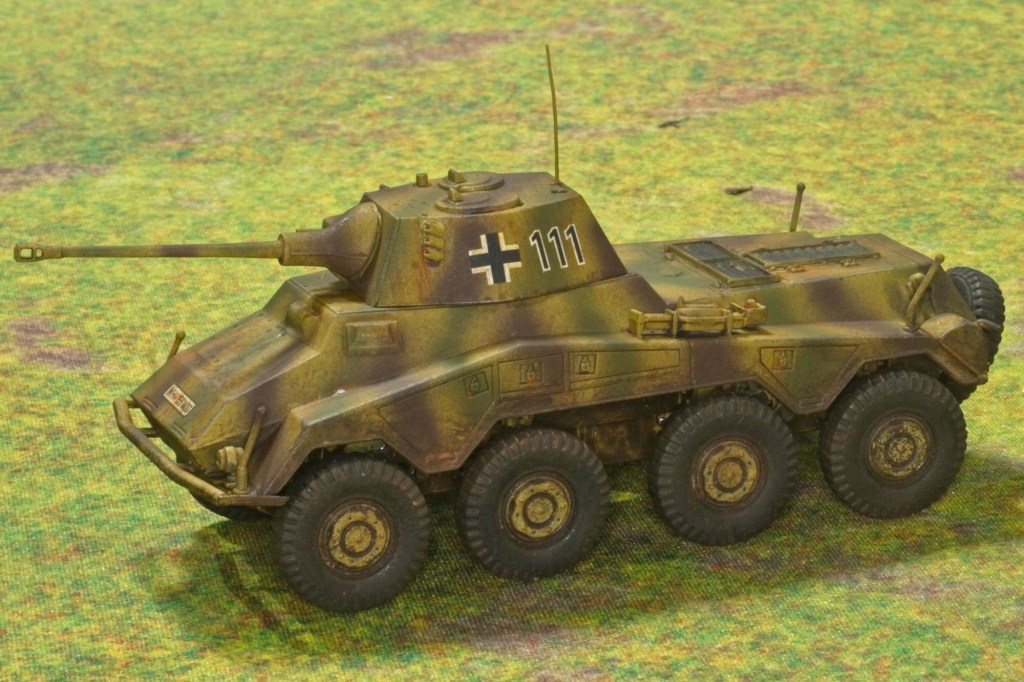
A friend of mine gave me his Bolt Action army last weekend after a year of not doing too much with it, he felt he’d rather not have it than having the pressure to complete it, and focus instead on Star Wars Legion. He’d amassed a pretty large collection of models, so this was very generous of him indeed. I’ve been itching to get a game of Bolt Action in after all this time so decided to act quickly and paint all his tanks so we could play the Tank War set of rules for Bolt Action, with the goal of painting the infantry later. After tallying up his vehicles (1 Puma, 2 Panzer III, 2 Tigers), I ended up at around 1500 points, so decided to round that up to 2000 by buying a couple of extra tanks to fill out the numbers (a Panzer IV and a Stug IV). This would let this army play against my own 1000pts of British tanks and another friend’s 1000pts of Russian tanks.
I decided to go for a late war scheme (the famed Dunkelgelb, Olivgrün, Rotbraun camo) to match my own armies which I mostly picked because of their presence in Normandy. The Panzer IIIs are a little bit out of place there, but I found three sources that mention there being a handful present, good enough for me!
With that goal in mind I decided that for time efficiency I would paint the lot together as there are a lot of efficiencies to be gained there. Tank painting with oils washes and layers of varnish has a lot of drying time in between steps, while the steps themselves are relatively short. Here’s a quick summary of the steps:
Undercoat – Vallejo Dunkelgelb Primer through the airbrush for the tank bodies, Vallejo Plate Mail Metal for the tracks (Kept separate where possible)
Camo – Vallejo Olivgrün and Vallejo Rotbraun through the airbrush, I decided to do a loose striped pattern.
Basecoat the bits that are not tank bodies (Rubber on the wheels, tracks where attached, attached equipment etc.)
Gloss Varnish the lot
Apply Decals
Gloss Varnish again
Overall oil wash – Abteiling 502 Dark Mud
Streaking rust, applied dots and streaked them downwards – Abteilung 502 Oxide Patina
Satin Varnish all over
Used Graphite pencil to wear the edges
Applied mud to tracks – AK Wet Mud
Applied dust – Mig Europeant Dust Dry Pigment
Matt varnish all over
Some of those decals were very tricky to apply! Luckily decal solvents saw me through! (I used Mig Decal Set/Fix for this)Very happy with the outcome of the rust streaks, I’ll definitely use that technique again.
Here’s a gallery of all the vehicles
The Tigers – Warlord Games/Italeri Plastic kitsThe Panzer IIIs – Warlord Games/Italeri Plastic kitsThe Puma – Warlord Games/Italeri Plastic kitThe Stug IV – Die Waffenkammer resin kitThe Panzer IV – Die Waffenkammer resin kit
Very fun little project, now I need to paint my British tanks otherwise this will all be in vain!
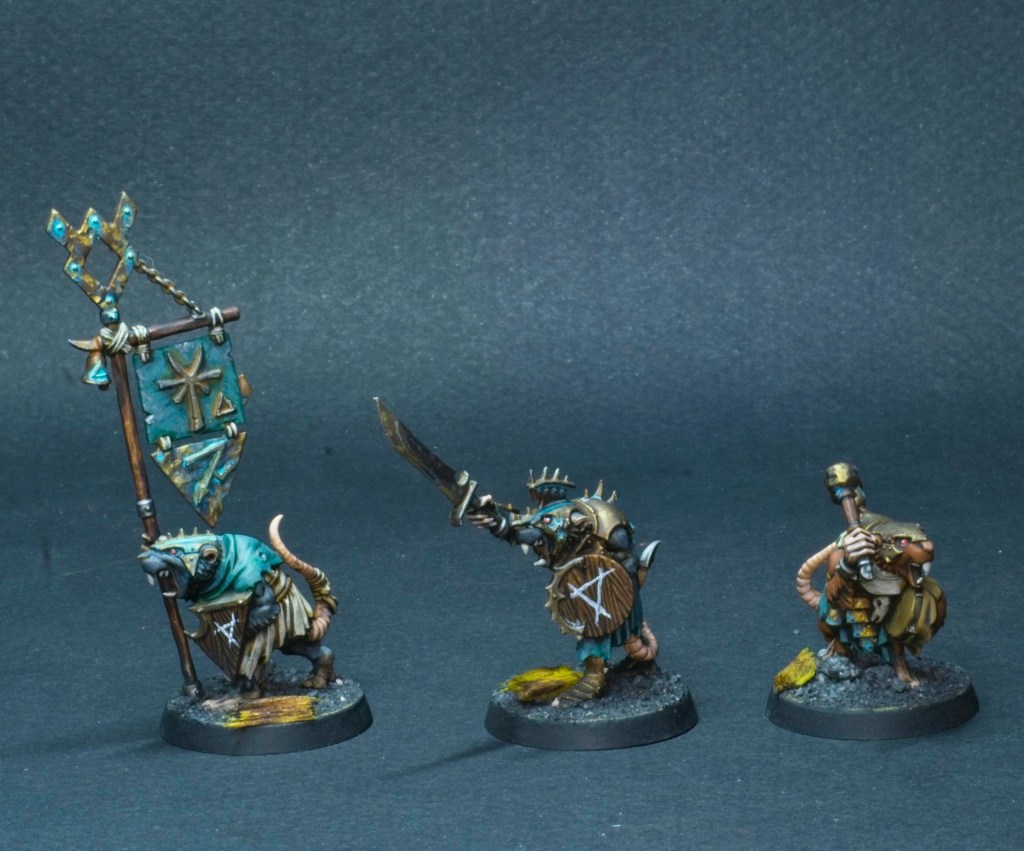
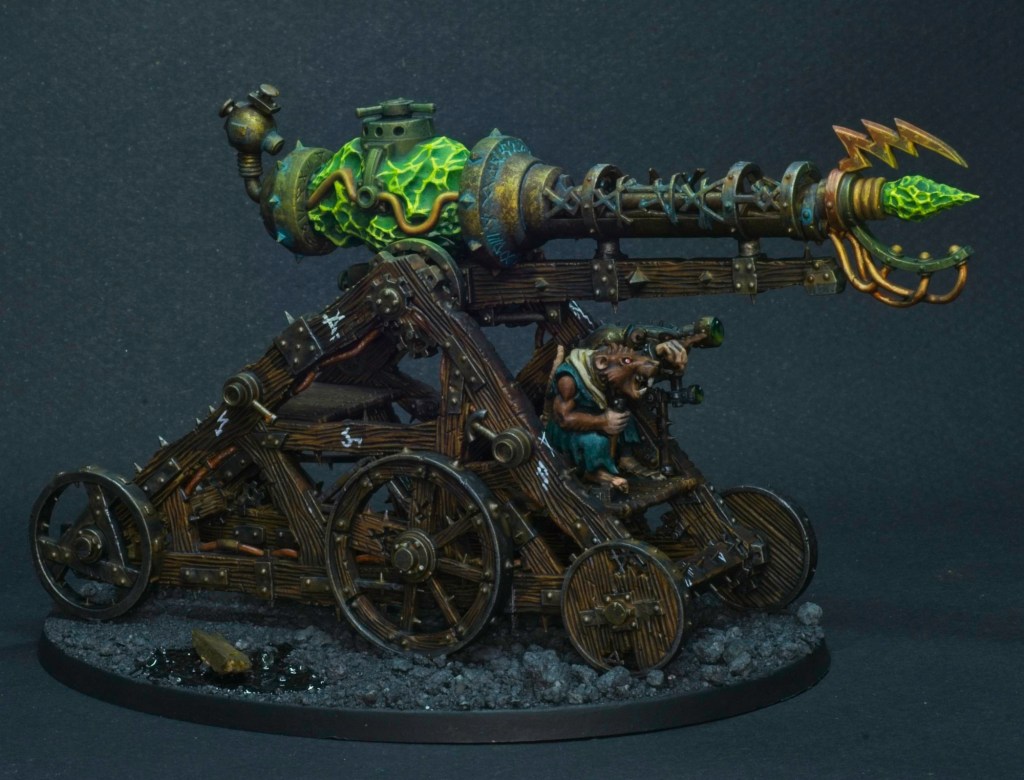
To keep things from getting too boring when painting this skaven army, I’ve decided to space out the blocks of infantry models with single models. First of these to hit the painting table is the Warp Lightning Cannon! One of the Skaven’s most powerful (and therefore extremely likely to blow up!) war machines.
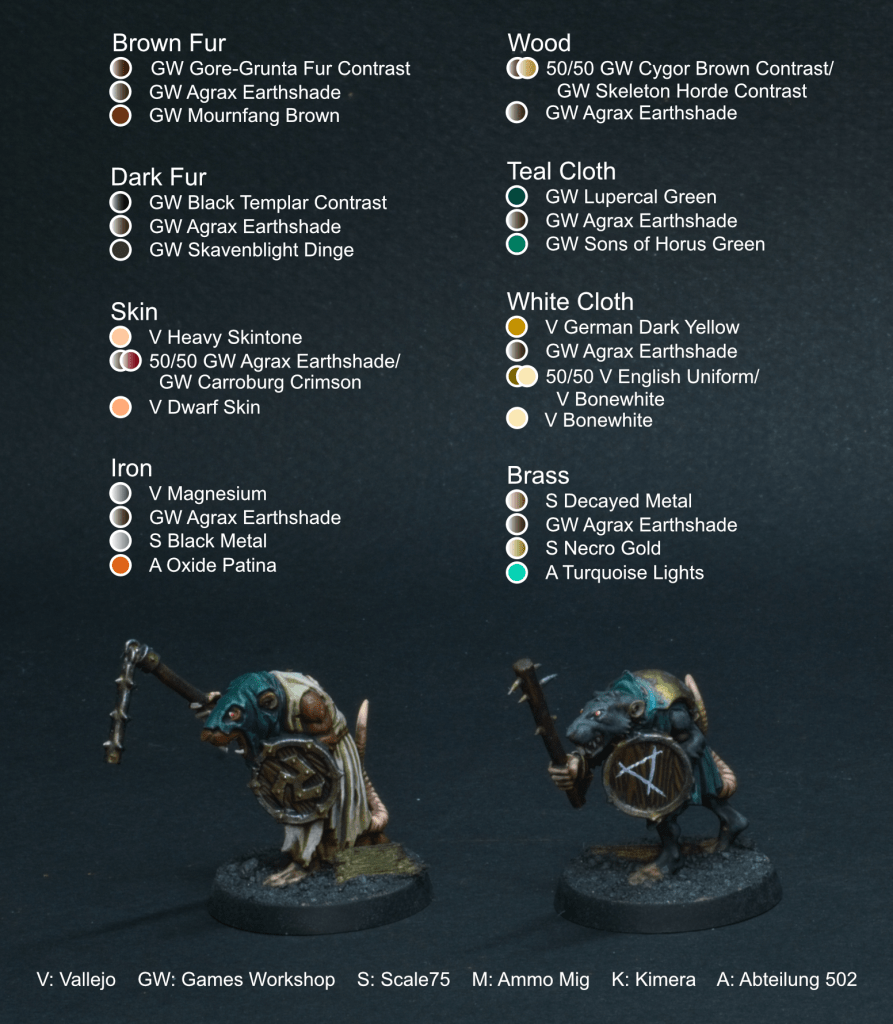
This model was painted following the same recipes I detailed in the post on the clan rats with the exception of two new materials: the warpstone chunks and the copper wiring.
The warpstone was painted by first covering the yellow ochre undercoat with GW’s Ork Flesh contrast paint, followed by a pure white highlight on the edges of the stone, and finally a very light misting of Vallejo’s Light Livery Green through the airbrush to tint the stone and the surrounding areas for that faint glow effect.
The copper was painted using Vallejo Metal Color Copper as a basecoat, followed by the overall coat of GW Agrax Earthshade the rest of the model gets, then GW Reikland Fleshshade to give it a nice reddish tint. This is followed by a fine highlight of the copper basecoat to bring that metallic look back in.
Overall I’m happy with how it turned out, painting time was relatively quick which is what I’m aiming for with this army, too many models to go slow! I also had a bit of fun with the “in-universe photo”, lots of squiggly lines seemed to do the trick!
In the background, I’ve been bitten by the historical bug again, so next post will be a WW2 interlude before resuming the skaven!
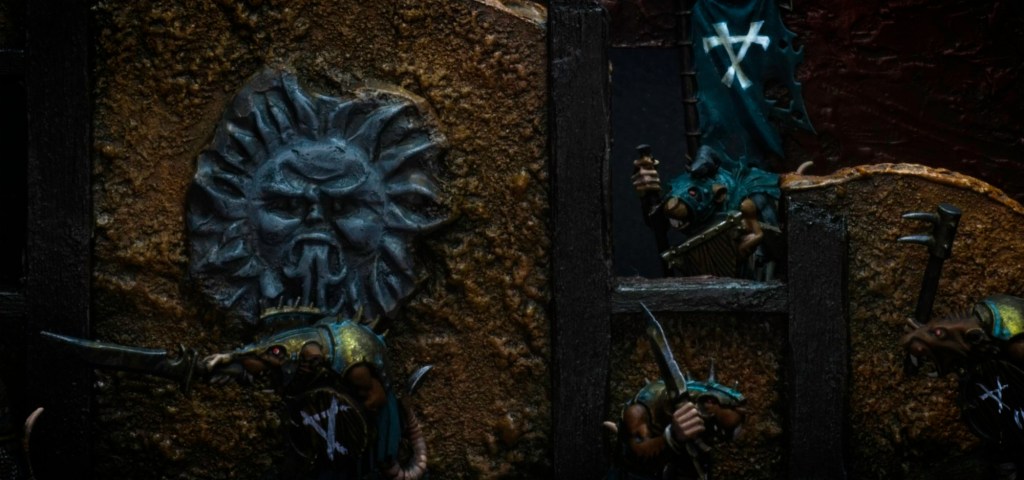
With the new edition of Age of Sigmar coming out in the past few months, I wanted to start a new army, specifically one that was not at its core just a rebasing of one of my old Warhammer armies. So I went about GW’s catalog to look for an army that inspired me. At about the same time I started planning the follow up campaign to my recently finished Icewind Dale Dungeon and Dragons campaign which had been going on for the last year. We decided to try out the newest Warhammer Fantasy Roleplay edition, and I set about to refreshing my memory of the old world by listening to Warhammer audiobooks while painting. The Gotrek and Felix audiobooks have turned out to be excellent, with great voice acting and plenty of background colour I could use in the campaign. More relevant to this post though, is the abundance of Skaven antagonists in these novels. The descriptions of the Skaven and their machinations, mistrust of each other, and readiness to blame others for their failures makes for very fun storytelling, and of course, made me want to paint some.
I’ve actually had these models painted for a few weeks now, but was waiting on the basing materials to arrive in the post to finish them. These 20 models were my guinea pigs (lab rats?), and were used to find a scheme that would satisfy two criteria: 1) look good on the tabletop, 2) be quick! My current plans for the army involve 100 troop rats (80 Clanrats and 20 Stormvermin) and I don’t want to spend the next year painting them.
In the same vein, I wanted the basing to be quick so I decided to try out the base ready range from geekgamingscenics.com, specifically their Grimdark City Rubble. My aim for the bases was to represent Skaven tunnels, which I picture as dark earth and broken supports, which I made out of balsa wood, stained with brown and green inks.
As with my previous armies I made a record of the paints used so I can refer to it as I continue painting the army (a useful precaution against becoming distracted by another project and forgetting how the early models were painted!).
Overall I like the look of these and am happy with how long 20 took to paint. I have a 1000 point list in place and am playing around with how to expand it to 2000 points in the future. Painting on this army continues and I should have another post on it soon.
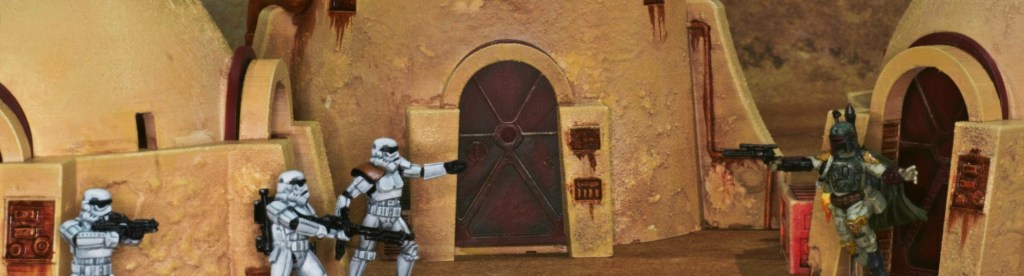
I played a Middle-Earth SBG tournament yesterday (more on this at the end), and was inspired by some of the tables I saw there to paint some terrain of my own. I’d done all the preparation for these buildings while recovering from my eye injury a few weeks back, but never got around to painting them as I got too excited by being able to see well enough to paint models again! My 15-month old had a three hour nap this afternoon that provided a window of opportunity to put my new found motivation to good use.
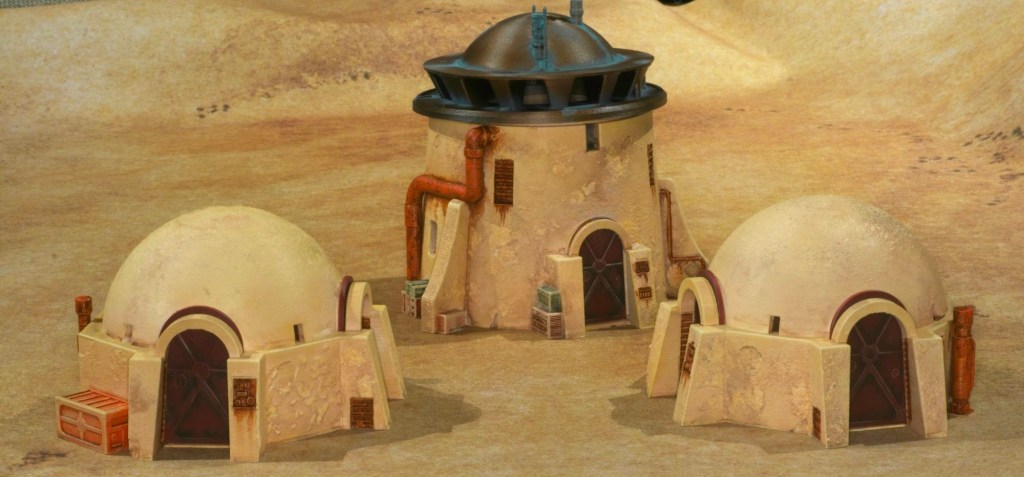
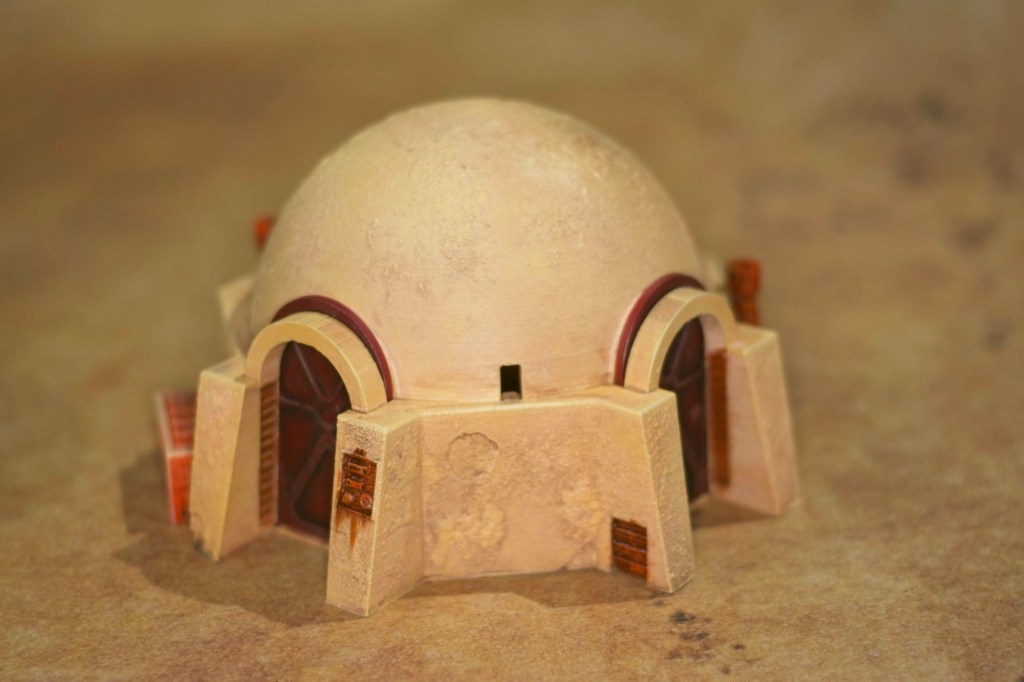
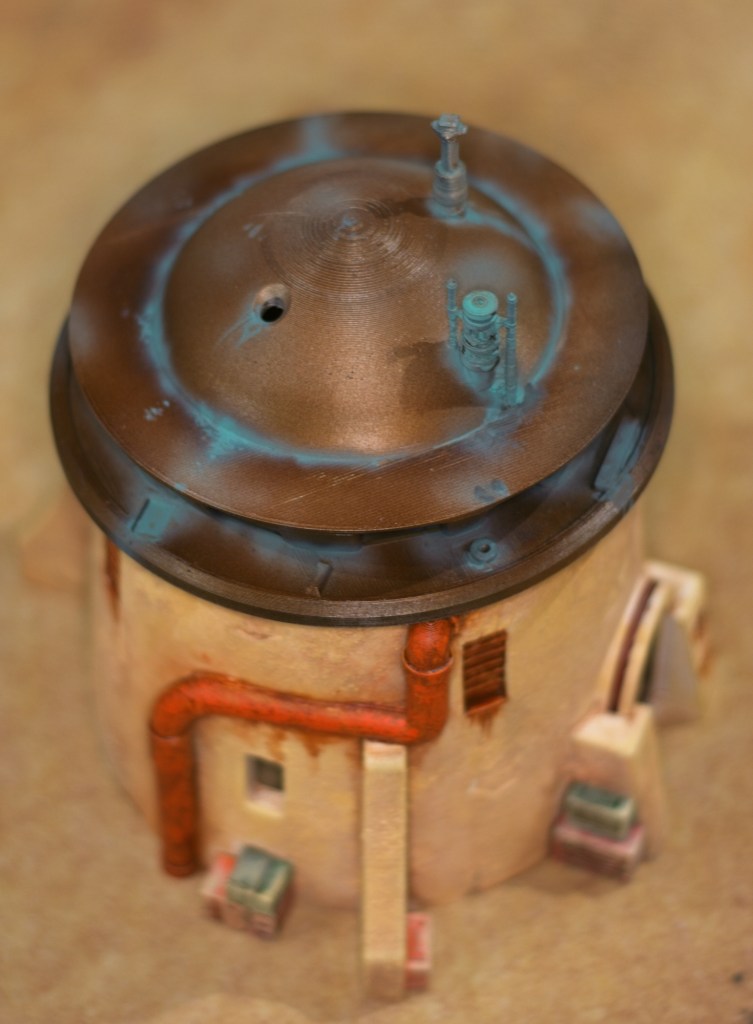
The buildings in question I 3D printed on my filament printer from models by Imperial Terrain who produce great Star Wars Legion terrain. To add to the look of them, I textured all of the walls with tile grout, which provided a great surface for drybrushing as well as hiding some of the layer lines from the printing process. I really love the look of this technique and will keep applying it to printed terrain where it makes sense.
For the walls of the structures, I started with an all over coat from a cream spray can, followed by a reddish-brown wash I made using a mixture of craft paints, water, and some window cleaner to break the surface tension. Once that was dry, I drybrushed a mix of ochre and white craft paint, followed by another drybrush of the same mixture with more white added.
The crates were painted in a variety of flat colours and hit with the wash and drybrush steps of the walls.
The rusted elements were done with a burnt sienna craft paint, followed by a mixture of burnt umber, red, and yellow inks all over. The same ink mix was used to do the rust streaks. The pipes were then hit with sponged on orange paint to add a bit more variety.
The roof of the tall building was done in a brassy-coppery look, which is something I’d seen on the painted examples on Imperial Terrain’s website and really like the look of.
I’m not sure how they did theirs, but mine was done using the airbrush, with an all over coat of Vallejo Metal Colour Copper, followed by a shading step done using Burnt Umber Ink. The verdigris was done using GW’s Nihilak Oxide through the airbrush (to avoid the wash running in the print lines), followed by some stippling of the same paint to add a bit of texture to the effect.
Overall very happy with the outcome, and the little guy woke up just as I was putting the finishing touches on the buildings so thanks a lot to him for giving me the time to get these done! I have a fair few more pieces to tackle before the table will be done, so expect some more Star Wars terrain posts in the future!
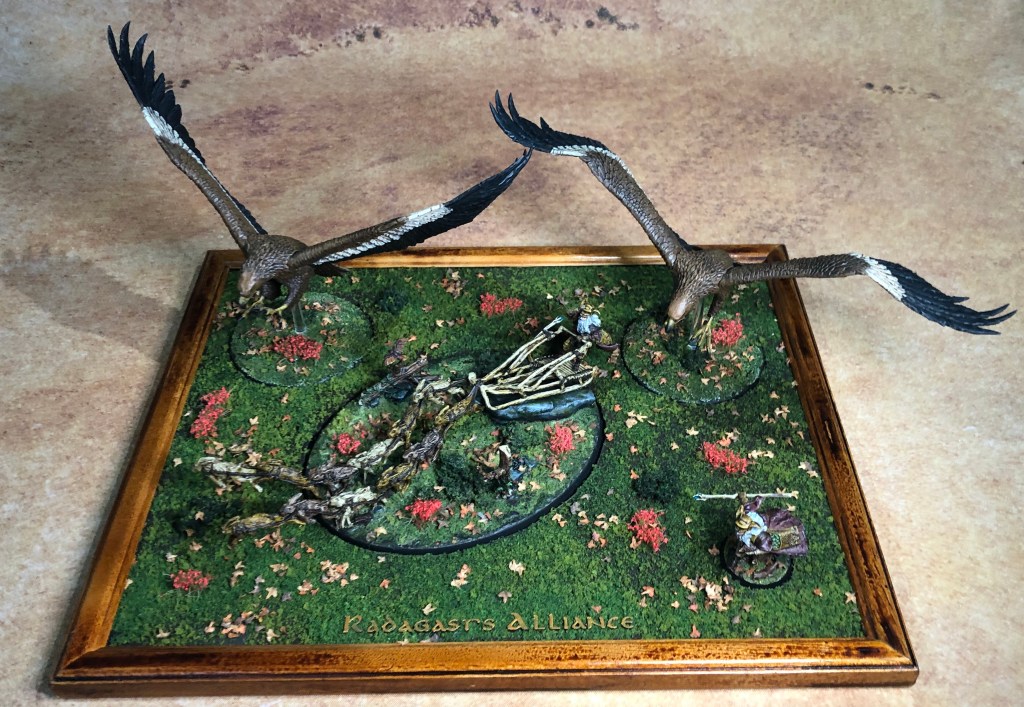
Radagast goes to war!
As I mentioned above, I played a one day tournament yesterday with the models I showcased in the last post. I ended up with two wins and two losses, finishing up somewhere in the middle of the field which I was happy with. For the tournament I put together the small display board you can see above and the effort paid off as I took home the best painted army award which I was very happy with. All in all a good fun day, and as always has motivated me to paint even more Middle-Earth armies!
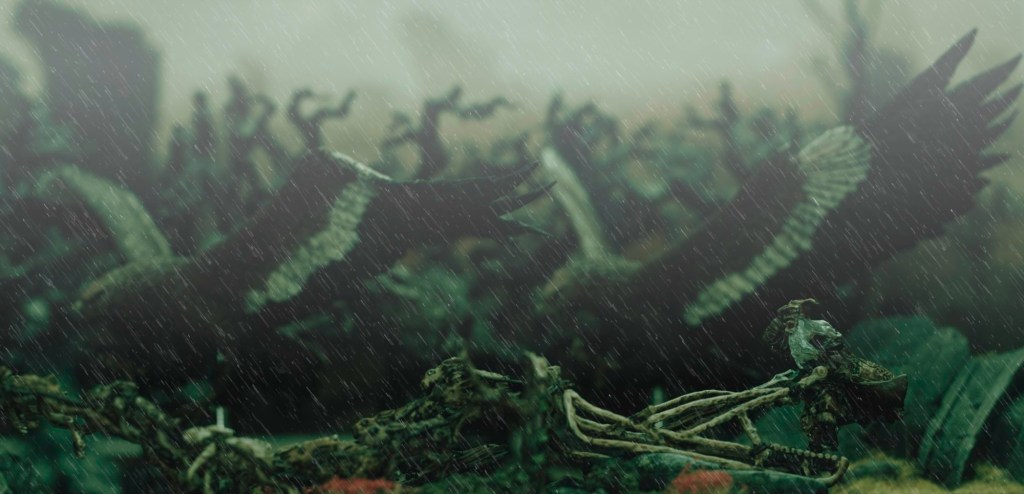
Radagast and his allies brave the foul weather to venture deep into Mirkwood
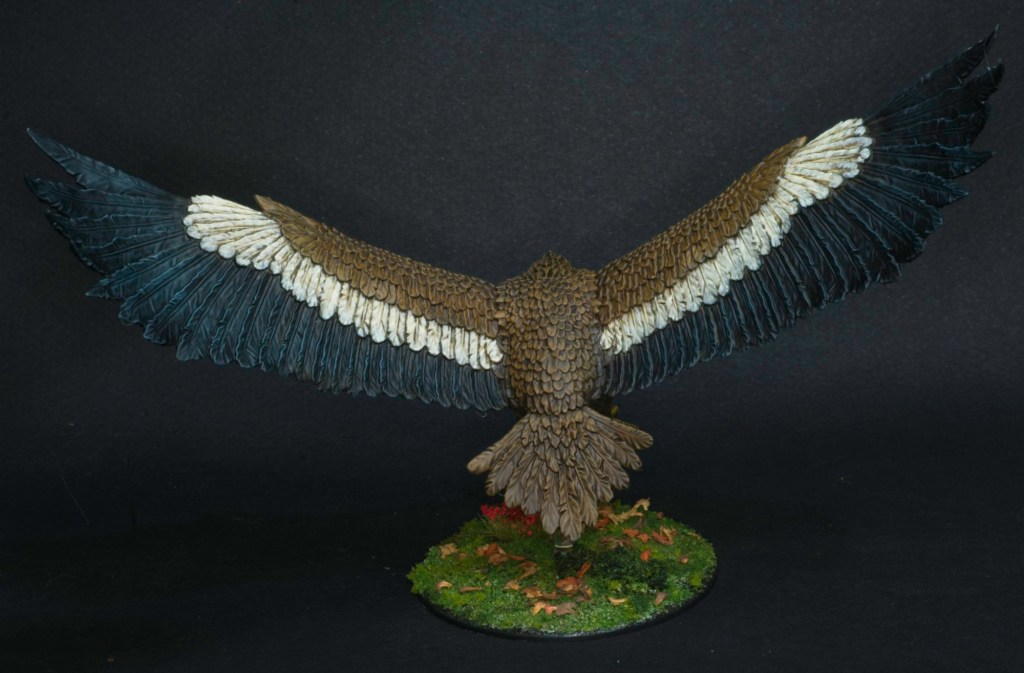
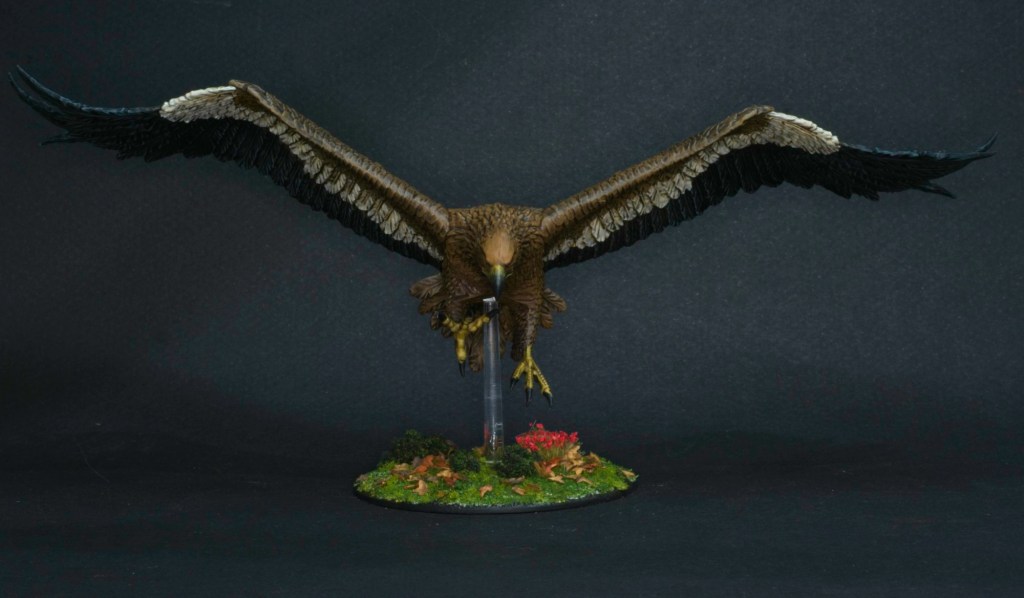
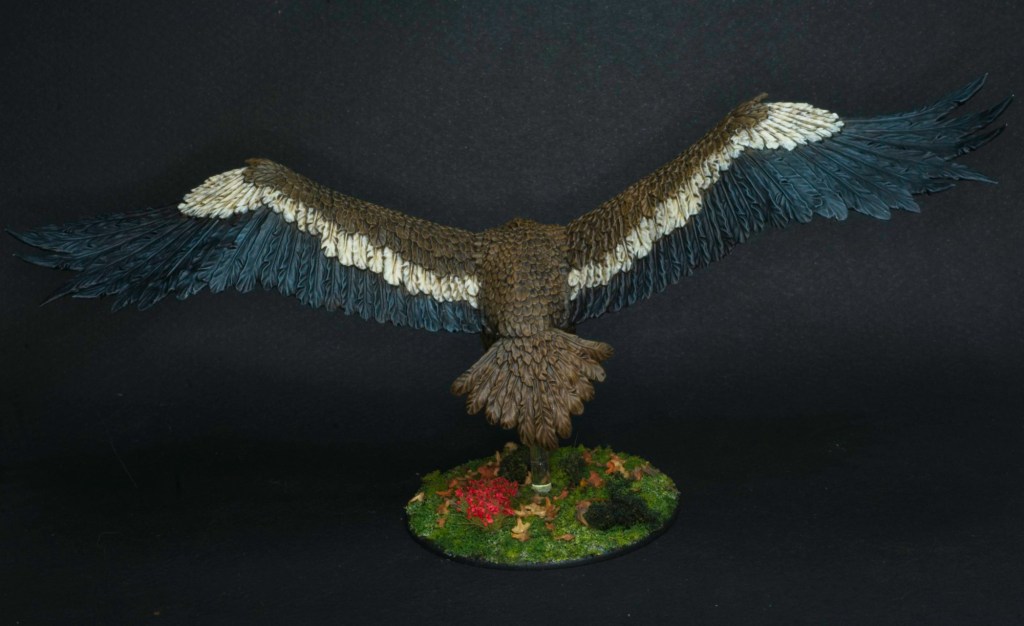
We have a small Middle-Earth SBG tournament coming up in a few weeks that I’ve planned on attending, and what better excuse to get more of my models painted! This tournament is limited to 400 points, which coincidentally is what Radagast on his sled and two giant eagles add up to! I’ve had these models since they were released (sometime around the release of the hobbit movies I assume), built and sitting in a case ever since. This seemed like a great opportunity to put some paint on them, and so off I went!
This is a three model army, and I have no idea how it will go in games but I hope it will be a lot of fun to play! I made the decision to experiment a bit with these models, and learned quite a bit in the process as I made quite a few mistakes that I hope not to reproduce!
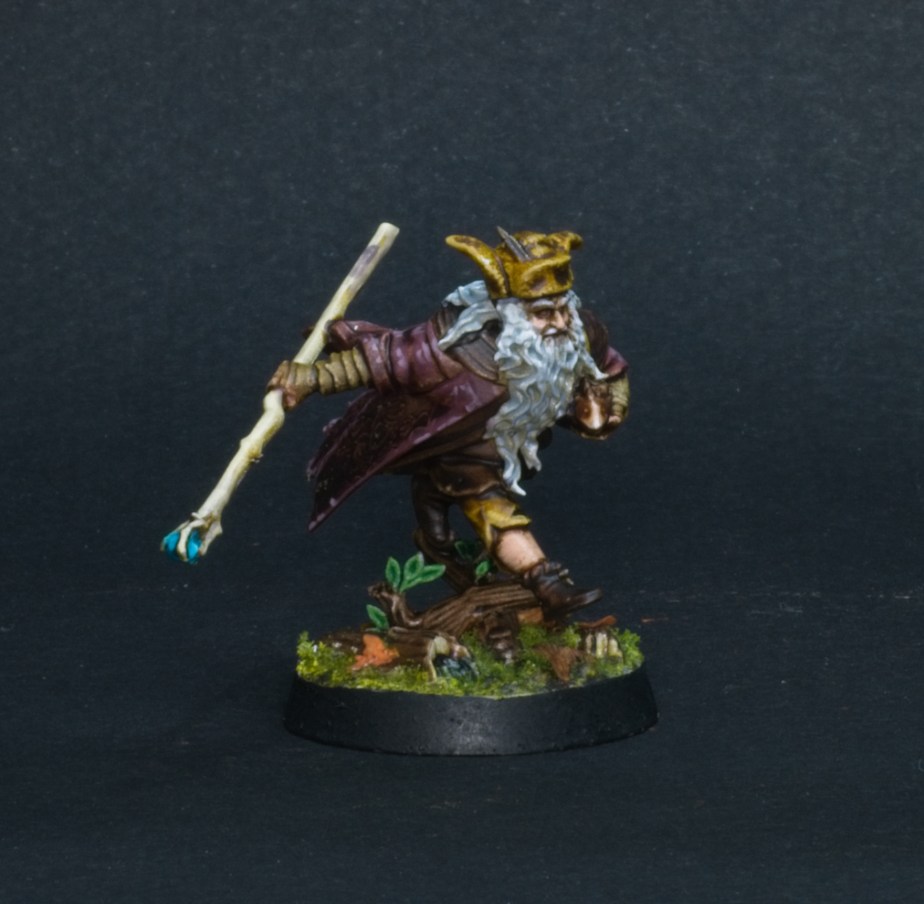
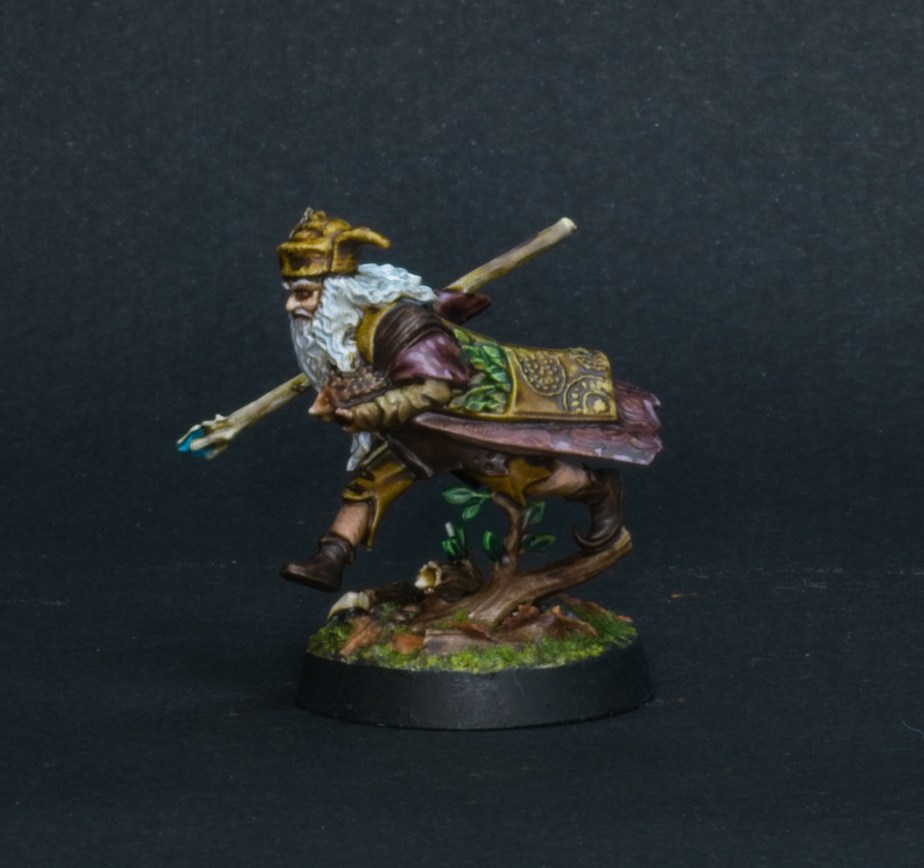
For Radagast and his sled I used GW’s contrast paints primarily, the first time I’ve really experimented with these in their “intended” use, i.e. one coat that does basecoat, shading, and highlights. I’ve always found the MESBG models to take really well to washes due to their tight, small details (as opposed to other GW models that have a lot more large flattish areas), and was intrigued by how the contrast paints would work with them. The answer I think is really well. The rabbits are only painted with a single coat of 3 different contrast paints: Cygor Brown (Thinned down 50/50), Snakebite Leather, and Skeleton Horde. Radagast and the sled were also painted with contrast paints but were followed up with highlights of regular old acrylic paints. This model has a massive base, so I knew I wanted to make it a feature. I used a variety of Woodland Scenics foam flocks, and their more bushy clumping foliage. The flowers are tufts from Gamers Grass. The leaves are the usual seeds you can get for that purpose, I’ve had them for years and can’t remember where I got them. I had some issues with all this being pretty loose on the base and ran some thinned down PVA all over to glue it all down. This ended up drying all white in patches and made me very scared I’d just ruined the whole thing. No idea what happened there, but I ended up using some green contrast paint to tint the areas affected by this and they blended right back in, got very lucky there!
The rules for MESBG account for your mount being shot off under you, so it’s expected to have a dismounted version of any mounted models. Here’s my Radagast on foot, carrying his faithful hedgehog Sebastian. Painted exactly the same as the sled version.
The eagles were another experiment, I decided to try shading them with oils to cut down the amount of time I’d need to spend on highlights. This worked very well, but I made the mistake of being impatient and varnishing over the oils too soon, and ended up with a very unstable coat of varnish that came off with gentle rubbing! I left them alone for a few days, then went back over the white areas with some highlights and finally gave them another coat of varnish and that is holding much better. The lesson here: when painting with slow drying paints, don’t expect them to dry fast!
Overall I really like the look of the “army”. They were painted fast and there are definitely areas that suffered as a result, but I think they look nice and cohesive on the table.