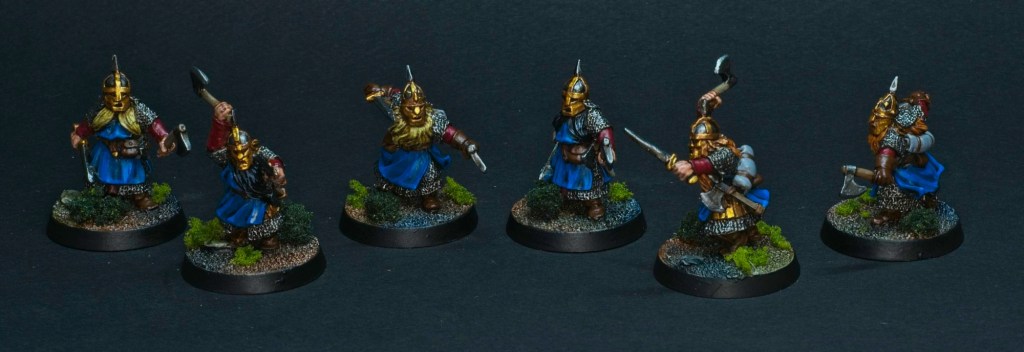
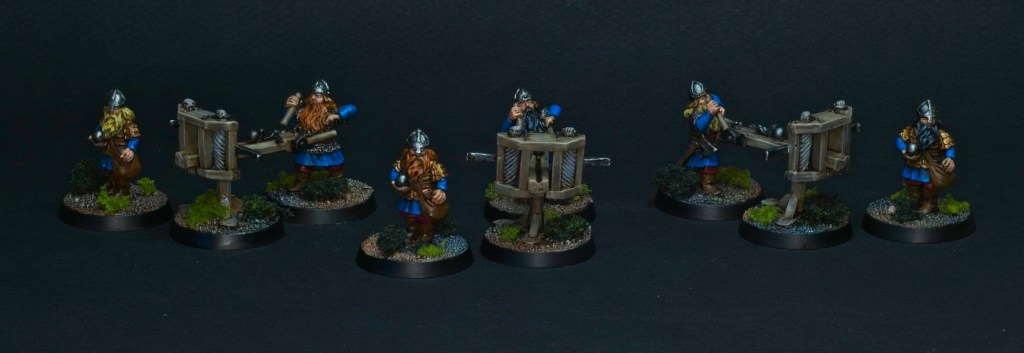
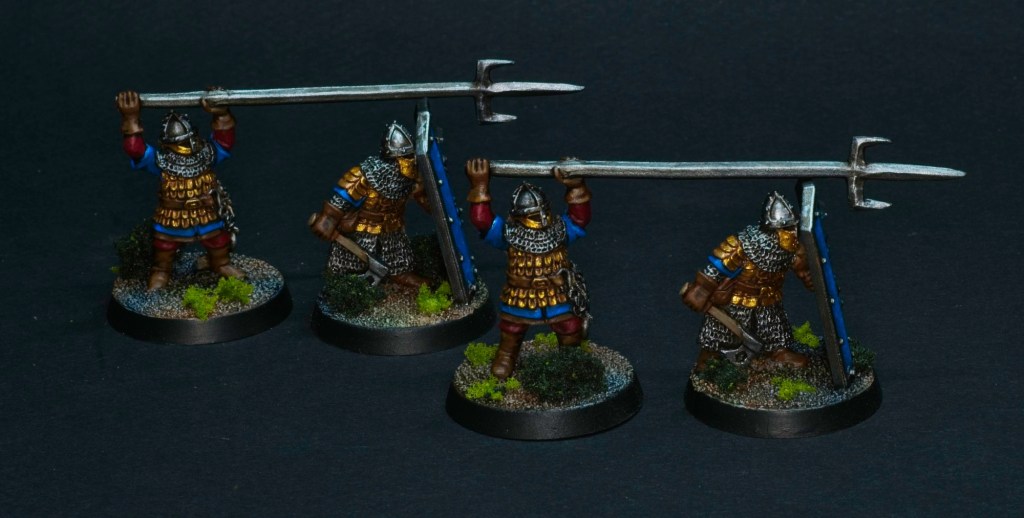
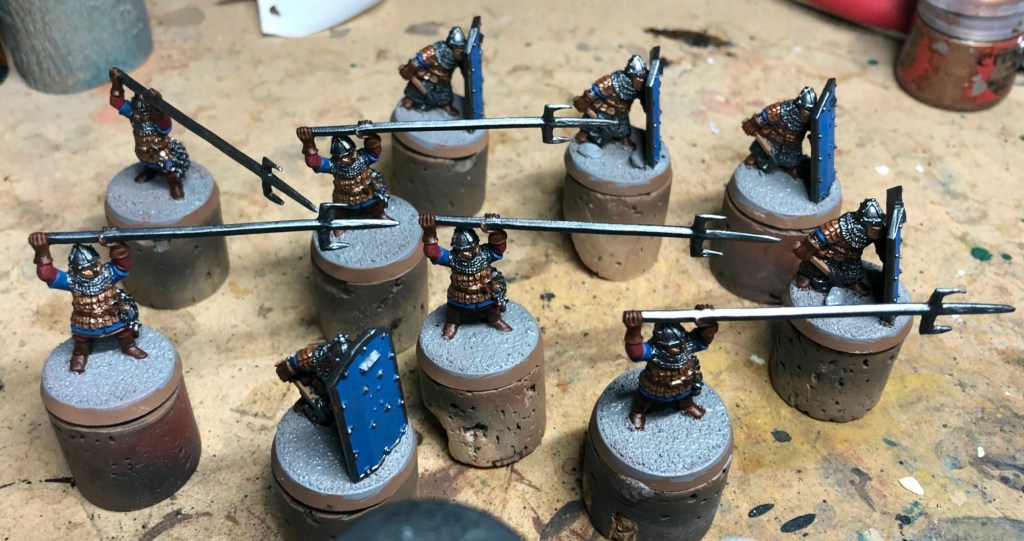
I’ve kept up the momentum for my Middle-Earth SBG army, and have painted up two more batches of models over the last couple of days: some Iron Guard, and 3 ballistas.
These were all painted following the steps I described in the Vault Warden Teams article, with the exception of a few new items those models the teams did not have.
Hair: The hair was painted one of three colours, each time in a simple base coat/wash/highlight pattern
Red: Vallejo Parasite Brown/Citadel Agrax Earthshade/Vallejo Parasite Brown
Black: Army Painter Black/Citadel Agrax Earthshade/50-50 Army Painter Black and Vallejo Cold Grey
Skin: The skin was painted with a base coat of Vallejo Beige Red, washed with Citadel Contrast Guilliman Flesh, and highlighted with Vallejo Elf Skintone
Wood: The wood on the ballistas was basecoated with Vallejo Leather Brown Primer (my undercoat for all these models), washed with Citadel Agrax Earthshade, and highlighted in two stages with first Vallejo Khaki and then 50-50 Vallejo Khaki and Vallejo Bonewhite, with both sets of highlights done in lines in the direction of the wood grain.
I’ve now committed to playing in an 800 point Middle-Earth SBG tournament here in Perth in April, so I now have a goal for these models. I have an 800 point list planned out, and am over half-way to painting it with what I’ve done so far. Hopefully I can finish it this week and work on a display board for them.
I wasn’t expecting to paint Lord of the Rings models this weekend, but there we are. I watched a couple of friends play a game of the current ruleset (Middle-Earth Strategy Battle Game) a few days back and it got me excited to play some games of my own, and by extension paint some models for the game. I used to play the Lord of the Rings SBG (as it was called back then) a lot during its peak, so this is a fun trip down memory lane for me. I dug up and dusted off the case my Moria dwarves were stored in and found the army as I’d left it, about half painted in a scheme I’d decided back then I no longer liked and abandoned. Armed with a new enthusiasm and a paint scheme that is pretty much just primary colours I’ve started repainting these models.
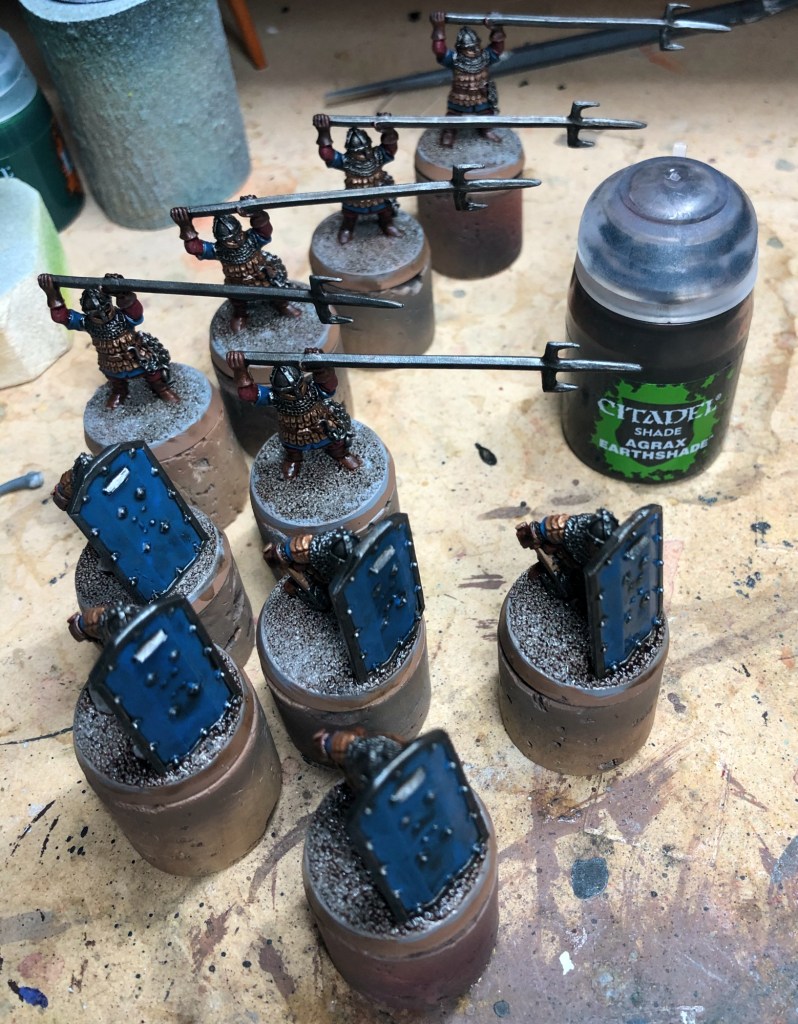
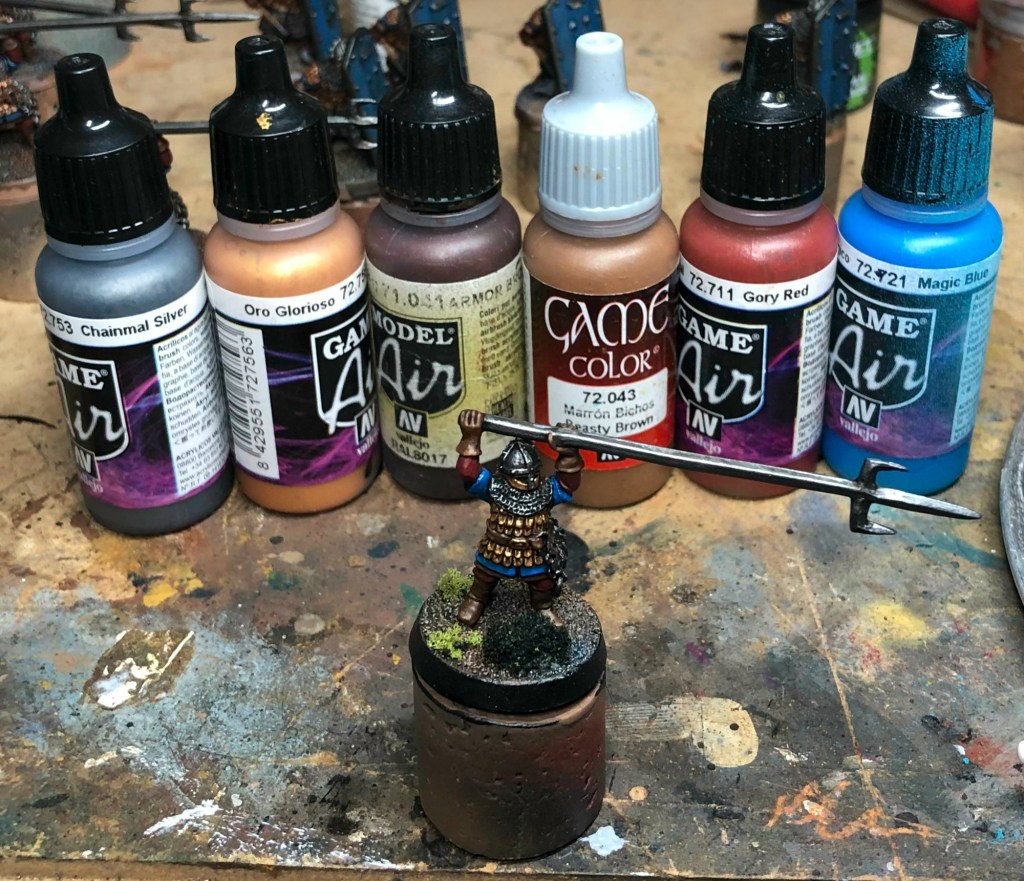
First up, the vault warden teams. I have 5 teams in the army (a team is a shield dwarf and a spear dwarf).
The paint scheme is simple, I didn’t want to spend too much time on these models so I used a method I use quite a lot for army models: basecoat the models, wash one colour across their entirety, and a single round of highlights.
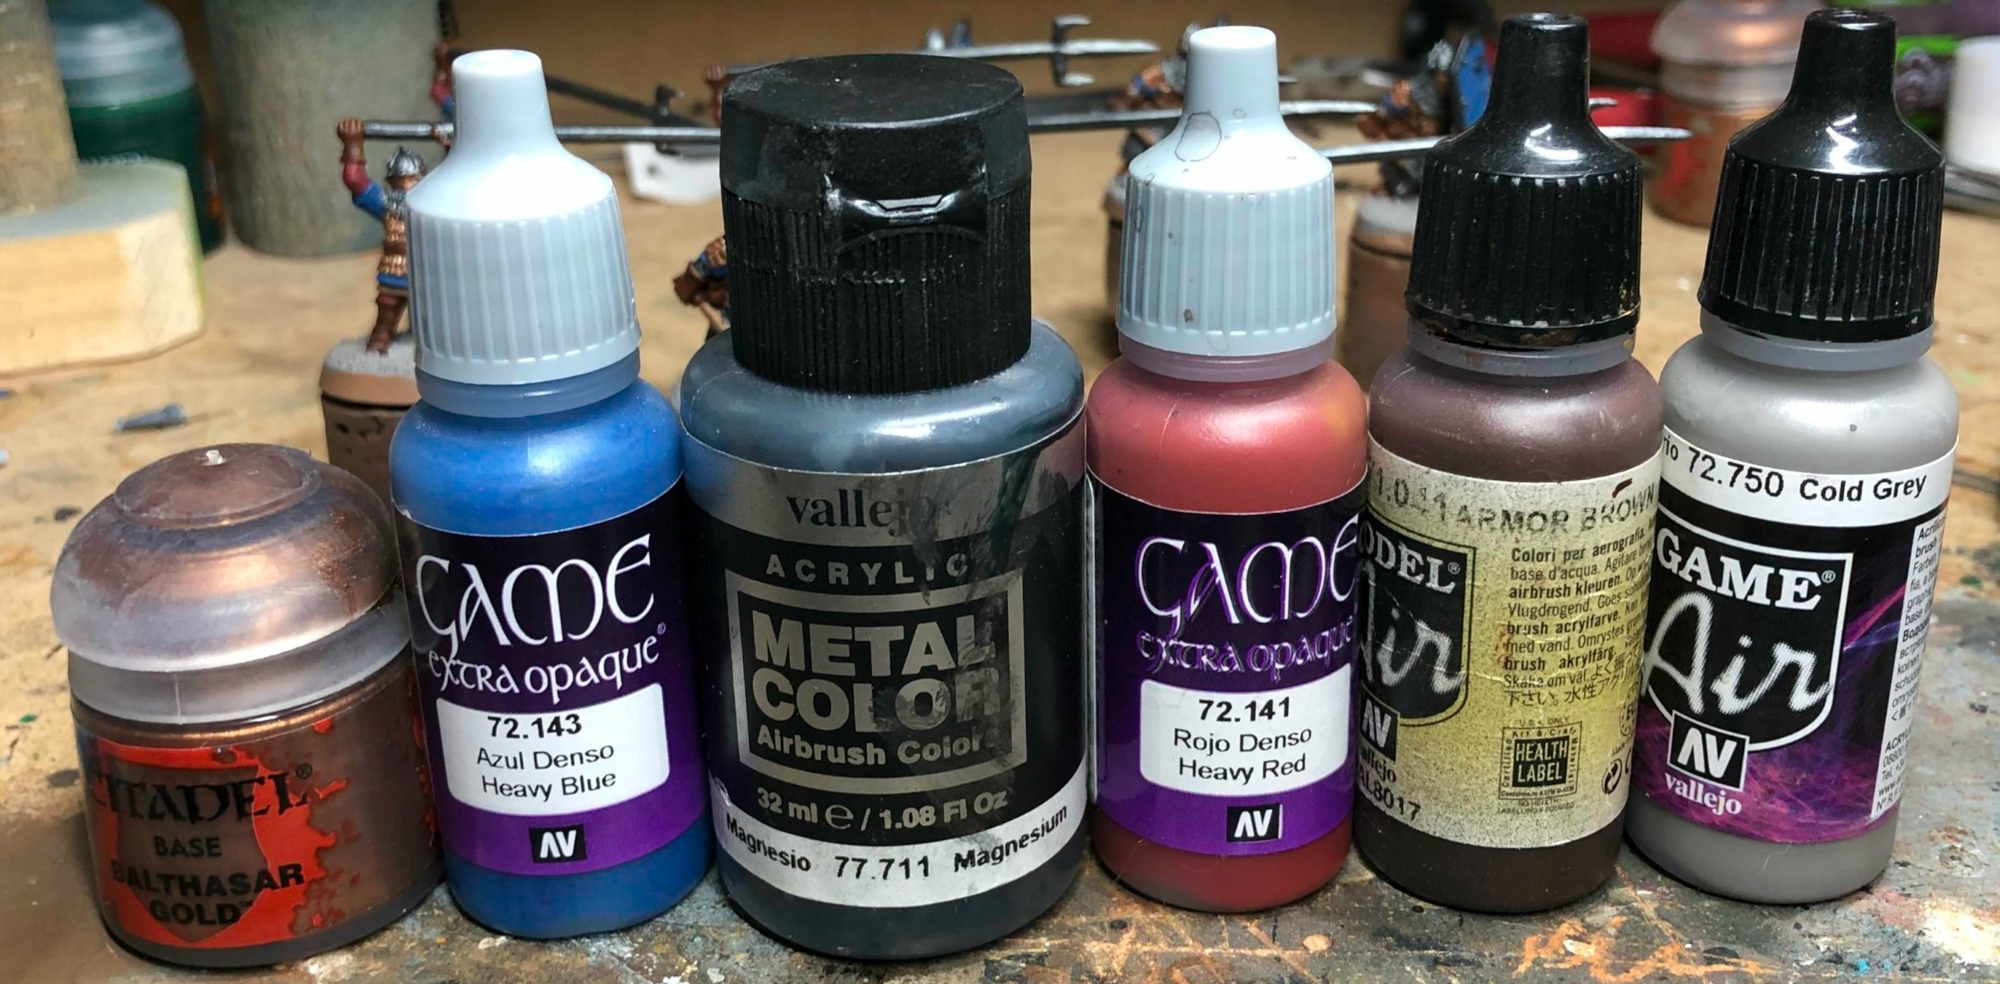
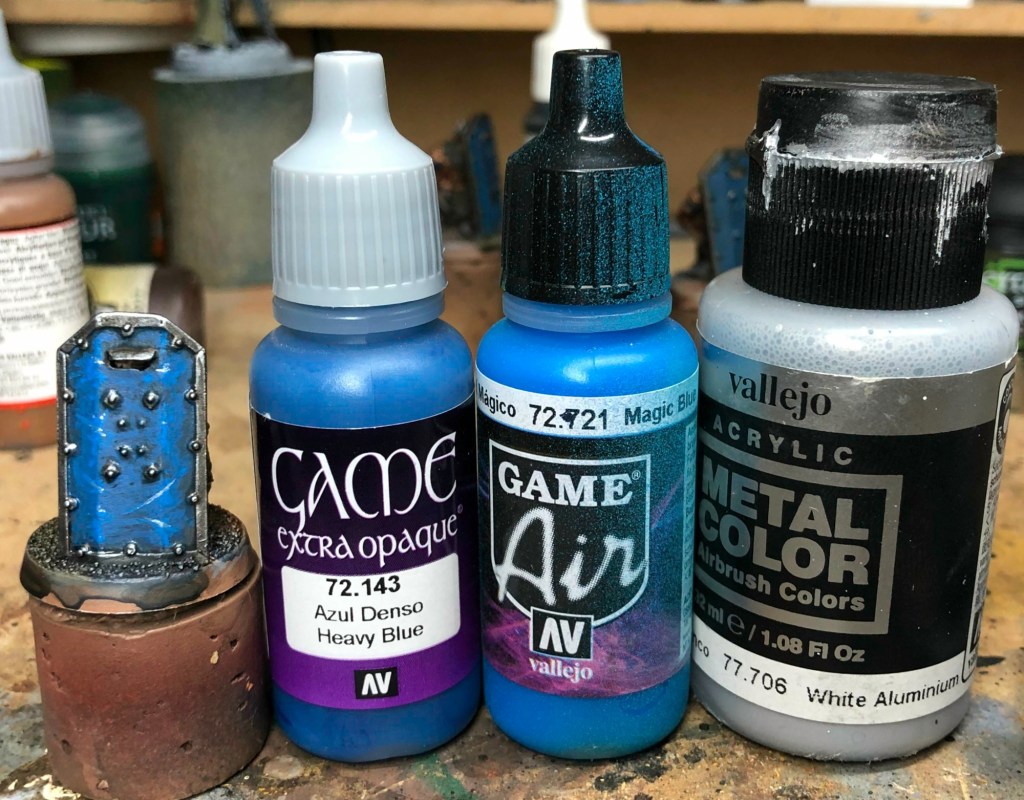
You can see the models after the base coat stage above. The scale mail and other gold bits were basecoated with Citadel Balthasar Gold, cloth and shields with Vallejo Heavy Blue, chain mail with Vallejo Metal Colour Magnesium, secondary cloth with Vallejo Heavy Red, leather with Vallejo Armor Brown and finally the bases with Vallejo Cold Grey.
After the basecoat was dry, I covered the models in Citadel Agrax Earthshade, taking care to not overload any sections, and leaving the bases a little bit patchy to add some variation.
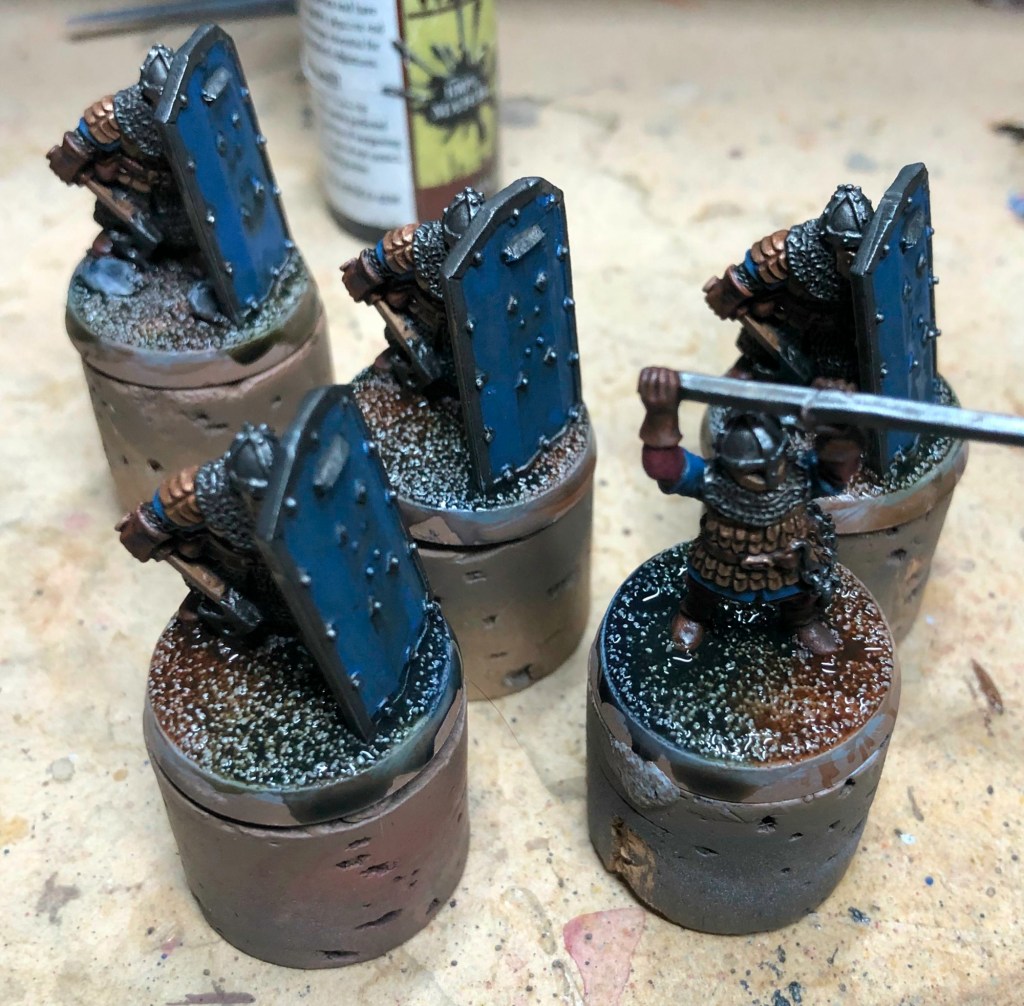
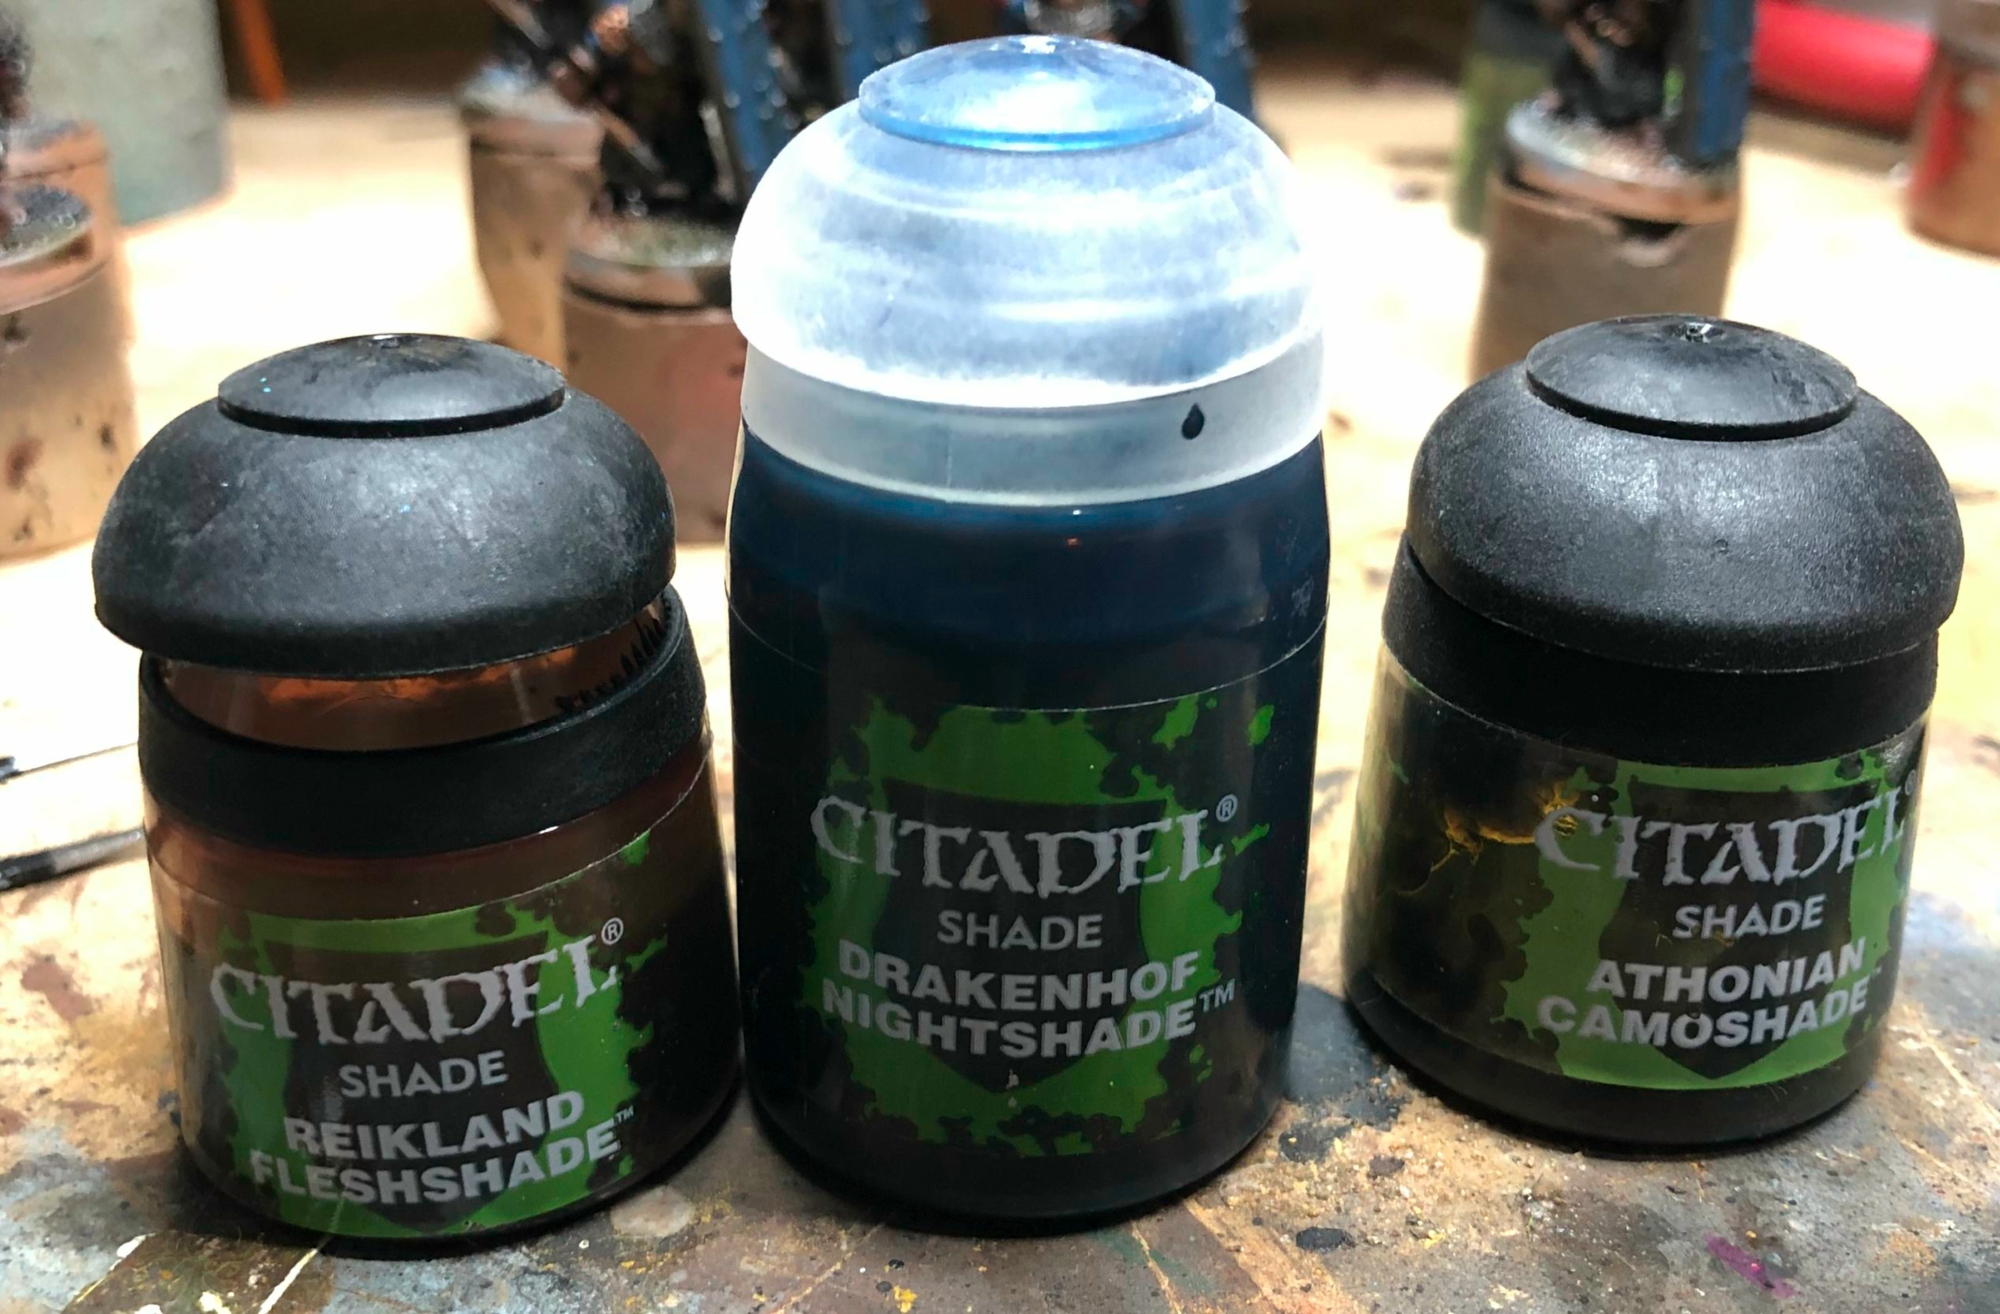
Once the Agrax Earthshade was dry I moved on to painting the bases. I wanted to try something new here, so I decided to use washes to tint the sand a variety of colours. First I did some underpainting by dry brushing the sand with Vallejo Cold Grey, followed by Vallejo Bone White. Then I applied Citadel Reikland Fleshade, Drakenhof Nightshade, and Athonian Camoshade in patches all over the base, and with a brush loaded with water I smoothed the transitions between the washes. Once dry I added some Woodland Scenics clumping foliage and some green foam to represent heaths.
The goal was to stick to single highlights to keep the process fast, so the mail received a highlight of Vallejo Chainmail Silver, the gold Vallejo Glorious Gold, the leather 50/50 Vallejo Armor Brown and Vallejo Beasty Brown, the red cloth Vallejo Gory Red and the blue cloth Vallejo Magic Blue.
For the shields, a single highlight would have been far too stark, so I first did a 50/50 Vallejo Heavy Blue and Vallejo Magic Blue highlight, followed by pure Magic Blue. I tried to give it a rough texture to make it look pretty beat up. To add to the effect I added scratches with Vallejo Metal Colour White Aluminium.
Overall I’m happy with how these models turned out, I painted them on and off today, so they were relatively quick to paint. If I can keep the momentum going I’d like to keep this rhythm up and paint the rest of the army relatively soon.
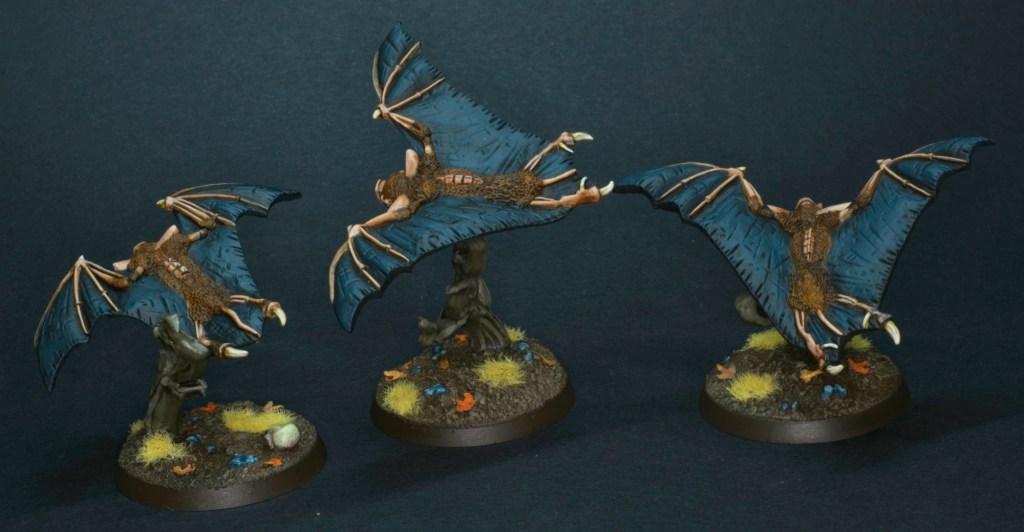
I’m playing a few games with some friends tomorrow and wanted to add this unit of fell bats to my death army for the occasion. I’ve had these models for quite a long time, so it was nice to have an excuse to get them painted up.
I painted these relatively quickly, starting by base coating all of the main colours (wings, flesh, fur, fangs) as a flat colour (Vallejo Dark Sea Blue + black, Vallejo Heavy Skintone, Vallejo Beasty Brown, Vallejo Heavy Goldbrown, respectively) and then washing them with GW Agrax Earthshade. I then highlighted the flesh with the base colour and added another wash of GW Reikland Flesh shade to add a bit of warmth to the flesh tone. The final highlight for the flesh was Vallejo’s Elf Skintone, and I applied some GW Carroburg Crimson around the mouth and nose. The wings got a simple highlight of Dark Sea Blue. The fangs were highlighted with Vallejo Desert Yellow and Vallejo Bonewhite successively. The fur was left as is.
They are based to match the rest of my Death army, which has been my main tournament army for Age of Sigmar for the last few years (not that I get to play in tournaments very often). There are quite a few models in that army that suffer from the painted the night before the event syndrome, and aren’t quite finished. I’ll probably be painting some now and then and posting them here.
This post will be different to other posts I’ve made on this blog, more of a formal explanation of what I am doing and why I am doing it. All of the posts so far I’ve made on the blog have been focused on painted models, but there are no painted models in this post, painted models will come later! Think this as an introductory chapter to a book about me painting this army.
This project I’ve been working on very slowly in the background, in between painting other models. It’s been going slow for a couple of reasons: 1) I have no real time pressure on this, as I don’t really have anyone ready anytime soon to play games of Warhammer Ancient Battles (WAB from now on!), 2) Part of the fun for me when building historical armies is to research them to try and get some historical accuracy to what I’m doing. I say some, because between the lack of complete certainty from the historians, the interpretations imposed by the model manufacturer, the interpretations imposed by the rules writers, and my own drives towards building something that I think will be fun to paint and play with, there is a lot of grey area! As a compromise I’ve settled on reading as much a I can about the era and the organisation of republican Rome’s armies, and from that, extract what I think are defining characteristics that I want to represent in this army.
Why Warhammer Ancient Battles?
Before getting stuck into why I chose this army specifically, I wanted to address the games system, as there are many other options to chose from when it comes to 28mm ancient battles, such as Hail Caesar from Warlord Games and Kings of War Historical from Mantic Games. While I enjoy painting miniatures for the sake of painting miniatures, when it comes to armies I like to have a framework to operate in, to help me structure what models to get and how to equip them. I chose WAB as that framework, mainly due to familiarity and nostalgia. I played Warhammer Fantasy Battles (which was the basis for WAB) for many years before it was discontinued, which means I have a baseline understanding of the WAB rules, and a bit of longing for a return to movement trays and ranked up miniatures (madness!).
Why Republican Rome?
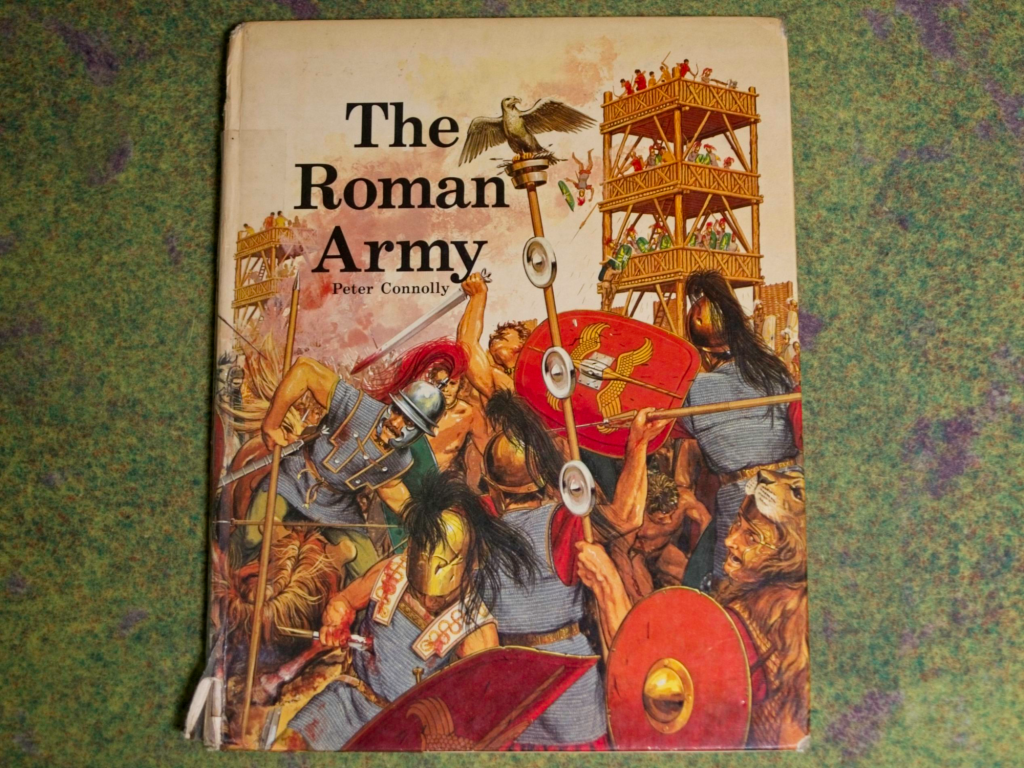
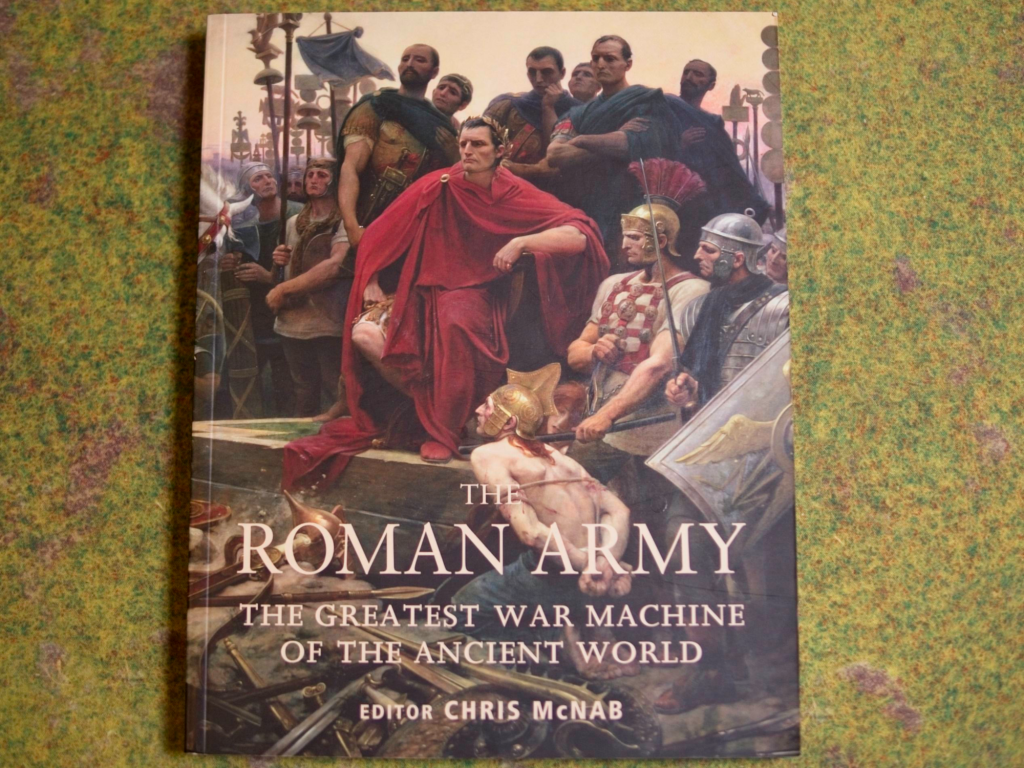
This decision was driven by childhood memories. As a history-loving kid I was given a book about the Roman army (The Roman Army by Peter Connolly), which covered the commonly discussed eras (Republic, Late Republic, and Imperial). I was always struck by the illustrations of the different infantry types in the republican army, with the Velites and their wolf skins, Hastati/Principes throwing pilums, and the Triarii with their long spears. I still have that book as you can see in the photo below.
While all three eras covered in that book inspire me, when it came to choosing an ancient army to put together, the Republic won over the later eras. Specifically, this is the army of the Republic during the 2nd and 3rd Punic wars. While memories of the book inspired the choice of army, a more mundane consideration came into the decision: the variety of troops in the Republican army would be much more fun to paint!
Forming the Army
As part of researching the formation of these armies, I re-read through the book I discussed above, but also drew from another book: The Roman Army edited by Chris McNab, which goes into a lot more detail about how and why the army was the way it was.
With this reading in mind, I came up with the following drivers for the army:
All four infantry types must be included (Velites, Hastatii, Principes, Triarii)
The ratios of those infantry types should be roughly respected (Hastati:Principes:Triarii -> 2:2:1, with enough Velites to screen all these)
A legion would be reinforced with cavalry (Equites), and I want to include some too
The legions of the era fought with allies from other Italian states, and I would include these if I had the points to (I did not in the end)
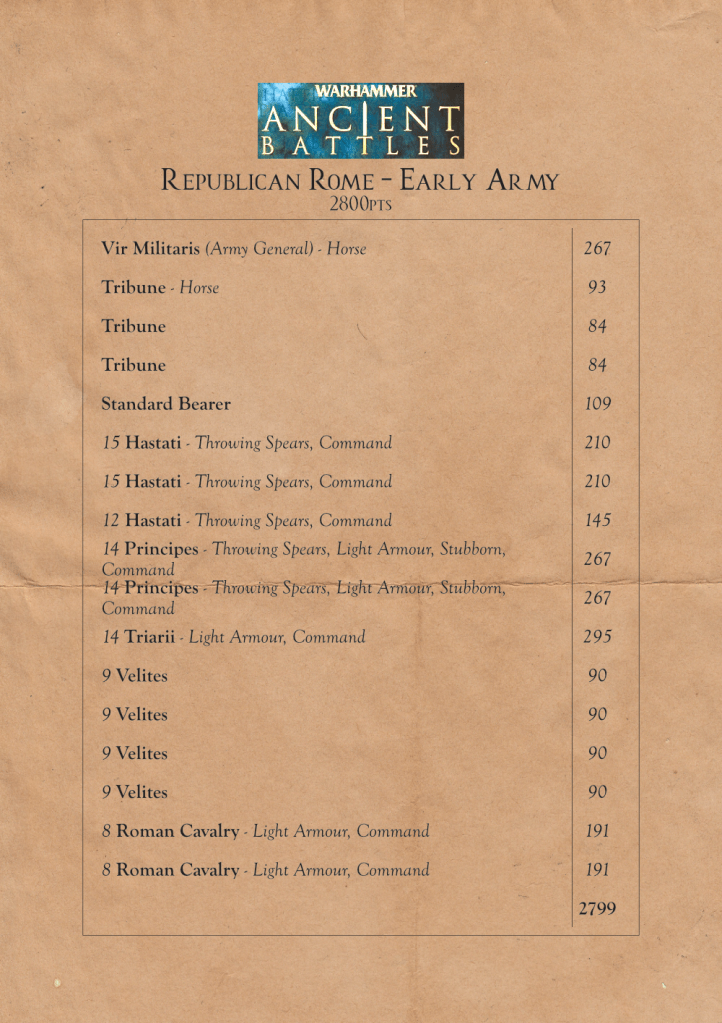
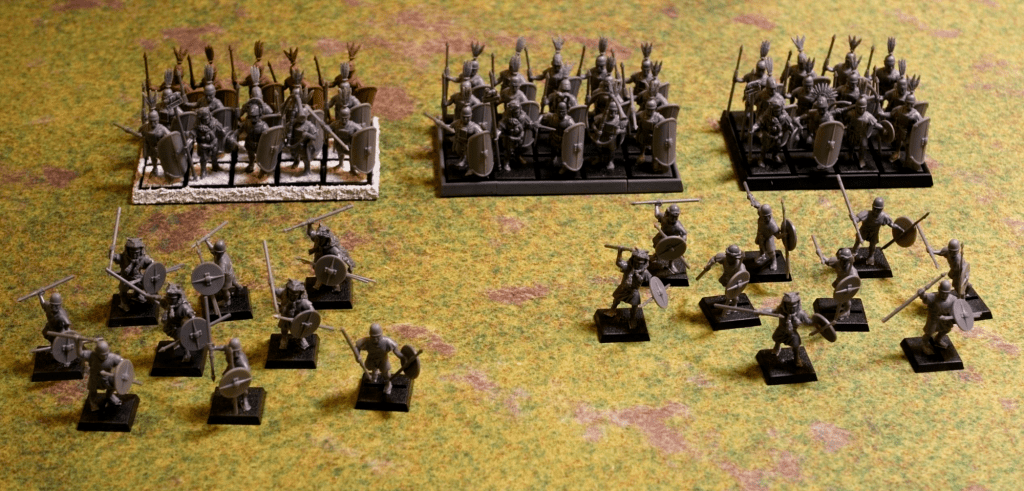
With these points in mind, I looked through the WAB army lists and put together this 2800pt list:
There are a few too many Hastati relative to the ratio I discussed above, included because I had leftover points and the models available, and there are quite a few characters given the size of the army (assuming each unit is a century, this army would represent around a fifth of a legion, and a legion was led by 6 Tribunes), but Warhammer is a hero heavy system so I think of this as a concession to fun over accuracy.
Building the Army
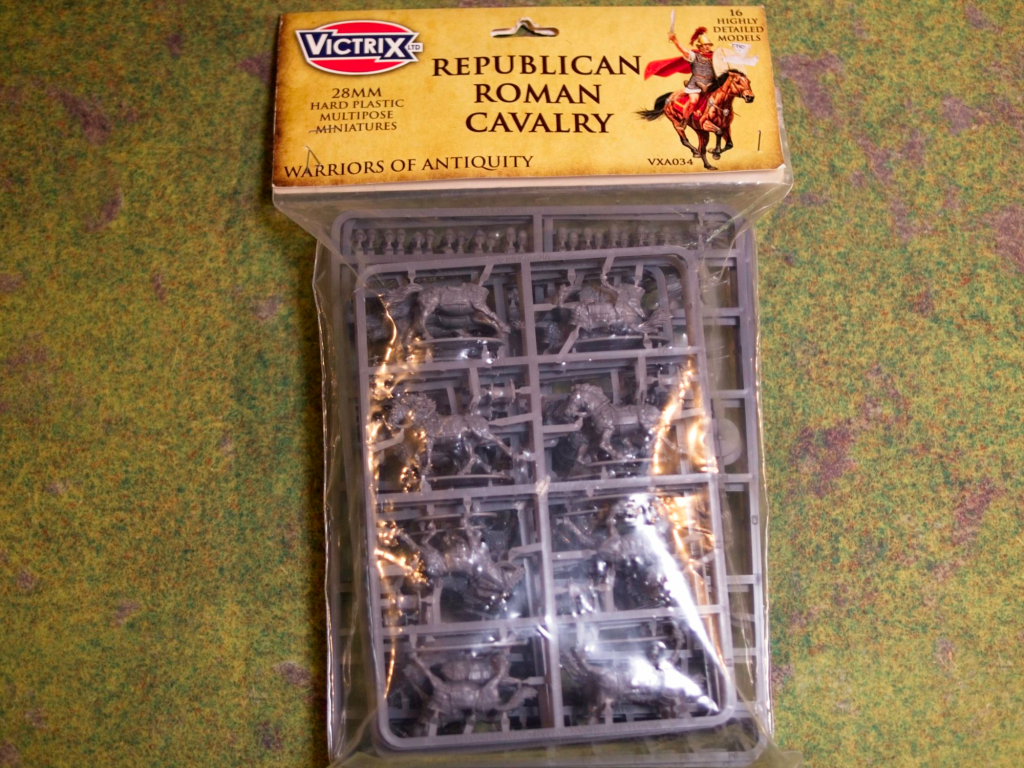
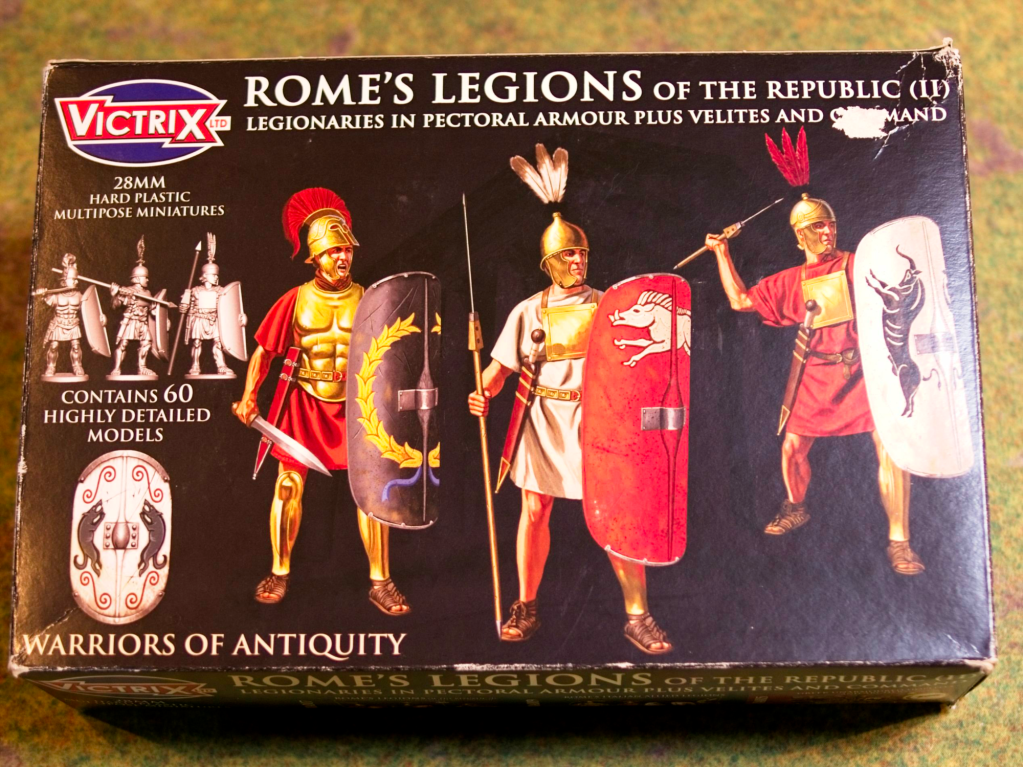
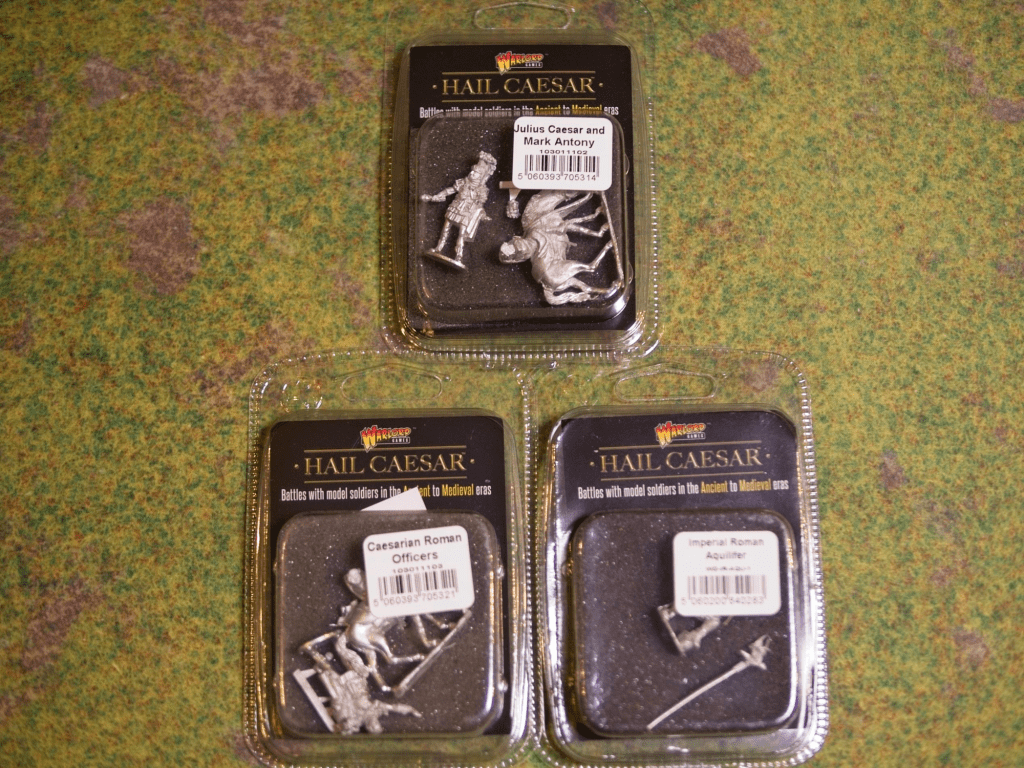
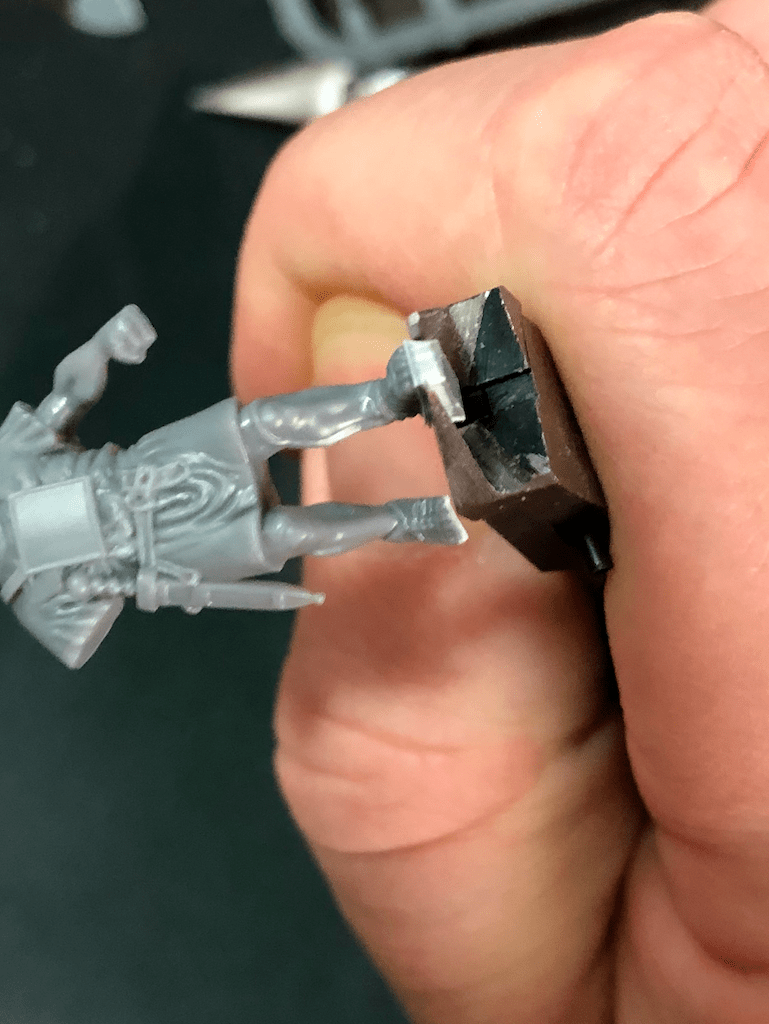
I settled on Victrix models for the bulk of the army relatively quickly. They have a range of Republican Roman figures in plastic that looked nicely detailed and well cast, and one of the local stores over here carried their models which made them readily available. For characters I had to look at other brands, and I decided to get some of Warlord Games’, models. Warlord doesn’t have a range of early republic figures, by they do have late republic models which I thought would be close enough.
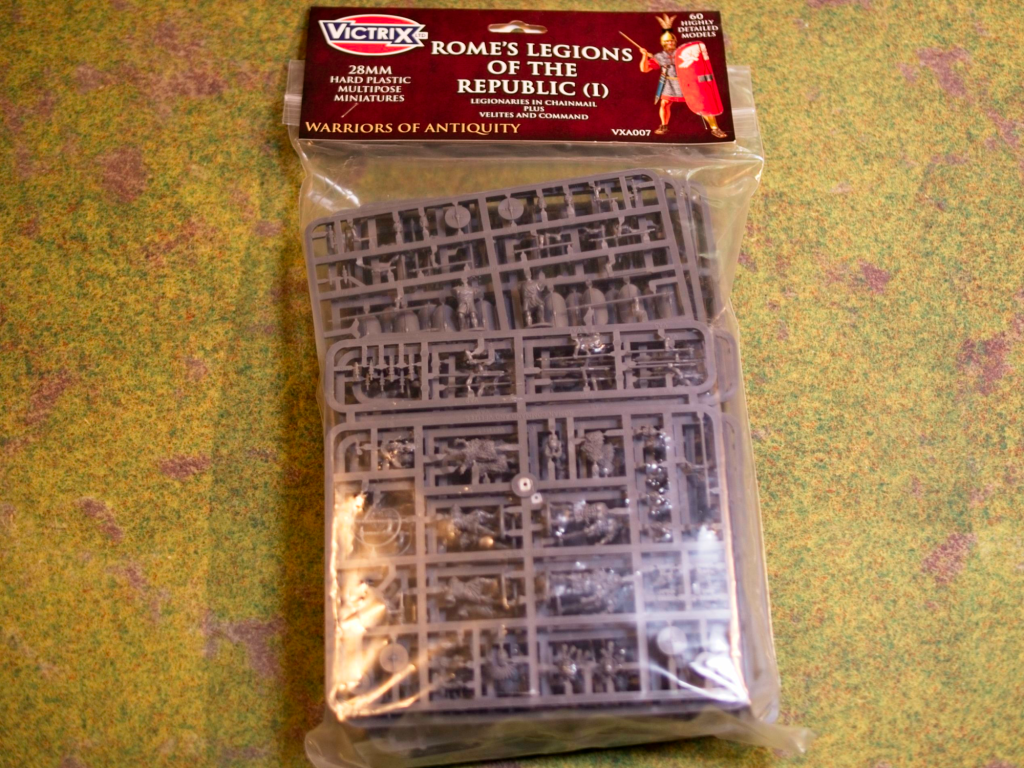
Victrix make two sets of legionaries, one with pectoral armour, and one with chain mail. Rome’s division between infantry troops being decided by wealth at the time, and troops buying their own equipment, I decided that the Hastati (poorest and youngest of the legionaries) I would model with the pectoral armour to make them easy to tell apart from the otherwise identically armed Principes who I would model with the chainmail bodies. The Triarii would also be modelled with chain mail, but as they are equipped with spears they would be easy to differentiate from the Principes.
Each Victrix set comes with 42 legionaries and 18 Velites, giving me a surplus of pectoral armour models if I were to only include the two units of Hastati as originally planned. Hence the inclusion of the smaller unit to fill out points, possibly the remnants of another maniple.
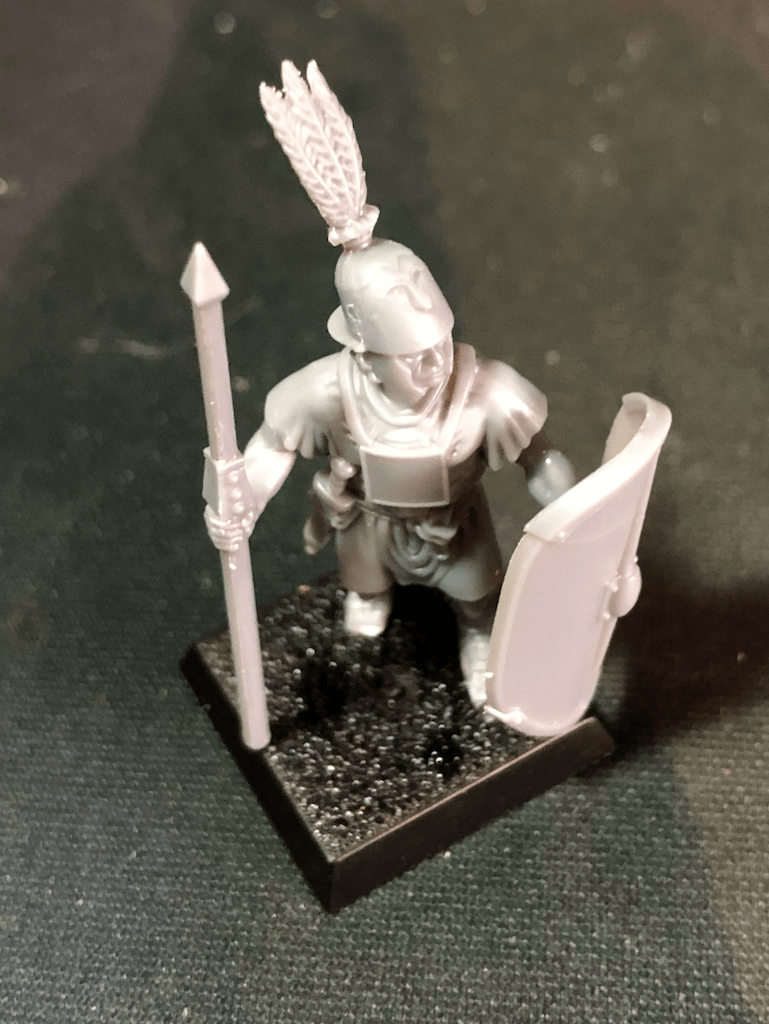
The Victrix models go together very easily, the main issue I had with them was the inclusion of stands directly on the models, which I cut off to glue them to Warhammer 20mm square bases. I can’t really fault them for this choice though, as they make these models to be system agnostic and need to cater to all types of basing as a result. I have some photos of the assembly process below.
I’ve finished building the first set of models I got, the pectoral armoured legionaries, which gives me my three units of Hastati, and two of the four units of Velites the army will have.
I hope you enjoyed a look at the process and decisions that I had to make as I went about planning this army. Expect to see some intermittent progress on this project, as I said at the start, I’m taking a very relaxed approach to getting these done, they will be worked on as inspiration strikes.
I’ve been painting up some longer duration projects recently and I’ve been needing a break to paint something quick as a change of pace to refresh myself (and feel like I’m making progress on something!).
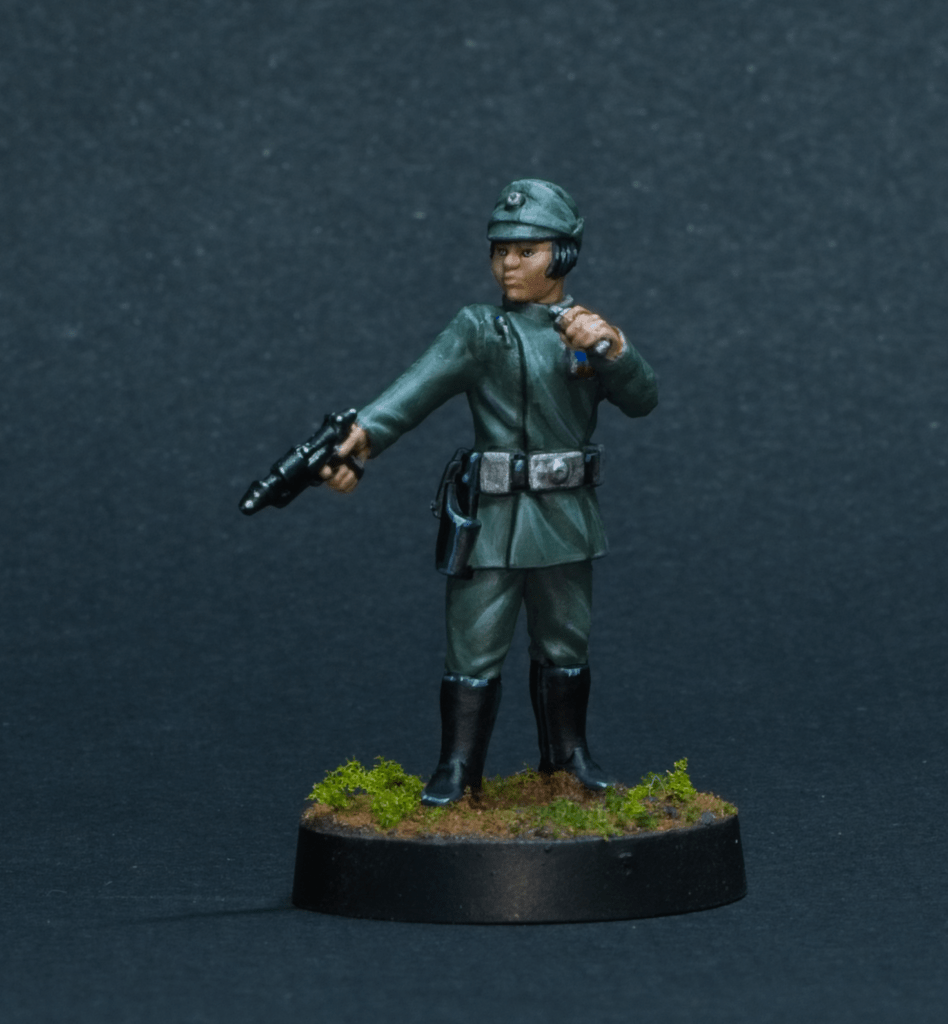
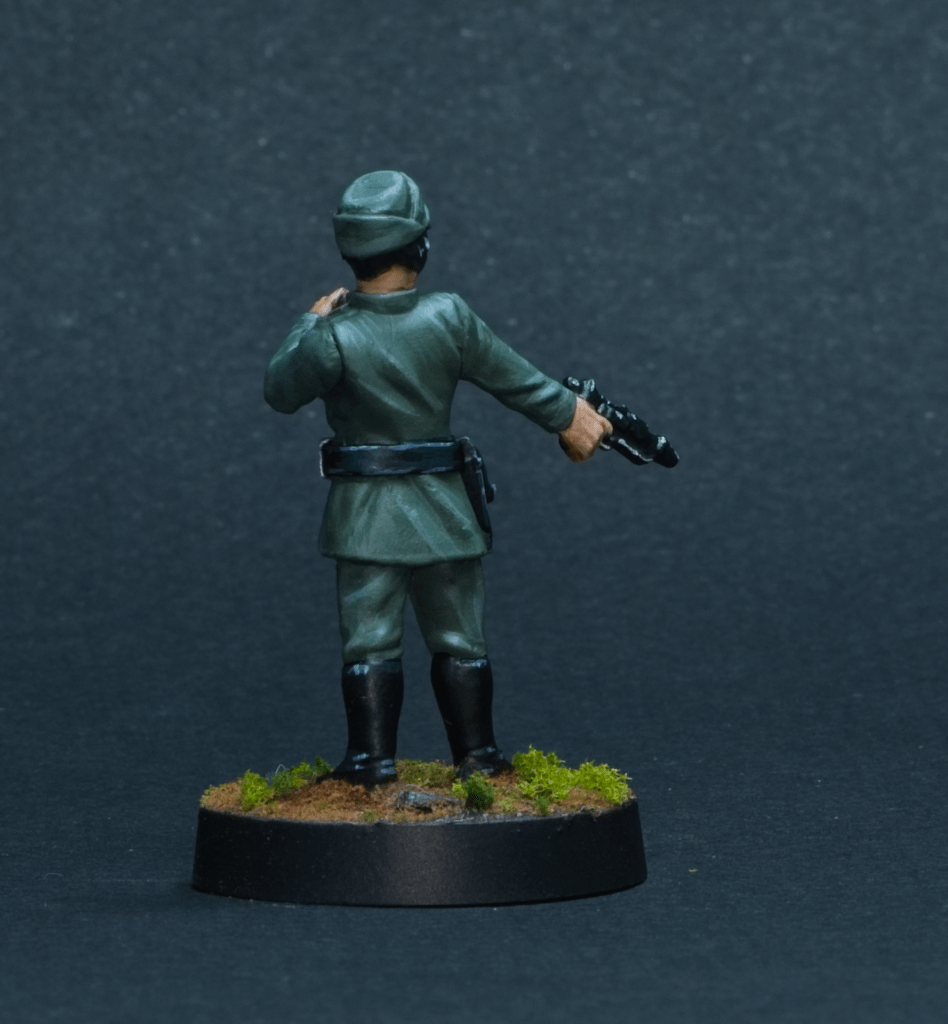
This officer model is from the imperial specialists kit that comes with 3 other models: two droids and a comms specialist. I’ll be painting these up as I feel, when I need another break probably. One of my friends is keen to play “no named character” games, and this officer will lead my imperial forces when we do that.
The main problem I had to solve with this model was the colour of the uniform. As with the emperor, the colour of the costume and how it comes out on screen seem quite different to me. I looked through my Star Wars costume book to look for references and the uniform is clearly an olive green in the photos, while I always saw them as grey in the movies. I tried to mash the two together here, aiming for a grey with some green in it.
The shiny black leather is painted just like I do on all my models, with successive highlights of Vallejo Dark Sea Blue with more and more white mixed in.
This model is one of the soft plastic models that were made for the game and detail is lacking compared to hard plastic models such as Games Workshop plastics. Here the eyes were not really marked out, so I painted them where I thought they should go, an interesting exercise. I have a couple of the hard plastic sets for Star Wars Legion built and ready to paint, I’m keen to see what the details look like on those.
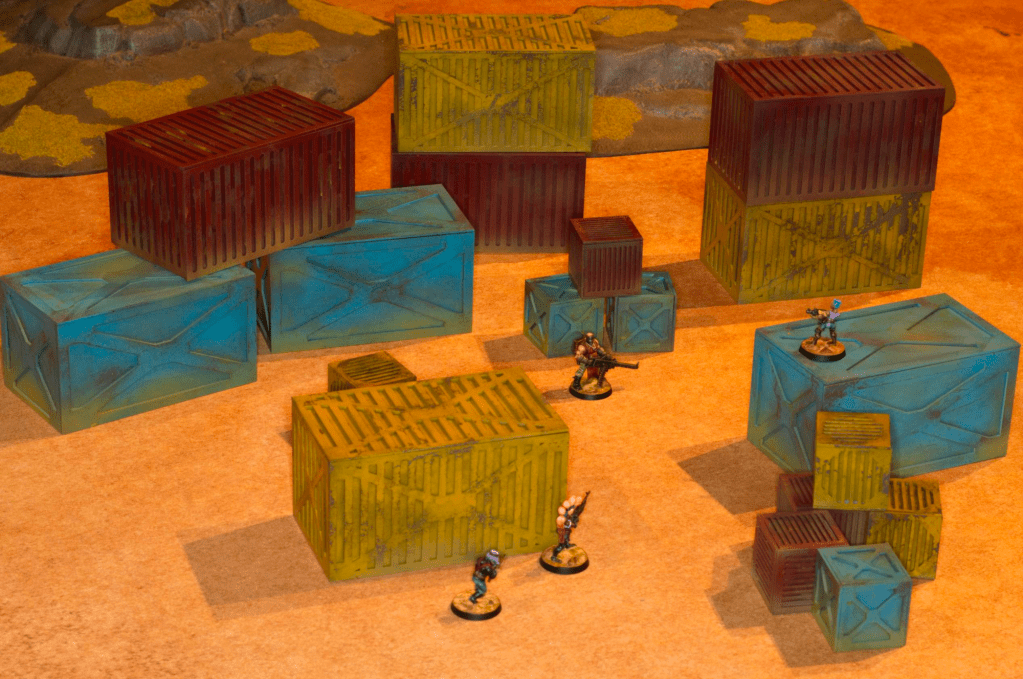
I quite enjoy painting terrain as a break from regular miniatures, I find it quite a different experience, and a nice way to relax between big projects. I’ve painted a fair bit of terrain this year and I’ll likely make some posts about that at some stage because I’ve never really shared any of it directly, they usually end up as backdrops for miniature photos.
I’ve had these containers and crates for quite a while now, they’ve been sitting mostly built for almost a year, and I finally made time to finish building them and get them painted. They’re an MDF kit from Krommlech/Tabletop Scenics (3 of that kit in fact), and I bought them for our This is not a test games, although I plan on also using them for other games (40k for example).
With my terrain painting I tend to go for speed as my primary driver, focusing on the overall feel of the pieces rather than the detail. Here as I was targeting a post-apocalyptic feel I knew I wanted the containers to be pretty beat up and covered in sand/dust. To get a nice chipped feel to the container paint I decided early on that I wanted to do the hairspray chipping technique, which produces very realistic results.
If you don’t know the technique, I’m sure you can find plenty of tutorials on youtube and the like, but for a quick summary here’s how it goes: 1) base coat the model in the colour you want you chips to be (here I used a grey-brown spray can from the hardware store), 2) liberally spray hairspray over the whole model, 3) spray the main colour of the model over the top (good to use an airbrush for this), 4) using a wet brush/toothbrush rub away at the paint. The layer of paint over the hairspray will reactivate and scratch away quite easily. It’s very important to varnish the model afterwards or you will continue rubbing the paint away as you handle the model.
I find it quite hard to control the amount of chipping you get (i.e. it’s really easy to get massive amounts of chipping), so I only tend to use this technique when I want to get something looking really beat up, which makes it perfect for a post-apocalyptic setting.
To weather the containers further, after the chipping was done I did a few washes of oil paints (payne’s grey for some darker staining, and yellow ochre to do dust marks), and sprayed some Vallejo Air Desert Yellow through the airbrush to get the dusty look you can see at the bottom of the containers and in splotches all over them.
Overall painting all of these took a coupe of hours of effort (not including drying time!), which is nice and quick for the result I think.
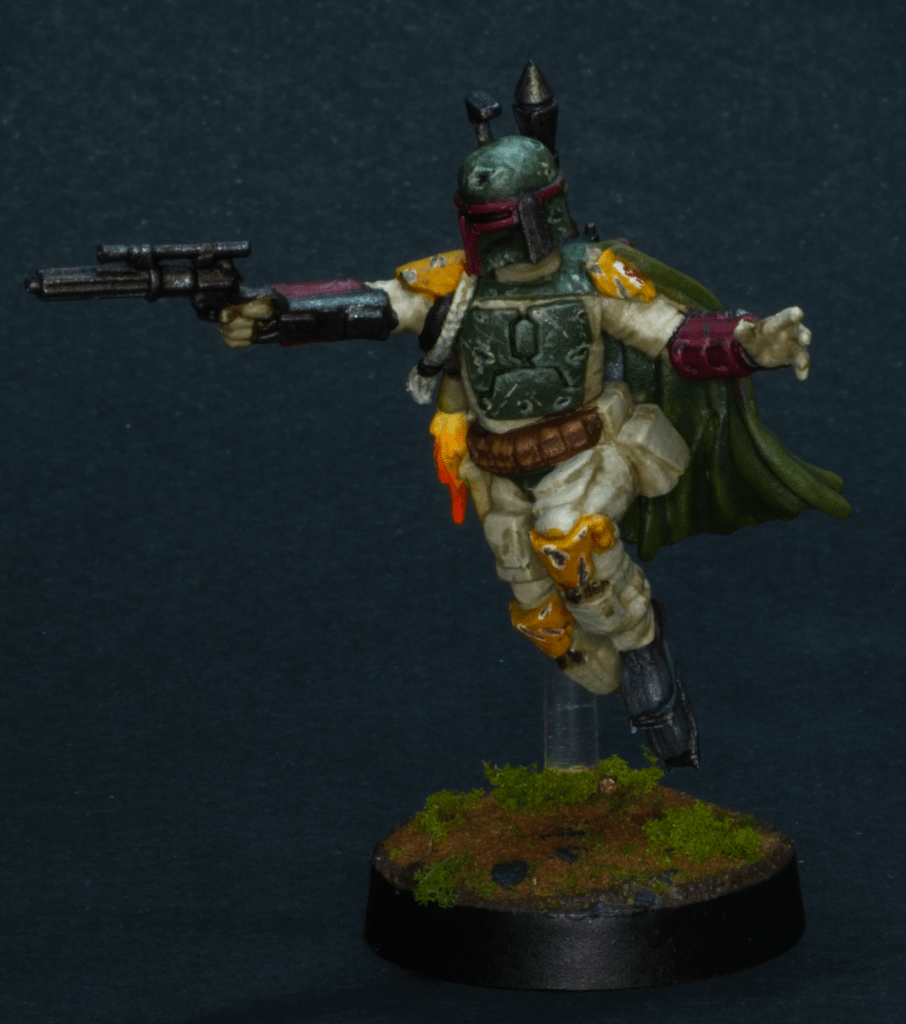
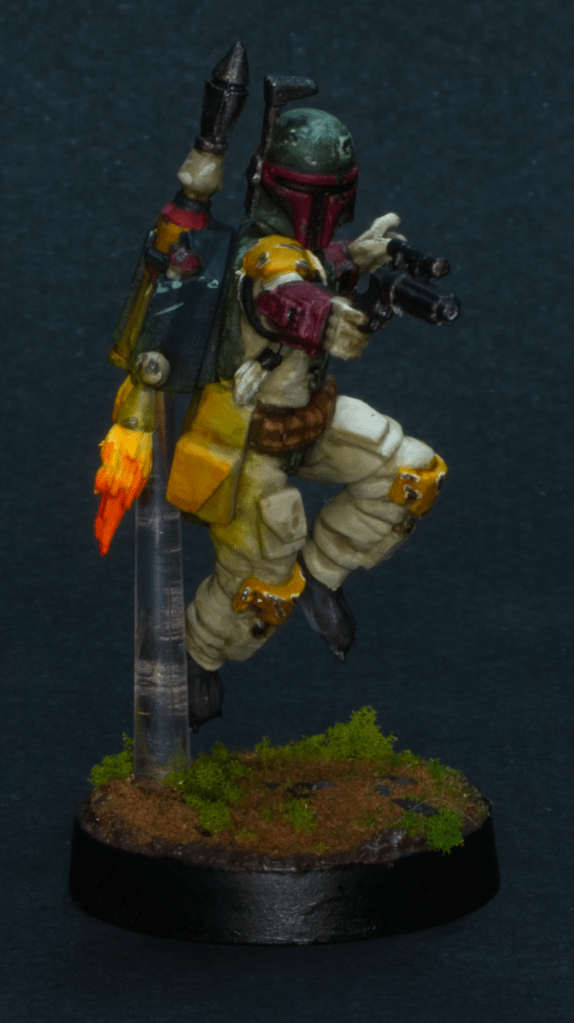
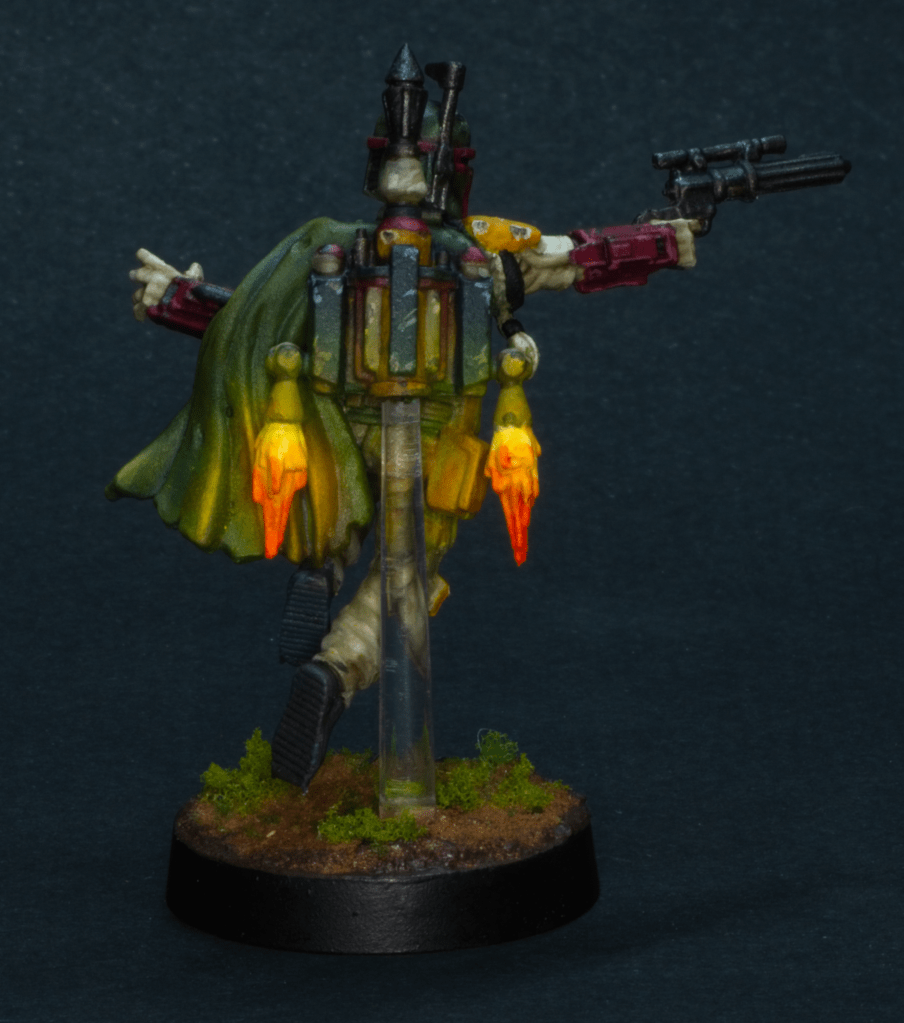
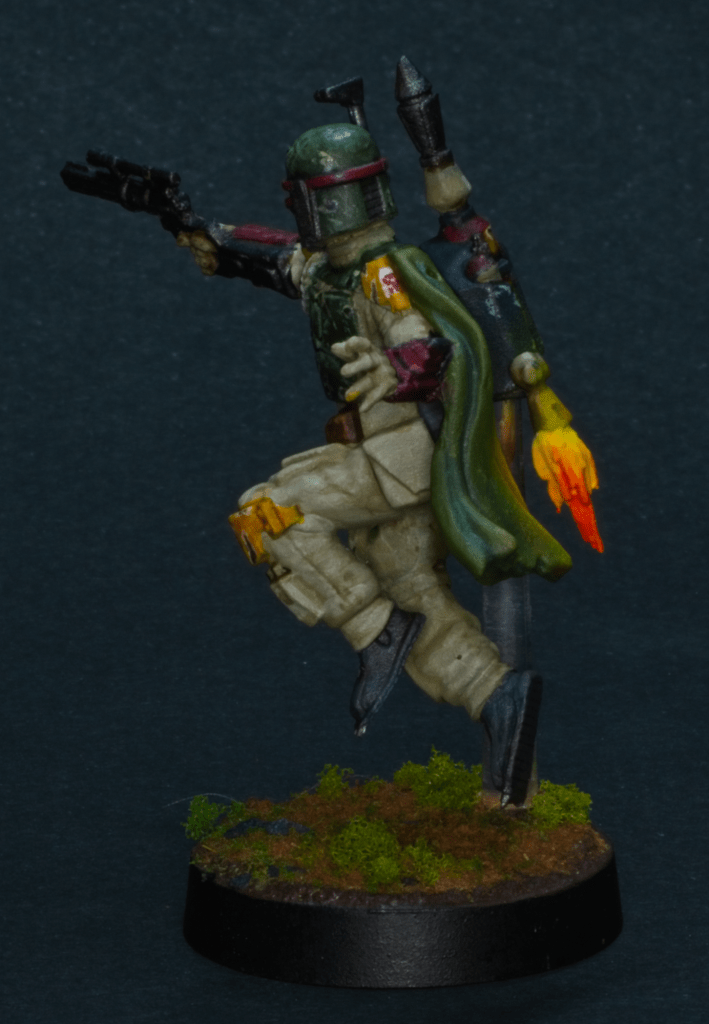
Here is the latest addition to my Star Wars Legion army, the famed bounty hunter Boba Fett.
This is a very cool model, I really like that they made him mid jump, as it really emphasises how different he is to the rest of the army.
He has a surprising amount of colour on him, more than I’d realised watching the movies. We have a book on the costumes that were made for the original trilogy that has a lot of photos of the Boba Fett costume, which was invaluable for this. I tried to stay true to the colours as much as possible.
There are a lot of different ways of painting chipped paint on metal pieces, and in this case I chose to first paint the chips in a lighter colour, then fill in the centre with a dark metallic paint (Vallejo’s Gun Metal in this case). I chose this method as it is what the prop makers in the movies did!
For the glow of the flames from the jetpack, I first used the airbrush to define the glow area using a bright yellow paint, and then darkened that back down with a glaze of orange paint. I chose to go this route as the orange paints I have access to are not opaque enough to sell a “lit up” effect. They would just end up adding a transparent orange layer over the dark green of the cloak which would end up more like a brown stain. Finally I mixed in some of that bright yellow into the orange to highlight back up the points where the light from the jets would project the hardest.
I painted the logo on the should pad pretty roughly, more to suggest the shape of the original design than anything else, the area is pretty small and the cloak half covers it so I’m not too worried about matching it exactly, it looks good enough on the tabletop.
This model was a fun change from the white and black of the rest of the army, and he really stands out from them on my display shelf. I have a few other models lined up to expand the collection, but these are mostly black, so back to normal!
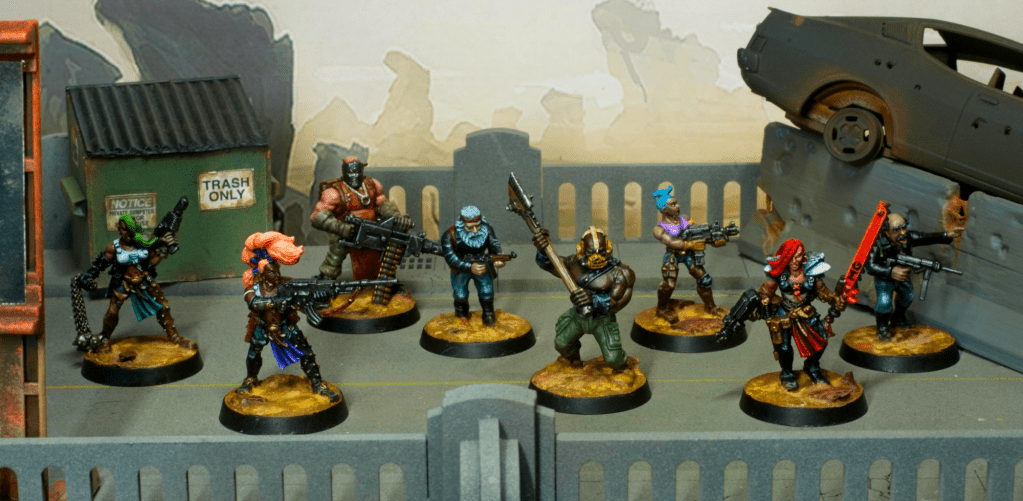
I’ve been playing the post-apocalyptic skirmish game This is Not a Test for a while now with a couple of friends, and decided it was time to paint up a new warband. I had a few old metal Escher gangers from Necromunda lying around that I thought could make really cool raiders for the game. Rather than make the full warband from those models, I decided to mix and match with other models I had around the place to get a nice eclectic look to the band.
Rosa’s Ravagers ready for a fight.
I challenged myself to paint the team with a variety of skin colours, to break away from the routine of painting skin the same on everyone. There’s a lot of variety in the real world, so why not in made up worlds too! Another challenge for me was the bases, I’ve been trying out various ideas to make desert bases I’m happy with for a while and I think these worked out really well.
I’ve taken individual photos of the members and will be talking about each below, starting with the leader, Rosa:
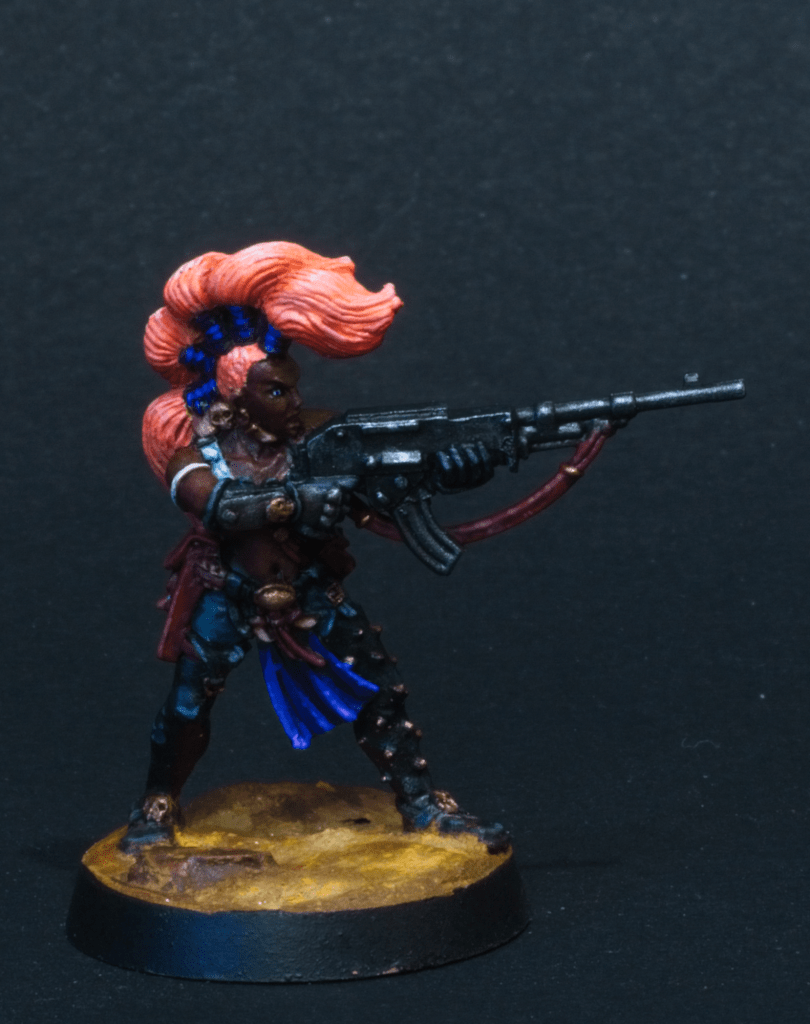
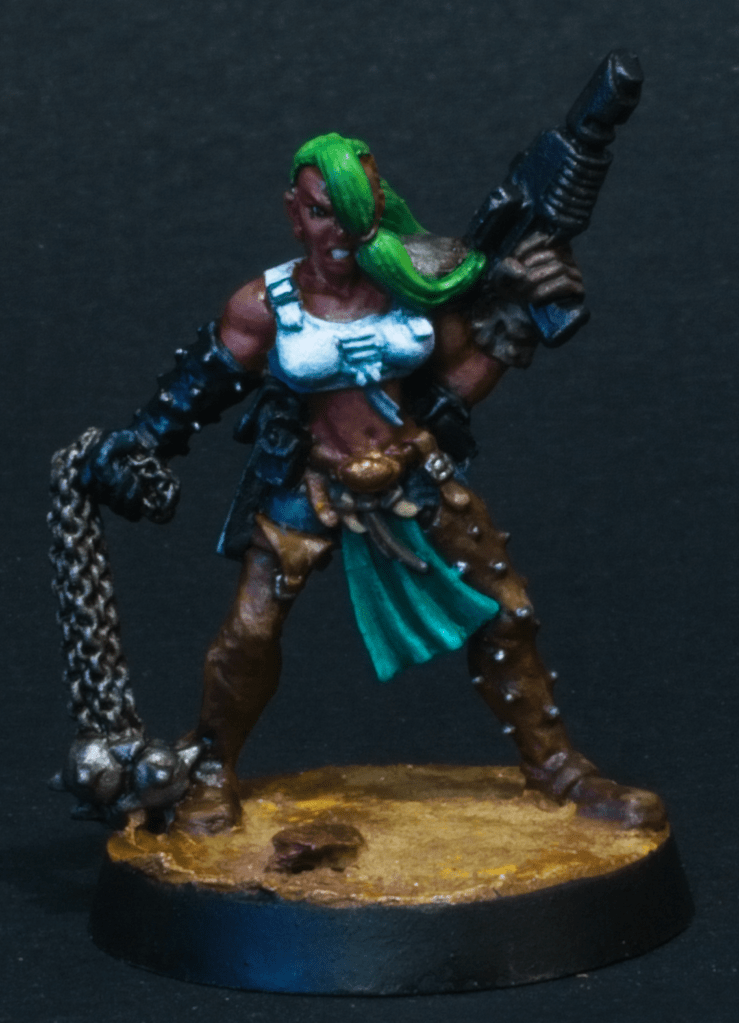
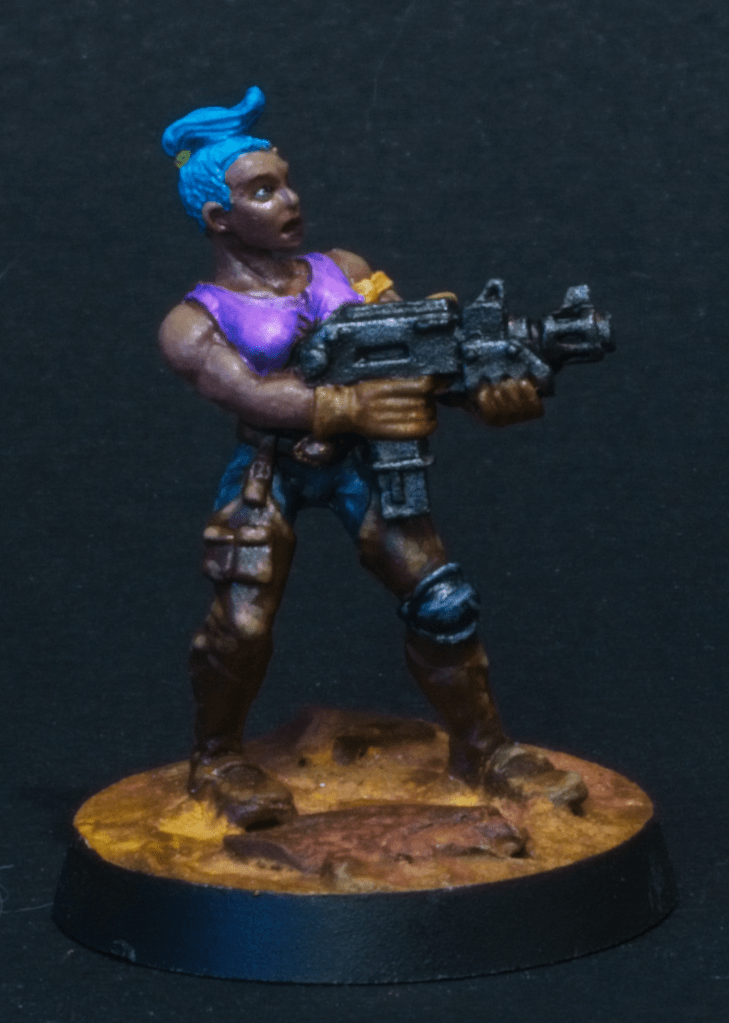
Rosa Salmón the Bandit Queen
Rosa is built out of an old Escher ganger, with the lasgun gut up and supplemented with Bren gun parts from the Warlord games WW2 British Paras set. Her hair is painted with Vallejo’s Salmon Rose, hence her name!
Butcher
Butcher was made from Games Workshop heavy stubber chaos cultist. I filled in the chaos star on his mask, and trimmed the chaos pendant back down to a simple ring.
Vasquez
Vasquez is a stock Escher ganger. This is Not a Test has rules for laser weapons so I decided to keep the pistol as is rather than replace it with a gunpowder equivalent.
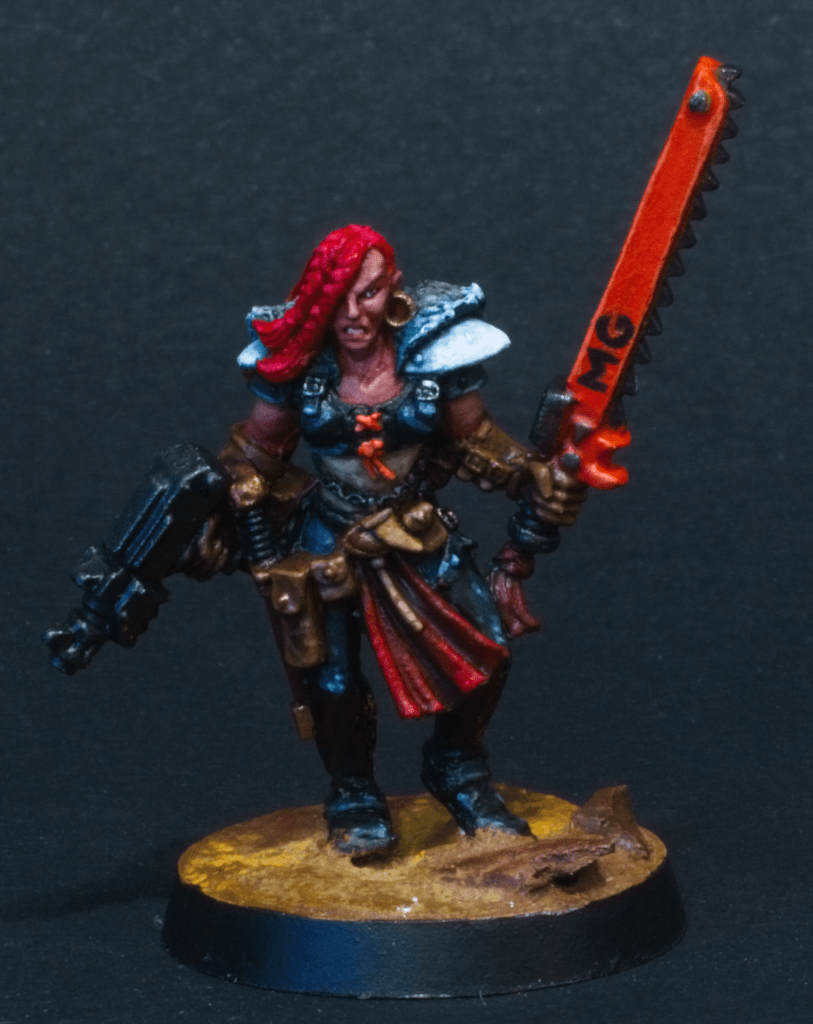
Sawtooth
Sawtooth is also a stock Escher model. The game has chain blades as relics from the past. In our own version of the universe, the apocalypse was cause by MG, a megacorporation that had its fingers in all the pies. In this case I painted the housing of the chain blade orange as a callback to gardening tools. I see this particular relic is a repurposed chainsaw of some kind.
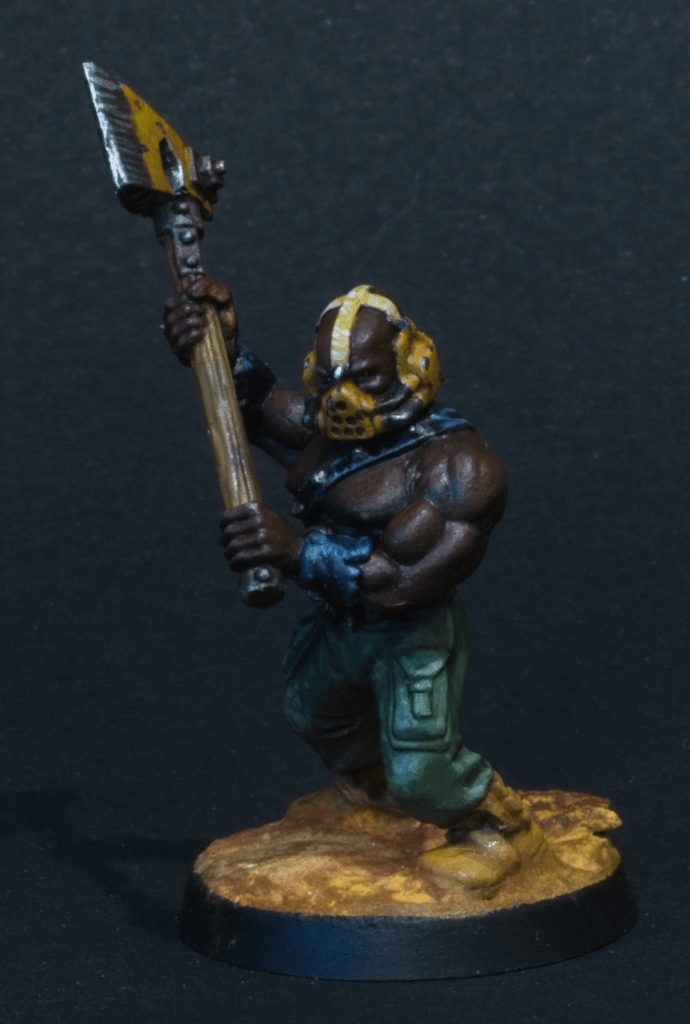
Ray, the Rage Sage
Ray was kit bashed from a GW marauder torso and arms, GW Catachan guardsman legs, a head from the GW Chaos Vehicle Sprue. In a past life Ray was a tech savant from the reclaimer faction, but unfortunately for him he tried on this mask, which he didn’t know was a Worker Focus and Resiliency Increaser also by MG (of course), which pumped him full of strength enhancing drugs and other drugs made to make workers compulsive about their jobs. Not being in a factory, the drugs pushed Ray to be compulsive about a job he couldn’t do, which made him very mad.
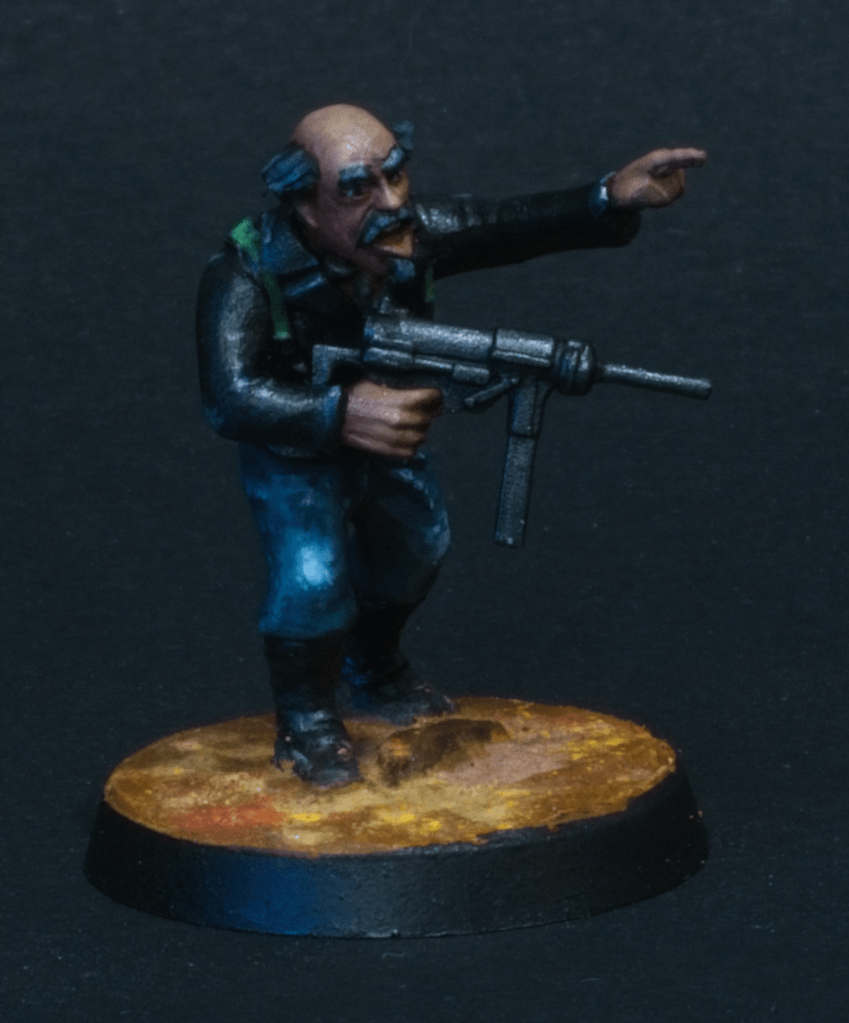
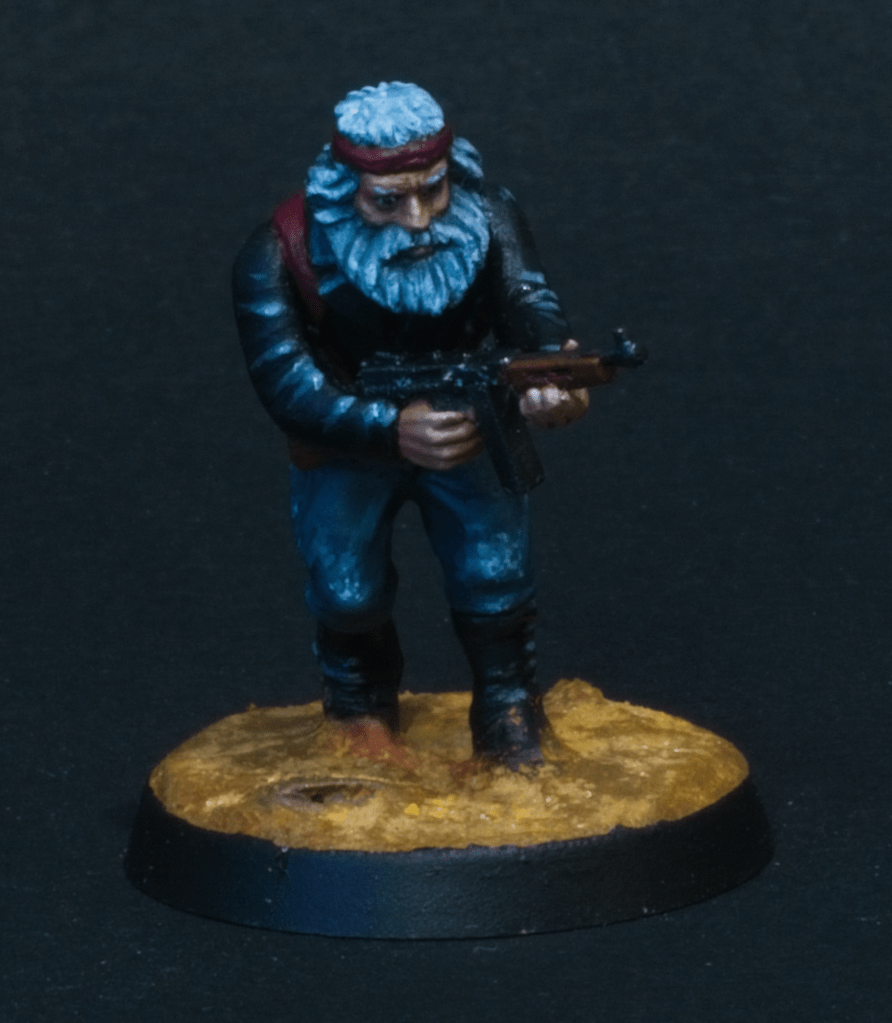
Old Man RamirezOld Man Parkes
Old Man Ramirez and Old Man Parkes are two old men in the band, I see them as ex-bikers, Both were built out of Warlord Games WW2 American Infantrymen, with old GW head from the empire militias set.
Darts
Rounding off the band is Darts, also a stock Escher ganger.
This was a very fun project, each model being very individual and requiring a new plan for painting. I’m looking forward to adding more models to it as the campaign progresses.