Gnawholes

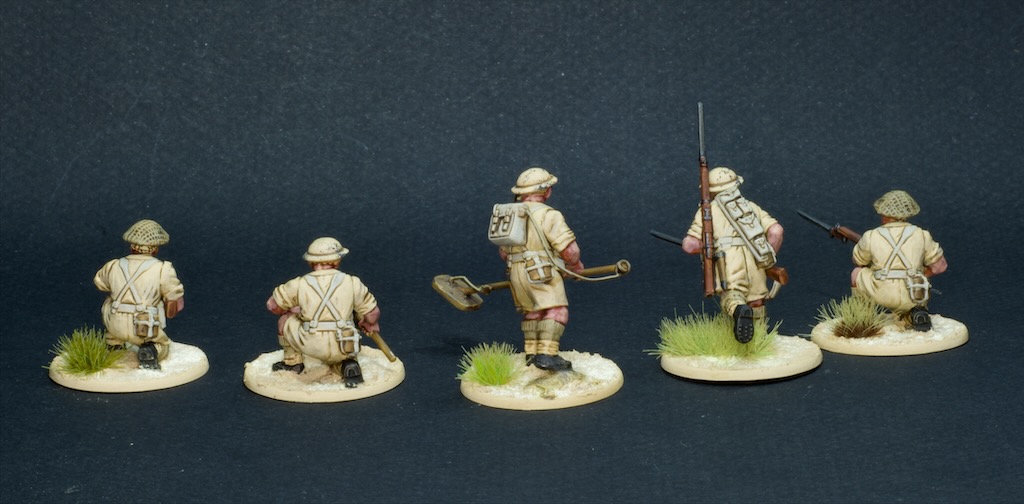
I’m getting rather quite close to having finished my 2000pts of skaven, so the last stretch motivation is kicking and and I painted some more models for the army tonight: the gnawholes.

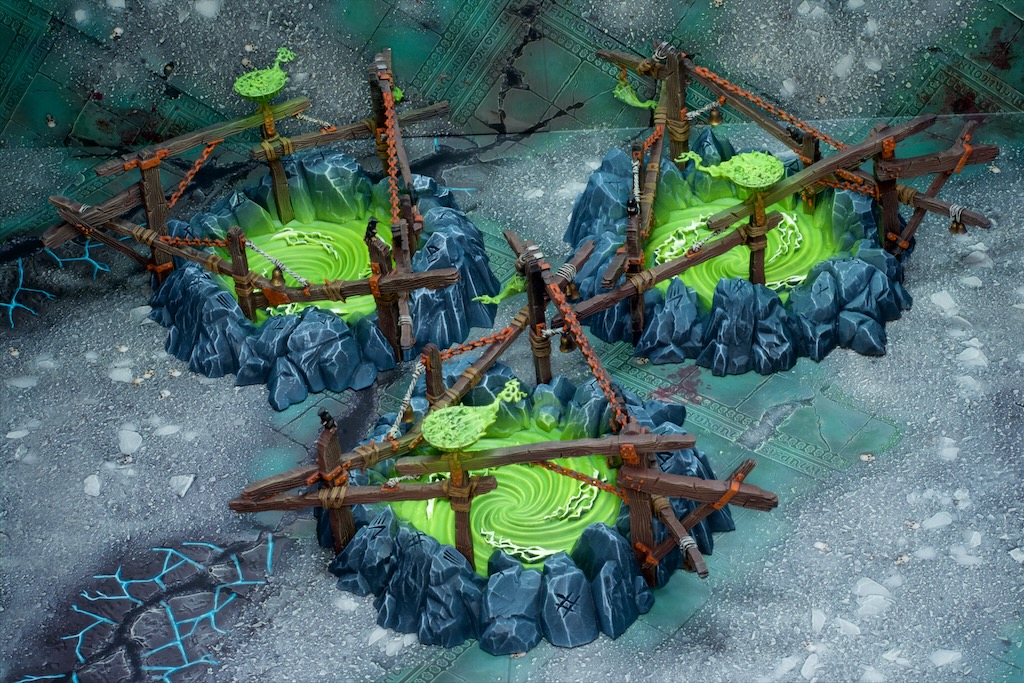
These are terrain pieces you can place as a Skaven player after the gaming table is set up. They are effectively magical tunnels that allow your Skaven units to pop up in fun places, such as right behind enemy units.

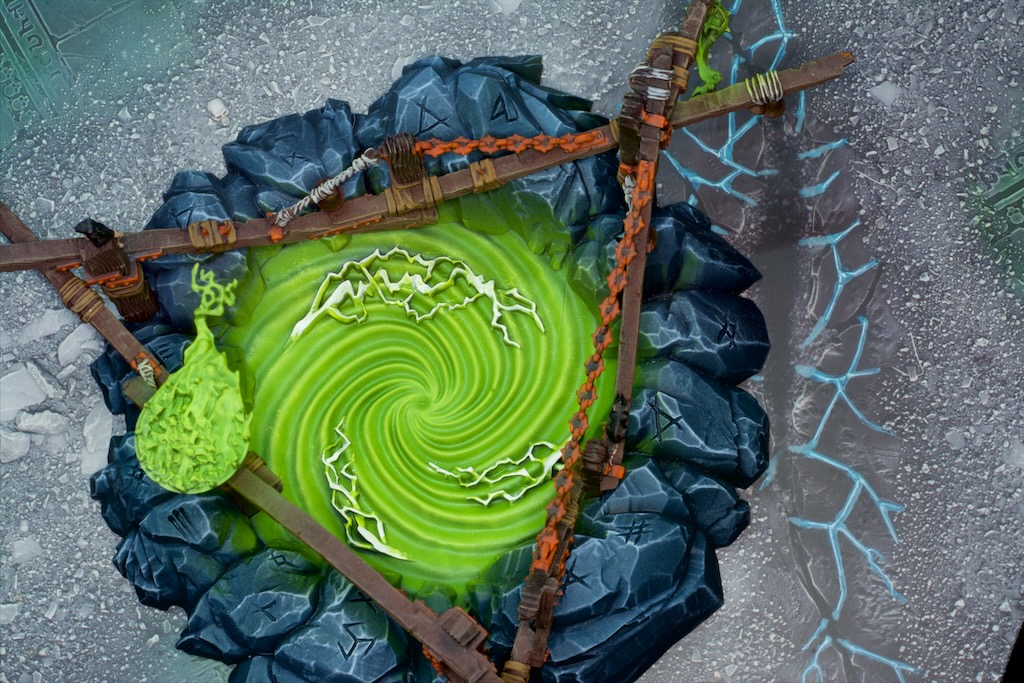
It took me a long while to get around to painting these models, I just really struggled to get motivated. I knew I was going to have to paint them in sub-assemblies as all the scaffolding is intermingled and it would have been hell to paint fully assembled. However I really dislike painting in sub-assemblies and often put off models where I just have to do that. These models also live in a weird space for me, they’re terrain but also part of the army in a way, so I couldn’t decide if I should paint them like terrain (i.e. quick and dirty), or army models (a bit more care involved). In the end I split the difference and went for somewhere in between, taking a bunch of shortcuts to make sure I could paint them in the one evening.

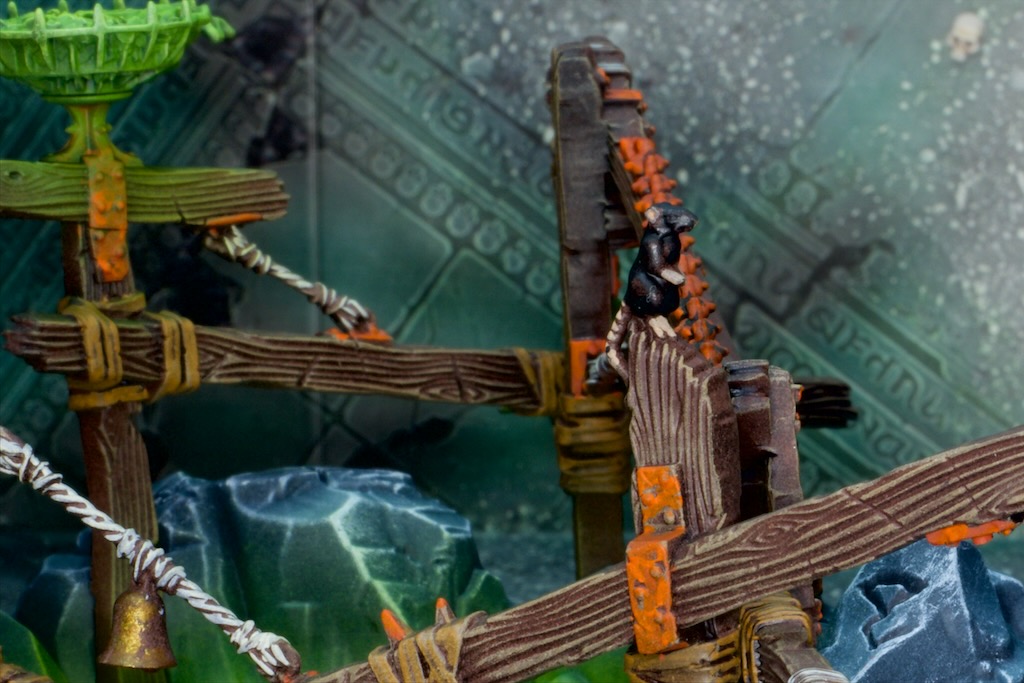
This mostly meant relying on the airbrush as much as possible, dry brushing where it made sense, and some fairly harsh highlights where it didn’t.

At the end of the day I’m happy with them, they look quite cinematic with all the glowing and fit nicely next to the army. I’m down to characters (including one that is probably the largest model in the army) and a little weapons team, so overall not too much more to go to get these all done. This is just as GW have announced a new Skaven army book which might require me to update the army – oh well!

Hell Pit Abomination

I recently acquired another glass cabinet a little larger than my existing ones to display some of my bigger projects all in one place. One of the armies that was placed within was the Skaven I’ve been working on for a little bit. There are only a handful of models left to “finish” that army and seeing them in their grey plastic next to the rest of the painted models motivated me to make some more progress. So behold in all its gruesome glory, the (extremely appropriately named) hell pit abomination.

What a fun model, absolutely covered in details and generally very abominable. It’s been a while since I painted a large monster, let alone an almost entirely flesh coloured one. It was a challenge to keep that much skin visually interesting without going a bit mad painting it all.

The skin being the major feature of the model I wanted to concentrate on that first then go in later for the rest of the details. This allowed me to use some rather messy techniques to get the bulk of the work done and then clean up after myself.

I started by airbrushing on a zenithal undercoat (black all over, followed by light grey from the top), followed by an all over coat of GW Guilliman Flesh contrast. This looked pretty terrible so I followed up by airbrushing some purply magentas from below, and Vallejo Elf Flesh from above. That ended up looking much better so I let everything dry for a few hours and came back in with oil paints, doing a wash of some reddish brick colour all over with some areas darkened with navy blue oils. This was wiped off the raised areas with some makeup sponges, and gave me a nice canvas to work on. A few more hours of drying and I was able to start brush highlighting using GW Bugman’s Glow, GW Cadian Fleshtone, and GW Kislev Flesh where most appropriate (having already created some nice gradients I just used the paint from the list above that matched best, sometimes using two or all three). The rest of the model was relatively quick after that and was completed in a couple of sessions.

As you can see it is holding a fish, which isn’t on the stock model. I pinched an arm from the GW river troll kit for this detail, it fit in there with only minor filling required which was nice.

This was a fun project, and allowed me to play some more with oils which is a tool I’ve been introducing into my painting for a while now and really like. That’s a little less grey on that shelf, with hopefully the rest to come soon!

The Chosen One!

I don’t know if this happens to everyone, but when I come home from a tournament my mind goes directly to wondering about my next project in that game system. As I mentioned last week I played in my first Star Wars Legions tournament, and of course had the urge to paint more models for the game. A quick chat to a friend with unused Legion models later and I’m apparently starting a Galactic Republic army!

First up on the painting table is Anakin Skywalker! I’ve already painted his future self so it only seemed fitting! The model is one of the newer Legion offering and was very nice to put together and a beautiful cast all around. Far cry from the early models which were made from that terrible boardgames model plastic.

As I’d done the glow effect on Vader’s lightsaber I felt I should do it here too, although I was very apprehensive about putting blue all over the face I’d just finished painting. Luckily I think it turned out ok.

I used the airbrush to sketch in the glow itself, and went back over and picked some highlights with a brush to accentuate the effect.

The lightsaber I painted after having done the airbrush work, as it was very much in the line of fire! I just did a somewhat textured gradient from blue to white using a brush.

When it came to basing him I wasn’t too sure what to do, but settled on a swampy look. This was nice and quick to do and should look nice over a whole army.

I also painted some terrain this week, but I’ll wait till I’ve received the new mat that goes with it before showing it off!

Sailing on the High Seas, Sweltering in the Desert

This week saw me paint a few odd things, starting with a sudden urge to paint models from Dreadfleet, a 10 and a bit year old standalone naval game from Games Workshop, set in the old Warhammer universe. I bought my set upon release, built all the models and then never painted any. Never too late to get to that though, just had to wait for inspiration to strike! There are quite a few ships and its of terrain in the game, so plenty more to paint before I can call it done, hopefully I won’t wait 10 years to paint the next batch!

Grimnir’s Thunder

First up we have Grimnir’s Thunder, the dwarven ship. Some ships in the game have small pieces they can send out, and in this case this is a dirigeable. You can barely see another ready to launch peeking out of the deck.

Seadrake

The second one I tackled was Seadrake, the high elf ship. This one has dragons!

These are very cool models, if a bit challenging to paint as they have a lot of overlapping pieces and are a smaller scale than I’m used to painting. They have however been quite enjoyable to paint! The mat that comes with the game also provides a really nice backdrop for photos!

This week also marked my first foray into painting terrain for my North Africa WW2 project, with these two houses. I printed these on my 3d printer (you can find the files I used here) and based them on pieces of MDF. The palm tree is a cheap plastic model I found on eBay. I have a whole batch of these so expect to see them on other terrain pieces in the future!

I painted them with craft paints using a series of progressively brighter dry brushes, nothing fancy but it looks ok.

I used a lot of cream grout to make the sand on the base. This ended up being far too bright for my desert mat so I airbrushed some warmer tones to get it closer to where it needed to be. It’s quite a bit brighter but looks reasonable to me now.

As a parting note I played in a Star Wars Legion tournament over the weekend with my Galactic Empire army. This was my first attempt at playing the game (nothing quite like diving in head first!), and I really enjoyed myself. I didn’t do particularly well (won one of my three games so not all bad!), but I did manage to leave with the best painted army award so am happy with that!

Royal Engineers

To break up painting basic infantry I decided to put together and paint my 8th army engineer section this week.

I wanted them to stand out from the infantry sections and therefore did a bit of research and found some great reference photos of royal engineers in the North African desert, with the ever present Polish metal detector. Now as far as I can tell 1941 is too early for the detector to have made its way to North Africa (most sources point to 1942), so it’s a bit anachronistic to include one here, but sometimes the rule of cool trumps accuracy!

SOUTH AFRICAN FORCES IN NORTH AFRICA DURING THE SECOND WORLD WAR © IWM (E 18844)
ROYAL ENGINEERS AT WORK IN THE WESTERN DESERT © IWM (E 12778)
Royal Engineers with a mine detector, 1942 (c) https://collection.nam.ac.uk/detail.php?acc=1999-07-14-1

From a painting perspective, again nothing new, these are done the same way my infantry were painted.

More interesting perhaps is modelling of the engineer with the detector I did using bits of wire and some plastic card.

Warlord games makes a model of en engineer with a detector, but he’s done up in late war uniform and uses a later mark of detector. So I decided to make my own. Not the most skilful job, but I enjoyed myself and I think it looks fine on the table!

Update on the master list:

1940-42 Commonwealth Infantry Brigade (British)

– 2nd Lieutenant – 2 Extra men

– Artillery Forward Observer

– 10-Man Infantry Section – LMG, SMG

– 10-Man Infantry Section – LMG, SMG

– 10-Man Infantry Section – LMG, SMG

– 5-Man Royal Engineers Section – LMG, Anti-tank grenades

– Machine Gun Team

– Medium Mortar Team

– Field Artillery (25pdr)

– Bren Carrier – Pintle-Mounted LMG

– Matilda II

1940-42 Commonwealth Infantry Brigade (Australian)

– 2nd Lieutenant – 1 Extra man

– 8-Man Infantry Section – LMG, SMG

– 8-Man Infantry Section – LMG, SMG

– 8-Man Infantry Section – LMG, SMG

– 5-Man Infantry Section – LMG, Anti-tank grenades

– Bren Carrier – Pintle-Mounted LMG

– Matilda II

– Matilda II

More desert Brits!

Back with a continuation of the 1941 North Africa project, this time with more of the same!

There isn’t too much to discuss from a painting standpoint, these were done in exactly the same manner as my previous post.

I built the Bren team prone for a bit of variety.

I was pretty happy with how some of the eyes on these turned out so here’s a look at that!

There will be plenty more where these came from, I have a whole lot more infantry to paint for this army as you might expect (and plenty more on the German side when I get to them!). This leads me to talk about what I’ve got planned for this army. As I mentioned last time, this army was partly inspired by my Great Grandfather having been part of 8th army in WW2, hence building these as British (the Warlord kits provide a ton of different heads for troops from all over the empire). I also plan on adding some Australian troops to the army as a nod to where I live now.

Here’s my planned army list with the currently painted models crossed out in red:

1940-42 Commonwealth Infantry Brigade (British)

– 2nd Lieutenant – 2 Extra men

– Artillery Forward Observer

– 10-Man Infantry Section – LMG, SMG

– 10-Man Infantry Section – LMG, SMG

– 10-Man Infantry Section – LMG, SMG

– 5-Man Royal Engineers Section – LMG, Anti-tank grenades

– Machine Gun Team

– Medium Mortar Team

– Field Artillery (25pdr)

– Bren Carrier – Pintle-Mounted LMG

– Matilda II

1940-42 Commonwealth Infantry Brigade (Australian)

– 2nd Lieutenant – 1 Extra man

– 8-Man Infantry Section – LMG, SMG

– 8-Man Infantry Section – LMG, SMG

– 8-Man Infantry Section – LMG, SMG

– 5-Man Infantry Section – LMG, Anti-tank grenades

– Bren Carrier – Pintle-Mounted LMG

– Matilda II

– Matilda II

As you can see I still have a lot to do! This was never intended as a short project, and should take me quite a while to get through.

New Project! North Africa 1941

Hi all, it’s been a little while since the last post on the blog (almost 3 weeks!). Most of that delay has been because of preparations for this new project I’ve embarked on. This new project (if you’ve read the title you know!) is for some more WWII action, this time in North Africa early-ish in the war.

It’s become clear to me that finishing my 2ème DB army did not in fact cure me of the want to paint more models of the period, and in fact made me keen to move on to the next theatre instead! So why North Africa, and why 1941? There are a couple of answers to these questions so here we go.

North Africa has always been one of those theatres that drew my attention, my first model kit way back when was a spitfire in desert camo and clearly that made an impression on my younger self. Fast forward a few years and I started playing the first Battlefield game (Battlefield 1942) and spent hours playing the El Alamein and Tobruk maps, which wound up being some of my favourites of the game. When my friends and I decided to start playing Bolt Action we settled on late war Europe as the primary theatre we would all put armies together for, but North Africa was also well into the running and I was always keen to do something there.

What sealed the deal was series of conversations I had with my Dad and his Mum not long after finishing the 2ème DB models, which revealed to me that one of his Grandfathers had fought in North Africa and Italy as part of the Buffs (Royal East Kent Regiment). Once I learned that I went on a good old internet scour looking for any information I could find on what the Buffs had gotten up to during the war. By extension that meant reading a lot about the North African campaign in general and well there was no saving me from painting armies for that campaign after that!

That tackles the North Africa part, but why 1941? That answer is a lot simpler, I wanted to paint early war tanks!

So here we are with the first models done for the project: some British infantrymen. I wanted to start with these as my Great-Grandfather was an infantryman and it therefore seemed right to start here. They’re not modelled after any regiment in particular although they could definitely stand in for the Buffs! These are Warlord Games’ 8th Army Infantry Plastics.

Painting-wise these were relatively simple, they’re mostly one colour after all! I created a record of the paints I used, as usual mostly so I remember how I did things down the track, but if it helps someone with their models then that’s always a nice bonus!

I broke away from my usual black base rims for these, but I really wanted to communicate that sun-drenched look and the bright rims really contributed to that I think. They’re painted in Vallejo Iraqi sand.

The reason this post isn’t called 1941 8th Army in North Africa is that as part of this project I plan on painting two armies: an 8th Army force, and their opponents the Afrika Korps (Sorry Italians! I’m sure I’ll get around to painting some). So look forward to seeing some of these painted up too in the near future!

Anyway this should keep me busy for a while! I have a lot more models to get done for this project, including many more British infantry, some Australian infantry (as a nod to where I now live), german infantry, trucks, tanks, artillery etc.

Flames and Fences

A bit of a mix of things this post! After working on a few of my bigger projects these last few weeks I felt like a small palette cleanser (can’t remember where I first saw that pun, but it’s excellent at expressing what I mean!). This resulted in me putting together and painting a blister pack of german weapon teams and an old set of Warhammer fences.

The weapon teams as you can see are made up of a Panzershrek team and a flame-thrower team. Not much to write about in terms of painting as these are done in exactly the same way as my other Grenadiers, except the fire!

I had a bit of fun with that flame, trying to make sure to keep it as bright as possible. To that end I started with a pure white, that I slowly covered in yellows then oranges at the very tips. The glow effect on the soldier is done with a very light pass of orange through the airbrush, to tint the underlying colours rather than cover them entirely. I think the effect is pretty convincing, and looks pretty good even when not lit up properly (i.e. anywhere not under painting lights!) which I’m happy with.

While I was painting these I also tackled an older set of plastic terrain I’ve had for years, the old fences set for Warhammer (back in the square base era!). I spent way more time n these than I usually do on terrain, but they’re great models and were very fun to paint. The green mossy parts on the walls are done with AK enamel washes (Slimy Grime Light and Slimy Grime Dark). I’ve been wanting to try these for a while and this seemed like a great project for them. Really like the result so will definitely use them on other projects.

Anyway, those were two fun short projects that served as a nice filler while I impatiently wait for my next project to be delivered!

Stormfiends

Back with more Skaven, this time a bit more bulky than usual! These are Stormfiends, combinations of Skaven technology and their ability to make really big rats!

These are quite imposing models, and it’s been a while since I’ve painted something this big that wasn’t a vehicle. I quite enjoyed painting the skin as a result and while I still kept things fairly loose and rough, there are a few more steps on these than I did on the other Skaven models.

These little brain rats on their backs are very creepy!

There is also a lot more armour on these than on anything I’ve painted for the army, so I really got to push the mottled brass look I’ve been doing. This was done as per all the other models but I think shows off the effect in a bit more detail.

Remaining for the army are a few characters, but also two big monsters which will require me to apply some of the learnings I got from painting these models. Should be fun!

Stormvermin

After quite the foray into historical subjects, it’s time to get back to my Skaven project! This time the last block of infantry I’m planning on painting for this version of the army: the elite Stormvermin. From now on it’s characters and monsters! Not to say that I won’t paint more infantry in the future however.

I still think of these as the “new” plastics, but they’re fairly old now. Still, very cool models and I really enjoyed painting them. Nothing new from a colour scheme point of view, but to befit their elite status I decided to have all the cloth on them as the teal colour rather than the mix of cream (read dirty white) and teal I have on the rest of the infantry.

I also spent longer on these than I did for the rest of the infantry. They got a few extra highlights to make them pop a bit.

As a nod to the Old World I painted their fur white, which marked out the Stormvermin that served as the bodyguards to the Grey Seers in the old Warhammer setting.

Finishing these has motivated me to keep going on the army, so barring other distractions there should more posts on them soon!