2ème DB – Vehicles

Back this time with the other half of the army! The 2ème DB being an armoured division, it couldn’t go without some transports and armour support! I tried where possible to base these on real vehicles, although limitations in reference photos and the model kits meant I had to get a little creative in some places. I also had limited suitable decals for the division so did a lot of the marking painting by hand which was an interesting challenge! It looks a little rough in places but I just tell myself a lot of the originals were hand painted too so let’s say it’s appropriate! The divisional insigna is from decals by Company B, which I was glad to find as I was not looking forward to having to paint those by hand! The other decals are from the kits themselves.

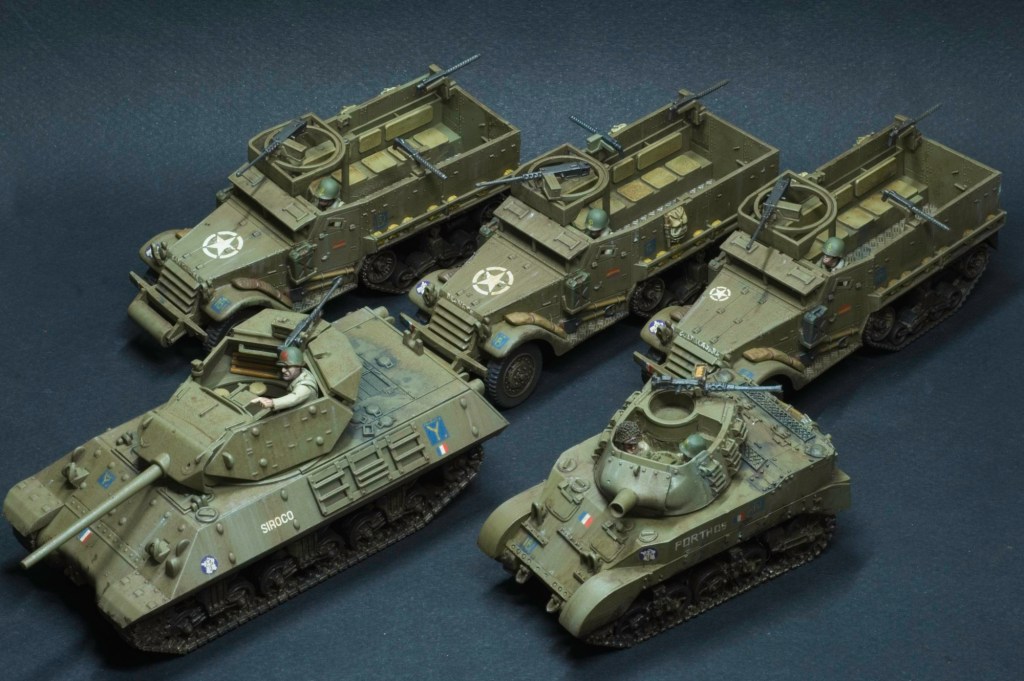
My goal was to represent elements from the 9th company of the RMT (Régiment de Marche du Tchad), known as “La Nueve” due to the large proportion of spanish revolutionaries in it. The half-tracks are painted as elements of the 9th company and the M8 as part of the support company of the 3rd battalion (that the 9th is part of). The M10 tank destroyer is painted as the Siroco, part of the RBFM (Régiment Blindé de Fusillers Marins), a tank destroyer regiment crewed by gunners from the french navy.
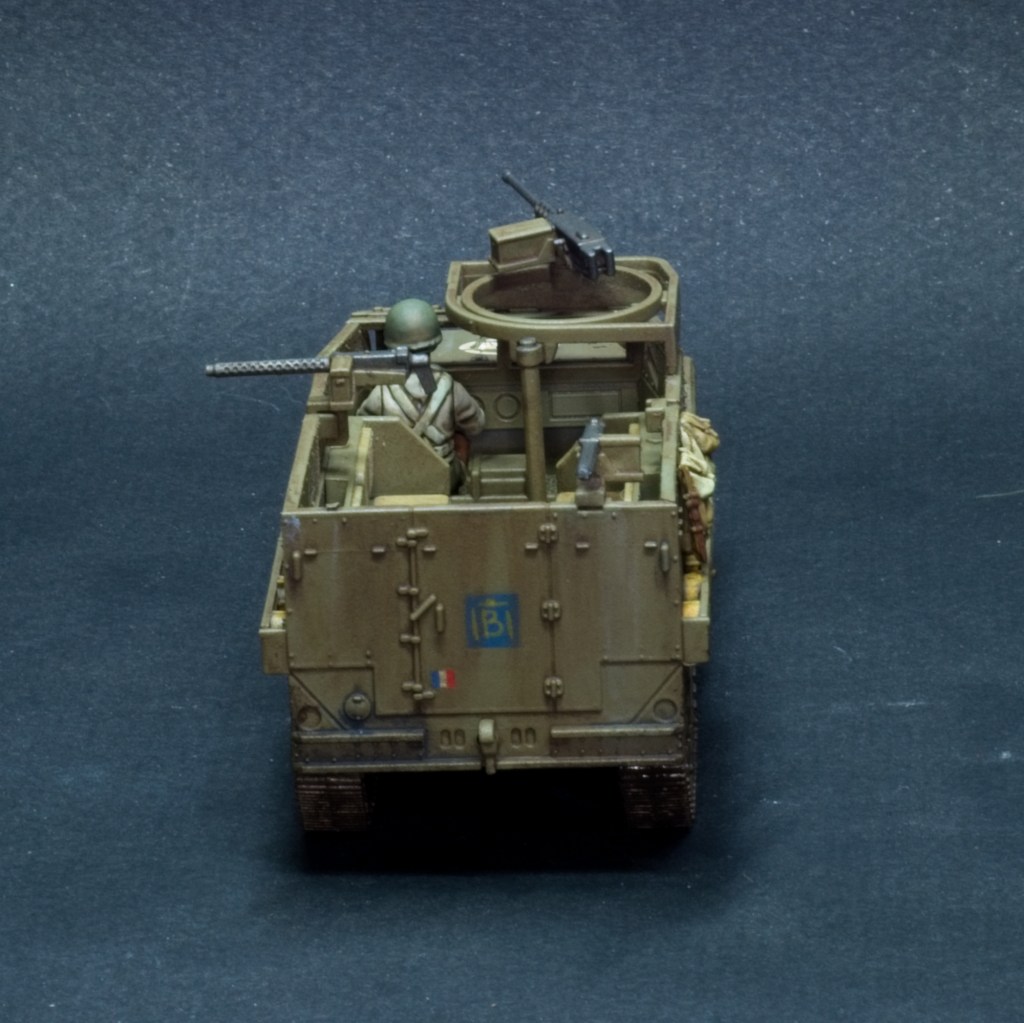
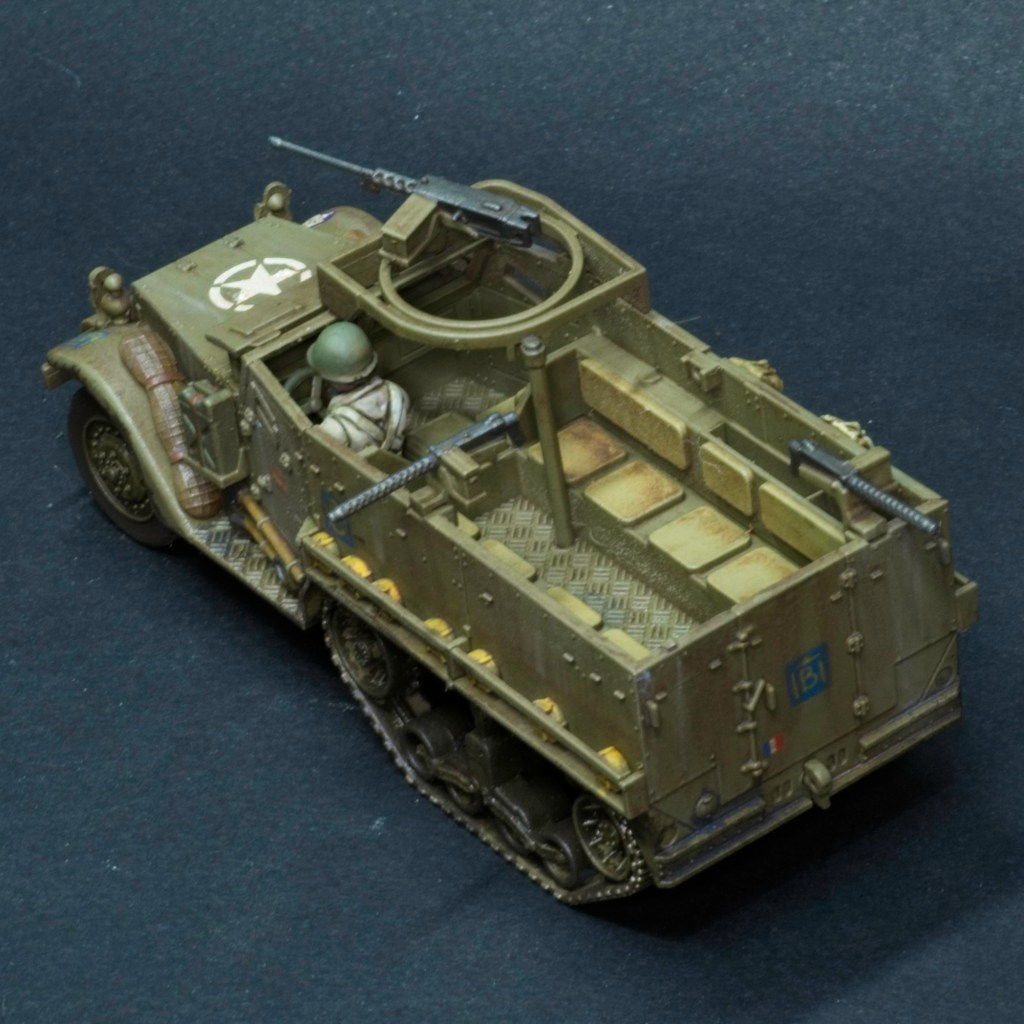
Half-Tracks

Brunete
Santander
Guadalajara

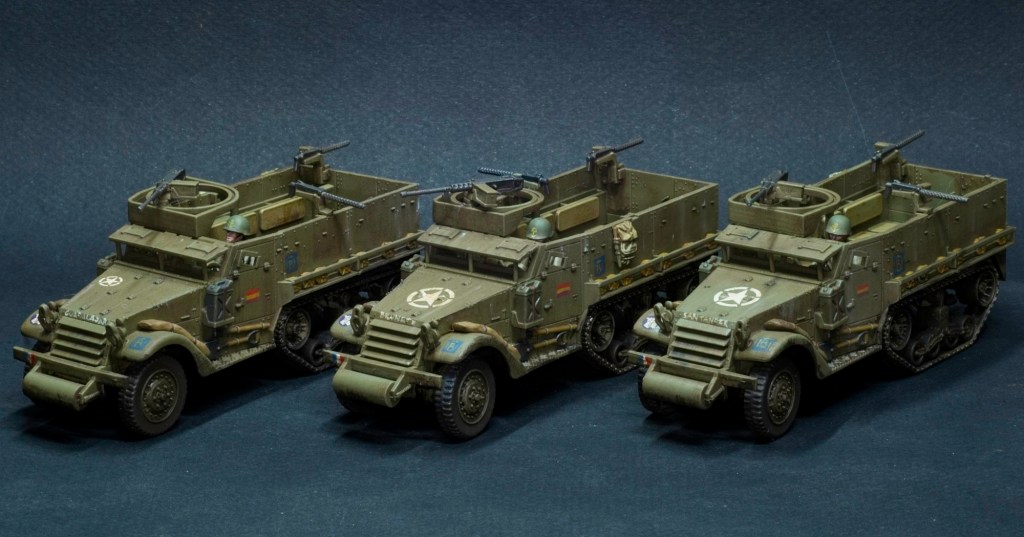
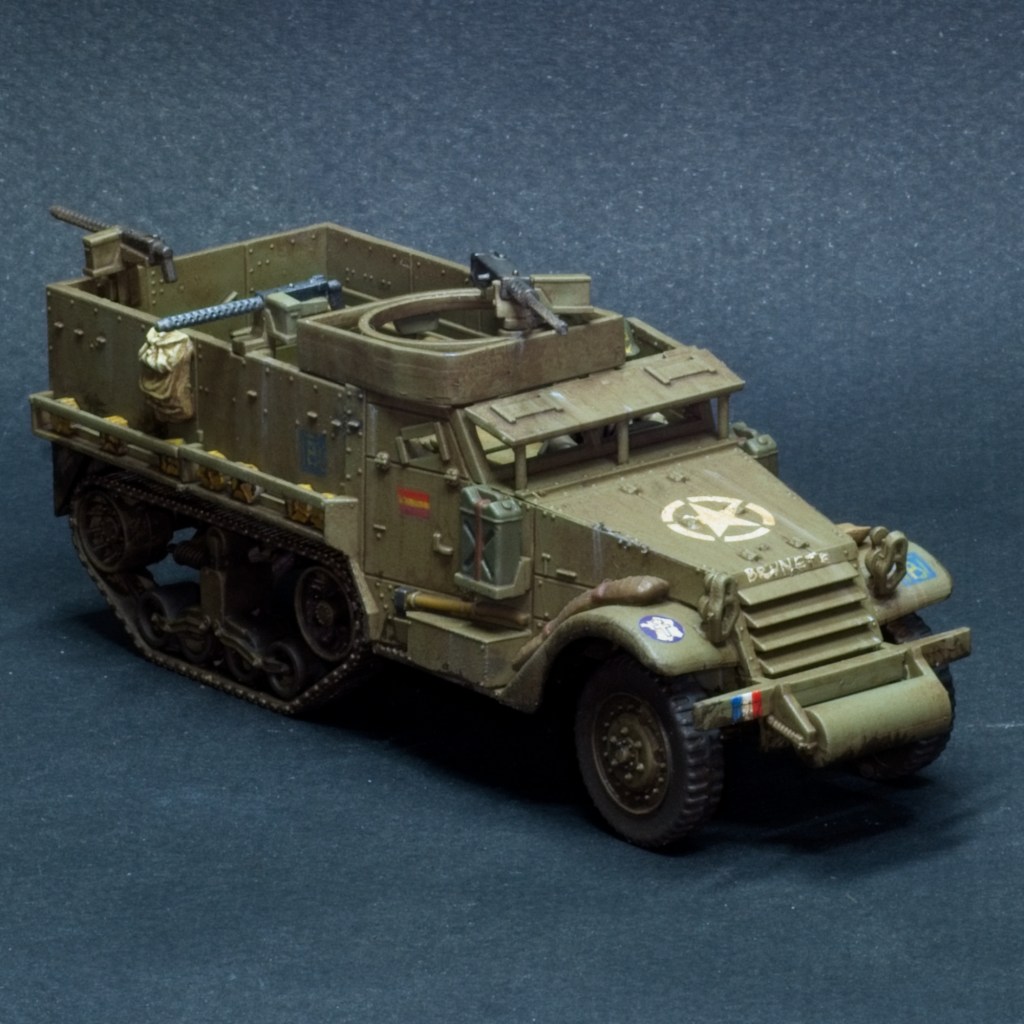
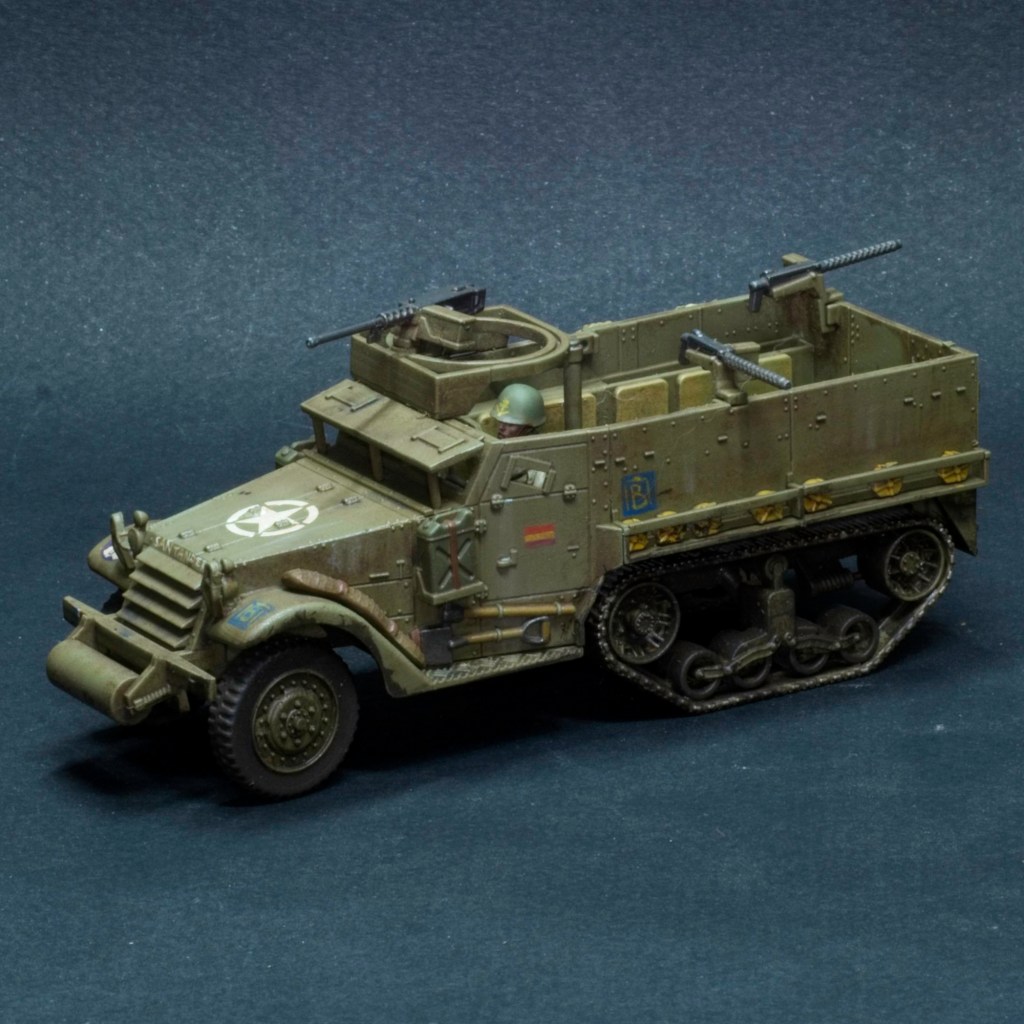
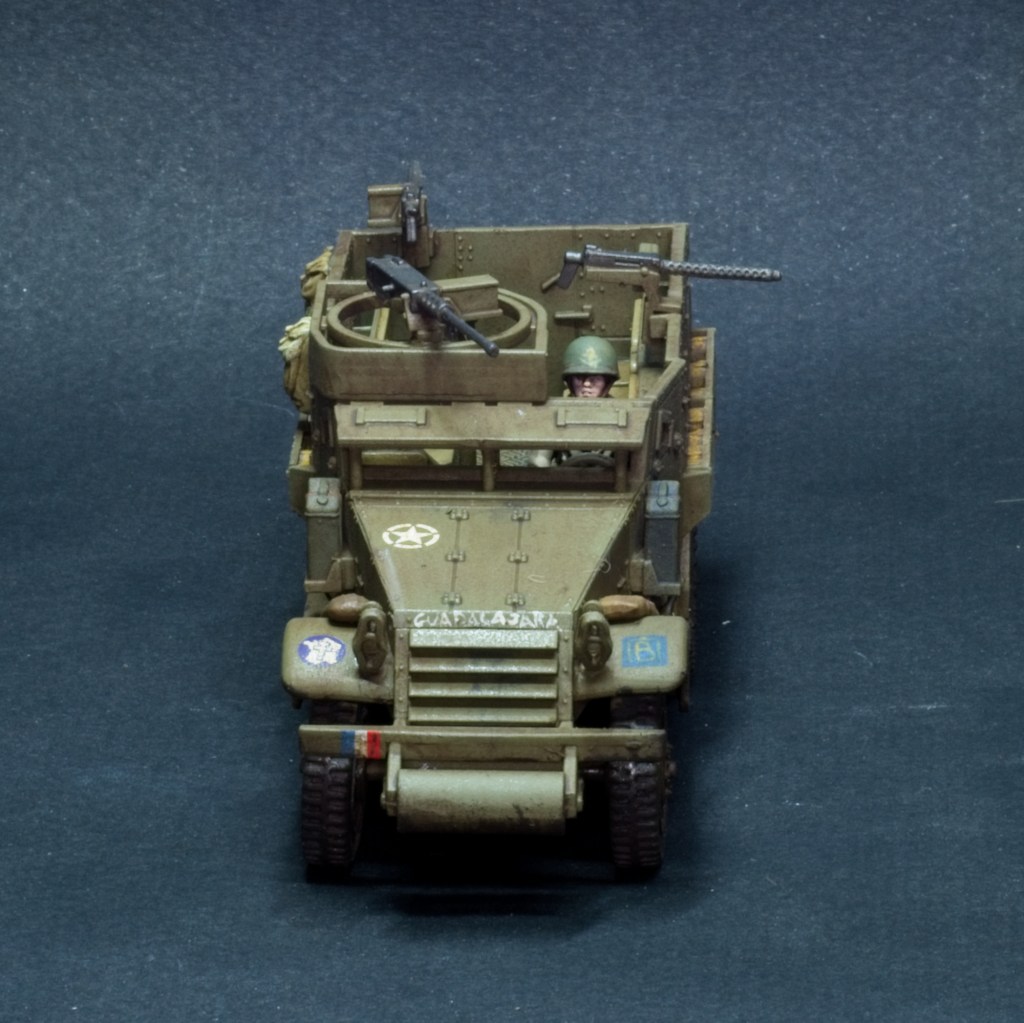
The half-tracks of La Nueve were generally named after important events of the Spanish civil war, and the names you see above all appeared on half-tracks of the company. I read that the soldiers of the company were allowed to paint the spanish republican flag on their half tracks, and interpreted that as a replacement for the French flag usually found on the half-track doors, but I have no idea if that’s correct and if they were all consistent or not. After painting these I found a photo in one of my reference books that had the flag on the side of the bonnet instead of the door, so that may have been more correct, but I quite like the look of them on the doors so wasn’t too worried! These models are by Warlord Games/Italeri.

M8 HMC

Porthos” I had no reference images of, but I had some from others of the division so took a gamble on what it might have looked like! Porthos, and as you might expect Aramis and Athos made up the M8s of the 3rd Battalion of the RMT and therefore presumably would have supported La Nueve.

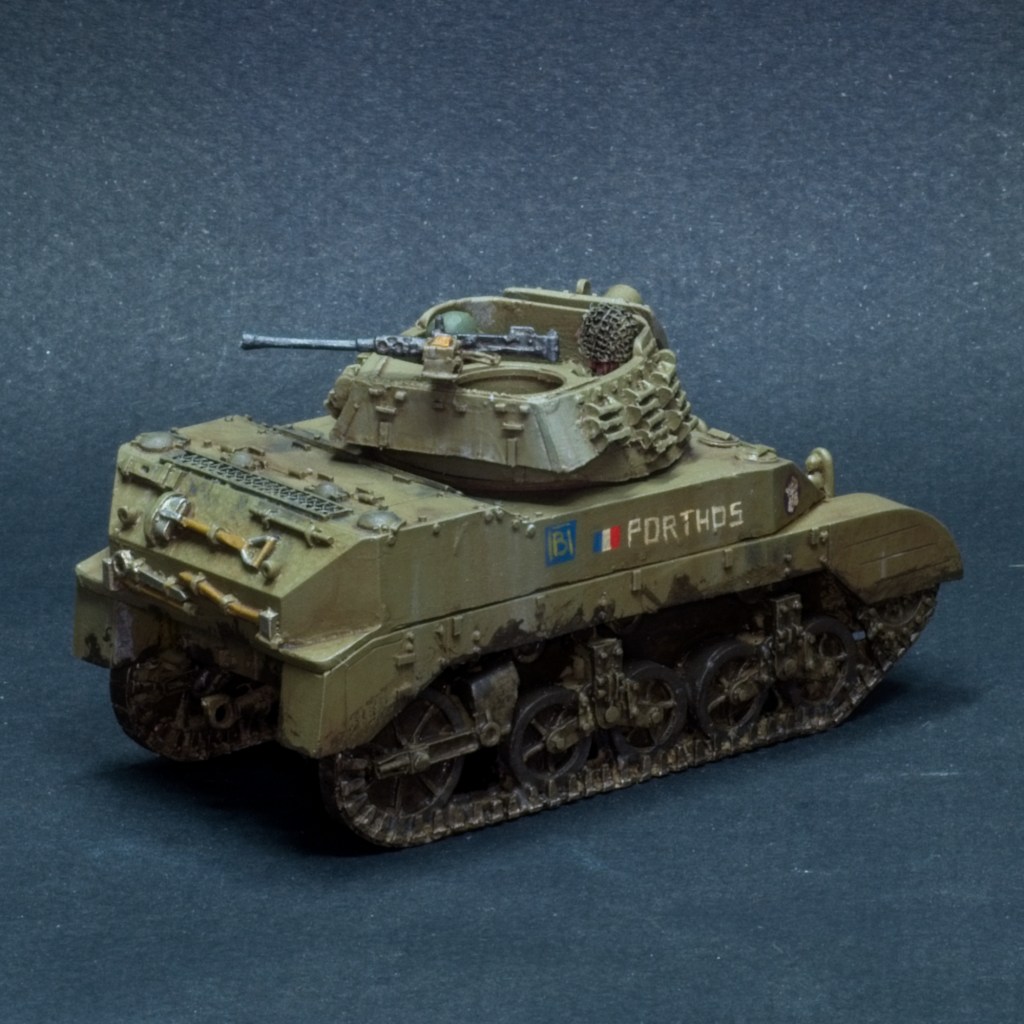
The model is a resin and metal kit by Warlord Games.
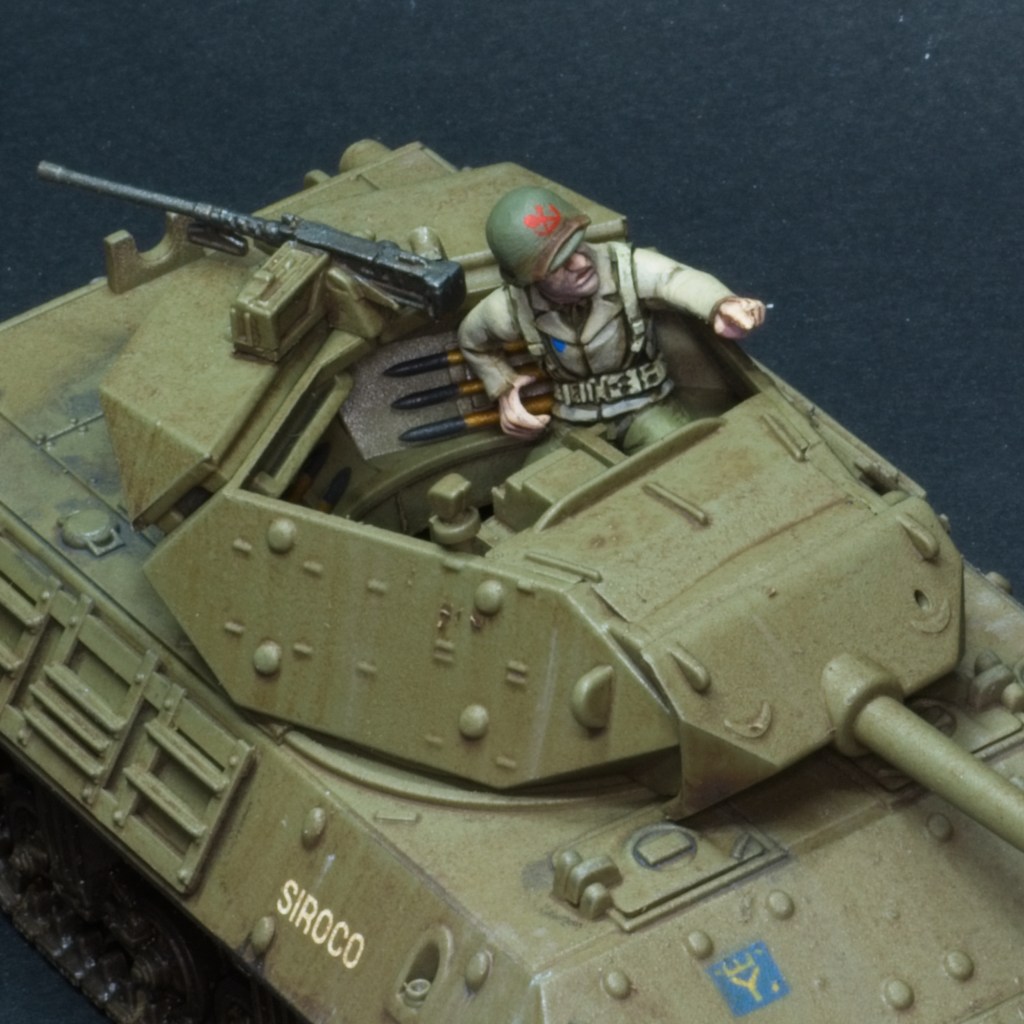
M10 Tank Destroyer

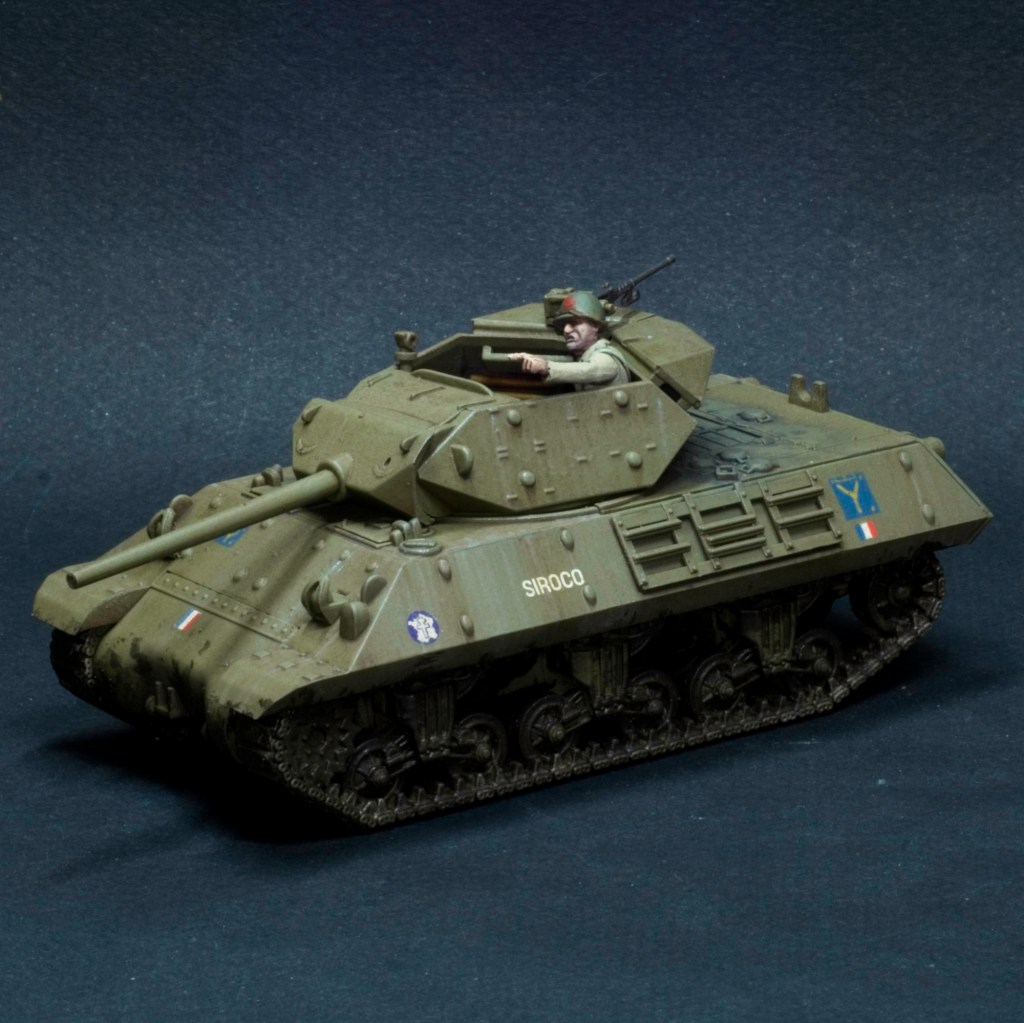
Siroco is probably one of the more famous vehicles of the divisions, famous enough that this Rubicon Models kit came with decals for it! I still used the Company B emblem to keep everything unified, and still had to paint the tactical markings (the yellow Y over blue background) by hand as there were no decals for that in the kit.

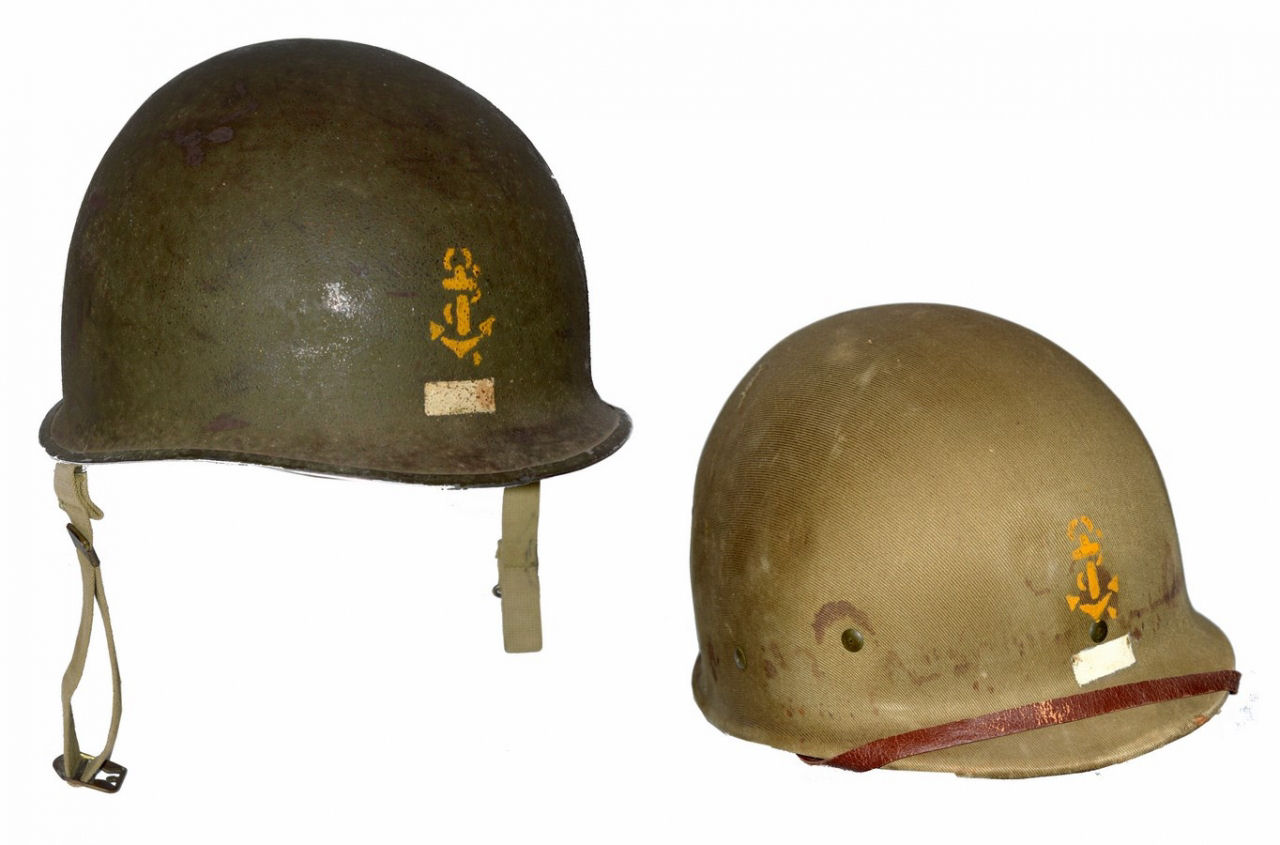
The kit did not come with crew member models, so I took a spare Warlord Games US soldier model I had and built him to fit in the turret. Presumably the rest of the crew are down below for some reason! You’ll notice this crewman’s helmet has crossed red anchors instead of the yellow anchor present on all the others. This is the emblem of the RBFM.

Painting-wise, all these vehicles were done in the same manner:

  1. Undercoat with Vallejo US Olive Drab primer
  2. Basecoat non-green areas (stowage, crew etc.)
  3. Paint on non-decal markings
  4. Gloss Varnish
  5. Decals
  6. Gloss varnish
  7. Oil wash all over with Abteiling 502 Dark Mud
  8. Dot Abteilung 502 Copper Oxide Blue in random places
  9. Wipe all that in a downwards manner with a brush wet in solvent to achieve the streaking effect
  10. Apply thinned down Abteilung 502 Starship Filth in random-ish spots around vents and fuel caps
  11. AK Wet Mud all over the tracks area
  12. Matte Varnish all over

I thoroughly enjoyed painting these models, the Free French markings are quite cool looking and considering at the end of the day these are otherwise just plain green tanks make them stand out quite a bit from “regular” US or British versions of the same vehicles.

Anyway that concludes my foray into the 2ème DB for now! Not to say that I won’t be going back to them, there are many more vehicles of theirs I’d like to do up at some time in the future!

2ème DB – Infantry

After a brief interlude in antiquity, back to World War 2 and Bolt Action, with an army that’s been in the works for a while but never got finished, my take on the 2ème Division Blindée, or Division Leclerc for some, an armoured division of American-equipped Free French troops.

If you read the previous post on the army you’ll realise that these don’t match those very well, and indeed I had a change of heart with regards to their colour, taking inspiration from the very good videos by Sonic Sledgehammer over on YouTube. From that original post, the bazooka team and the mortar team were repainted to match the newer scheme.

The infantry in the photo above are all I’ll need for the 1000pt army list I devised for the army. To follow on are the vehicles. As these are for an armoured division, I have half tracks for all of the squads and some tank support as well.

First up, we have a lieutenant and bodyguard, both armed with Thompsons.

A ten-man rifle squad, with BAR and NCO with Thompson.

A nine-man rifle squad, with BAR and NCO with Thompson.

A six-man mortar squad, most of the time I envision the mortar team splitting off from the rest of the squad who will be manning the machine guns on the half-track.

A bazooka team.

You might have noticed yellow anchors on the helmets of the non-netting covered helmets, and blue patches on most of the jackets. The Osprey book I have on the division has them marking their helmets with a yellow anchor, symbol of French colonial troops. I found a photo of American helmets painted with the same anchor (although in use by other French troops).

The blue mark represents a pin with the emblem of the division often worn by the troops. Both of these I added to make them look a little bit different to regular American soldiers!

I also tried to vary the skin tones I used, as the division had many soldiers from North Africa in its ranks as well as Republican Spaniards that had fled after the civil war.

These were a lot of fun to paint, I found myself quite motivated when I started a got through all of them 5 models at a time, which wound up being a nice batch size. The basing was a bit of fun too, I found these packs of tufts by Vallejo at my local game store and got 4 different types that I randomly scattered on the bases. I found the result looked quite swampy so I added puddles with a product by AK called … “Puddles”! They worked out nicely I think so I’ll be using that on other models.

Unless I get wildly distracted (which is a very real risk let’s be honest!) the next post should be the vehicles to match the army.

In the meantime however, this is not the end of this post! A few weeks back I played a 2000 point game of Bolt Action with some friends and thought I’d share photos. The game had a small force of Germans backed by a couple of Tigers take on a coalition of Russians and British Paratroopers, a very historical scenario as you might imagine.

The game was played on the Normandy board I’ve been working on for a while, you can see the layout above.

The allies ended up taking the win, the game ending with just the two Tigers left on the german side, Although as you saw above, one of them ended up at point blank range of the IS-2, so who knows how that would have gone!

Hastati

Some of you may remember a post from a while back about my Republican Romans army. At the time I had built a fair few models and spent some time deciding how to field them using the Warhammer Ancient Battles ruleset. They’ve been sitting in a box since then waiting for motivation to strike. A couple of weeks ago I found a second hand copy of the rulebook and army list book for the Hail Caesar game by Rick Priestley at a local game store. I bought them, started reading them, and immediately began planning lists for my Romans using the ruleset.

In Hail Ceasar, armies are built around “divisions”, a generic, period agnostic word they use to describe a group of units lead by a commander of some sort. One of those commanders is chosen to be the general of the army. This system is quite flexible, and meant to be used as the player sees fit to represent historical formations. In my case, the unit was pretty clear as the divisions fit the republican maniples quite well.

One decision that needs to be made between players of the game is how big do they want a “standard” unit to be. Ranks in the game are mostly aesthetic, frontage is all that really matters as far as the rules are concerned. This is so that players of other rule systems can easily port their armies across to this system regardless of the conventions that might have been enforced by other rulesets. This flexibility is interesting and definitely took some adjusting to coming from more rigid systems. Seeing as the other player doesn’t exist (most likely to end up being friends playing whatever other army I end up painting for this system!) I got to argue with myself about what size to make units.

To respect the ratio of Hastati to Principes to Triarii found in each maniple (120, 120, and 60 men strong respectively), the republican army list sets a rule that a ratio of 2:2:1 units must be taken. I decided that these 5 units plus some skirmishers would make a good maniple/division. The game treats the components of a maniple as small units (so half the size of standard units), and sets as a guide the frontage of small units to 80-120mm (so 4-6x20mm based models in the first rank). If two of these small units are to match the 120 men found in the historical formation, then choosing the smaller end of that range gives me a 4×2 formation, 8 men per unit, 16 hastati per maniple, or a ratio of one miniature per 7.5 men, which seems reasonable to me (I’ve seen 10 used in the past). Now enough of that, let’s talk about painting!

As you can see above I have painted up four of these small units giving me enough for two divisions of troops. Still to come then are as many principes, and half as many triarii to complete the core of the units. On top of that I need to paint some velites (skirmishers), and a division of equites (cavalry). Finally I’ll need one commander per division.

I occasionally try things out when I paint, and this seemed like a good project to try the GW contrast paints in their intended use, i.e. single coat applications over a pale undercoat. I find rank and file games to be more forgiving than loose formation games when it comes to painting standards, as the nature of tight formations means they generally get looked at from further away. This meant that I wasn’t too worried about experimenting here, I was fairly sure I’d end up with something serviceable!

The paints I used are listed in the picture above. As you can see, many of the colours are a single coat of the contrast paints. The exceptions are flat colours and metallics. As undercoat I used Vallejo Grey primer, which is effectively an off-white, just very slightly grey. There is one highlight in the scheme and that is the cream cloth, which I wanted brighter than I could get with the contrast on top of the primer. You’ll notice off by itself an oil paint listed, and that was for the second experiment. I’ve used oils a fair bit on tanks and other vehicles in the past but haven’t really tried them on organic things before. I wanted to tone down the brightness of the models and unify them somewhat, so after some drying time, I thinned down some of the Dark Mud by Abteilung 502 and covered the models in it. I let that dry for a few minutes until the thinner looked to have evaporated (it has been over 40 degrees C for almost a week over here so that did not take long…), then wiped the excess off of the raised areas with a cheap makeup sponge.

I’m pretty satisfied with the result, I painted all 32 models in a few sittings so the speed is definitely there, and I think they look nice all ranked up! I can see why many army painters swear by these paints. I actually got excited by how fast I did these and started on the equites, but I missed highlighting things so I’m back to painting some WW2 models for a little bit.

Road to 1000pts… and more!

After typing up the last post, I did a quick tally of the points I’d painted for my Bolt Action army and found that I was pretty close to finishing 1000 points. All I needed was to paint up the Pak 40 and 120mm mortar teams. With that milestone so close, I decided to just go for it!

I really enjoyed painting both of these, the models are quite characterful and form this nice little vignette. The base for the Pak 40 was cut out of plasticard, as the round base provided was really too small.

Here’s the army in the current configuration I’m thinking of for 1000 pt games

After finishing these models, I realised that painting up another lieutenant model would let me fit in more of the tanks I’d painted a while back (In regular games of Bolt Action, you can add 1 tank per reinforced platoon, adding another lieutenant would let me split the infantry sections from my base list into two of these, giving me one more tank allowed). If I made these two tanks Tiger Is, the list would come really close to 2000pts (Tigers are veeery expensive, especially if crewed by veterans). I floated the idea of playing a game with these to some friends and they came back asking to play tomorrow! So I quickly painted up the second lieutenant this morning, ready for the game! He’s a little rough around the edges, but needs must!

Here’s the army at 2000pts:

As you can see, it’s not much bigger, just has larger cats!

I’m looking forward to this game, which will see this german army facing my 1000pts of 6th Airborne allied with 1000pts of late war russians! Might have to think a bit to make up a plausible explanation for how that scenario occurred!

German Reinforcements

I love listening to audiobooks while I paint, and have mostly listened to books about WW2 recently, which always pushes me to paint more models from the period. Recenty I listened to “Killing the Bismark” by Ian Ballantyne, which was a fantastic account of the hunt for Bismark by the Royal Navy, mostly old from the perspective of that navy through accounts of those who were there. That definitely has me considering naval wargaming!

Following on from that, I’ve been listening to James Holland’s “Brothers in Arms”, an account of the Sherwood Rangers’ participation in the later years of the war, again told from a very personal level through accounts of men of the regiment. I’m not all the way through it yet (so far it has been excellent!), but the early chapters cover Normandy on and after D-Day which has motivated me to paint more of my Normandy armies (and also consider buying Shermans…).

So here is the next batch of Germans for the late war army I’ve been putting together, with first up an officer and forward observation officer

The officer model I found really fun, he looks right out of Indiana Jones or another pulpy movie with the round glasses and the luger.

The observer I’ll either use as an artillery/air observer, or as a spotter for the mortar I still have to build and paint.
I had fun painting the reflection in the glasses so here’s a close-up!

Both models are from Warlord Games.

Next up are opponents that regularly show up in “Brothers in Arms”: the SS.

Last post on the army I made the comment about how I felt conflicted with painting an army of real world villains (thanks to everyone who commented by the way, I feel like some really positive and constructive discussions were had on the topic). If there was any unit to have misgivings about painting, here they are.

This camouflage pattern was a lot of work! I can see why display painters are drawn to it, and army painters dread it! My hands were cramping up after repeatedly dotting these 10 models. I used Vallejo German Camo Medium Brown, Vallejo German Camo Dark Green, and Vallejo Gobin Green for the pattern. As a reference I used an illustration in a very useful book I have on WW2 uniforms.

I plan on running these models in one of three ways: as a 10-man section, as two 5-man sections with an MG each, or two 5-man sections with MGs and assault rifles split up.

The MG models are some older Warlord Games metal models, which have one of the team members acting as a mobile tripod. I saw photos where this tripod-man was facing either way so I built the teams to have that man face both directions to add a bit of variation in what are otherwise identical poses. The rest of the models are from Warlord’s fairly new SS set.

This mostly leaves weapons teams to fill out the rest of the army as I currently plan on fielding it. Something like a couple of MG teams (with real tripods this time), an anti-tank gun, and a mortar team. I have quite a few more models in the collection, so most likely these plans will change, we will see!

Endor-ish

I painted some terrain over the weekend, finally getting around to the Endor bits I’d printed quite a while back now. Rather than just posting pictures of an empty board I figured I may as well use the occasion to take pictures of my Star Wars Legion army while I was at it!

This terrain is all from imperialterrain.com, and printed on my Ender 3 Pro 3D printer. This was a fair bit of printing, I think it took around a couple of weeks of almost full time running the printer.

I painted the trees to look like the redwoods used as the Endor backdrop in the Return of the Jedi, but decided against matching the basing the army has (see Endor bases) for the forest litter. For the army I used Jarrah (A local Western Australian wood) sawdust, I which I reckon matches dried pine needles pretty well. To collect the amount of sawdust needed to cover these pieces would have taken me quite a while, and Jarrah sawdust can be an irritant for some people so I decided against having large amounts of it flying around. Instead I used the method I described in my Wood Elf post, blended dried leaves mixed with foam flocks. This has the advantage of being easy to make in large quantities, and down the track allows me to paint up some fantasy ruins to match the tree bases to re-use them for MESBG and other fantasy games.

The ferns you see in the photos were made by cutting up a cheap fake fern I found in a shop around here. I have plenty of it left for future terrain pieces!

This was a nice Sunday project, I started mid-morning and finished in the evening, drying times incuded (helped along by the heat we’ve been having here!). I look forward to playing some games with it and using the pieces as backdrops for forest miniatures!

Wood Elves of Lothlorien and Rivendell

It’s been a while since the last post (almost a month in fact!), the holiday period is definitely a busy time and it took me a while to finish up this latest project: a 500 point wood elf army for the Middle-Earth Strategy Battle Game.

The army is lead by Galadriel on the Lothlorien side and Gildor for the Rivendell contingent. My goal was to cram as many elf bodies in the list as I could while also having access to relatively powerful characters.

Galadriel I’d painted many years ago, so she got a touch up and a rebasing to match the others. Gildor on the other hand is new for this army (one of the rare metal models GW still sells!).

The wood elf plastics are definitely showing their age, as single piece plastics from that time the detail is rather soft, and the single piece restriction leads to some significant filled in undercuts etc. I think they look good at the tabletop level though, if not under close scrutiny, and painted them appropriately (i.e. to tabletop rather than anything else standard).

I tried to stick to the rather desaturated colours you see on the wood elves in the movies while still keeping some variety of colours. The military colours I’ve been collecting for my WW2 models have definitely come in useful here! As you can see most of the areas of the models are 3 stages to keep things nice and quick.

I had some fun with the bases, I wanted to try something else than my previous attempts at forest bases and I really like the outcome, especially when considering how simple this was to do. I took some dry leaves I had ready for basing purposes, and broke them up using a spice grinder. I took the results and mixed in some Woodland Scenics foam flocks and ended up with what you can see in the photo below. Then simply coated the bases in glue and dunked them into the pot of my forest mix. I did seal them in watered down PVA to fix everything properly as an extra precaution. Nice and quick!

I painted these for a tournament that is coming up in February, so for once I have some time to practice games ahead of time! We’ll see how much practice actually happens though.

2021 Recap

2021 marked the first full calendar year for the blog (I started it in September 2020), and coincided with one of my most productive years ever when it comes to model painting, with 326 models finished for the year! It’s the first time I’ve documented a full year’s work so I can’t be sure, but I wouldn’t be surprised if this wasn’t the most models I’ve ever painted in 12 months.

Here’s to another hobby charged year, and I hope you all have a great 2022!