My historical wargaming kick is still going strong (I’ll get back to you Fantasy gaming I promise!), and I’ve put some birthday vouchers to good use, picking up some models I’ve been eyeing off since they were released last year: Warlord Games’ Punic War “epic scale” range.
I you’ve been keeping an eye on this blog for a while you might remember my foray into Republican Romans back in 2021. This was in 28mm scale, which is home for me scale wise (well that and the associated 25, and 32mm scales), but while I enjoyed painting the models I was always troubled by the fact that to get some of the formations in the historical record (e.g. the famed Triplex Acies for the romans, with its triple row of supporting infantry blocks) I would need a lot of space on the game board (not to mention crazy amounts of miniatures!). That took the wind out of my sails for this project and the models have sat unprogressed for a long time. When I saw the Warlord announcement last year I knew this was the way forward, a smaller scale letting me have the number of units to play games with some semblance of the historical formations. This doesn’t solve my unused miniatures problem for my 28mm romans however, and the plan there is to repurpose them for smaller scale games in the Caesarean invasion of Gaul which is something else I’d like to wargame.
Another tricky aspect of the era was finding rules that captured the kind of gaming that I’d like to do for the period. That was resolved when I discovered Midgard last month, the game is fun and simple to play and has some great rules to reward the in depth formations the Roman’s adopted. In fact the author has published some army lists for the Punic wars specifically, making using Midgard for the period very easy.
Armed with some rules and a model range I plunged in and picked up the Roman/Carthaginian/Allied division boxes (and most importantly the elephant set) from Warlord, which gave me more than enough models to play a large game of Midgard.
The models come with bases for Hail Caesar, which aren’t quite right for Midgard where units are more standalone. So I decided to make my own bases, larger than the Hail Caesar bases, and put more models on each. The bases are of an 8cm frontage, 4cm deep for infantry and 5.5cm deep for cavalry. I modelled these and 3d printed them. If you’re interested in the files I put them up on Cults3D as a free download.
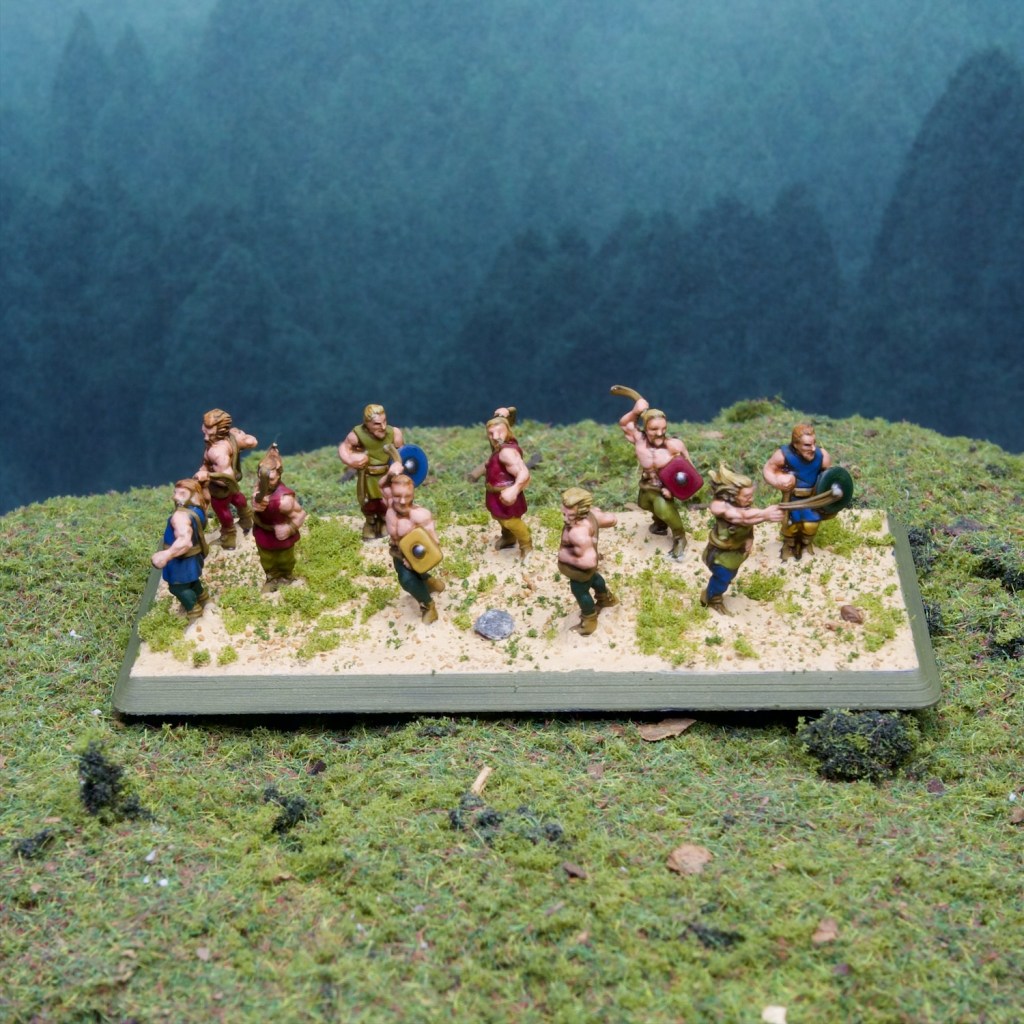
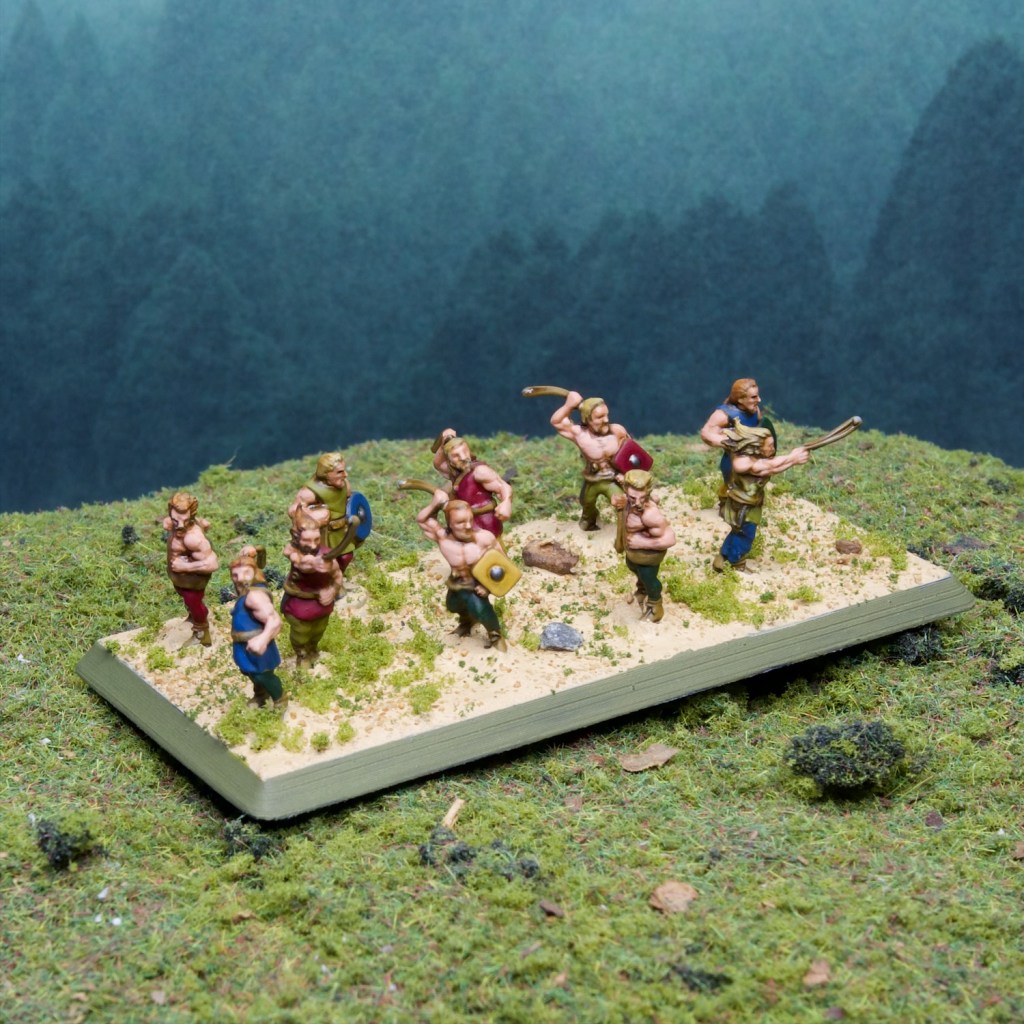
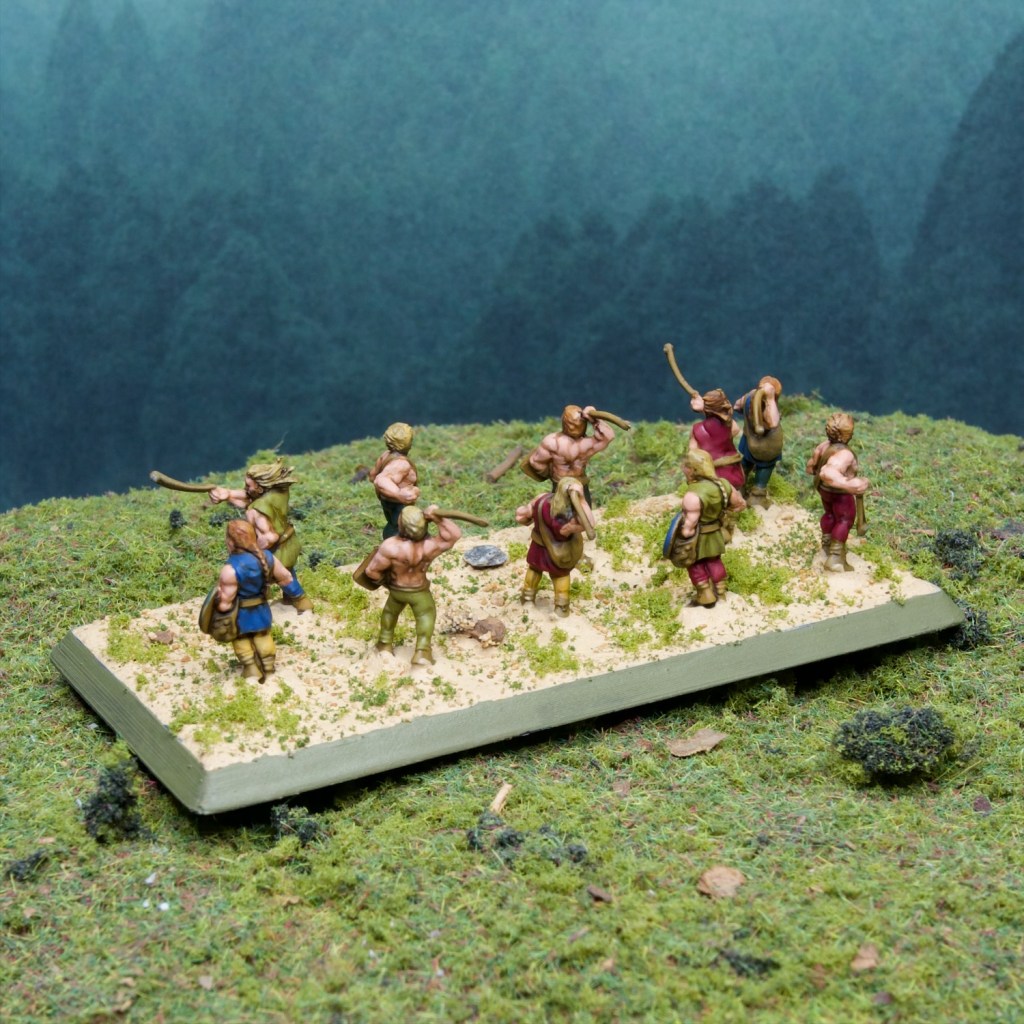
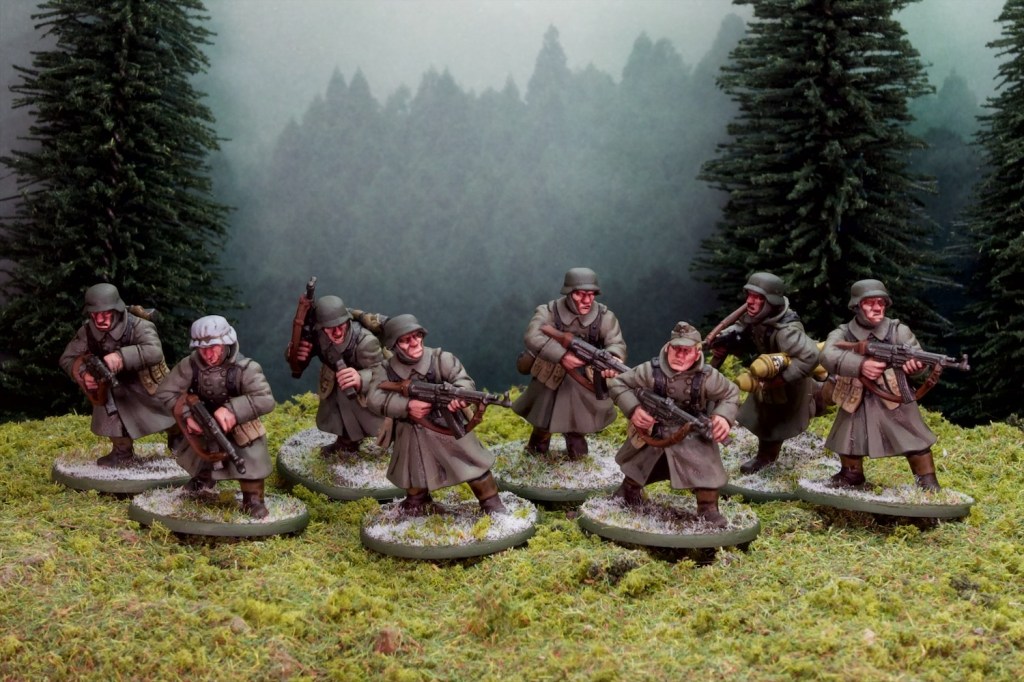
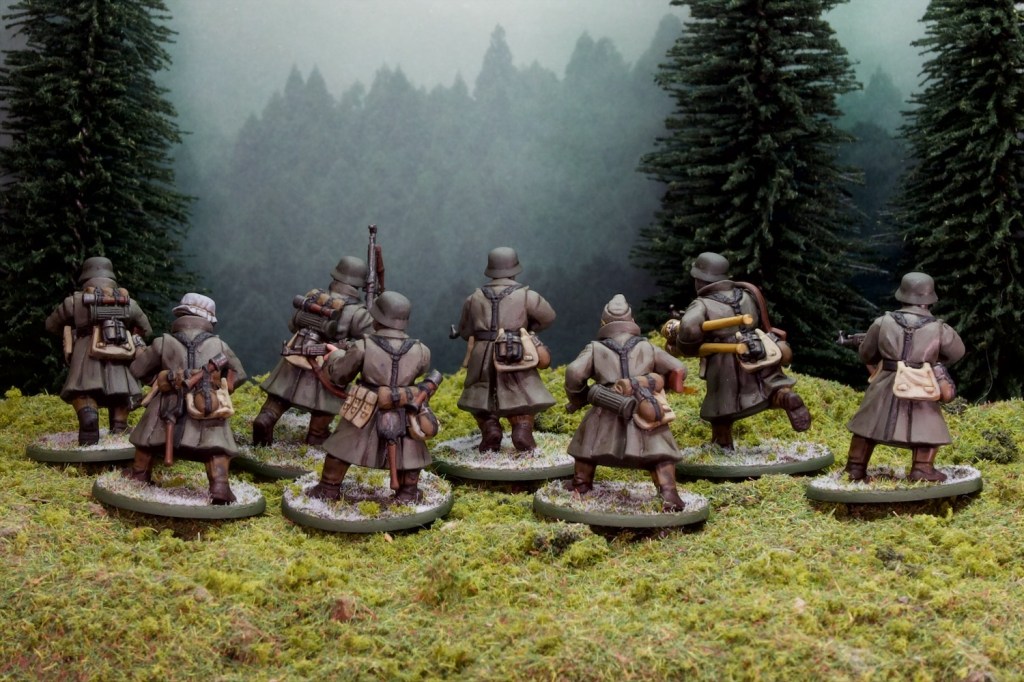
That’s enough context, onto the models! The models are Warlord’s epic scale which seems to be around 14mm so half size from what I’m used to. The detail is really quite good given the size and the models took washes really well which is very helpful. I painted this base of gallic slingers as a test unit to try out a few things: what washes work well at the scale, and what basing scheme I was going to go with. Wash wise, I was worried that my usual go-to Agrax Earthade might be a bit much (too dark/strong) for the scale so I looked for something lighter. I settled on Army Painter’s Soft Tone wash, which I think worked really nicely.
The process I used is as follows: I airbrushed some leather brown all over the models to get a nice brown base to work with, which would work for any leather items (belts, shoes, slings), and let me focus on painting cloth, shields and skin. I then basecoated these areas in nice bright colours (probably inspired by my reading and re-reading of Asterix comics as a kid!), basecoated the skin in AK Beige Red, and gave the models an all over wash of Soft Tone. Once that was dry I gave the skin areas a second wash of Citadel Reikland Fleshshade (somewhat diluted) to get some red into the skin. I then used the basecoat colours to highlight the models back up. The hair was then painted, basecoating it with an off-white, and using GW contrasts for colour (Aggaroth Dunes for the blonde hair, and Gore Grunta Fur for the reddish hair). Nice and quick!
For the basing I wanted to aim for a generic Mediterranean look, which could work for Summery Italy as well as the North African coast. To that end I used and AK texture paint called Sandy Desert, and while it was wet sprinkled on a couple of Woodland Scenics foams and some old GW sand mix I had lying around. The base rim is Vallejo Russian Uniform WW2. Overall I’m happy with the look, it’s probably a bit too deserty for Italy if I’m being honest, but hopefully close enough that suspending disbelief is easy enough!
In what is the final post of my holiday-driven burst of activity we have quite a few trees!
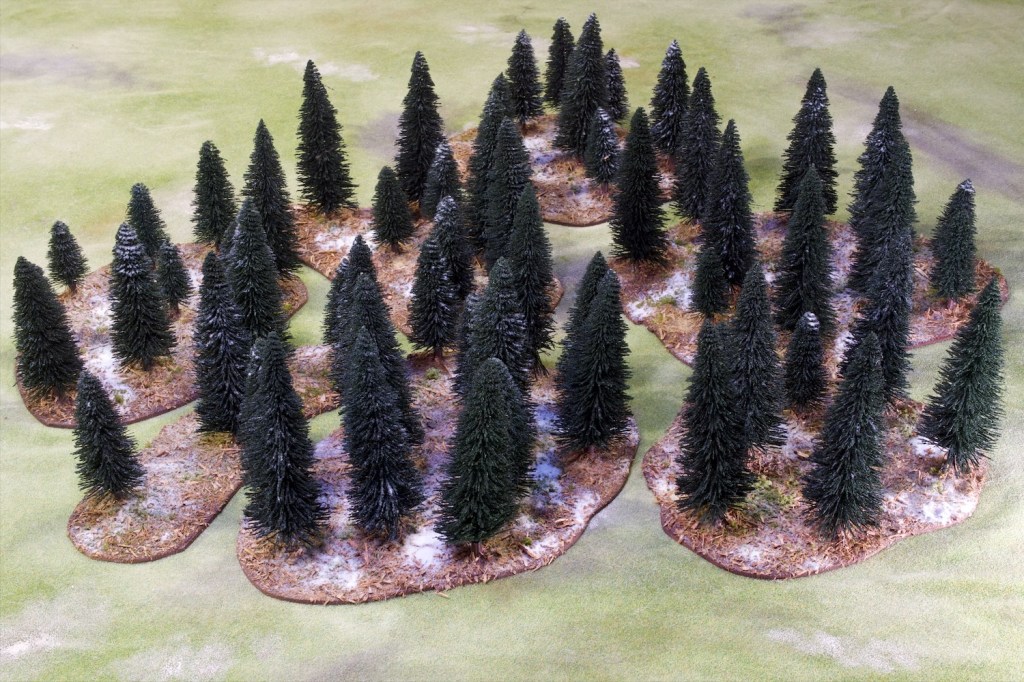
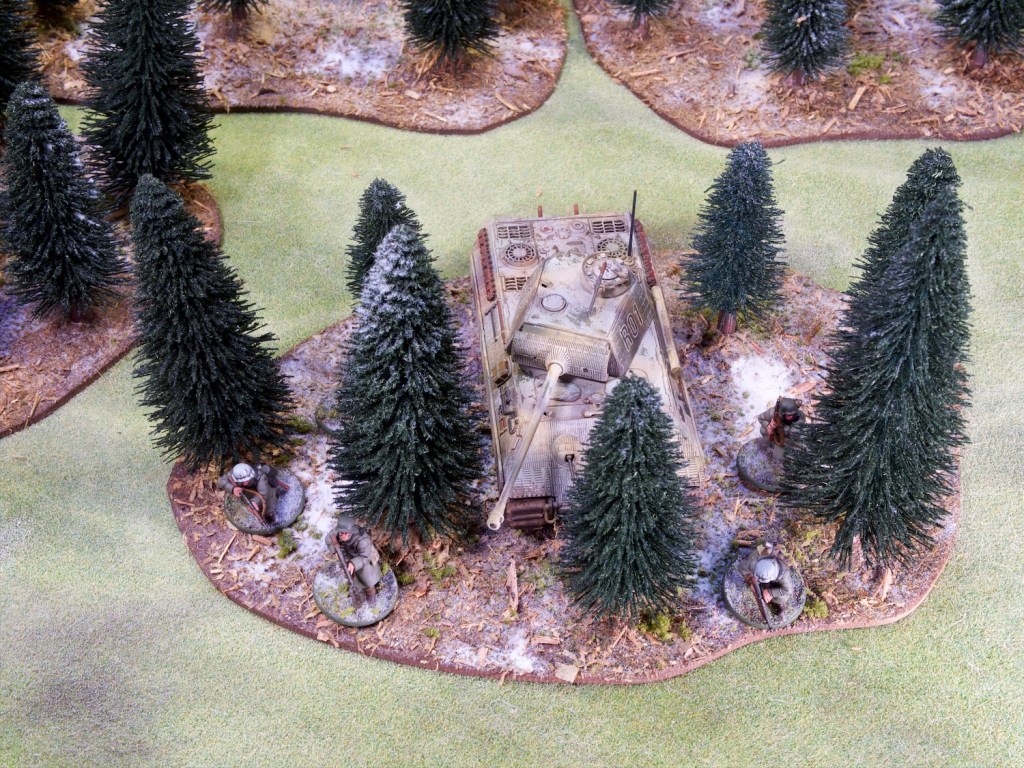
As I’ve mentioned a few times in the last few posts, I’m planning on running a game of Chain of Command for some friends in the coming weeks, and the setting is the Eastern Front, sometime in winter 1944. Having no winter terrain was going to make that a bit difficult, so I decided to paint up a few pieces to populate the table. The main thing I wanted was to have some nice pine forests, so I set about finding some suitable trees.
The trees you see above were cheap ones from Amazon which came in big batches with some variety in sizes which was quite nice. 60 of them cost me just below $60 (Australian dollars that is!) which seemed like a nice rate. They are a basic shaped and flocked bottlebrush style pine trees, nothing fancy but they do the trick. The flock was not glued on great but I knew I was going to spray them with varnish to get some snow on there too so was not too worried. The “trunks” of the trees were bare wire twists so I needed to make some holders for them, to make the trees more realistic and allow them to be removed for gaming and storage purposes.
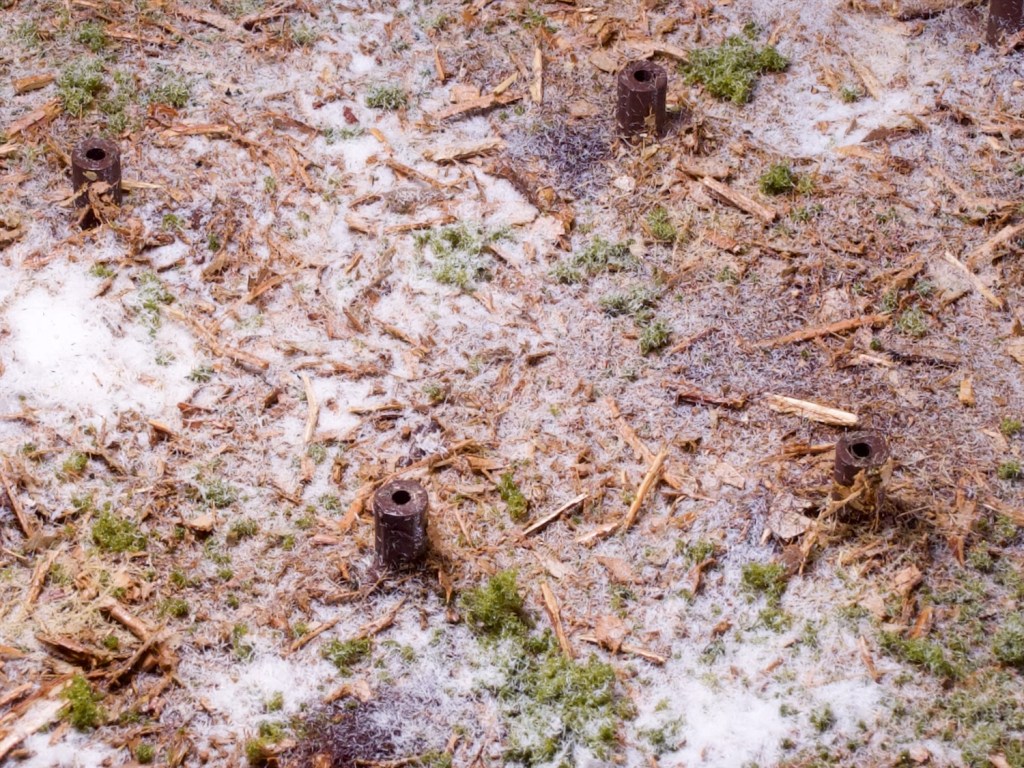
I made a very rough trunk shape in tinkercad and 3D printed the 60 I needed. I then glued them down in a semi-random pattern to some MDF bases I cut out of the back of an old bookshelf (never throw anything away!), and was ready for basing.
I wanted a forest floor look but wanted to stay away from a leafy look as befits a pine forest. As a result while I went my usual route of blending up some leaf litter as I did for these citadel woods and for my endor table I stayed away from soft leaves (european style!) and went for dried eucalyptus leaves which are much harder and blend down to a powder. That mixed with small twigs gave a nice finish that I think does a decent job of impersonating dropped branches and bark at the scale.
To finish the look I added some green foam from woodland scenics to represent small vegetation on the forest floor. I tried adding some dark and some dry static grass to look like dropped needles, but I don’t think they’re very visible. To top it off I sprinkled some snow flock over the trees and bases (over wet hairspray), then sealed the lot with some spray varnish.
Keeping the trees removable is quite practical for gaming purposes, especially for those game systems that treat forests slightly abstractly as an area of terrain rather than individual trees.
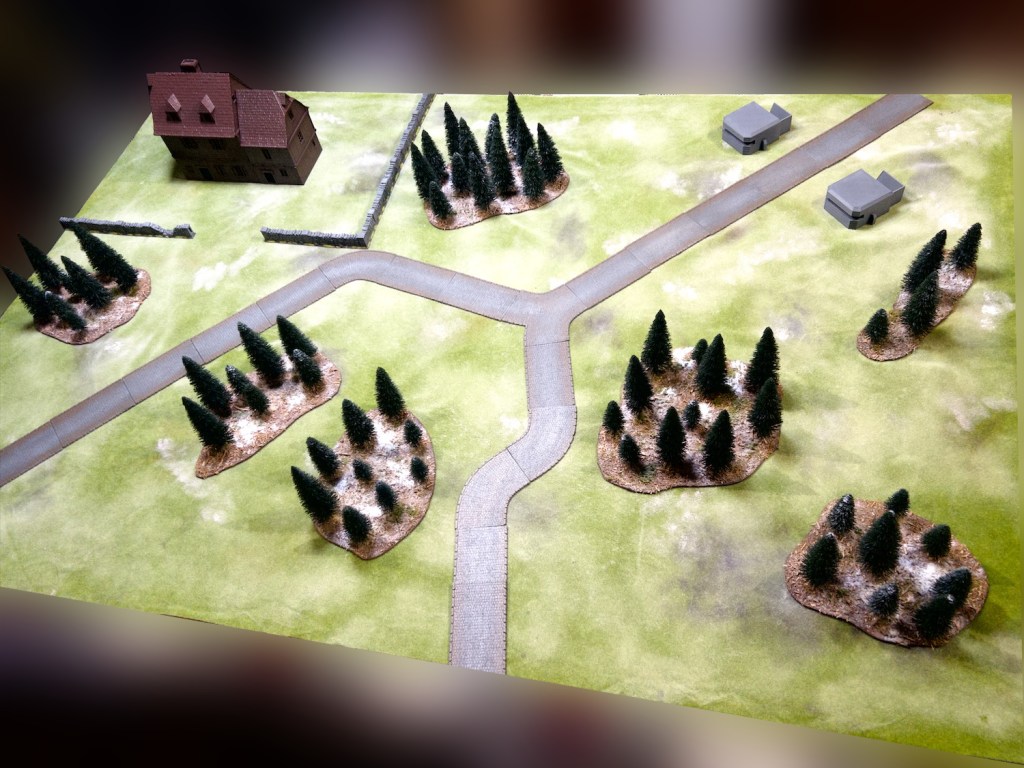
The trees make up most of the terrain I needed ready for this game as you can see from the layout I set up above. You get a sneak preview of the remainder of the terrain which is the large house in the left corner and the two small bunkers to the right.
You also get to see my attempts at repurposing my old Citadel grass mat, which has sat unused for years since I’ve move on to printed neoprene battlemats. It seemed a waste to not use it, so I decided to see if I could convert it for this cold setting. I hit it with patches of brown and white and then “frosted” it with a light pass of white spray paint to get that frozen grass look.
I wanted the table to have a frosty morning with some light snow look rather than a full on snow storm, hence the light use of snow flock on the forests and the light dusting of white on the mat. I’m hoping to communicate the cold through the mat and the tree stands only, allowing me to place terrain pieces I painted for my other settings over it and having them not look out of place. For example I’m planning on using the cobblestone road I painted for my Normandy games in this game as you can see above.
I hope you like the look of these, and I’ll be likely back onto my slower pace of posts as I head back to work next week!
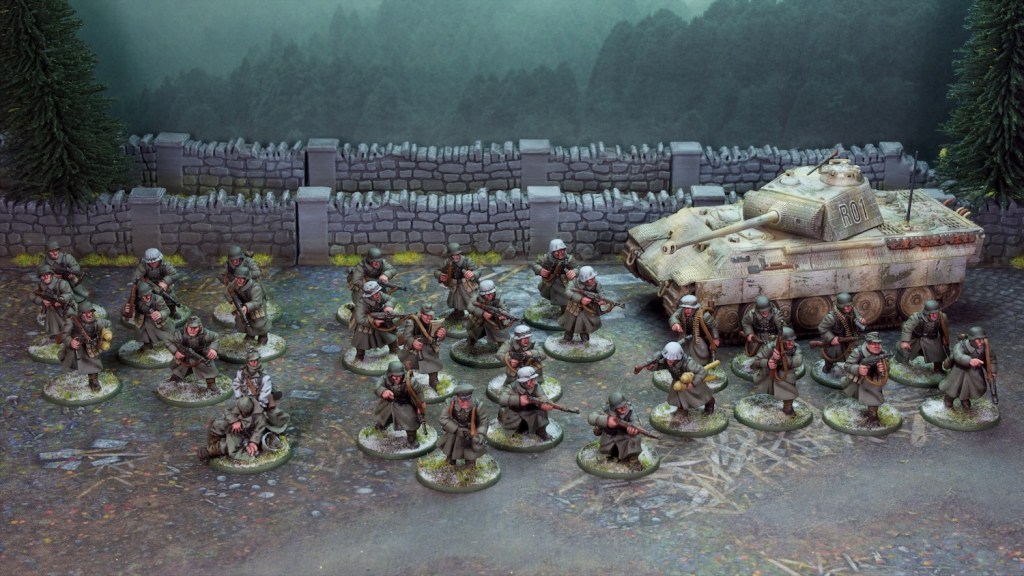
I’ve had some leave this week and have put it to good use by painting lots of models! I’ve now finished painting my Volksgrenadier platoon for Chain of Command (you saw the first section last post), as well as some extra firepower in the form of a Panther tank.
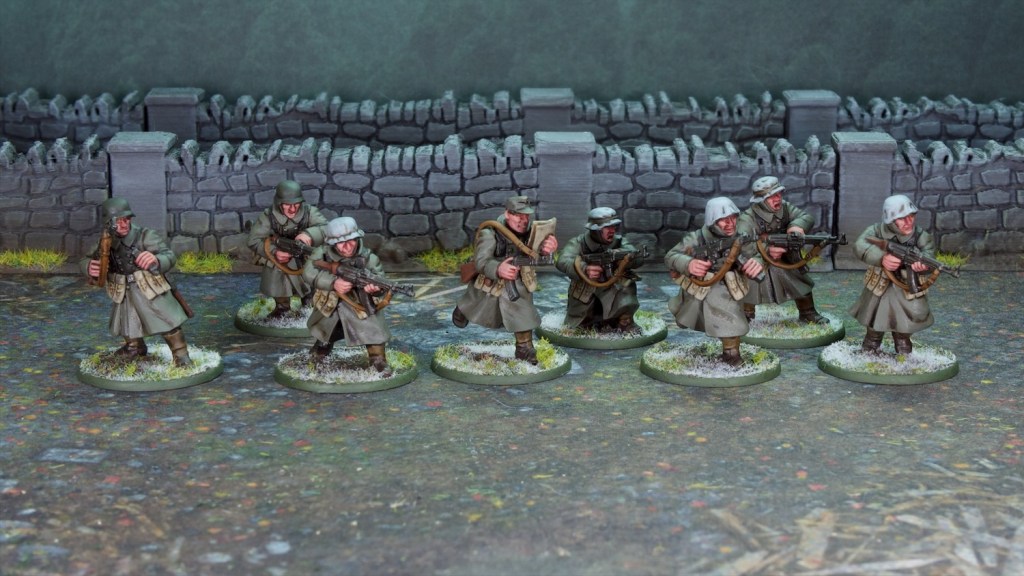
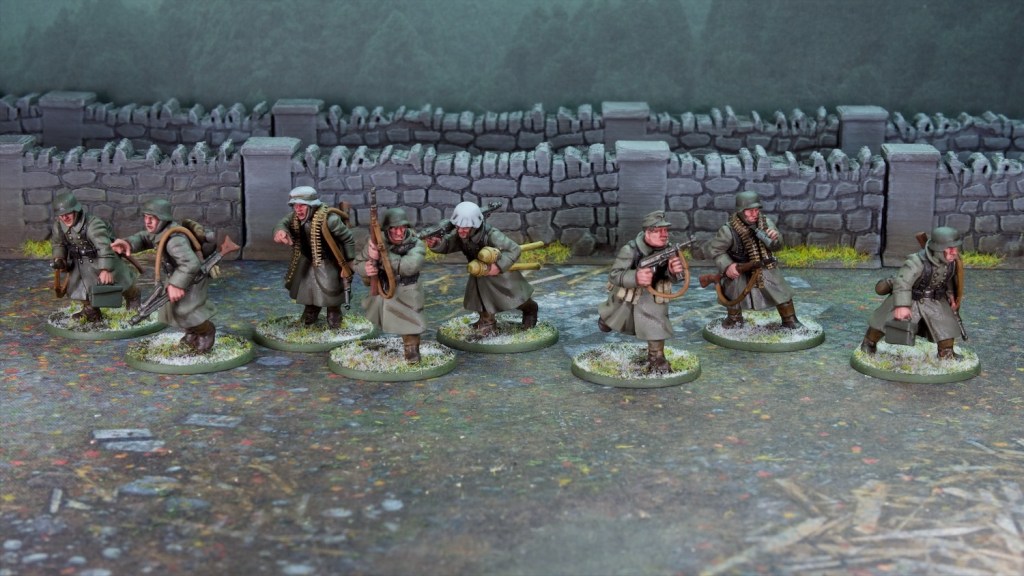
The platoon is made up of a command section, two assault sections (armed with STG44 assault rifles), and an LMG section (split into two LMG teams).
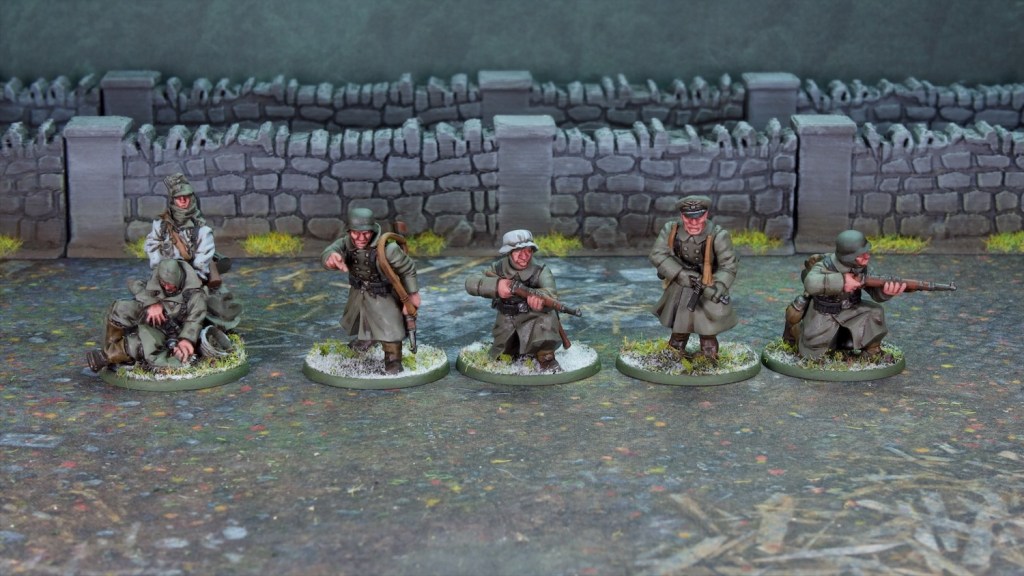
The command section, with an officer and four riflemen. I also painted up a medic model I had in cold weather gear, he’s not part of the command section but can be selected as a support in game.The second assault section. You might have seen the first one last post.The LMG section. In game this operates as two teams, one for each LMG.
I described the painting method for the infantry last post so I won’t repeat it here. The process is very quick, and this was a good test for it. I batch painted all three new sections (and the medic) at once (21 models all up), painting each colour on each model in a row. I got them to the wash stage in a few hours on Sunday, and did all the highlights on Monday. Not a bad rate I think! They’re certainly not my finest work, but they look effective on the table which is always the primary purpose for army models.
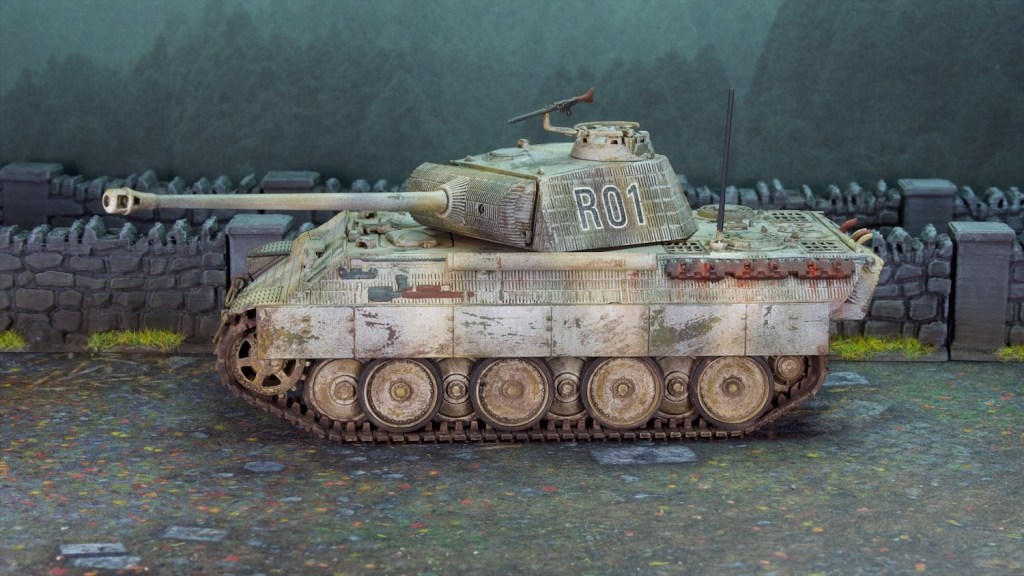
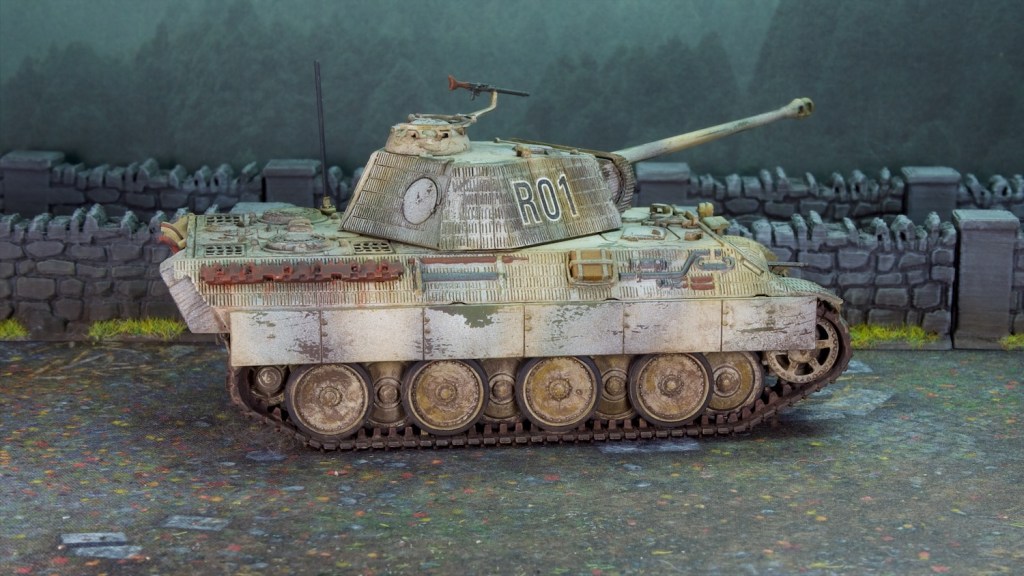
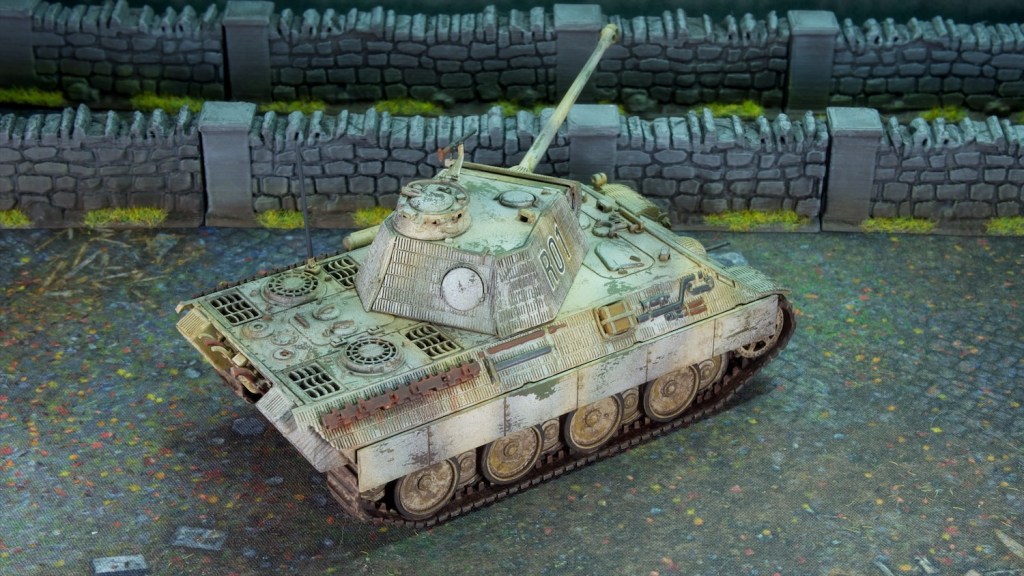
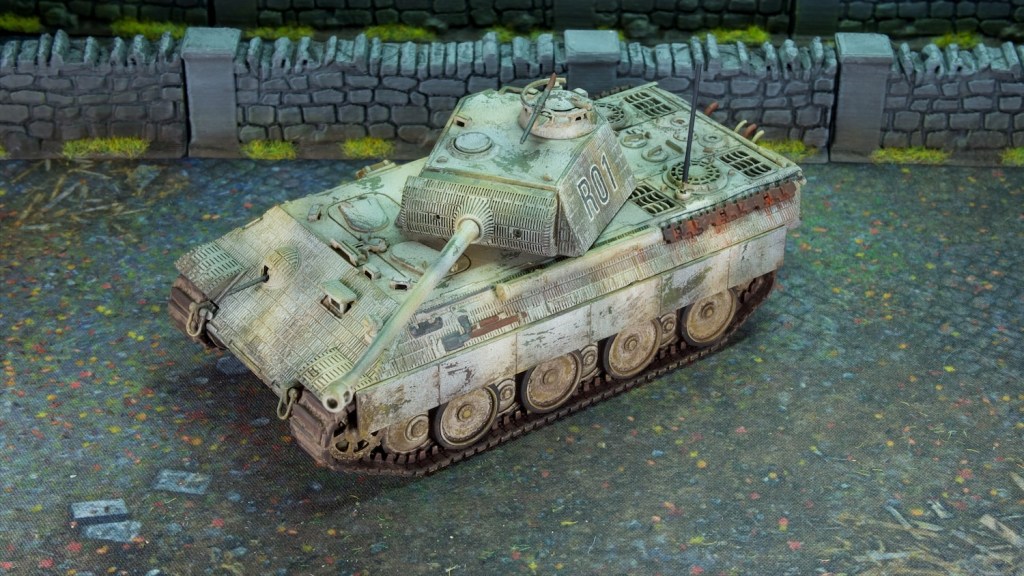
Onto the tank! This is a Warlord Games/Italeri plastic kit, and as with all the ones of these I have put together over the years it is a relatively simple build, if a bit light on detail (for example the tools on the side are basically flat). These are meant to be gaming pieces over display models however, and they paint up nicely.
I decided to go for a winter scheme on the tank, and tried my hand at a white wash look. To achieve this I painted the normal late war German camo pattern (yellow base with dark red/brown and dark green patterns – you can see it under the somewhat transparent white), then followed that up with a coat of hairspray on which I lightly airbrushed some white.
If you’re not familiar with the old hairspray method you may be wondering what that’s all about. Effectively, the hairspray allows for some great chipping patterns by providing a water soluble layer under the coat of paint in need of chipping (the white paint in my case). This paint can then be rubbed away by using a wet brush (ideally with somewhat stiff bristles, a drybrush is great for this). The water disolves the hairspray under the paint, which causes the paint to drop off in nice patterns. The tank needs a good coat of varnish after that so that the unstable layer gets locked away an no more paint rubs off.
I then finished the model with the usual oil washes, with a mix of browns and dark grey colours. I also added spots of rust (also using oils) which I streaked downwards, mostly from the spare tracks. I then finished the tracks using pigments. This is a new thing for me, I usually douse tracks in mud but in this case I figured if the ground is frozen there would not be any mud around!
I now have all the models I need for a game of Chain of Command I’m planning on running for some friends soon. What’s missing now (and you may have noticed from the photos!) is some appropriate cold weather terrain. Next up on the painting table will be said terrain, I have most of what I need now, it’s just a matter of painting it.
As the title suggested, I’ve been busy the last couple of weeks, with some painting and some gaming to discuss in this latest post.
The Gaming!
I have a regular games night with some friends which is usually spent playing role-playing games or board games. The last few of these we had to change the program as a couple of us couldn’t make it, and we decided to get some wargaming in.
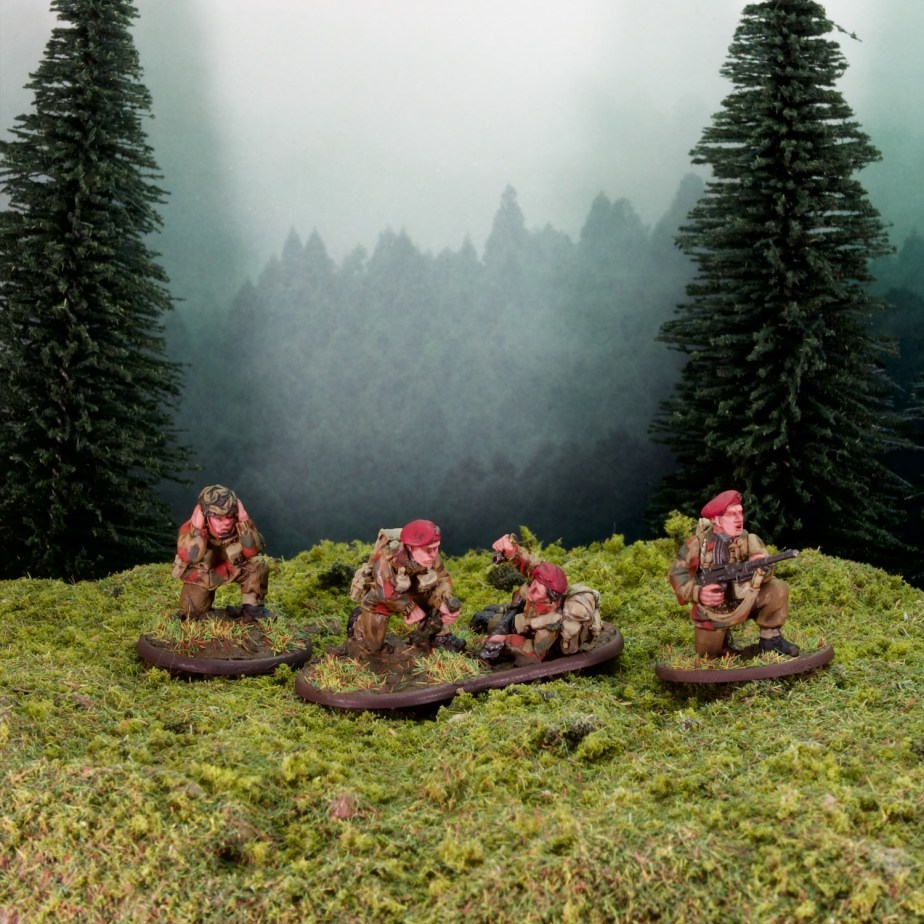
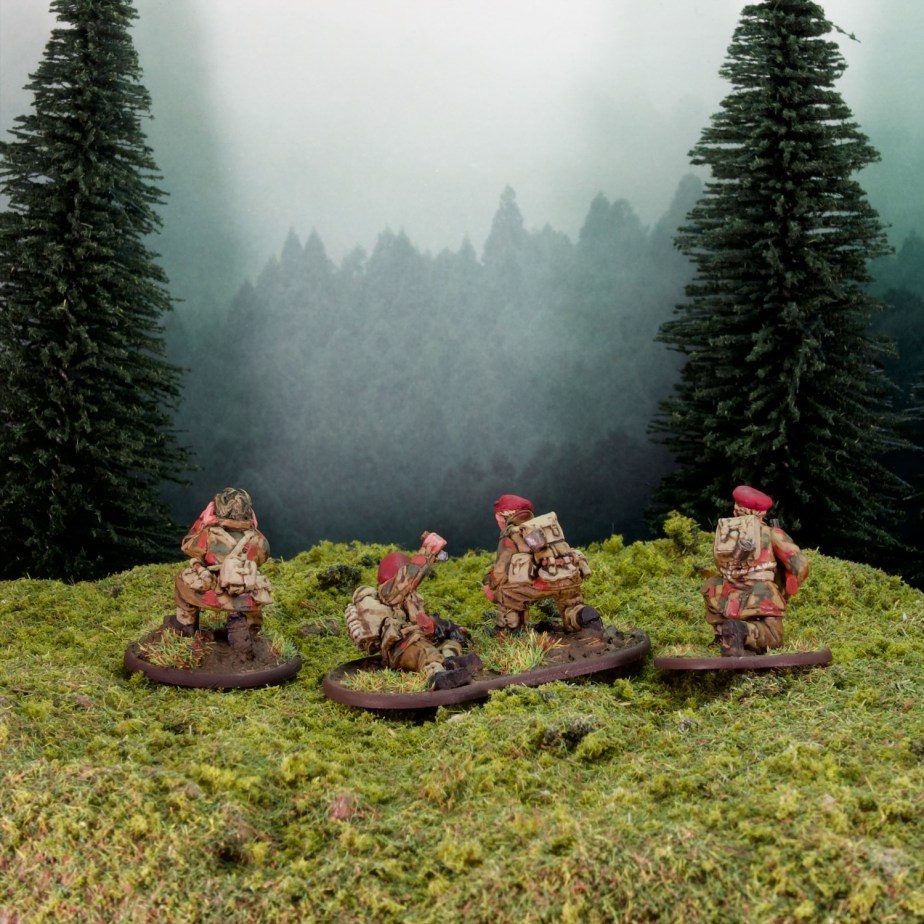
For the first one of these I introduced the group to Silver Bayonet and we played through the fourth solo mission of the main rulebook with my British warband.
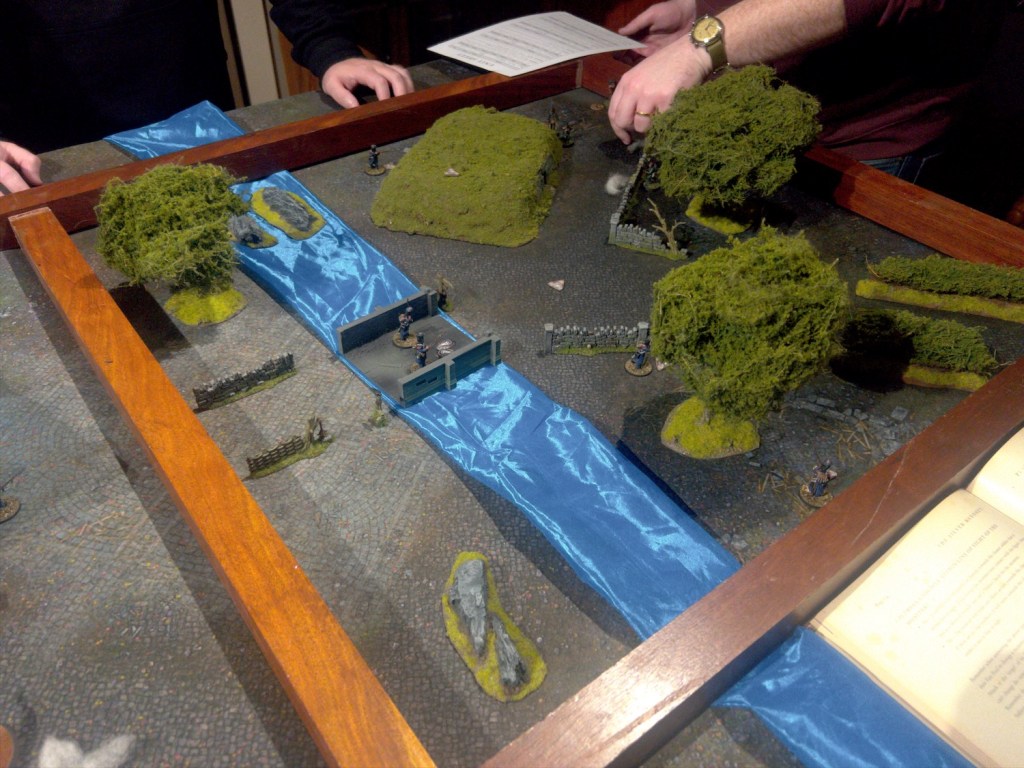
The scenario had the unit attempt to leave the wilderness after its encounters there in the past few missions, but finding their way home cut off by some bandits (role played by the French Imperial Guard unit I painted a few years back). I didn’t take very many photos as I was too busy running the game unfortunately, so no battle report for this mission. Playing the game was very last minute so I had to improvise some of the terrain as you can see in the photo above, with the river being represented by some shiny blue cloth, and the bridge is a section of a ruined church I used for WW2 games!
The game went very well, the two players were running the unit together while I was telling them the rules and taking the monster actions. They were much more aggressive than I usually play, but it paid off and they cleared the mission relatively easily. Both of them really enjoyed the game so that’s always a plus!
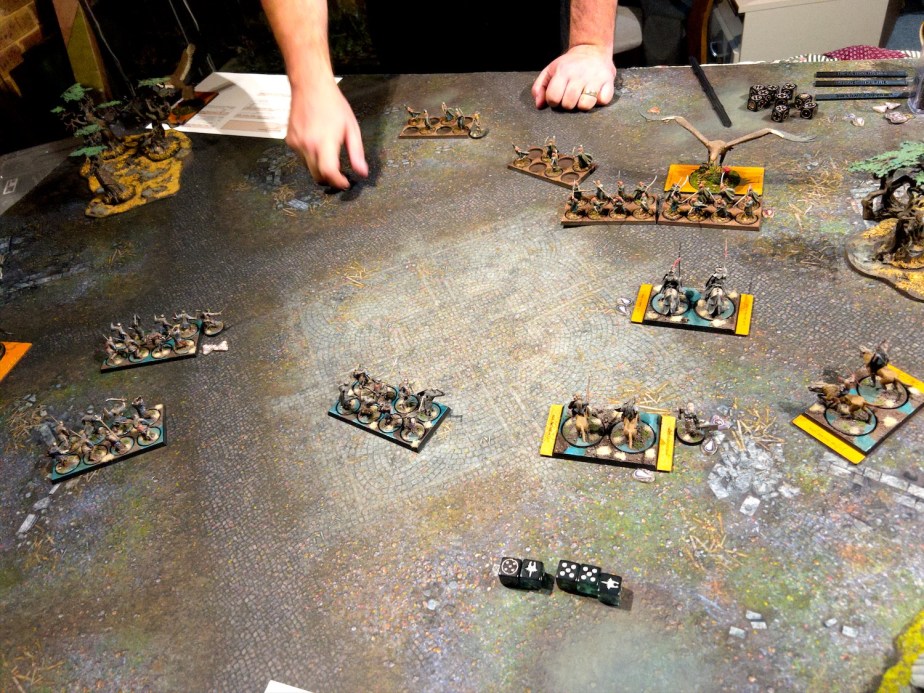
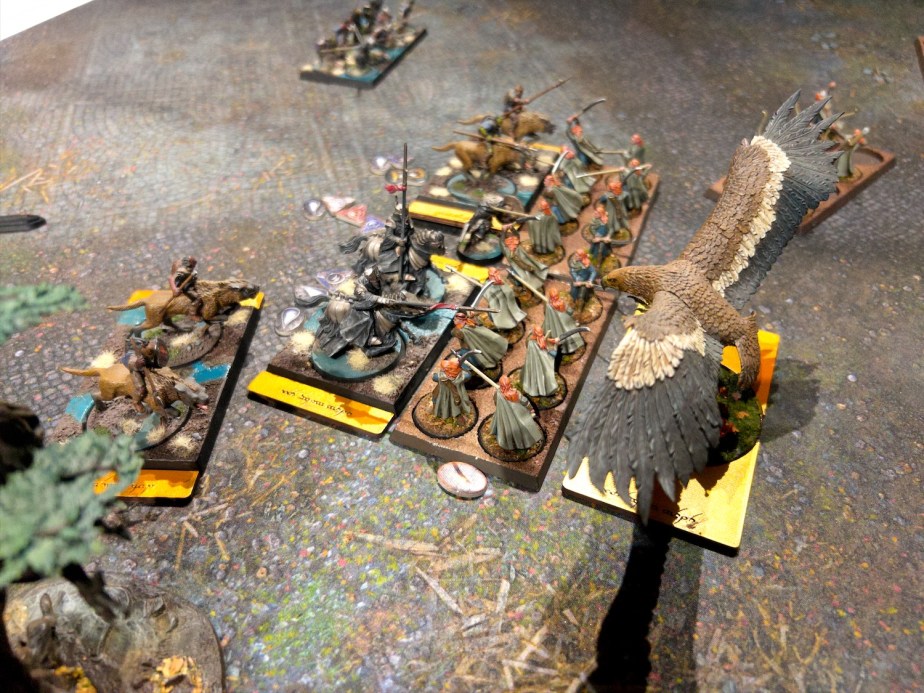
On the second week we decided to try out a new (to us!) ruleset for fantasy/historical battles: Midgard. Midgard is a game by James Morris (check out his blog, it’s very cool https://mogsymakes.net/blog/) which came out last year and covers quite a lot of ground. At its core, it’s a system for covering historical (and fantastical) battles where the heroic actions of army leaders can carry the day. This is suitable for covering periods all the way from antiquity to mid to late middle ages when commanders started running battles from a bit further back than the front lines. Midgard also caters for more mythological/fantastical battles, with rule for monsters and magic thrown in. I’ll be talking a lot more about Midgard in the future as it ticks a lot of boxes for me.
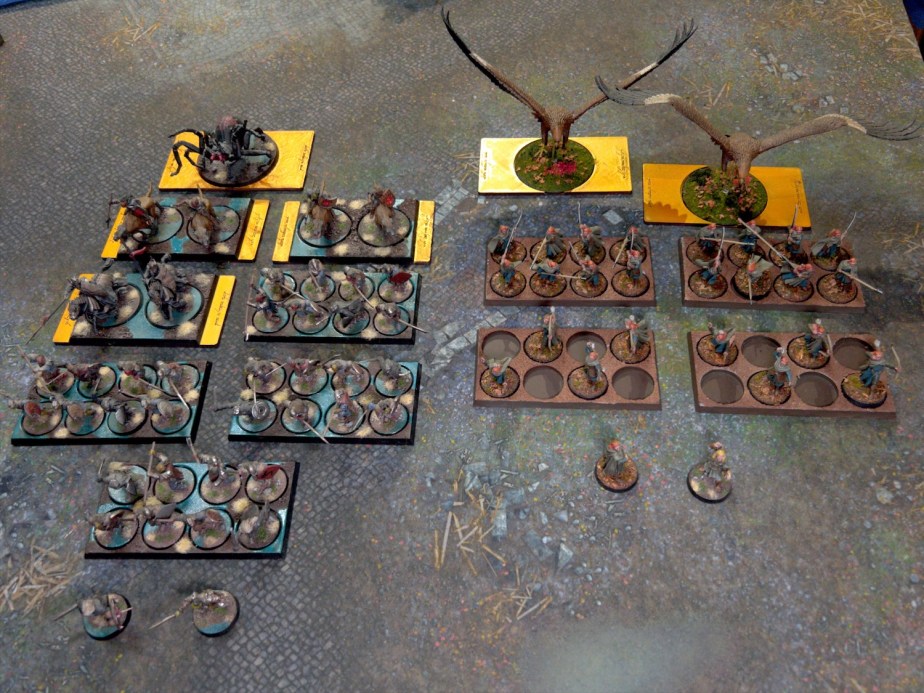
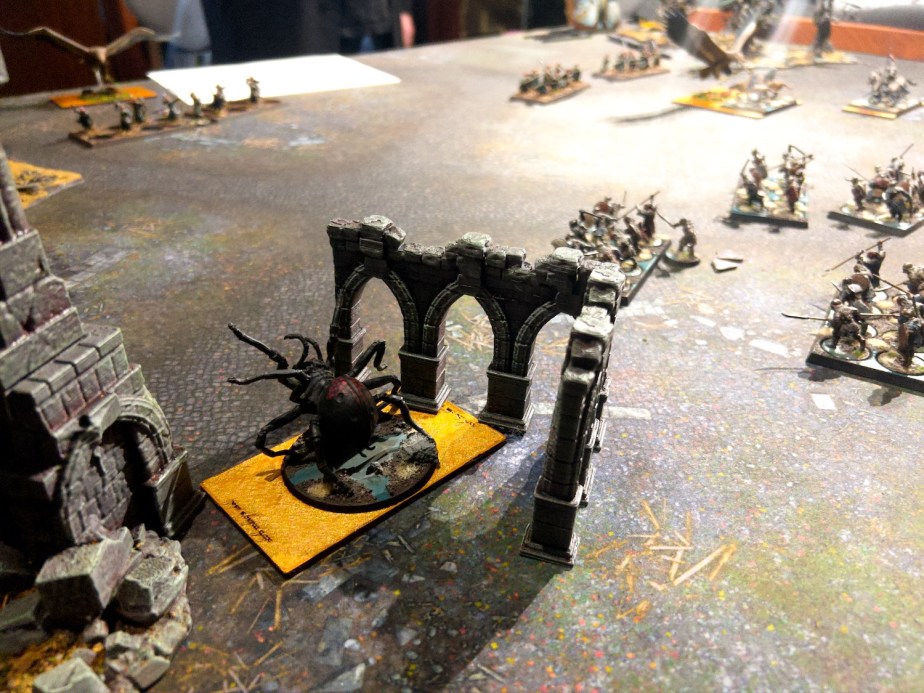
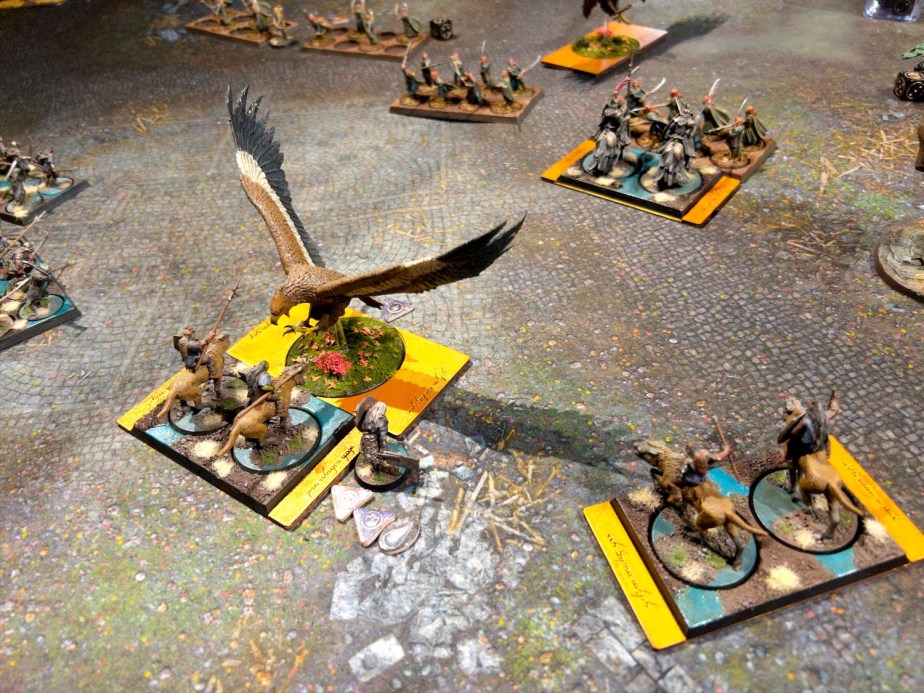
We decided to play the game with some Lord of the Rings armies, and I dusted off two of mine: my Cirith Ungol force, led by Shagrat and Gorbag to rival orc captains, and an amalgamation of Elves led by Legolas and Gildor Inglorion.
If you’re familiar with Games Workshop’s efforts in the Lord of the Rings space, you might recognise the trays they produced for the War of the Ring mass battle version of the game. As Midgard also uses trays they seemed like a great starting point. Midgard however requires all the unit base sizes to have the same frontage so I 3D designed and printed some adapters for the cavalry trays (which are narrower than the infantry trays) and for the monsters (who never had trays in the first place). As I did these adapters the day of the game I needed to go fast and decided to make them simple and to include a little joke – the elven script reads “One tray to adapt them all“.
The game was great fun even for a learning game, and everyone was very impressed with the rules. They are easy to pick up and the system puts pressure on heroes to go out and perform heroic acts in a way that leads to some excellent moments. I look forward to playing much more of the game.
The Painting
My painting table has had some form of WW2 models on it for quite a while now, as the build up of forces to get ready to play games of Chain of Command continues.
First up some British Paratroopers, with a Bren gunner and a 2-inch mortar team to bring my 6th Airborne up to strength.
Secondly we have the first unit of a new army (don’t I already have too many WW2 projects on the go? Yes, probably).
The models are from Warlord Games’ German Infantry (Winter) set, that I’ve built up as Volksgrenadiers for use in late war games on the Eastern Front or the Ardennes. I have a full platoon of these to paint for a game I’m planning soon, so this is just the tip of the iceberg.
Painting-wise, these were quite straightforward as the greatcoats really simplify the models. I started with an all over airbrush of Fieldgrey, then got painting in the details. The process is my usual easy army painting one, with basecoat, wash, then highlight back up with the basecoat colour. The exception is the skin which uses a second highlight colour.
The colours are as follows:
Washed with Citadel Agrax Earthshade and highlighted with basecolour
Coats/uniforms – VMC German Fieldgrey WWII
Wood/leather – VMC Flat Brown
Waterbottle/blankets – VMC German Camo Medium Brown
Bags/Pouches – VMC German Camo Beige WWII
Helmets/Gas Mask Boxes – VMC German Camo Dark Green
Panzerfausts – Vallejo Surface Primer German Dark Yellow
Cloth Helmet Cover – VGC Heavy Bluegrey
Washed with Citadel Agrax Earthshade – no highlights
Guns – VGA Gunmetal
Other metallic objects – S75 Black Metal
Webbing – VMC Black
Boots bottom – VMC Dark Rust
Boots top – VMC German Camo Medium Brown
Skin
Basecoat – Pro Acryl Shadow Flesh
Wash – Citadel Reikland Fleshshade
Highlight 1 – Pro Acryl Shadow Flesh
Highlight 2 – 50/50 Pro Acryl Shadow Flesh/AK Beige Red
Pick out the nose – Citadel Carroburg Crimson
Bases
Texture paint – AK Muddy Ground
Flock – some mix of foams and static grass I made ages ago
Snow flock – Citadel Snow
Rim – S75 Ardennes Green (Seemed appropriate!)
This scheme is very quick, I just lay down the basecoats (including the skin), then wash the whole model (Agrax for everything apart from the skin, Reikland Fleshade for the skin – doesn’t matter if they bleed a bit into each other), then highlight.
I’m happy with the way they look, the basing works well for me as I didn’t want to go full snow but rather light snow/frost. I’m also happy with the speed at which I can paint them, these were done in an afternoon/evening with some distractions.
Anyhow this was a rather long post, but I hope it was enjoyable!
I’ve had a rather unplanned dip back into WW2 wargaming these last few weeks, and it’s resulted in quite a bit of model painting and building. This all started when I read Cryptonomicon by Neal Stephenson, one of those books I’d always meant to read, which sets half of its action in the WW2 years. This made me look into the new edition of Bolt Action which had been released since I last dipped my toes in the period, and also look into the other much talked about game for the era which is Chain of Command. Turns out Chain of Command had also just released its second edition, and having seen the game played on youtube in the past I was sufficiently interested to pick up a PDF of the rules from the publisher and start reading.
After reading the rules, I decided I really liked the look of Chain of Command (CoC) and I wanted to play it. Now CoC bases its armies on historical formations rather than the more Warhammer-like unit customisation Bolt Action offers. In Bolt Action, squads/sections have a minimum size, and extra models and special weapons are purchased to fill them out. The job of the list builder is to build a army that is functional and fits into the points limit. This often means under strength sections, as extra models get shaved off to upgrade another section to get an extra LMG etc. In CoC the platoon you select is as per historical records and there is little to no customisation available, so sections are full-strength, special weapons are as per historical kit out etc. This meant my Bolt Action armies were not quite playable in CoC and required a few more models to be painted to get there.
I started working on getting two of my armies up to scratch: my 2ème DB (i.e. my Free French Armoured Division), which needed (and still needs I’m not quite done!) quite a few more models to bring it up to a full strength Armoured Infantry Platoon, and my late war Germans who only needed a handful of models to make them into a Panzergrenadier platoon. I’m planning on making my North Africa forces CoC compliant but that requires a fair bit more work as they’re much smaller for now.
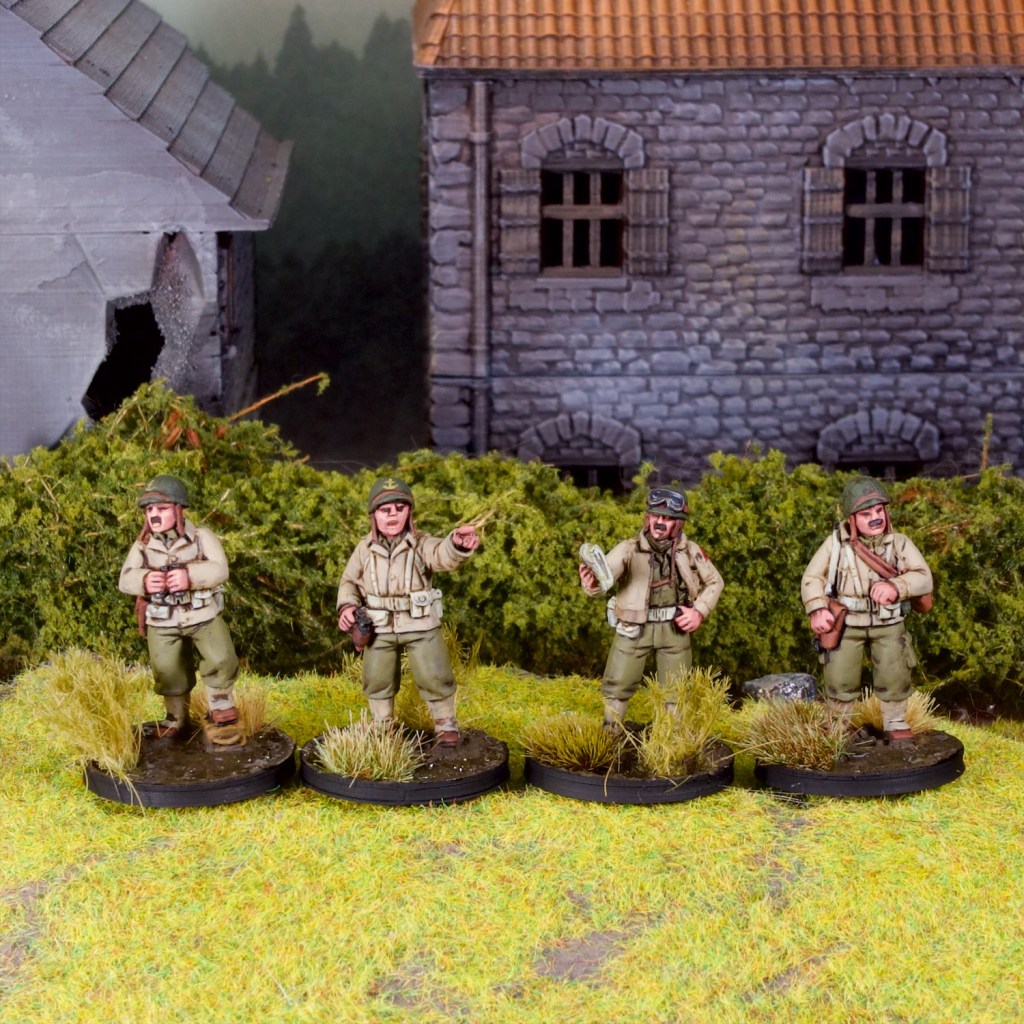
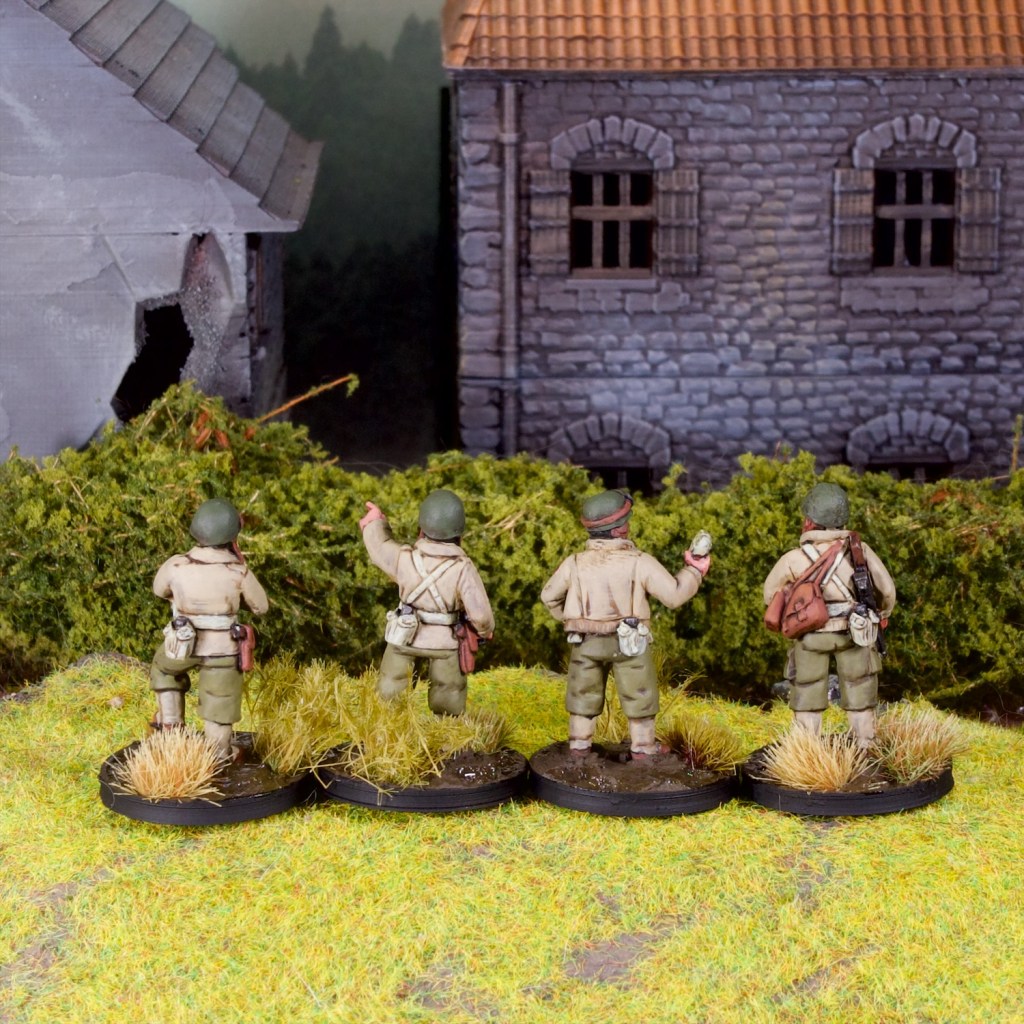
First up, my Free French needed a lot more officers (very important in CoC), so I picked up the Warlord Games US Army Platoon Commanders set which has the four models you see above, cast in their “Warlord Resin”. The models were all one piece and quite easy to clean up. The detail on them was quite nice and they were easy to paint (in my usual slightly speedy manner employed for historical models).
I also added a Browning .30cal team, also from Warlord (this one a metal set), and I also painted the remaining crew member of the Perry Miniatures mortar team I painted as part of my first batch of models for the army all the way back in 2022! Bolt Action tends to default to 3 crew for a lot of weapons (presumably for game balance), while CoC sticks to historical numbers, so the mortar should have 5 crew all up – which means I still need to make another crew at some stage!
I still need a few more models to get the army game ready, namely some regular infantry as well as a second Browning team. I’ll work on them soon so I can play a game!
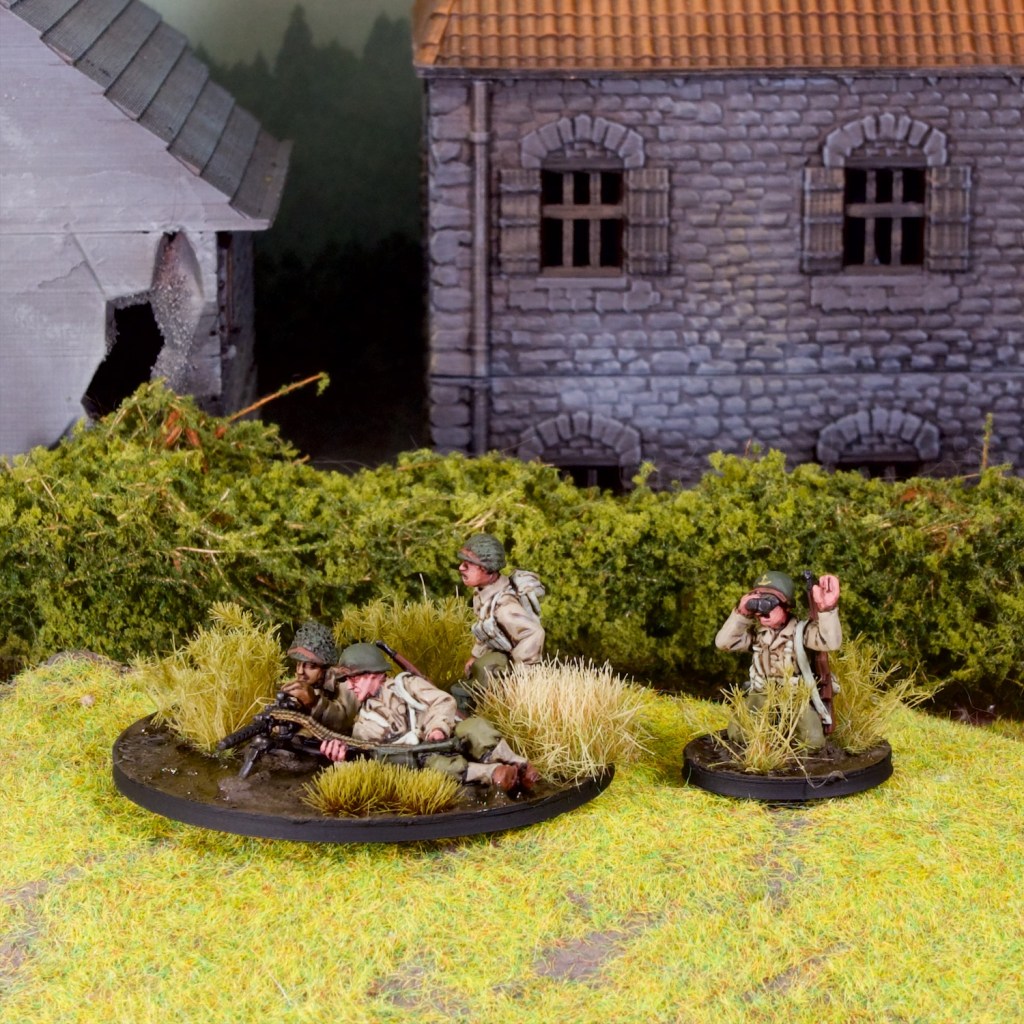
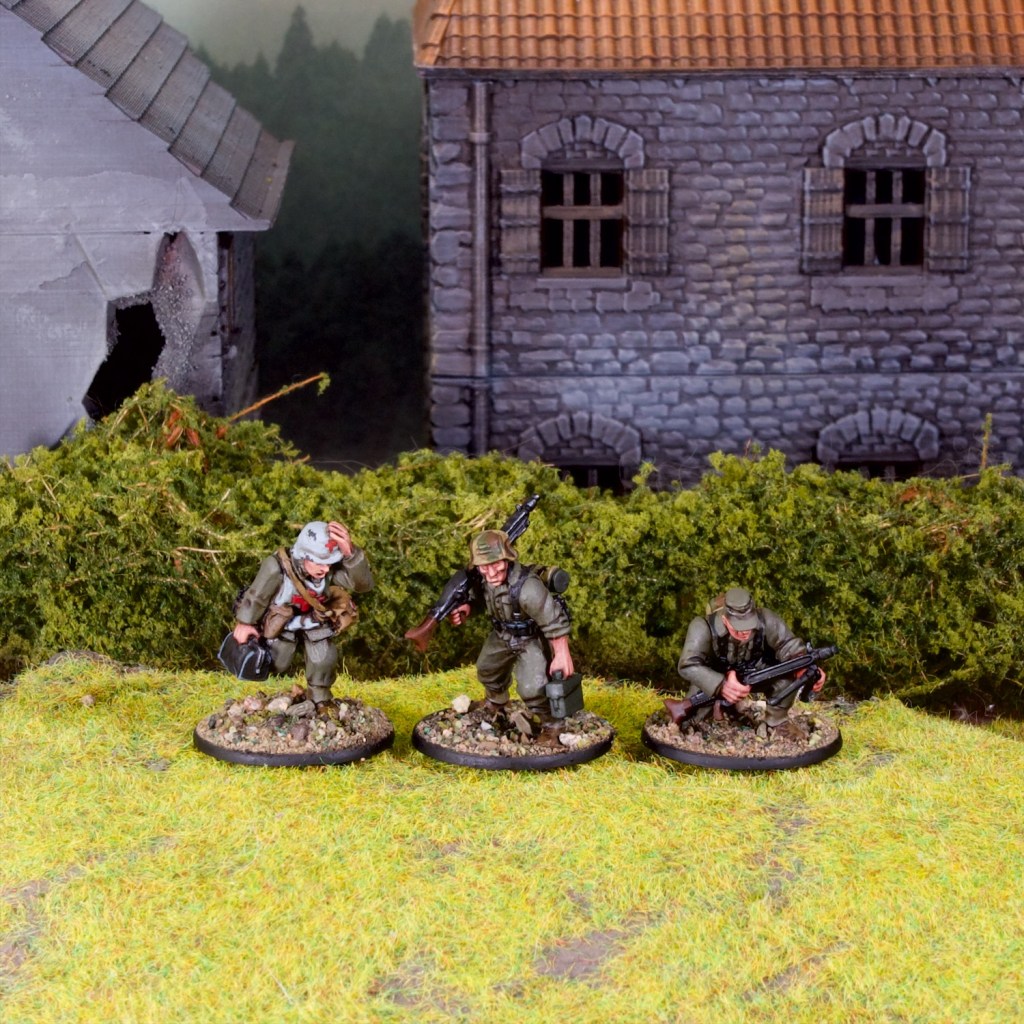
As mentioned above I also painted a few more Germans to make that army ready to play, which meant painting two more MG42 gunners. I also painted up a medic model I had, this one not required by the game but is an available support option and I liked the model!
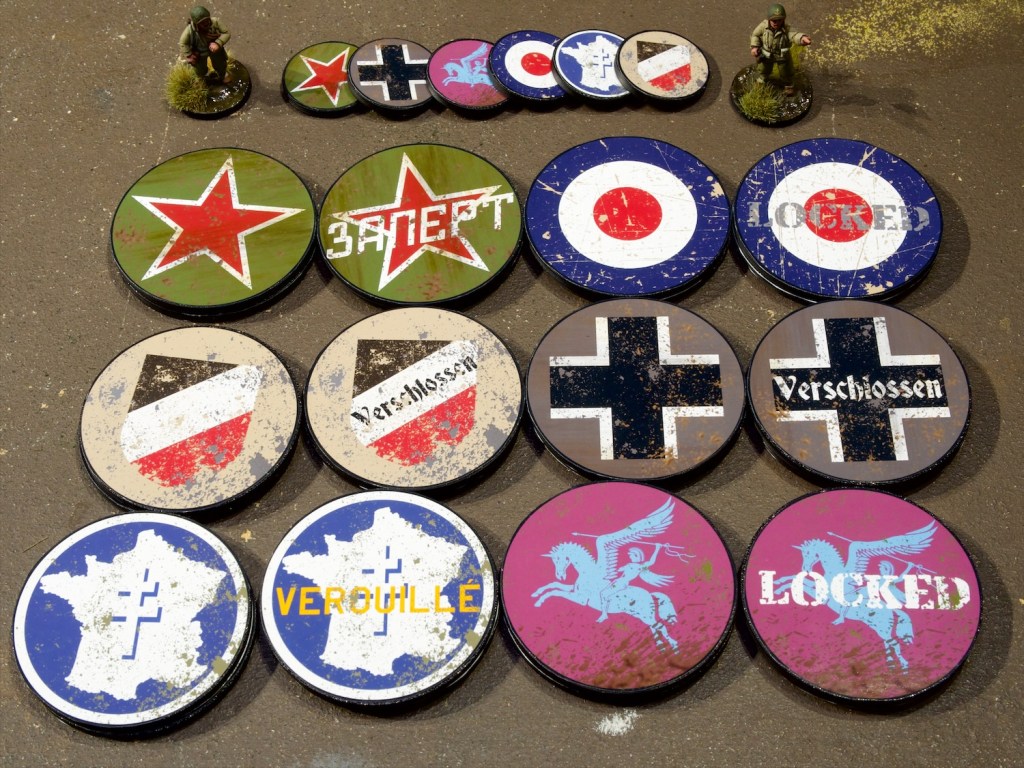
Finally, CoC is a pretty token intensive game, and I’ve been in a token-making mood recently (I made a whole batch of custom tokens for Netrunner recently and that kicked off something in me!) so I started making tokens for the game. Most of those aren’t ready to show so I’ll leave them for another post, but what I do have ready is what are called Patrol Markers and Jump-off Points in the game. These are used for a pre-game mini-game that determines the starting positions of both armies.
The patrol markers tend to be bigger (I went for 60mm diameter) and the jump-off points smaller (I went for 30mm). The patrol markers need to be able to be marked as locked so I made them double-sided with a locked side and an unlocked side. The translations are all mine so hopefully they’re right (I’m confident about the French one at least!).
These are made by 3D printing simple discs and (2D!) printing the designs on some self-adhesive photo paper. I made the designs in Affinity Designer (an Adobe Illustrator alternative that I heartily recommend). The only parts I didn’t make are the map of France (SVG from https://simplemaps.com/svg/country/fr) and the Airborne (From Wikimedia commons https://commons.wikimedia.org/wiki/File:British_Airborne_Units.svg). I made a set for all of my armies as I was enjoying myself quite a bit making these. Left to to right, top to bottom: Soviets (I don’t have any of these but my regular opponent does!), 8th Army, Afrika Korps, Germany, 2ème DB, British Airborne.
I look forward to giving the game a go, it looks like a really nice way to play the period. I’ve organised to have my interested in WW2 friends to come over for a game in the next month or so, so I’ll be doing some preparations for that until then. I’ll most likely be playing a practice game by myself beforehand to get across the rules properly so might turn that into a battle report for the blog.
My foray through the Silver Bayonet solo campaign continues and in this mission my hapless British unit tries to have a good night’s sleep after their close call in the ruined chapel. As all good horror fans know however, sleeping in the woods is asking for trouble and trouble indeed finds the sleepers!
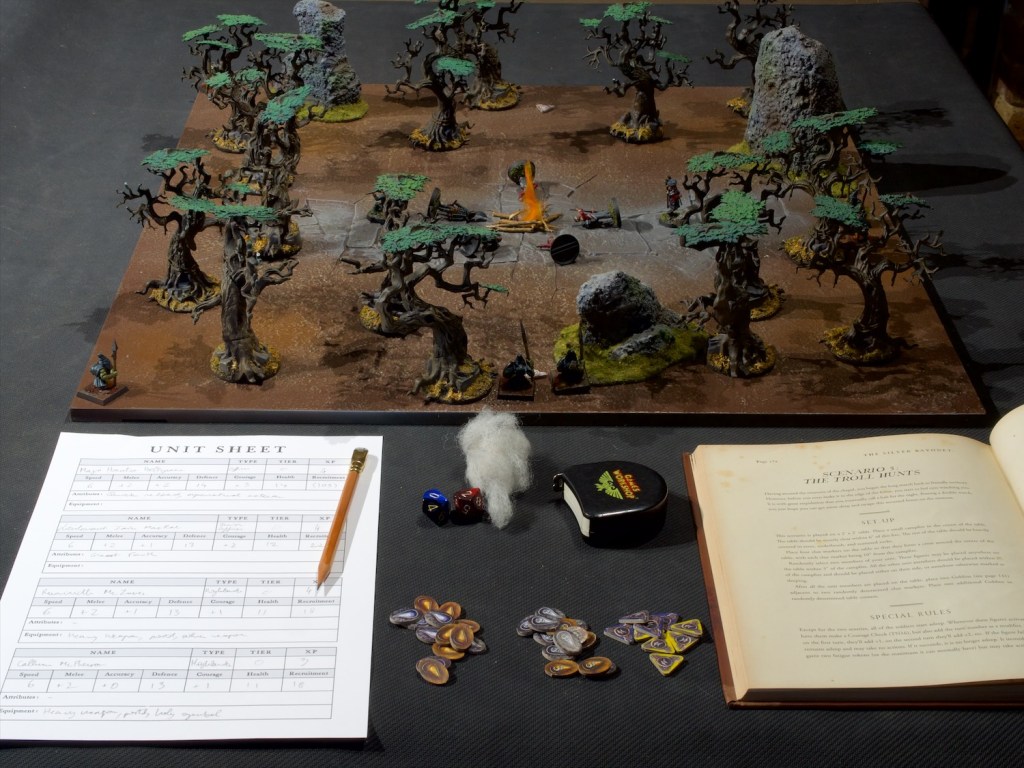
This mission is played on a 2’x2′ table, and rather than marking off an area of my 6’x4′ mat as I’ve done for the last two games, I decided to break out a panel from my Citadel realm of battle board which doesn’t see much use these days (neoprene mats are just so convenient!).
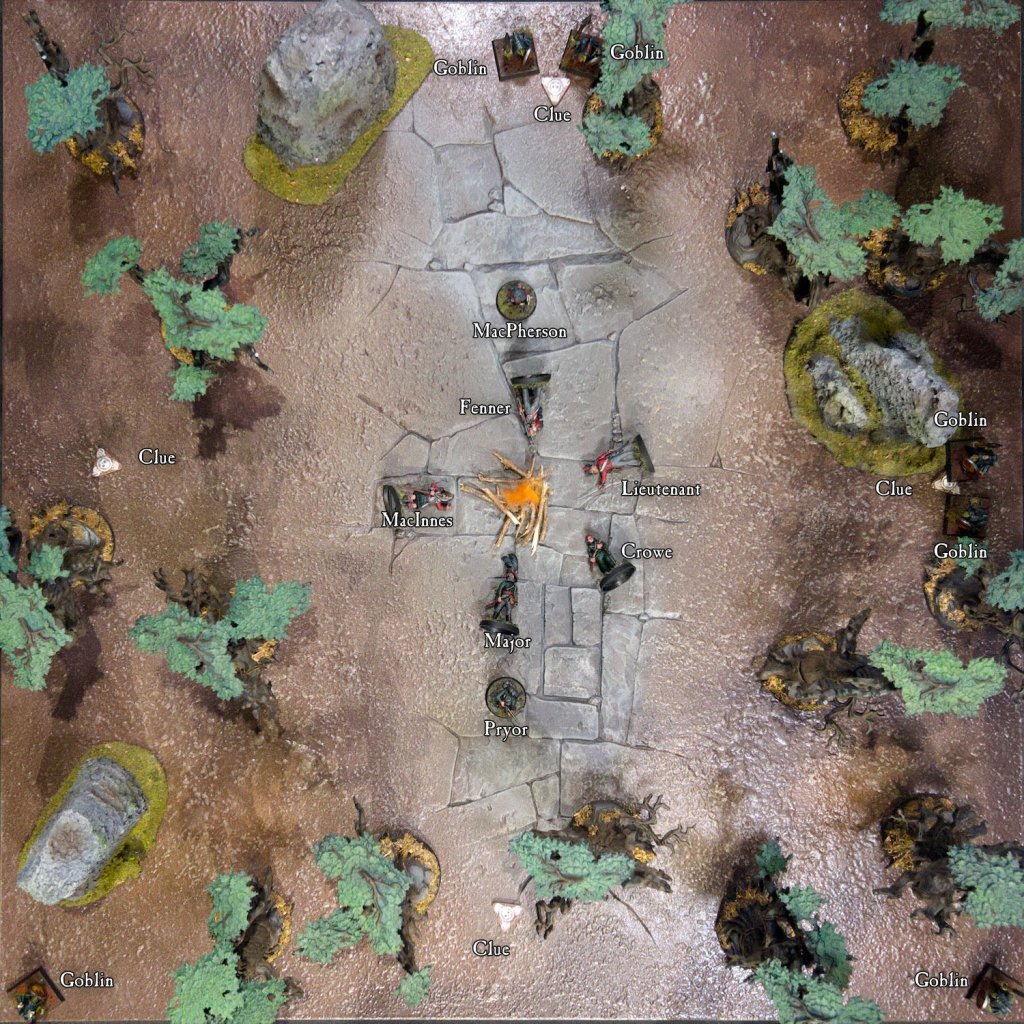
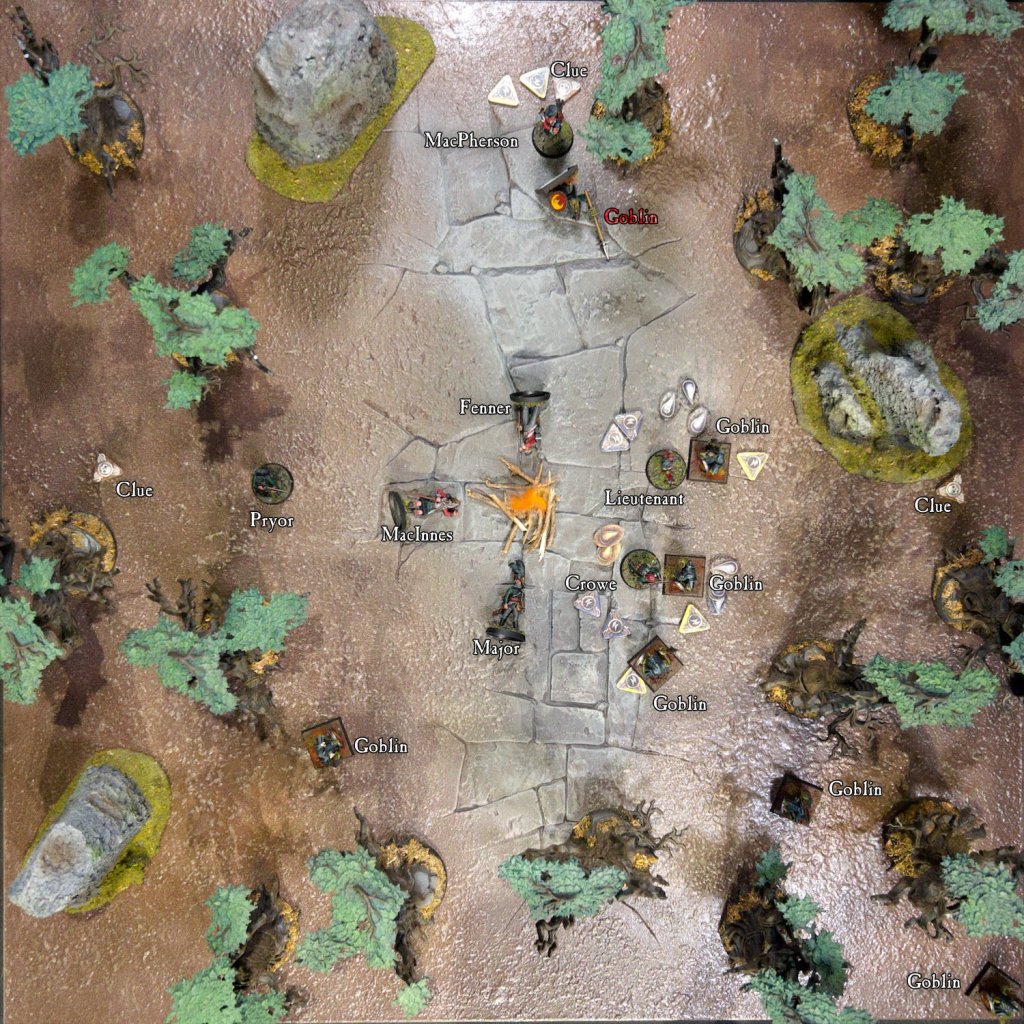
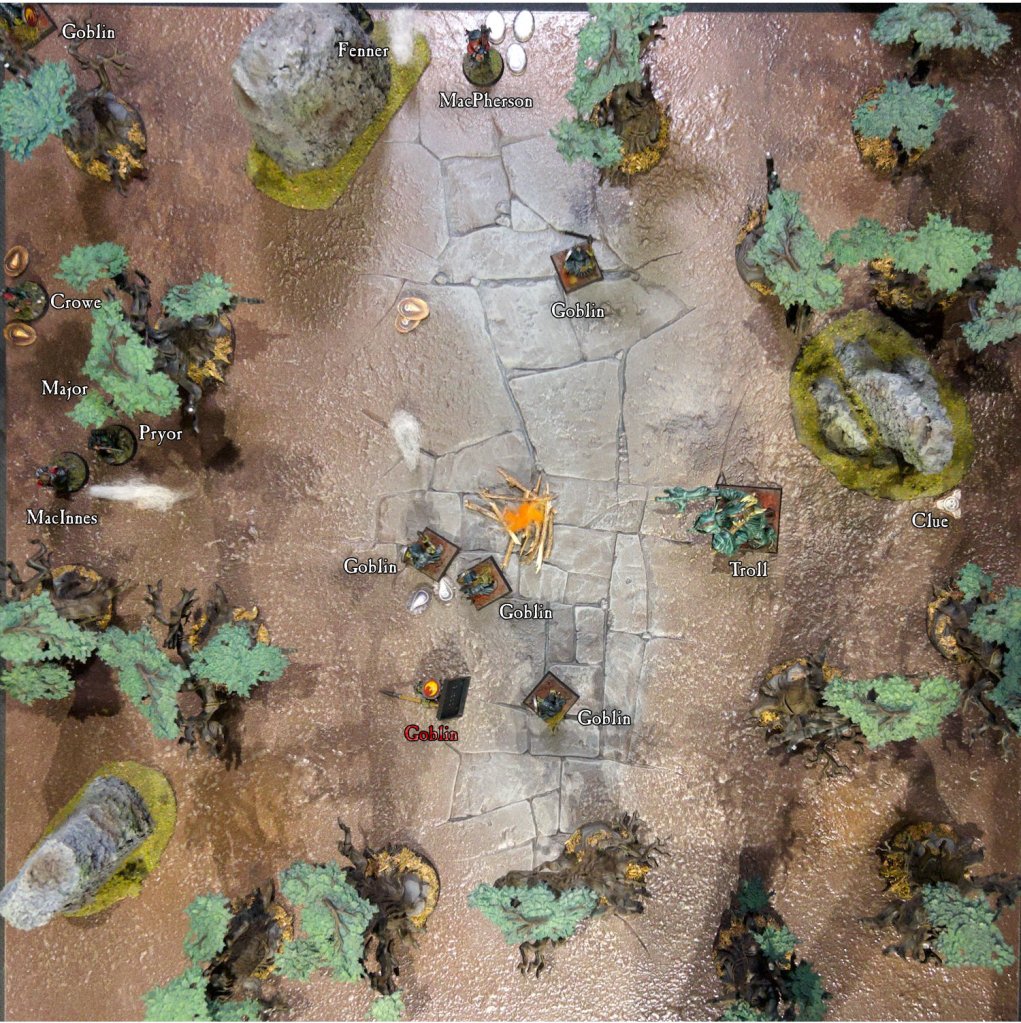
The scenario setup has two randomly selected sentries standing guard while the rest of the unit is asleep around a campfire. There are four clue markers set up close to the outside of the table, two of which have goblins close to them with a further two goblins appearing at two randomly selected table corners. The sleeping figures need to roll each turn to see if they wake, or if a monster attacks them they automatically wake. Either way once a figure wakes it gains fatigue tokens which negatively affect its defense and melee ability for the turn.
The board at the start of the game.
Goblins are very tricky to deal with in the game, they have very high defense, they make mechanical devices fail when close, they are hypnotic meaning voluntarily attacking them is tough, and they have damage reduction (negated by cold iron). They are repulsed by holy symbols, which give them penalties to hit, so MacPherson’s bagpipes should help keep them at bay to some extent!
I didn’t have a campfire model on hand, so some twigs from the garden and some orange wool from Bolt Action vehicle damage markers did the trick!
Hopefully they’re sleeping lightly…
Turn 1
The sentries burst into action, with Pryor moving towards the closest clue and investigating it – finding a gold ring which allows me to add a skill or power die to my fate pool (I choose power). MacPherson tries to shoot the closest goblins but finds his pistol won’t fire. Clearly the creatures have some power over mechanical devices! He attacks instead and scores a solid hit. The goblin misses on its attack back, clearly disturbed by the bagpipes. The Major stirs but fails to wake. The goblins near MacPherson swamp him but his pipes affect them and they both miss. On the other hand he rolls amazingly and hits both with his attacks back, killing one.
Seems that they’re heavy sleepers…
The rest of the goblins close in on the sleeping forms which all fail to wake! At the end of the turn another goblin enters the table.
The board at the end of turn 1.
Turn 2
MacPherson and Pryor are still the only two awake at the start of the turn. MacPherson continues his rampage, disposing of the second goblin. Pryor sprints towards a second clue. The major keeps slumbering. The goblins next to the camp reach Lieutenant MacRae and Crowe and attack them, waking them. Very luckily for me (given both men are fatigued) the only goblin attack that hits only deals small amounts of damage. Even more lucky, MacRae hits his opponent back and Crowe hits one of the two goblins attacking him. The other goblins close in on the camp fire, and my sleeping figures all fail to wake. MacRae attacks on his turn, misses and the goblin strikes nastily, prompting me to burn a fate die to reduce the damage. Another goblin arrives onto the table, things are looking pretty grim.
The board at the end of turn 2.
Turn 3
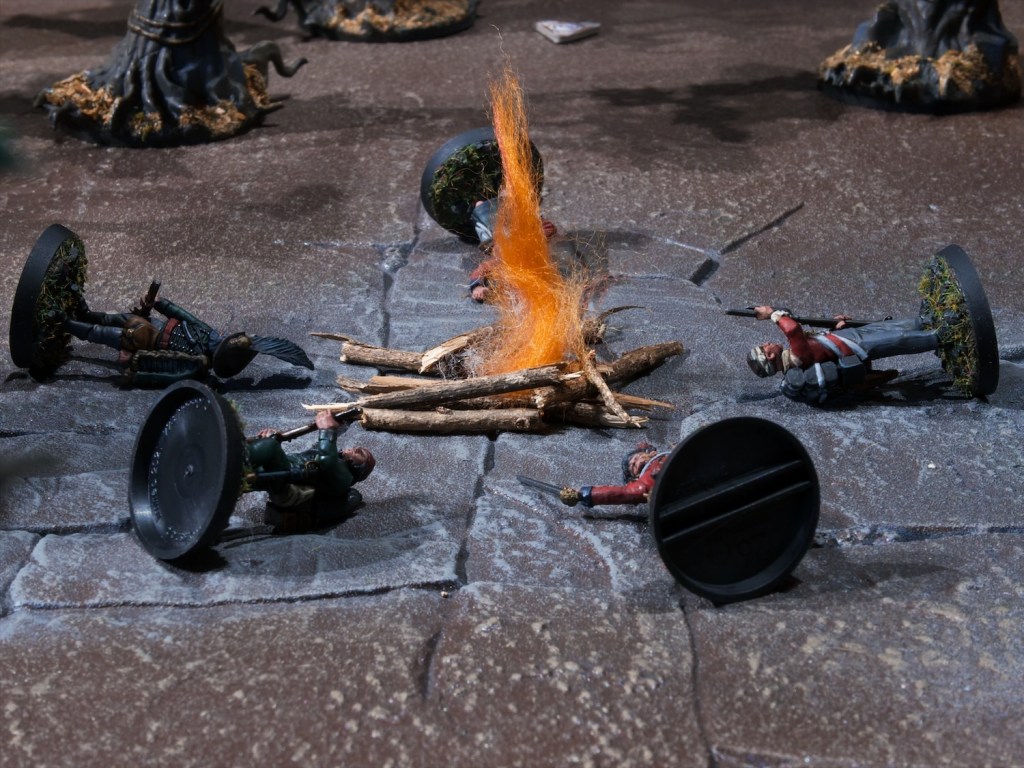
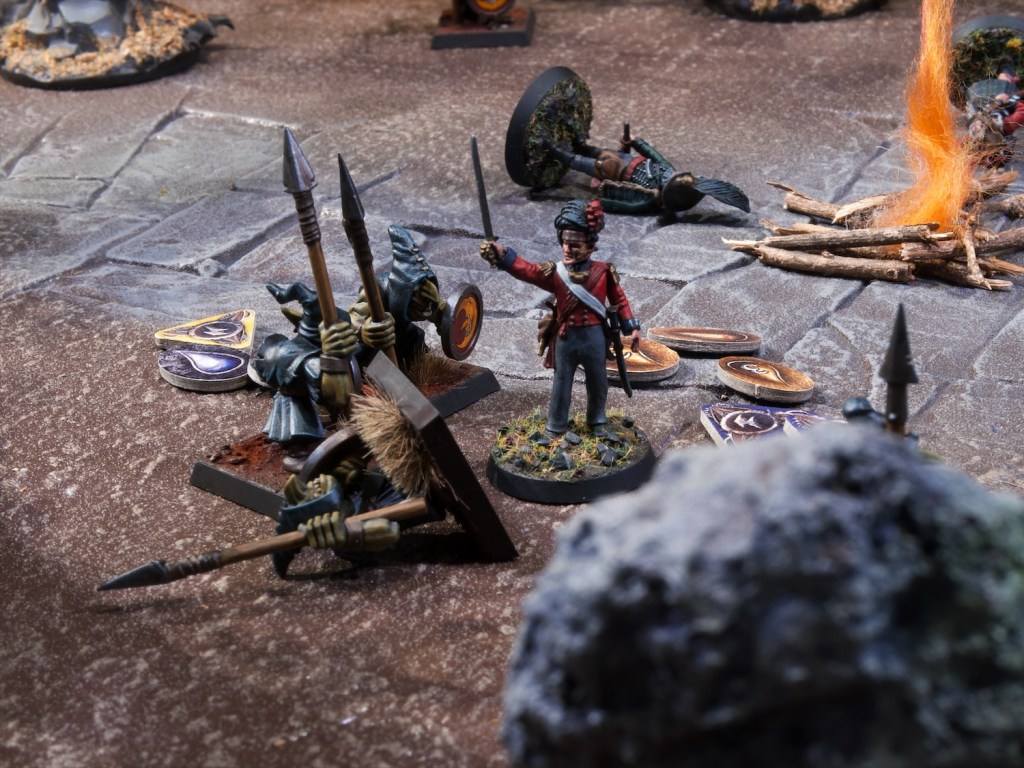
MacPherson runs to the rescue of the Lieutenant and Crowe, charging the closest goblin. His attack misses, but so does his opponent’s strike back. Crowe is one of the only models in posession of cold iron shot so I really need him to be able to fire which he cannot do if he’s close to them due to their disruptive aura. For that reason he moves back and takes a shot but misses. The Lieutenant then dives in the gap and takes on Crowe’s attackers. He misses and so does the goblin.
Moments before disaster…
The goblin on MacPherson attacks, misses (those bagpipes!) and MacPherson misses right back. MacRae is in for a bloodier fight: the first goblin attacks, hits him for low damage, and MacRae’s strike back kills the goblin (after I spend my skill die re-roll). The second goblin hits him, dealing 10 damage, which would take MacRae out! I spend my second power die to reduce the damage – this keeps MacRae in the game. MacRae scores a solid hit back. The third goblin also hits MacRae and this time it’s too much for the brave Lieutenant and he collapses. The last goblin charges the Major, waking him by scoring a solid hit. The Major tries to strike back but misses, still bleary-eyed.
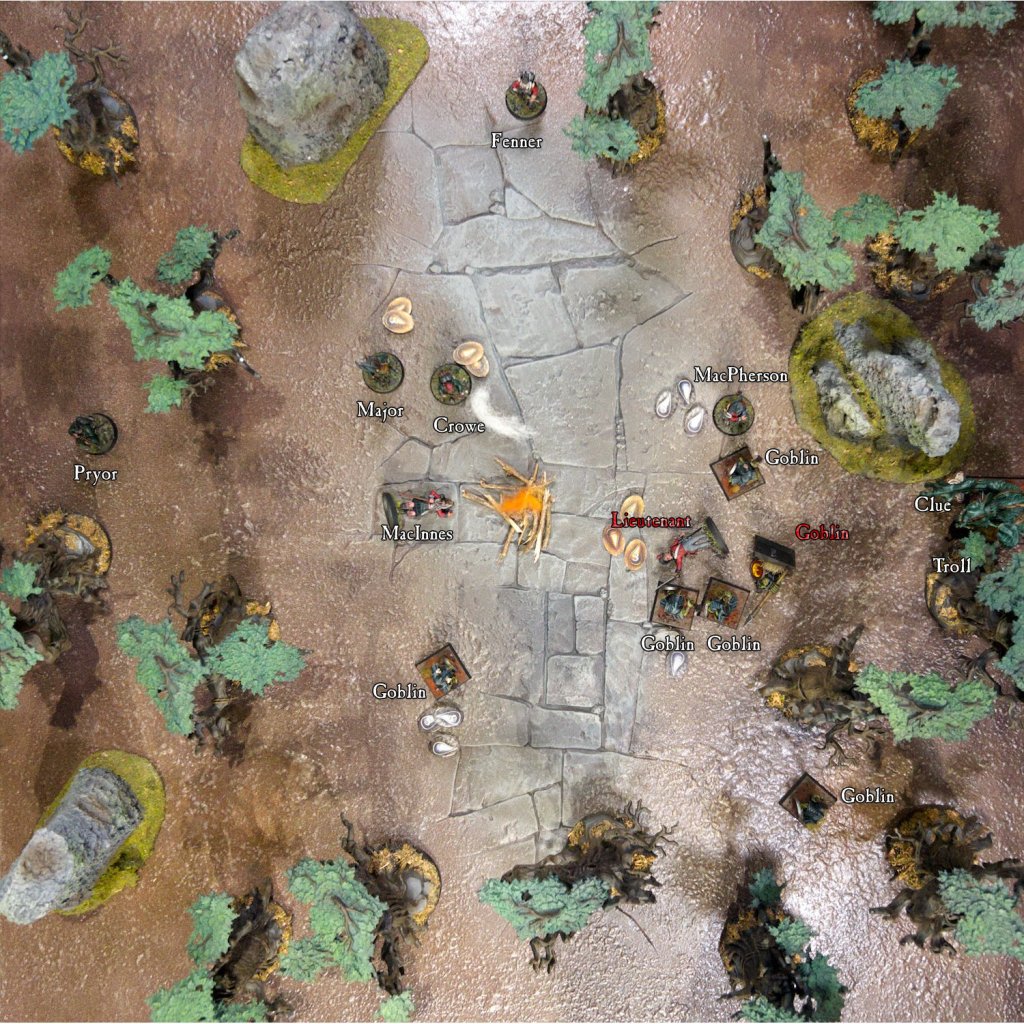
Pryor investigates the clue he was moving towards last turn and finds some nice dry wood which he lights up, never know when something will need to be set on fire! Fenner finally wakes up and moves to investigate the clue to the north. He finds a bag of iron nails that he promptly loads into his musket. The Major moves away from his attacker and fires his rifle at it, hitting and heavily wounding the goblin. MacInnes sleeps on.
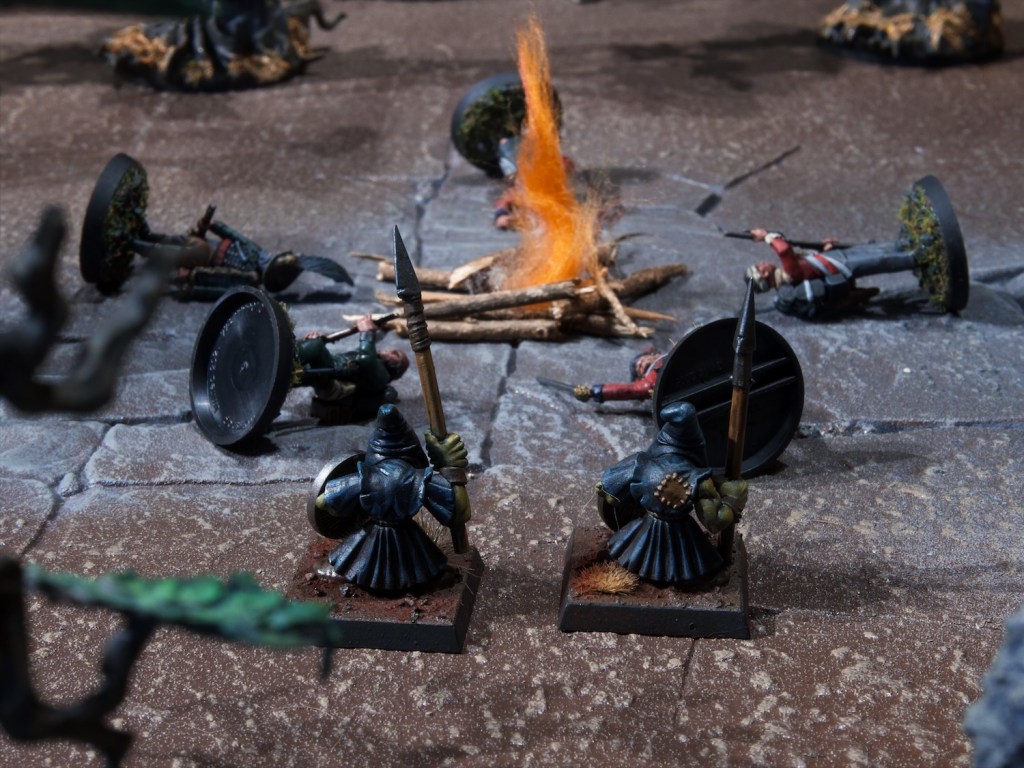
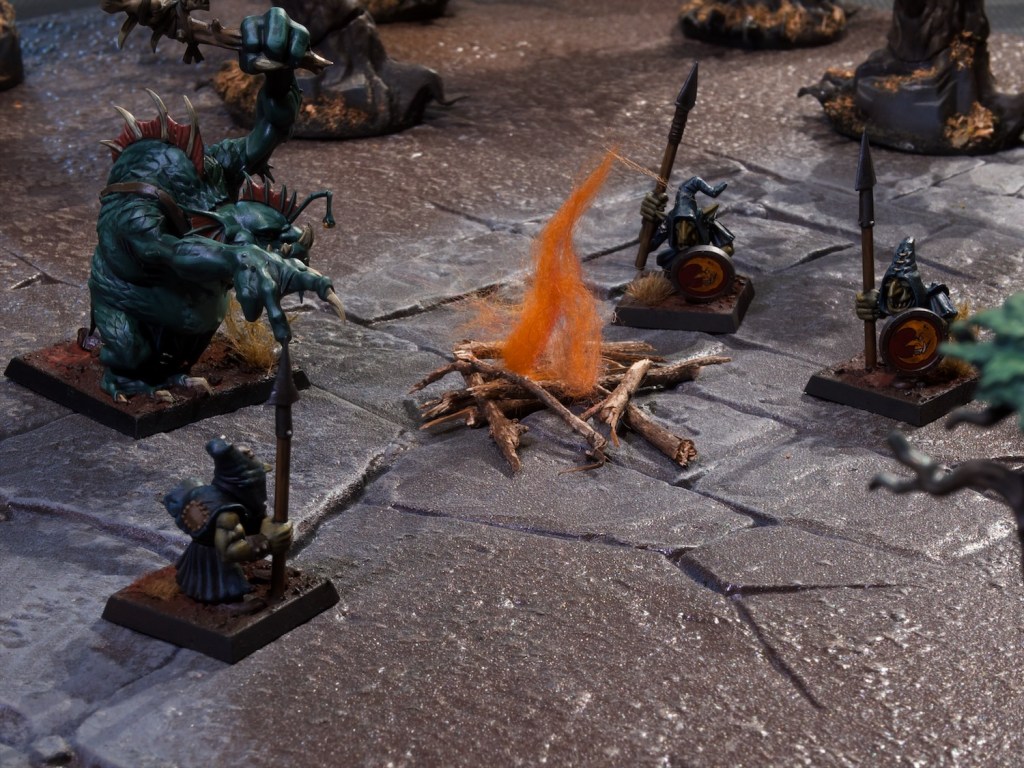
A large troll walks onto the eastern edge of the table.
The board at the end of turn 3.
Turn 4
At this stage, the Lieutenant is down, a troll is approaching, and the goblins have been cleared from the North-West corner of the board. Time to clear out!
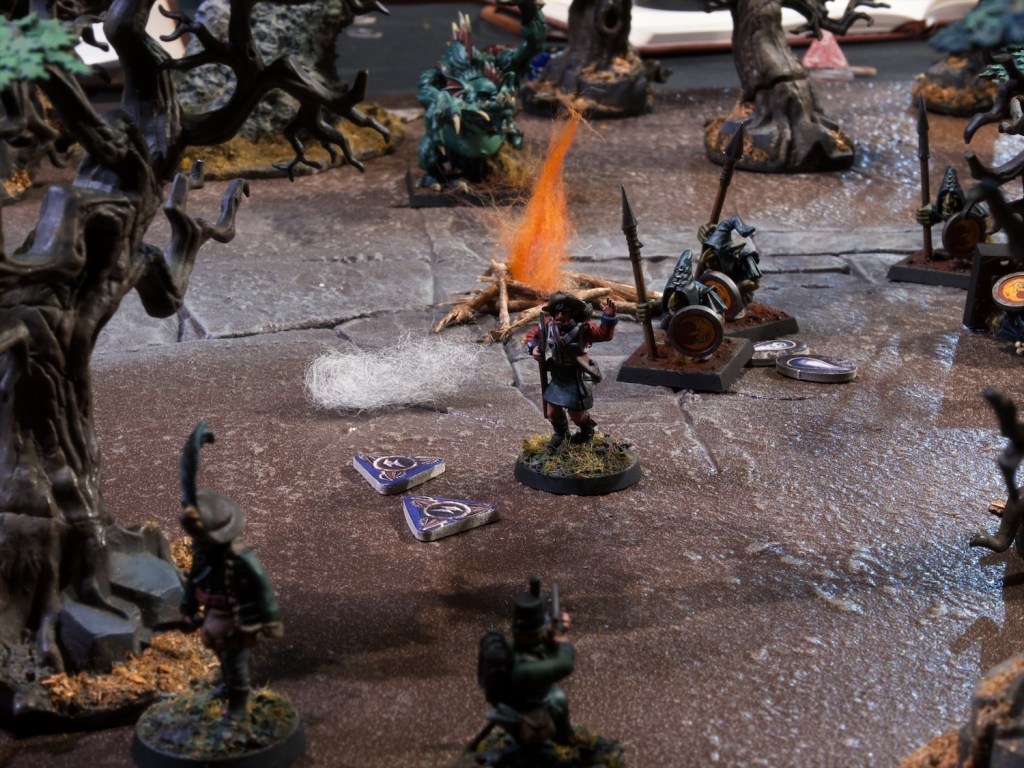
MacPherson sprints away from the goblins. Crowe walks away and reload his rifle with some cold iron shot. The Major does a quick reload and fires at the closest goblin but misses. He then also moves away. Most goblins are now out of range of attacking anyone so they just follow the unit members. One goblin is in range of MacInness and rushes him, waking him up with a close miss. MacInnes reads the room and moves back rather than attacking back. The troll approaches the campfire, picks up a rock and throws it but misses.
Time to get out of here!
Fenner moves back and fires his iron nails at the closest goblin but misses. McInnes legs it away from the goblin, fires his pistol and also misses. Crowe moves back and reloads.
Another goblin enters from the North East corner.
The board at the end of turn 4.
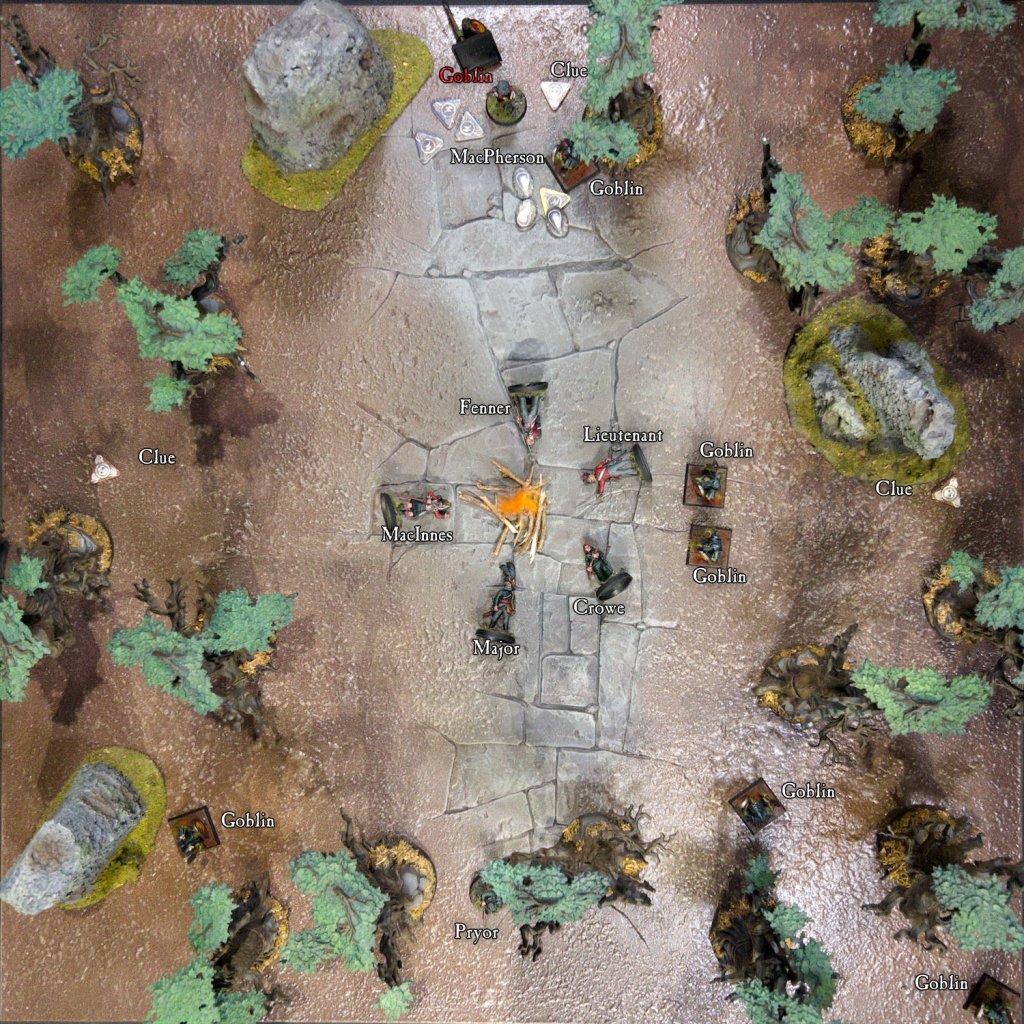
Turn 5-6
These turns are rather uneventful, the unit moves back and finally off the board, taking pot shots at goblins and the troll but no more real damage is done.
After the game I rolled on the injury table for Lieutenant MacRae and he picked up a permanent injury for his troubles, with a nasty leg wound that reduces his move by one.
The troll and the goblins enjoying their well-earned camp fire
This mission felt like the hardest by far, the goblins are really tough! I didn’t even brave tangling with the Troll, that felt like a good way of losing half my unit. This game is quite interesting, I achieved most of the objectives (investigating 3 clues, killing 3 goblins, getting 6 unit members off the table), but it still felt like losing as I unceremoniously scampered off the table. It’s a great bit of atmosphere through mechanics I think.
There’s one more solo mission left in the main rulebook which I’ll run through soon I think. As I mentioned last post I’ve been enjoying this game enough that I’m preparing a new unit for the Egypt supplement, so will continue solo missions in a different setting after that.
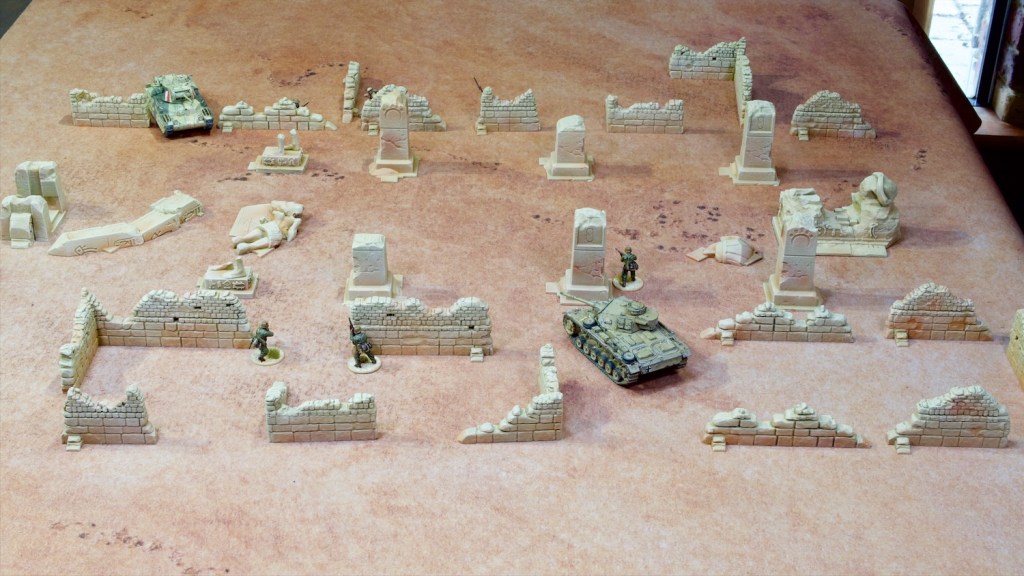
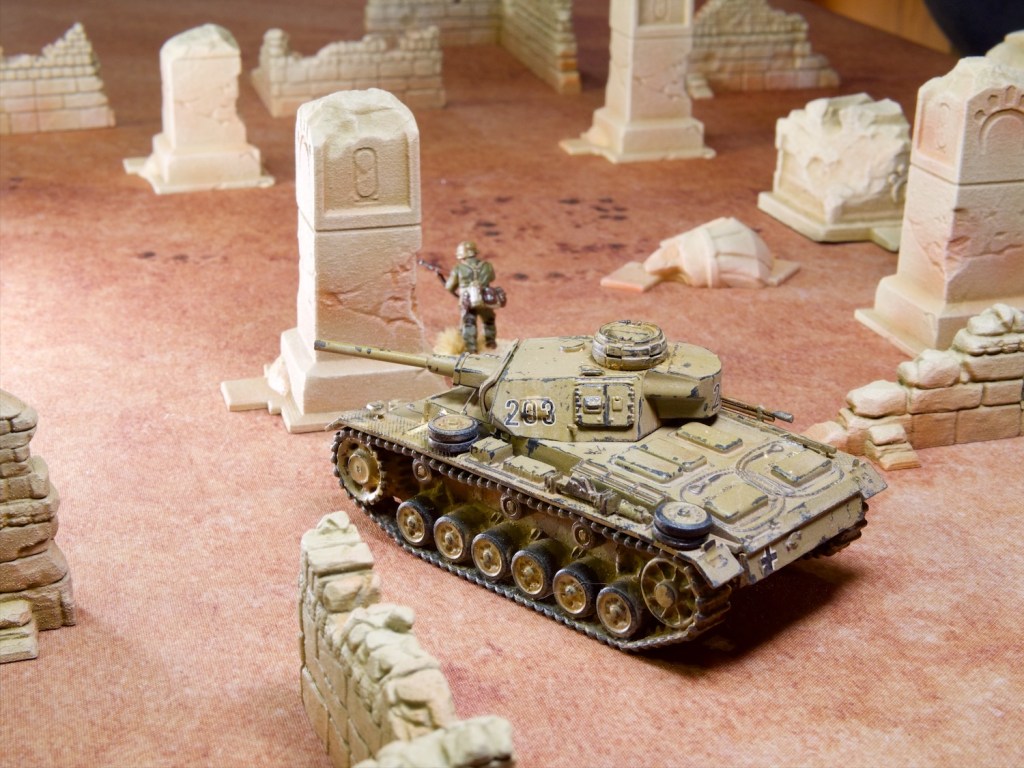
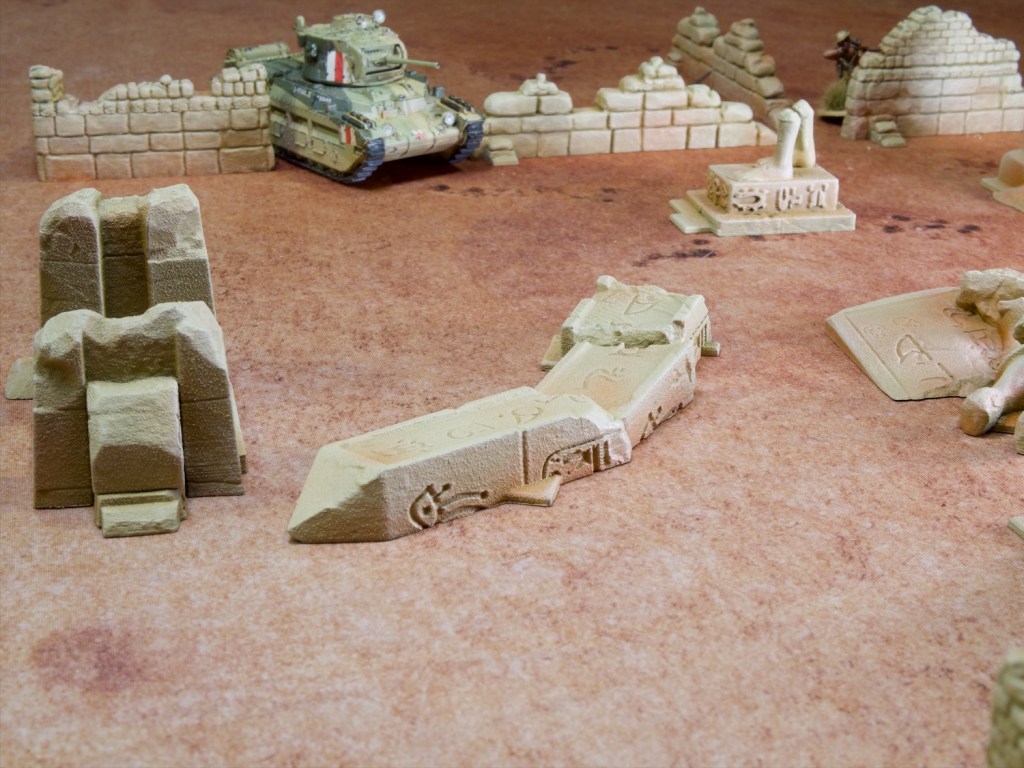
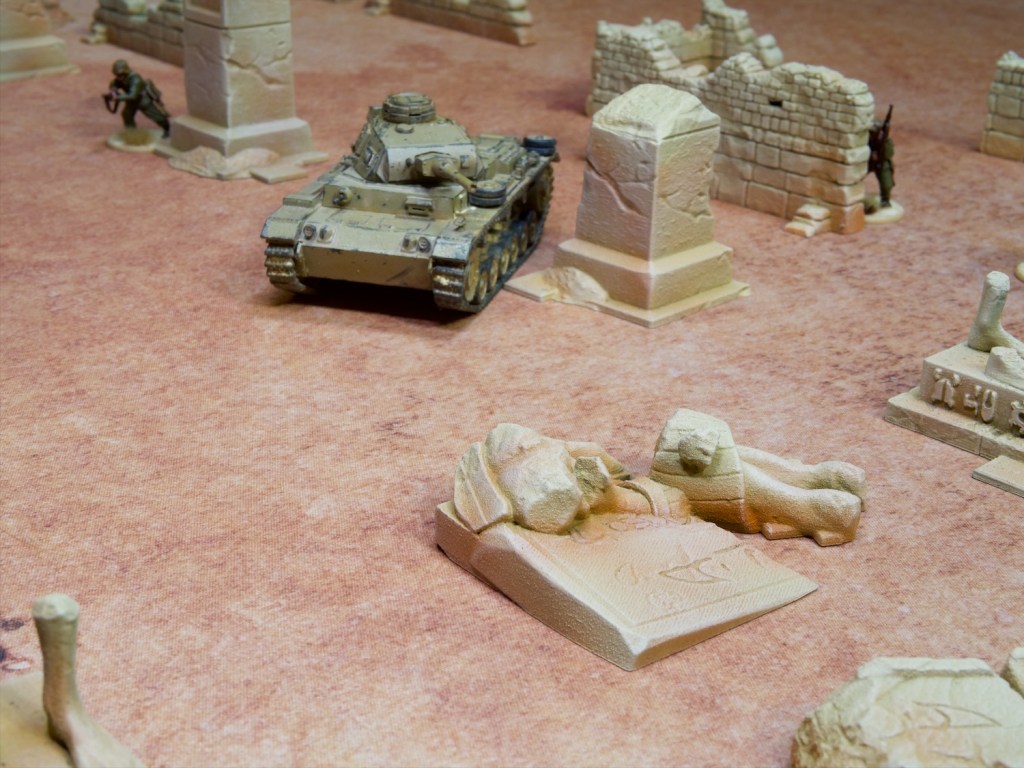
My 3D printer has been very busy these last two weeks, producing enough scatter terrain to cover a densely packed 3’x3′ area, or a more loosely covered 6’x4′ board. The theme: desert ruins, more specifically Egypt-like ruins.
The primary motivation for this effort has been the Silver Bayonet, I picked up the Egypt supplement a few weeks back and one of the North Star units for the game, and needed a nice set of terrain to play some of the missions. The good news is that I have a fair few other games that require desert terrain, such as Bolt Action for my North African forces, and Warhammer of course for my Tomb Kings.
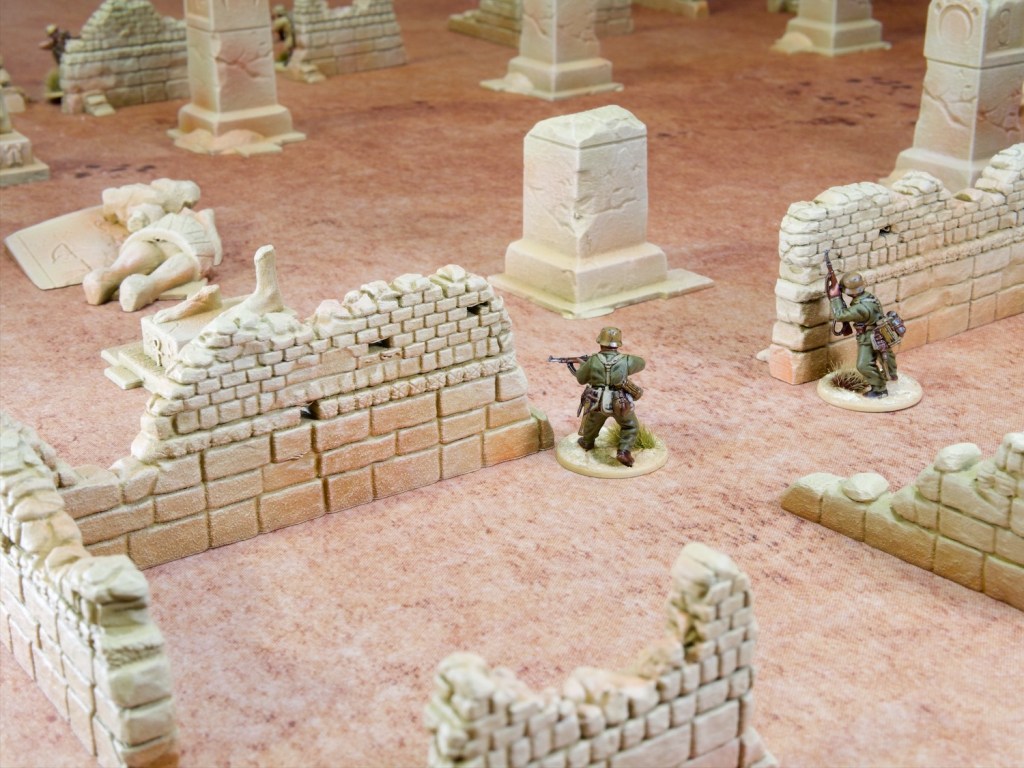
The models I printed were from two sets: the ruined walls are by The Lost Adventures Co., and the Egyptian statues/columns etc are by Txarli Factory. I printed the walls at 65% scale to make them a nice size for my historical miniatures, allowing them to peek over the lower sections of wall.
I undercoated all the pieces with an old can of Citadel Roughcoat which is a spraycan-based texture paint (and long out of production, I’d love to find a good replacement). This had the dual effect of hiding the print lines on the models, and adding some nice grit for that sandstone look.
Painting-wise these were pretty straightforward. I sprayed Vallejo Primer German Dark Yellow all over, followed by a top down spray of Vallejo Model Colour Dark Sand through the airbrush. I then drybrushed Vallejo Model Colour Dark Sand, followed by another drybrush of Vallejo Game Color Bonewhite. At this stage I popped the pieces onto my desert mat and realised they looked out of place as the mat has quite a bit of red to it. To remedy this, I added patches of Vallejo Skin Wash Ink using the airbrush, followed by another drybrush of Vallejo Game Color Bonewhite. I would probably have skipped the first Bonewhite drybrush if I’d known I’d be doing another, but sometimes you find things out and need to go again!
I’m really pleased with how these came out, the roughcoat really did a nice job of making the 3D prints more stonelike. The reddish tones also really tie the pieces to the game mat. Here’s a few more closeups showing off the different pieces:
A nice quick update after the longer last few posts. I do enjoy panting terrain as a nice break from more involved models. I’m currently painting up my Egypt campaign unit for Silver Bayonet (guess what nation!), and looking forward to playing some game with this new terrain. The Egypt 3D model set also comes with a sphinx and a pyramid so if I feel like filling out a bigger table I have what I need!
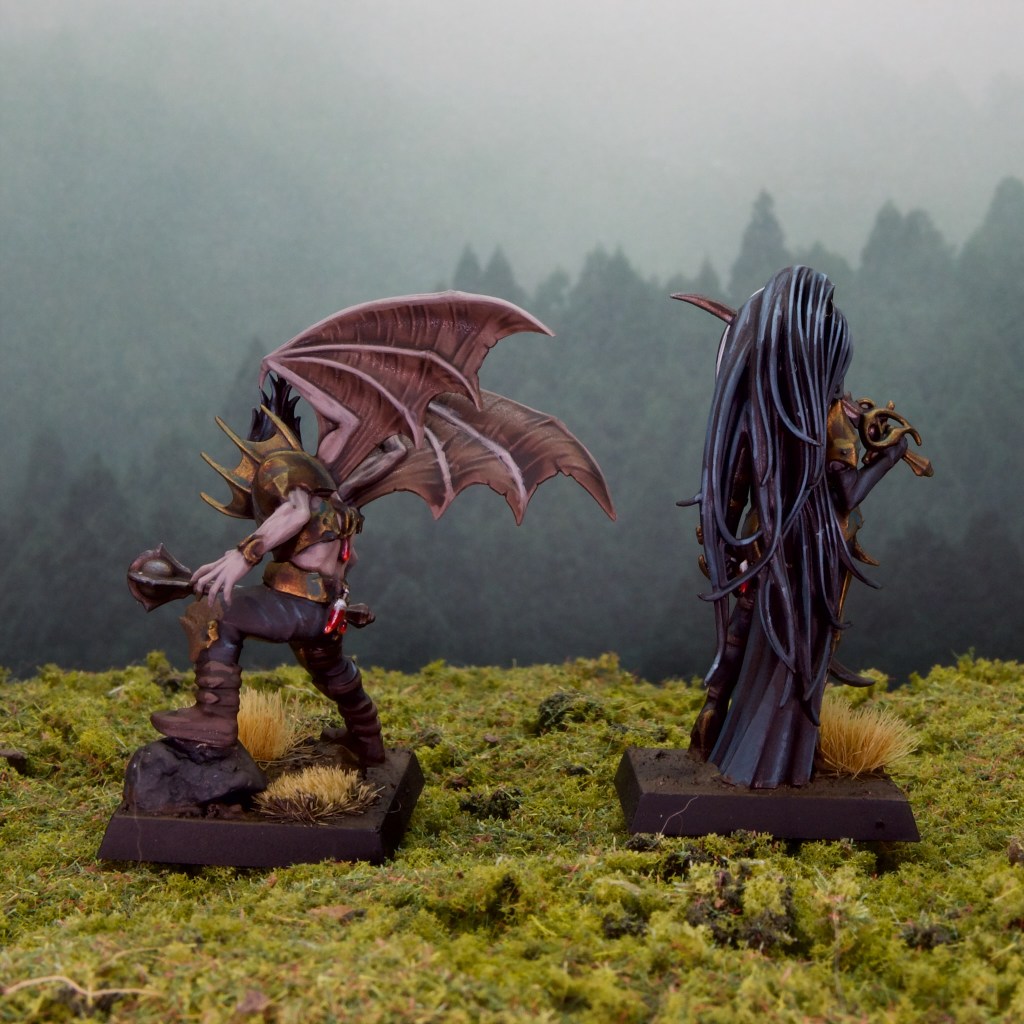
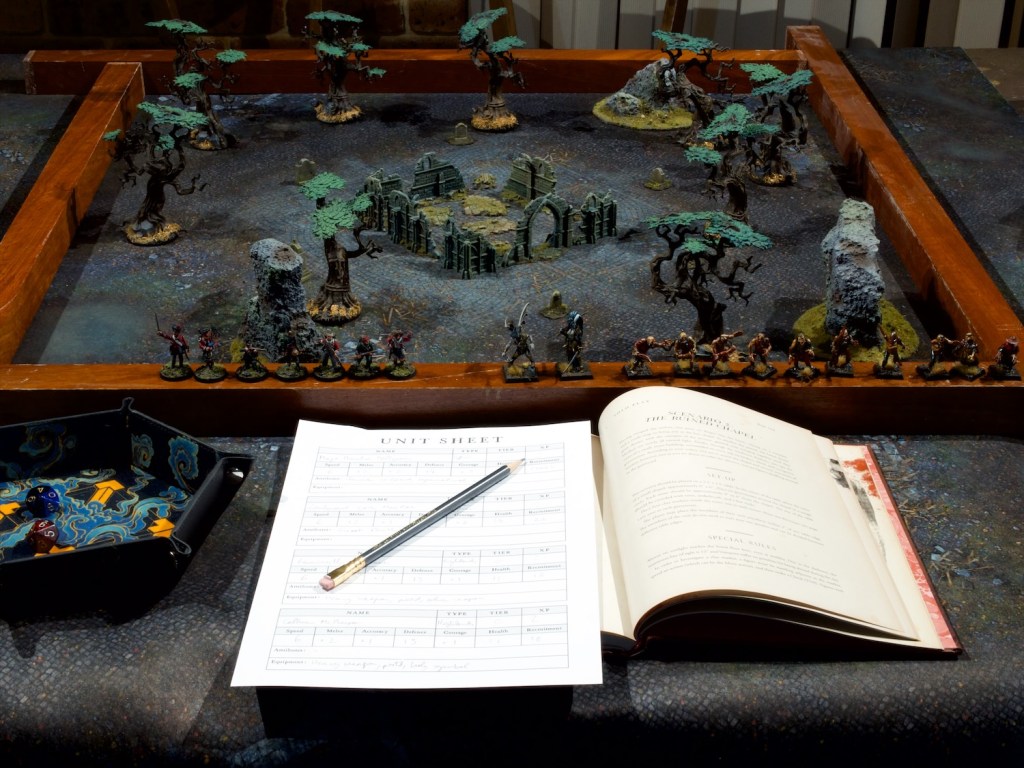
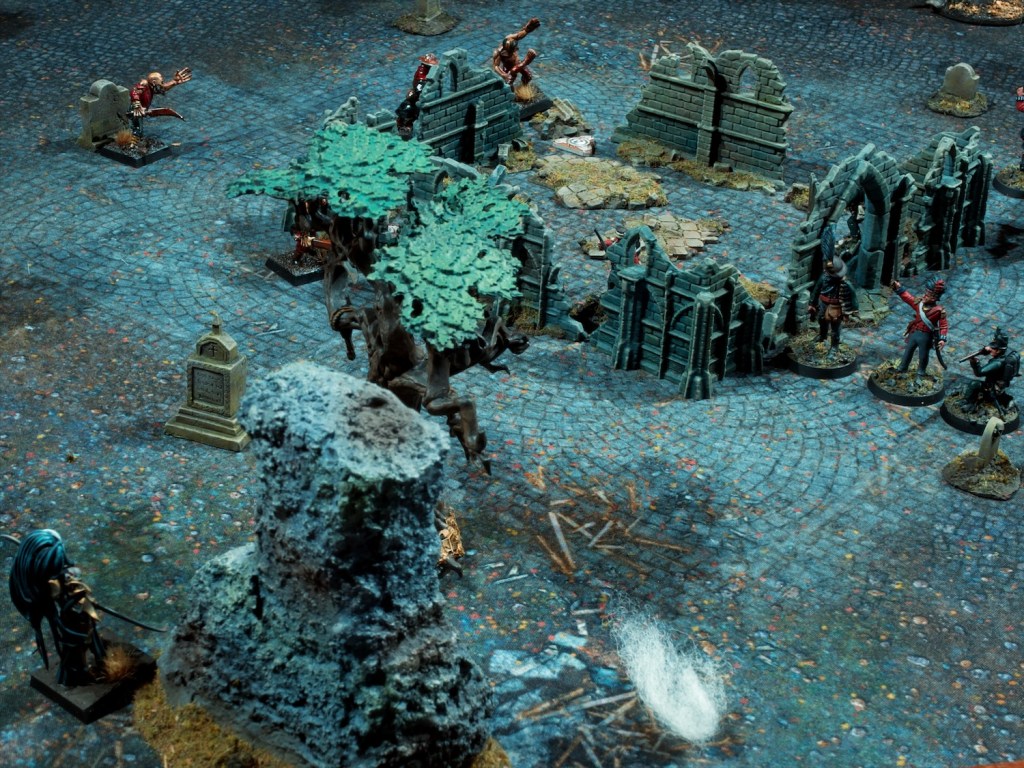
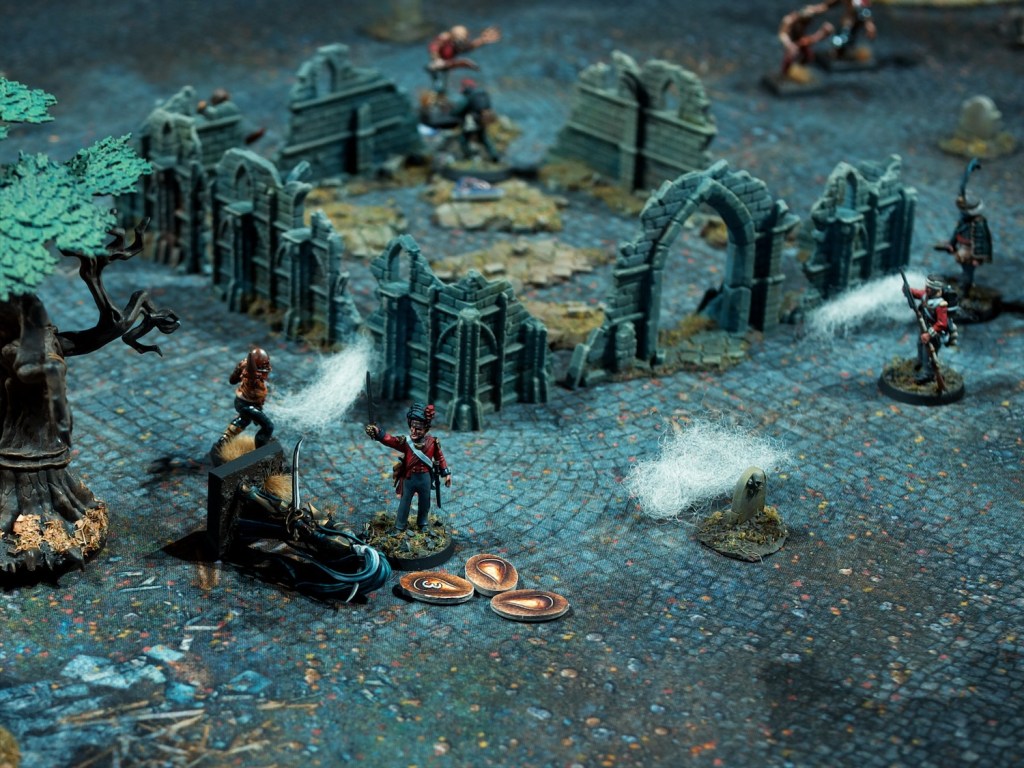
After last week’s fun with The Silver Bayonet I was keen to continue with more of the solo missons in the book. The second mission has the unit come across a ruined chapel and investigate it. Unfortunately for them, zombies have overrun it, and some more powerful undead are lurking about!
I was covered for the zombie miniatures, but needed some vampires that looked a bit less overtly warhammer-y, so I decided to paint up a couple of the less over the top miniatures out of the Crimson Court Warhammer Underworlds warband. I based them on square bases as I think I’m most likely to use them for Warhammer Old World going forwards.
I kept the colours very muted on these, with black cloth and the bronze dulled down. These models were really nice to paint, with nice crisp details but not too much going on. I love painting glass vials too so glad to see some on both these models, clearly they like carrying a top up with them!
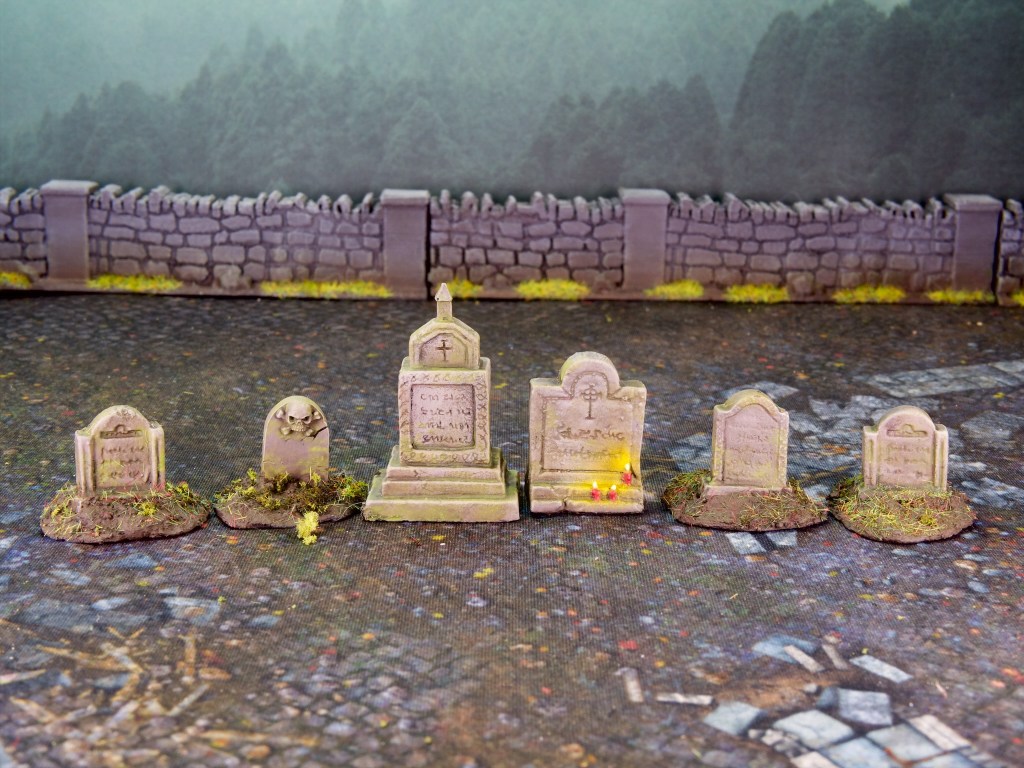
I also needed a bit more terrain for the scenario, namely a set of tombstones and a ruined chapel. The tombstones are really nice resin models from Tabletop World except the one with a skull and crossbones which is from the old Warhammer Skeleton sprue. I painted these pretty quickly, with a grey undercoat, brown wash, some grey and cream drybrushes. All topped off with some nice mossy greens using some enamel washes.
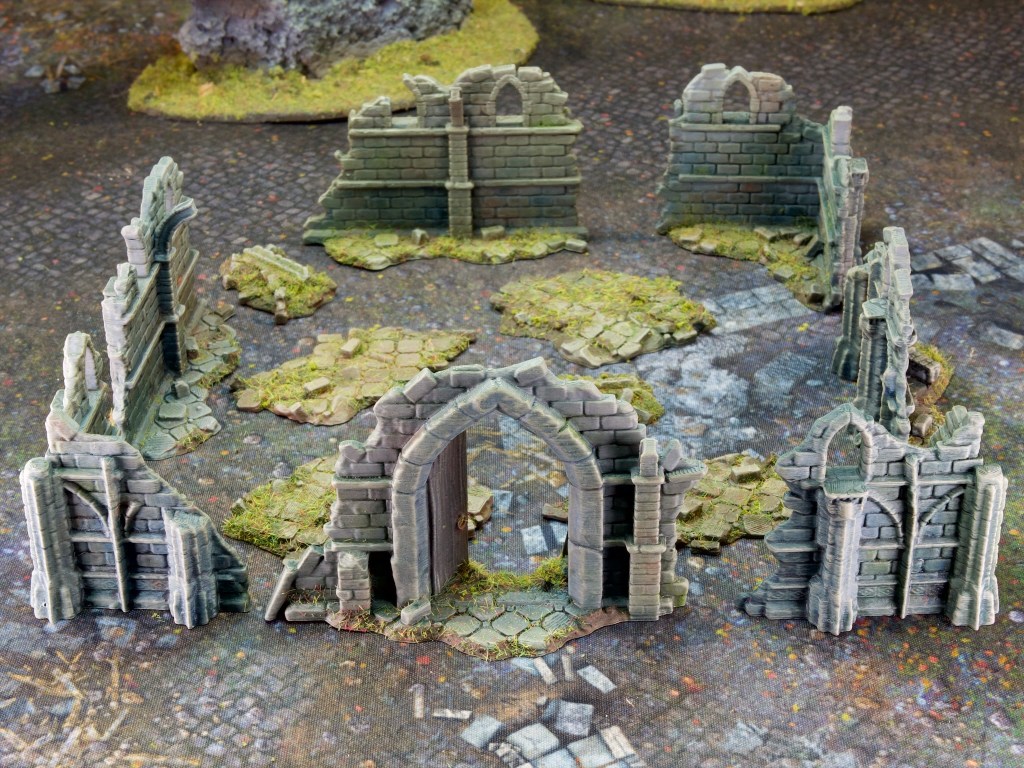
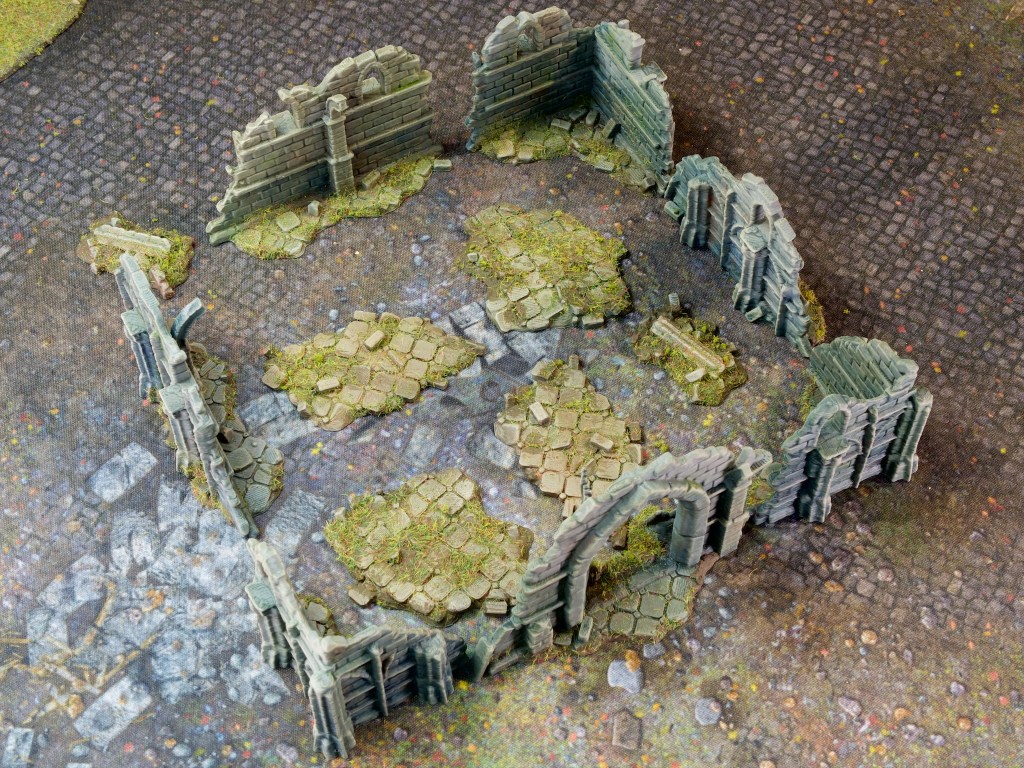
Finally, the ruined chapel. This is a nice modular ruined church STL set by Vae Victis Miniatures, which I printed at 50% size to make into a reasonable size for a chapel. The scenario calls for a 6″ x 6″ footprint for the chapel which the pieces you see above fit nicely into.
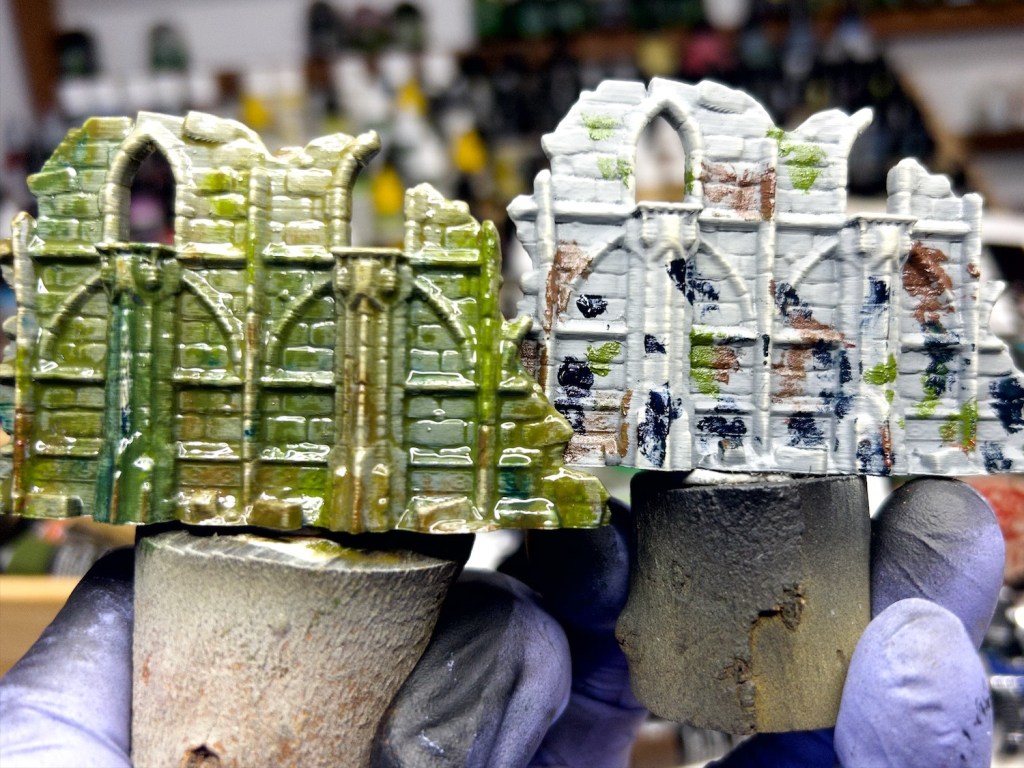
I had a bit of fun painting this, starting with a grey undercoat, then spotting on varied colours of oil paint. I then used some thinner to spread the oil paint around and create some nice variation. You can see what I mean in the photo below.
I left the wet pieces dry overnight, then wiped off the oil from the raised areas. I then left that all rest for a few days, and once fully dry, did a few drybrushes to pick out the raised areas. Was all quite fast apart from the drying! With the terrain and the antagonists ready, I set the board up for the mission and got started!
Ready to go!
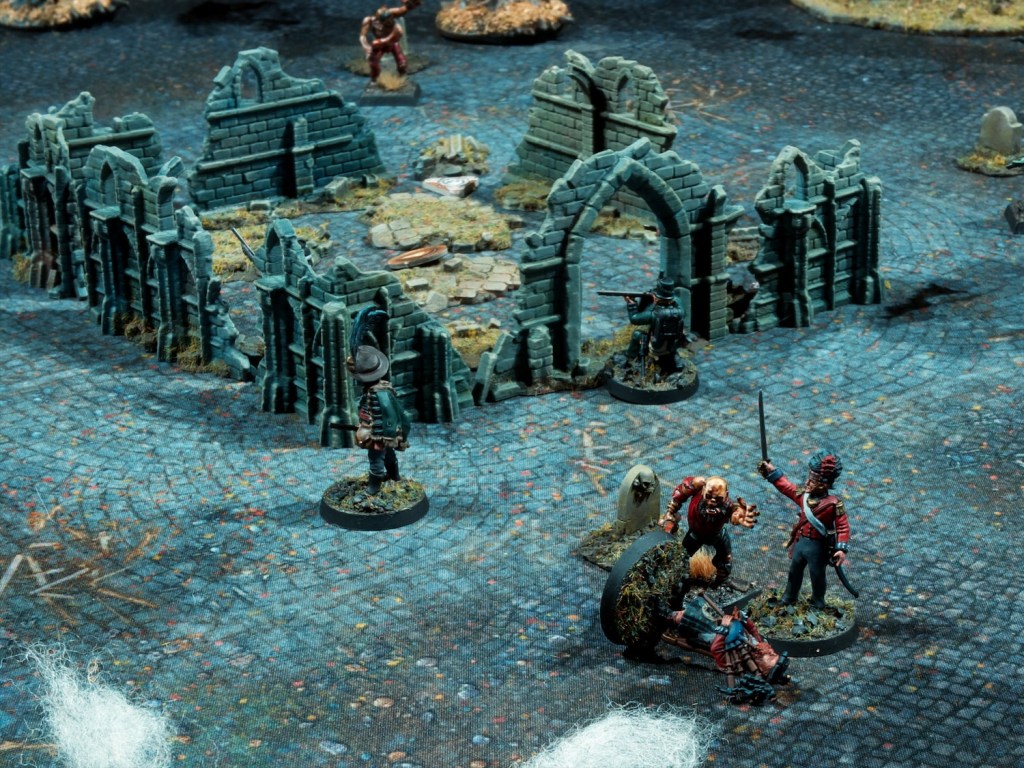
As I mentioned at the start, the premise behind the mission is that my unit is looking for a ruined chapel to investigate it, and at the mission’s start has just arrived at said chapel, but finds it swarming with undead. The unit needs to battle through revenants and investigate the clue tokens in the chapel and move anything they find off the table.
Initial setup.
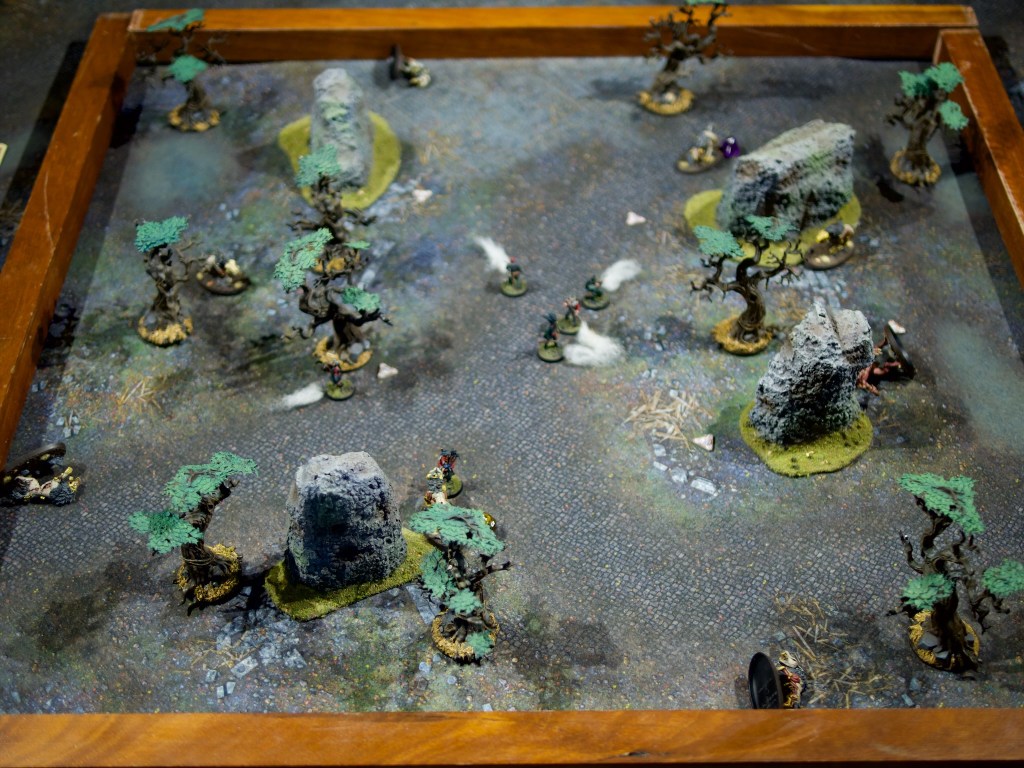
The board is setup with the chapel at the center, a clue in each corner, a rough circle of grave stones around the chapel, with a zombie (these are called revenants in the game, but I keep forgetting!) at each grave stone. I was allowed to place my models within 2″ of any board edge, split up in as many groups as I liked. I remembered from the first game how useful it was to have backup so I decided to keep my full unit together, sacrificing searching power for increased survival chances. If you can’t remember the characters in the unit feel free to check out my earlier post. I also go into a bit of detail on how the rules work in that post so I would recommend reading it first if you’re interested in that.
Turn 1
Turn one starts very poorly, with MacPherson charging the closest zombie, hitting it with his claymore and dealing some damage, but the zombie’s return blow critically injures him and takes him out of the game. Lieutenant MacRae charges that same zombie and finishes it off with a blow from his sword.
MacPherson is taken out by the zombie’s blows, Lieutenant MacRae rushes in to avenge him!
Crowe fires his rifle at the next zombie, only dealing a small amount of damage as they are not particularly bothered by ranged attacks. MacInnes then finishes off that same zombie with a strike from his massive axe. All the while the zombies are coming closer.
The Major fires his rifle at the next closest zombie, injuring it. Fenner then fires his musket at that same zombie, misses, charges it with his bayonet and takes it out (after I used a skill re-roll). Pryor sprints towards the chapel doorway.
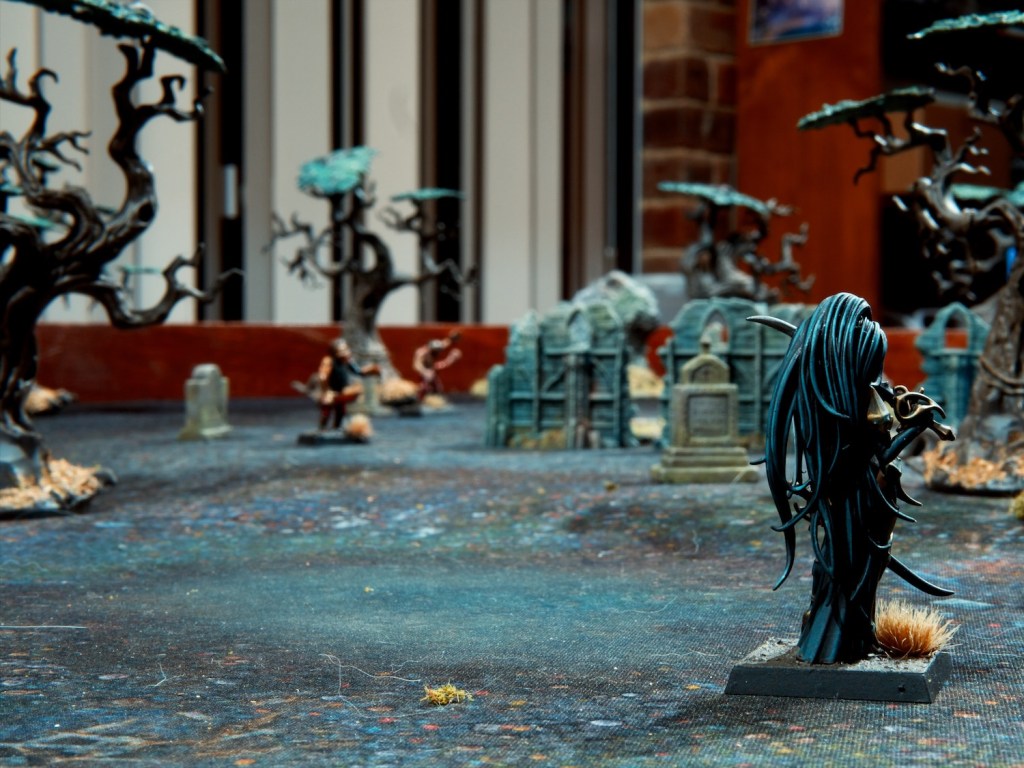
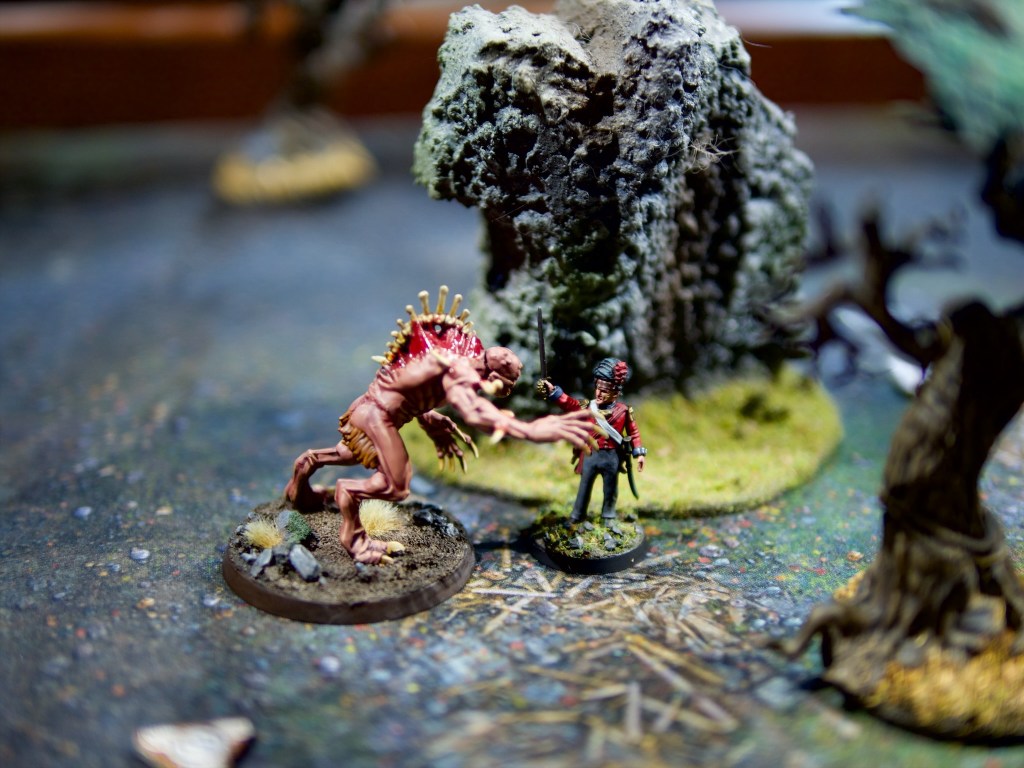
A mysterious form walks onto the battlefield…
At the end of the turn a vampire arrives, and another zombie springs up from a random gravestone.
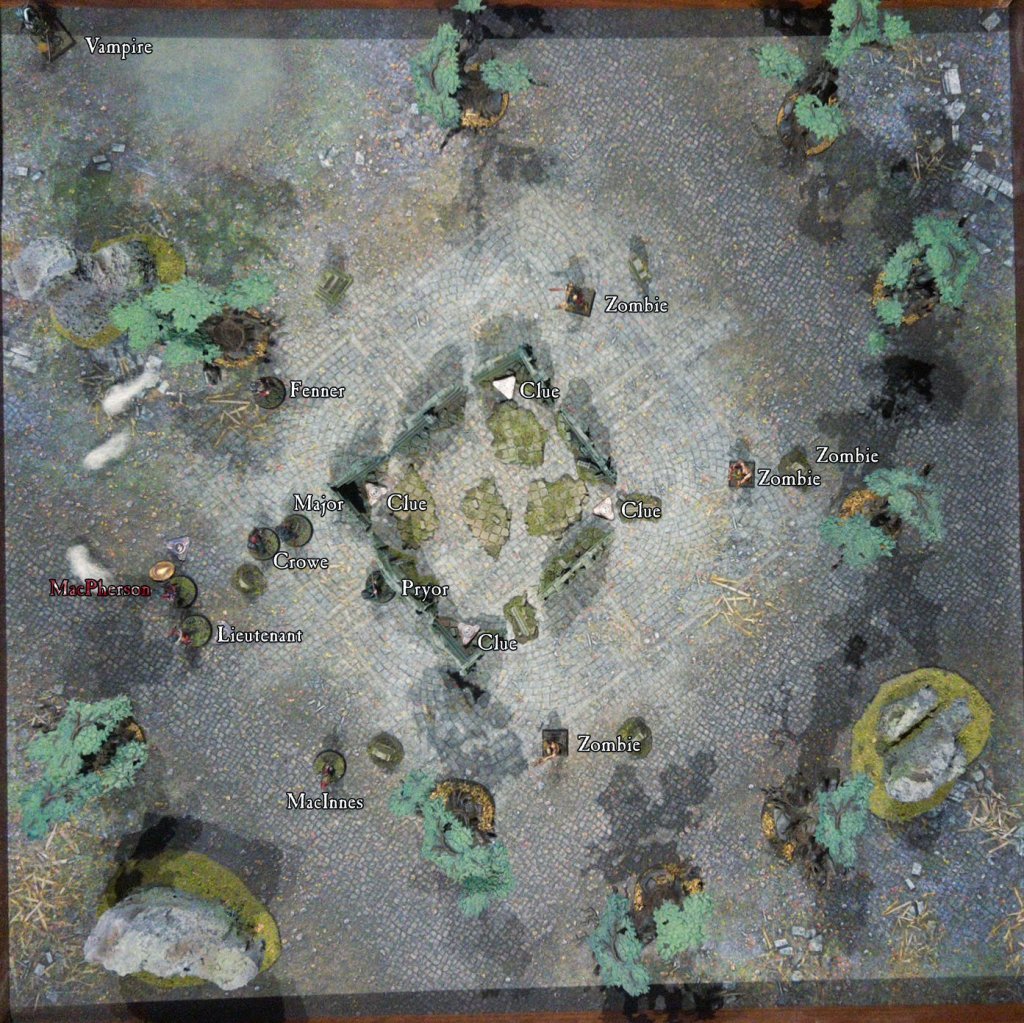
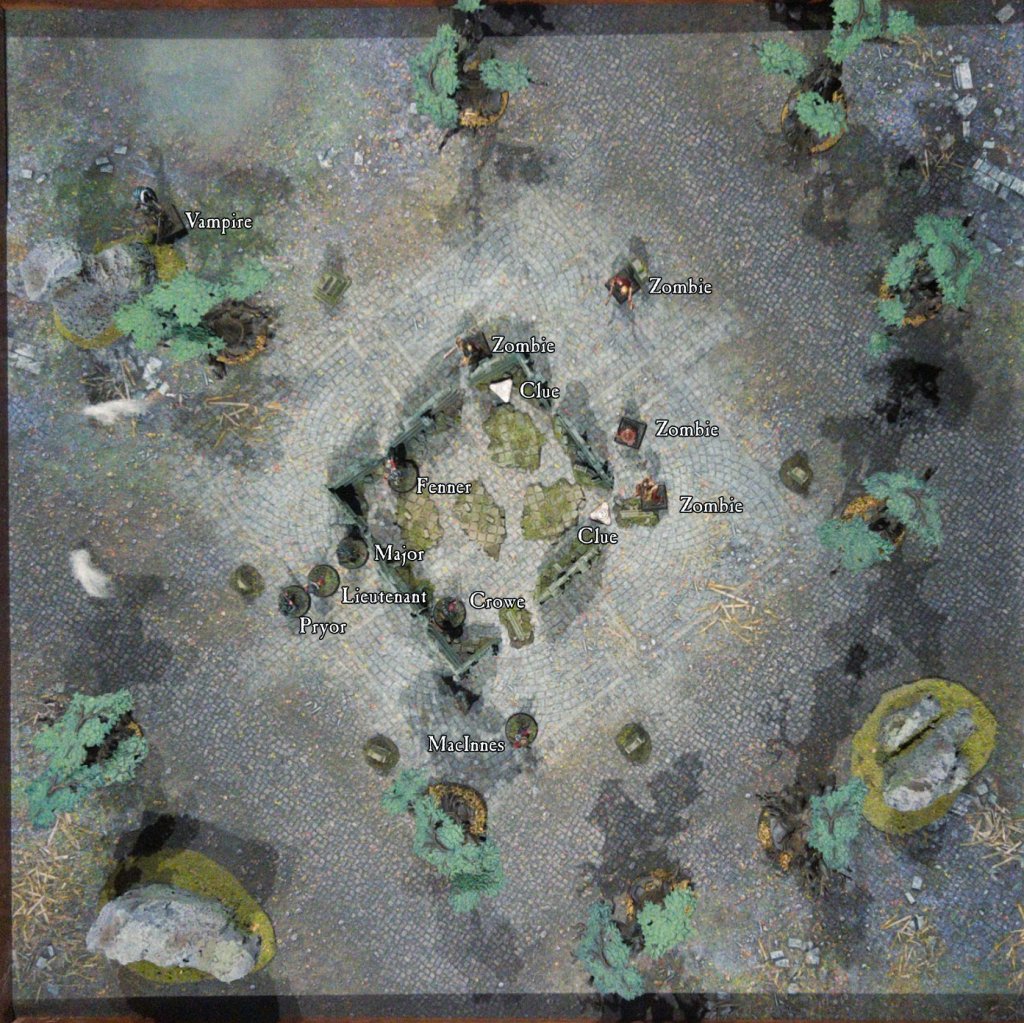
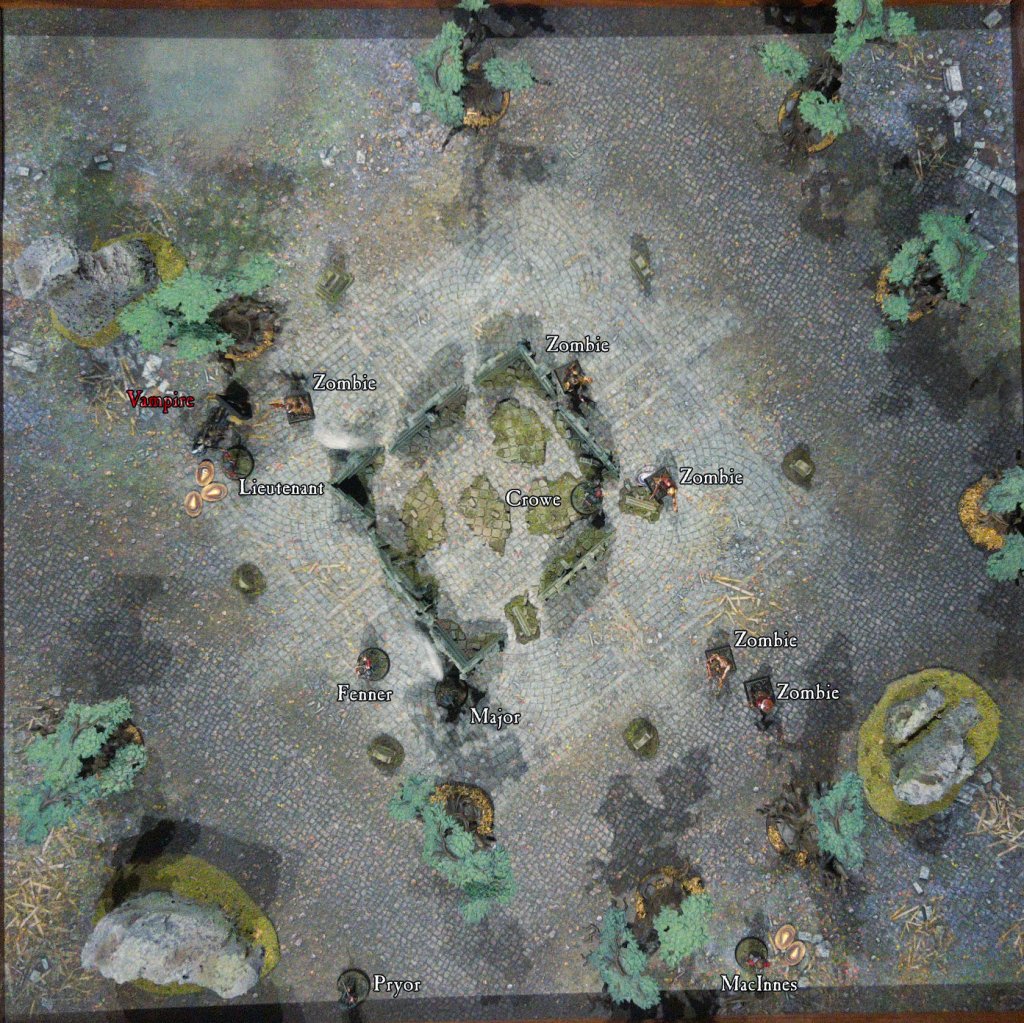
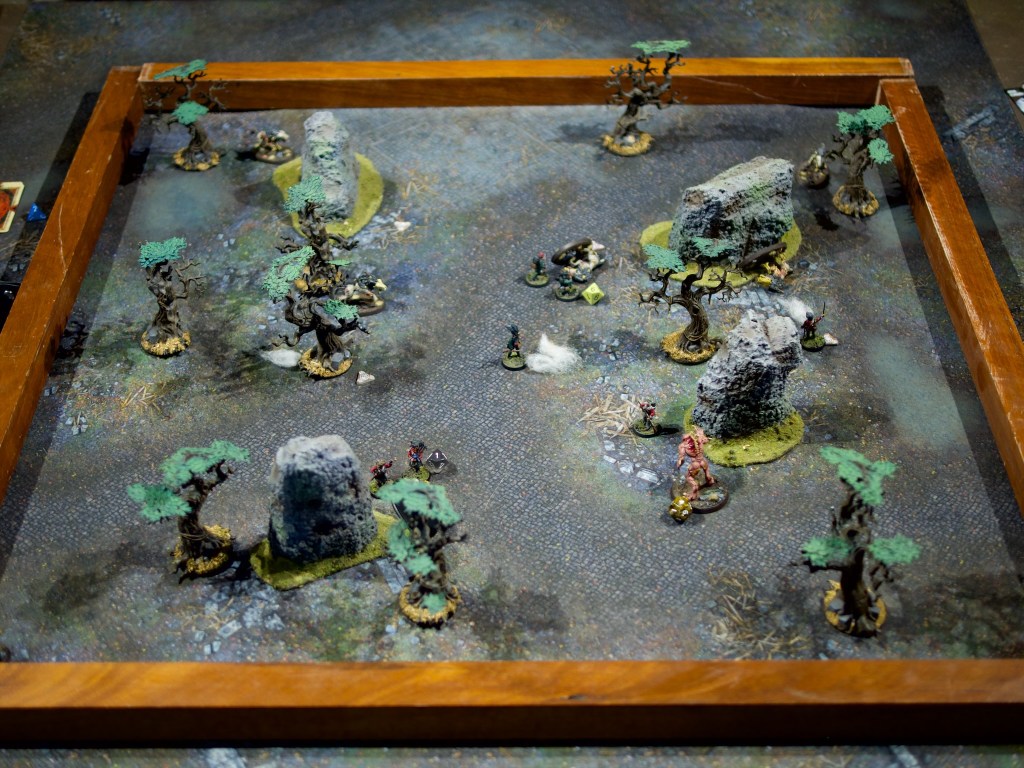
The state of things at the end of turn 1.
Turn 2
Fenner moves into the chapel, finding something of interest in the closest corner: a bag of silver shot! Crowe heads for another promising area of the chapel and scrounges up a silver knife. Both men feel a little bit more equipped for the horrors that await them outside of the chapel walls. Meanwhile, MacInnes continues his zombie hunt, charging the next closest and scoring a solid hit. The zombie’s strike back misses completely. The zombie then attacks MacInnes, but misses again, giving MacInnes the opportunity to finish it off with his own strike back. The rest of the zombies shamble forwards. In the far corner, the vampire approaches the Major and the men surrounding him.
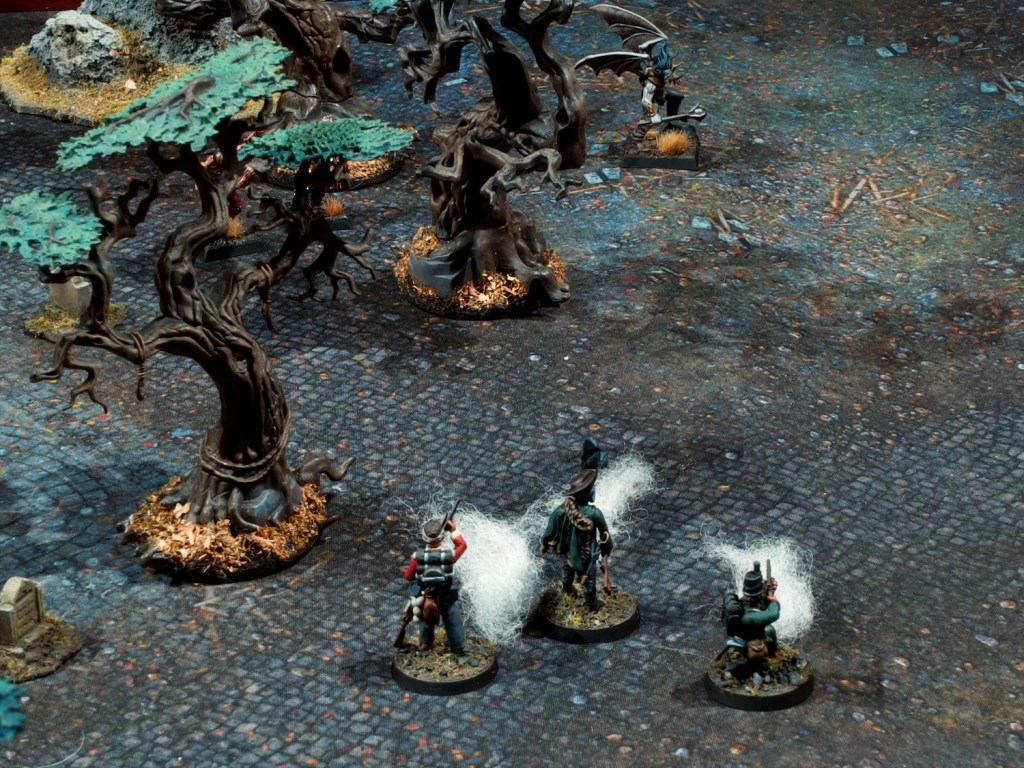
The unit prepares a silver-filled volley for the approaching monstrosity.
The major spots the shape coming towards him, loads silver shot into his rifle and backs away, closer to the chapel entrance. The Lieutenant and Pryor both line up next to the Major, ready to greet the new arrival with a well-timed volley. Another zombie claws its way out of a shallow grave…
The state of things at the end of turn 2.
Turn 3
Fenner loads one of his newfound silver bullets into his musket and sights through a crack in the chapel wall. Crowe keeps on searching the chapel and finds a small icon which gives me an extra power die in my fate pool (i.e. an extra re-roll!). To give the members of the team searching the chapel some more time, MacInnes fires his pistol at the zombies, misses, then rushes out towards them, drawing them away.
MacInnes draws the zombies away from the chapel.
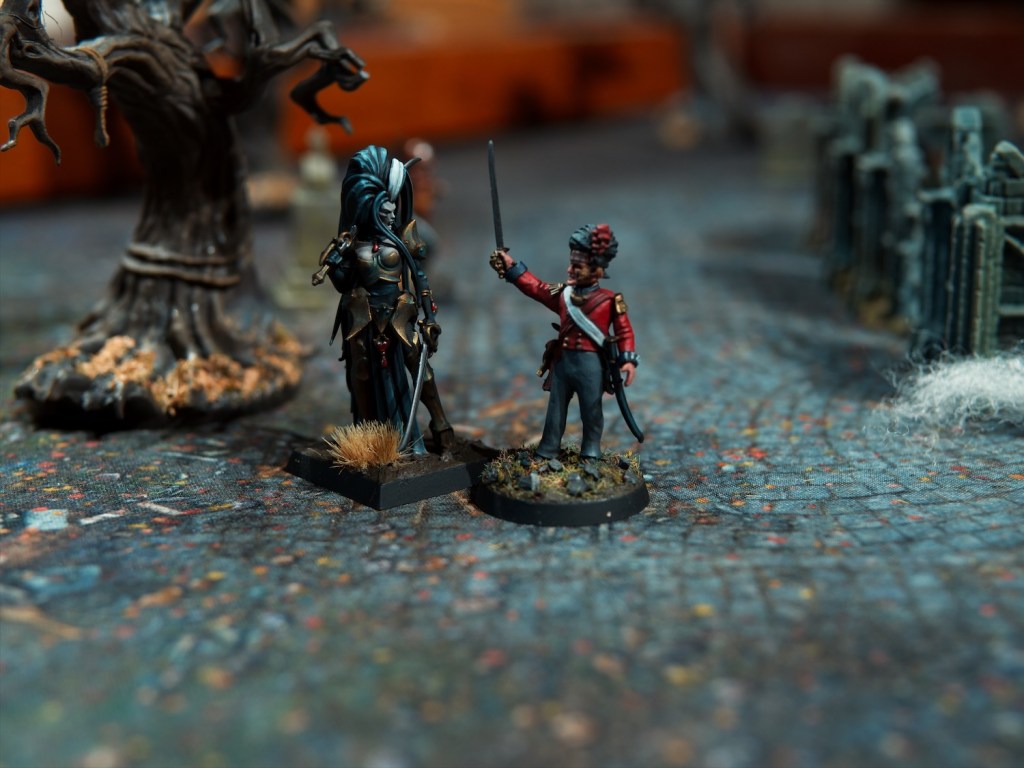
The vampire moves closer to the Major and his two sidekicks. All three open fire, but only the Lieutenant hits with his pistol. The Lieutenant is not equipped with silver shot, but his great faith means his attacks are blessed, which allows him to injure the Vampire. Bolstered by his success, the Lieutenant charges in, but locks eyes with the Vampire and its hypnotic powers freeze him in place.
Lieutenant MacRae might have bitten off more than he can chew…
With a groan, another zombie emerges from the soft ground.
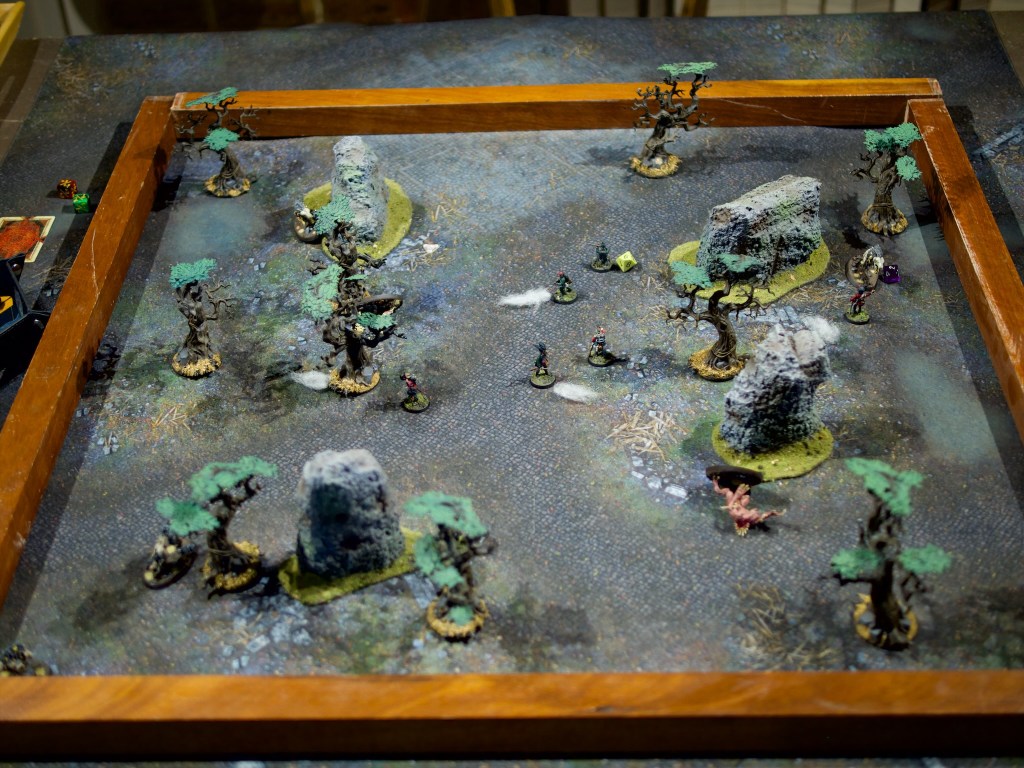
The state of things at the end of turn 3.
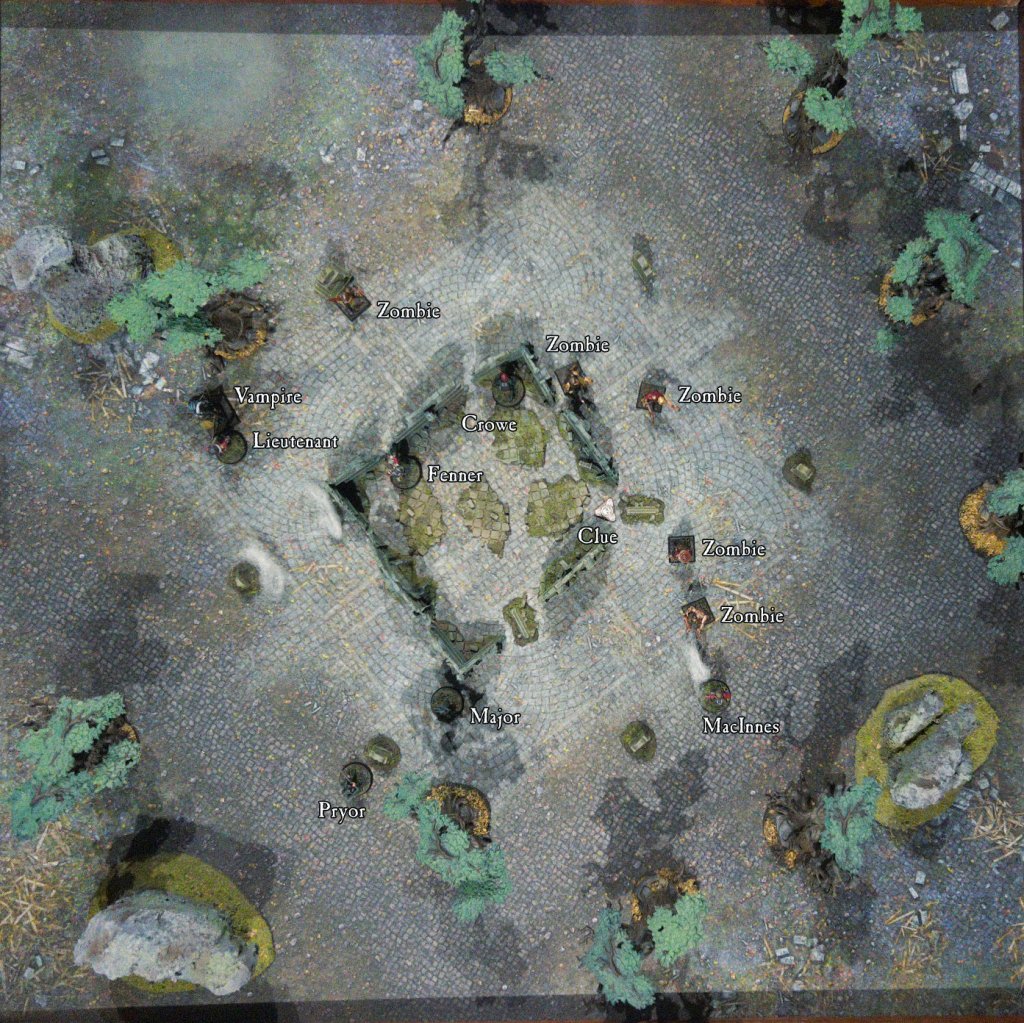
Turn 4
Fenner now has a clear shot on the vampire and takes it, but misses. He rushes out the the chapel, time to sound the retreat! Crowe takes the time to investigate the last corner of the chapel and finds a strange candelabra. He packs away the relic and makes ready to leave the chapel. The Major quickly reloads his rifle and shoots at the vampire but misses.
On the far side of the chapel, McInnes is caught by one of the zombies he’s been baiting and suffers a nasty hit. He backs away to stay out of reach of the second zombie, but in so doing exposes Crowe who is attacked in turn. The zombie misses, and Crowe sticks his bayonet into the Zombie almost taking it out. MacInnes moves away from the zombies and reloads his pistol.
The Vampire attacks the hypnotised Lieutenant and scores a nasty hit, which causes the Lieutenant to have to take a terror test which he fails spectacularly and is paralysed with fear as a result.
Lieutenant MacRae fights off his fear and the hypnotic powers of the vampire to strike at it. After the judicial use of a re-roll, his sword finds its target and the silver of his blade finishes off the vampire.
Lieutenant MacRae triumphant.
Fearing the arrival of another vampire, Pryor reloads his rifle and moves away from the chapel. Another zombie erupts out of the ground.
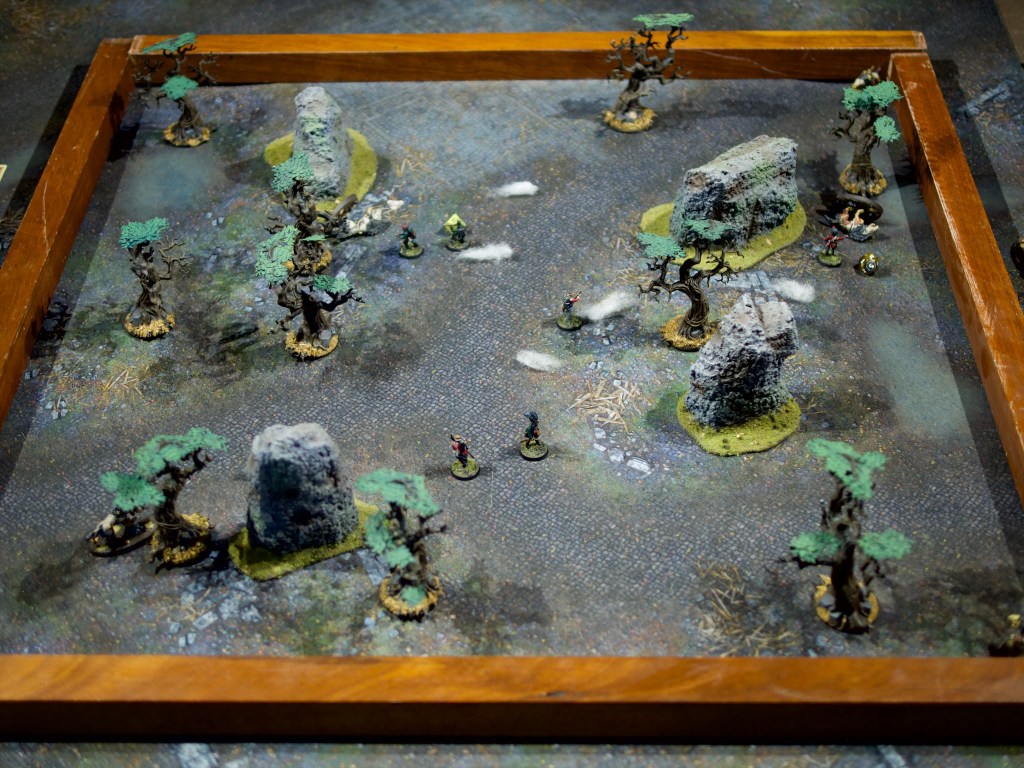
The state of things at the end of turn 4.
Turns 5 and 6
With the vampire slain and the chapel thoroughly searched it’s time to leave the area before the unit gets overwhelmed. MacInnes leaves the board first, with the rest of the unit moving towards their closest board edge and reloading their blackpowder weapons. At the end of turn 5 another vampire arrives right next to where MacInnes left the board (close call!).
Turn 6 sees the unit unloading a volley into the newly arrived vampire, and this time did not miss, killing it before moving off the board.
If they’d missed at least they’d have a nice cloud of smoke to cover their escape!
This mission felt a lot more tense than the first one, I came really close to losing more than just MacPherson, and I spent a lot of time retreating from fights. Last time, musketry was quite powerful, whereas in this mission the zombies were resistant to it, and the vampires completely immune if the musket wasn’t loaded with silver. MacPherson survived his injuries, but now has the shakes permanently, making his aim with his pistol much less good. Luckily for me he’s more of a close combat character!
Overall the mission was tremendous fun, and I’ll happily play through the rest of the solo missions in the book. Painting a few models and some terrain and getting to use them in a game immediately was very rewarding.
I tried to improve my battle report style with changes to how I wrote the action up and with the extra annotations on the top down photos. Keen to get any feedback on how you feel this reads compared to last week or if you have any idea how to improve it!
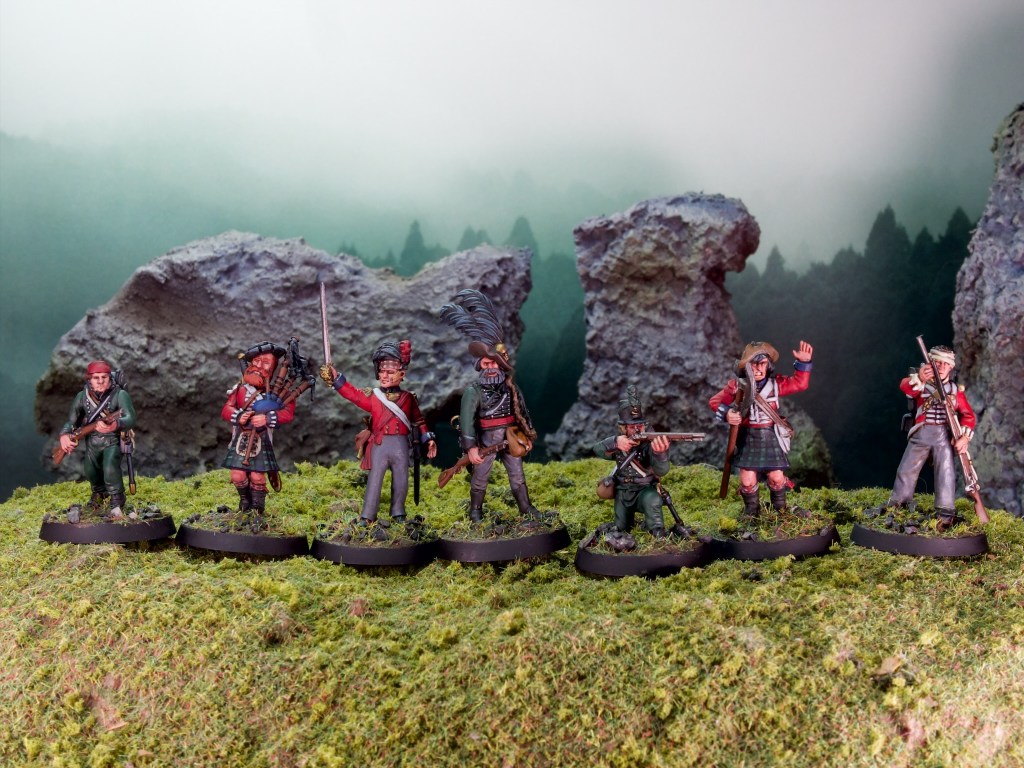
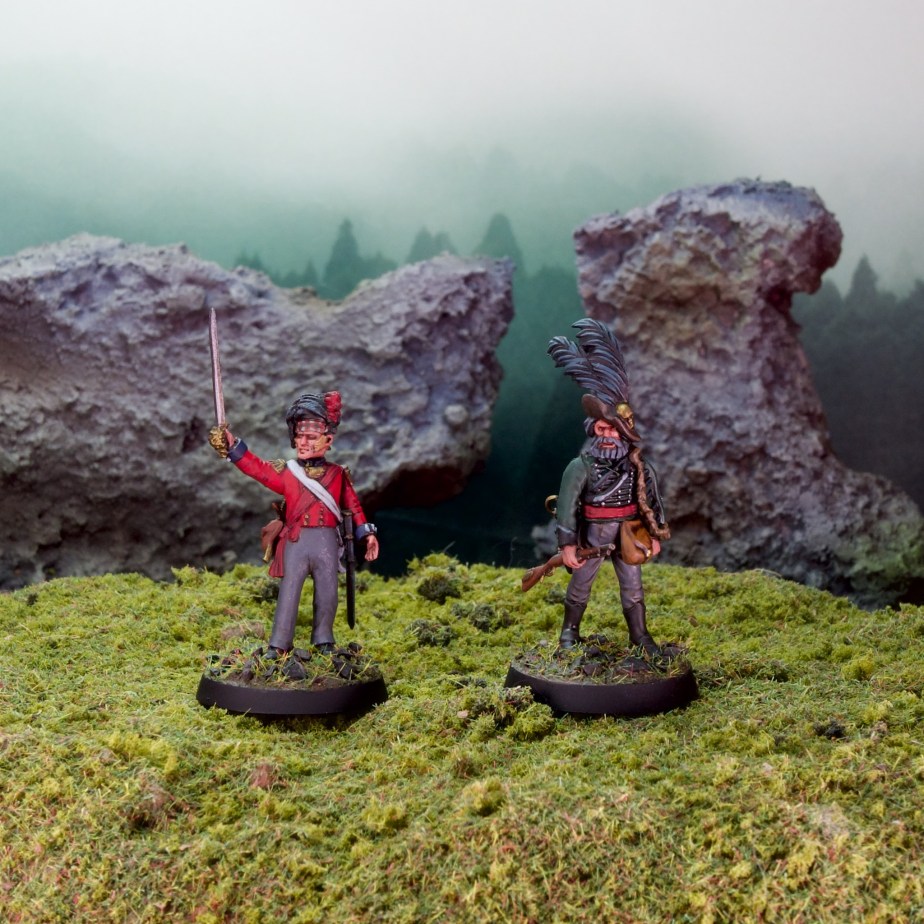
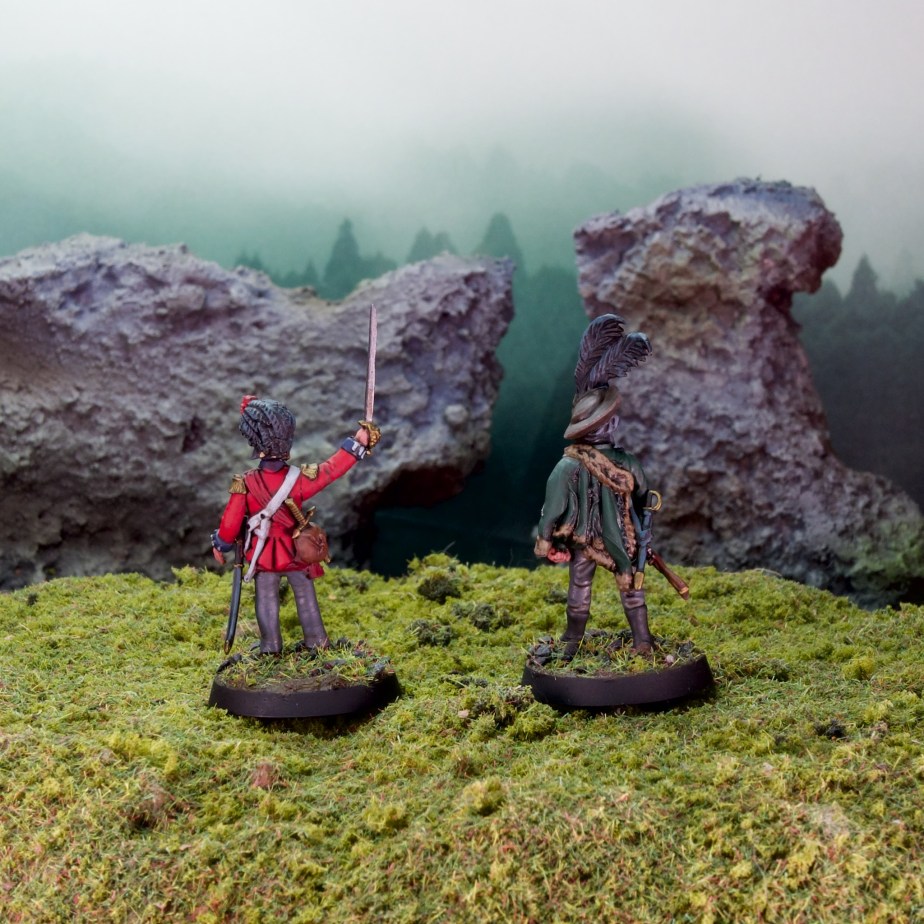
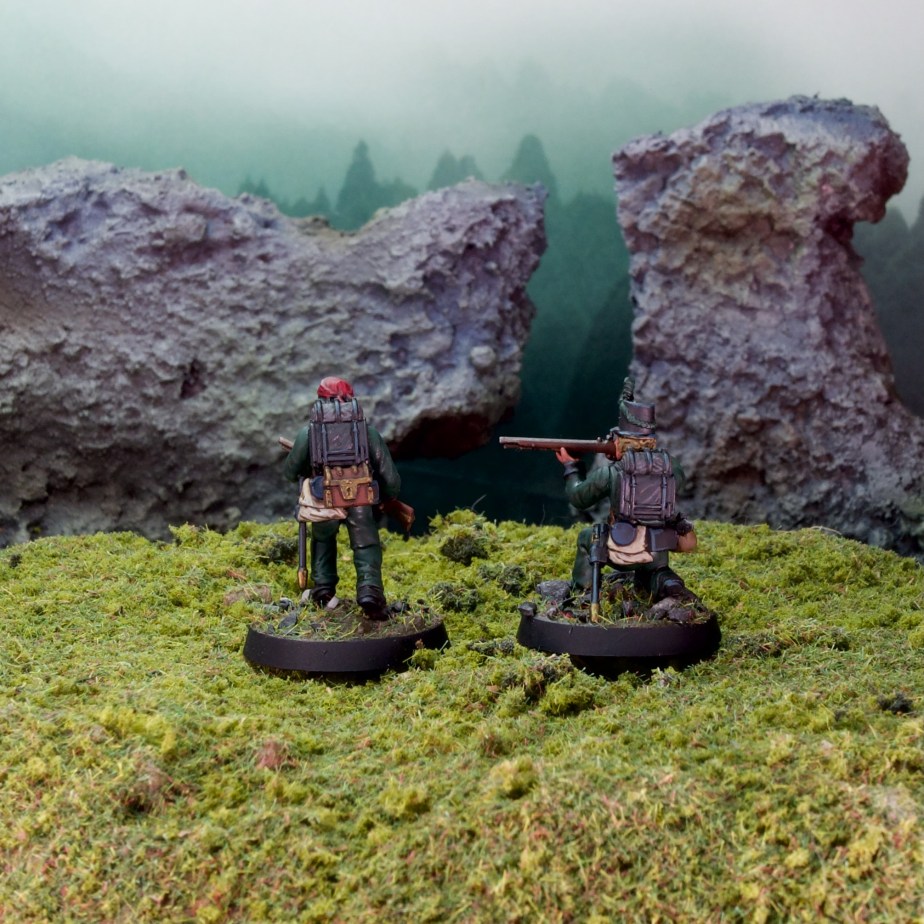
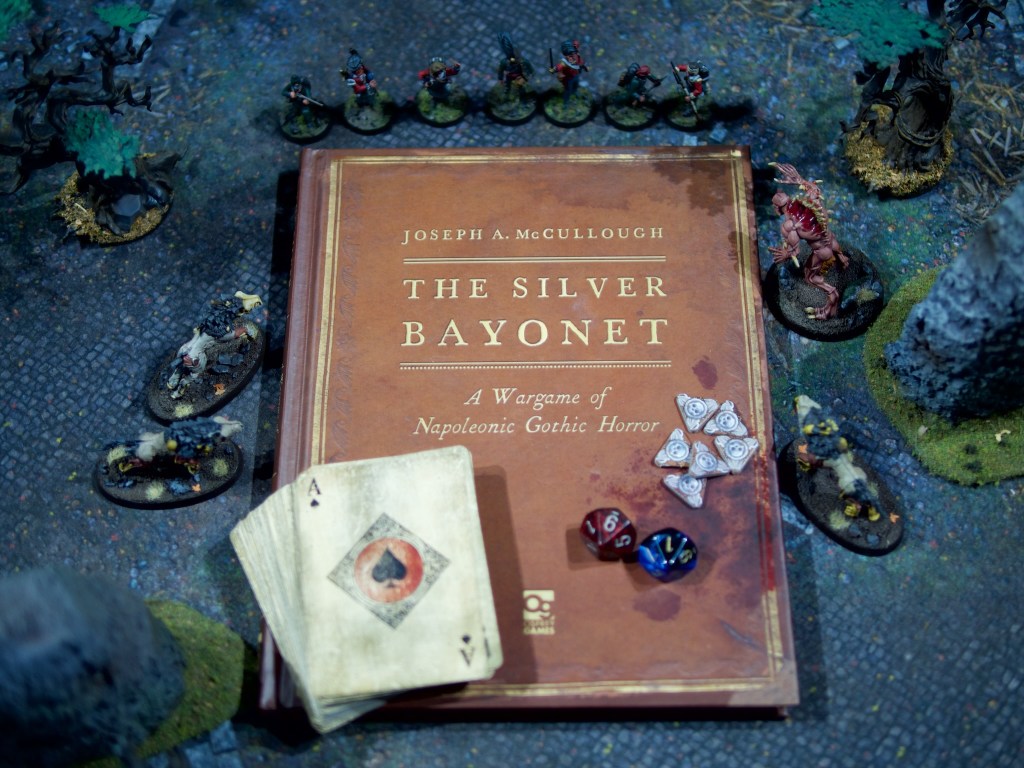
I wasn’t expecting to be working on this this week, but when inspiration strikes, seize it! I’ve been looking at running Rangers of Shadowdeep for my usual roleplaying games group, and while reading the books and doing some research I remembered one of Joseph McCullough’s other games that interested me while back: The Silver Bayonet. The Silver Bayonet is a skirmish game pitting Napoleonic era units against each other as well as against monsters brought about by the horrors of the constant wars of the era. This renewed interest in the game coincided with my reading of a book on the founding of “New France” (Canada/Quebec), so I was primed for some musket-based action. The game is really easy to pick up so I quickly threw together a unit roster (which can be up to 8 models), and started kitbashing!
I bought a bunch of different Napoleonic sprues a while back to use for Chosen Men so I had plenty of models to turn into a Silver Bayonet unit. As you can see above I ended up with 7 models rather than the max 8, so a slightly elite unit composed of my officer, a junior officer, two highlanders, two riflemen, and an infantryman. This eclectic mix is pretty standard for these units, which are made of soldiers (and others!) that have survived encounters with the supernatural rather than any particular regimental affiliations. The officer and the riflemen are based on the Wargames Atlantic Riflemen kit, the highlanders and junior officer on the Victrix highlanders kit, and the infantryman is from a Perry Miniatures kit. I decided early on I wanted to minimise the amount of shakos in the models, I see these units as being on the road a lot and being in full battle-dress for these skirmish fights doesn’t seem very appropriate (plus I could see losing your hat very easily when running away from a Werewolf!).
First let’s look at the officers:
My unit leader is Major Horatio Bellgrave, a 95th rifles officer reassigned to lead a Silver Bayonet unit and with a long history of hunting monsters. I selected the Supernatural Veteran attribute for him, which lets him pack extra supplies, which I used to cover all the super natural bases giving him silver shot, cold iron shot, and a salt bag for those pesky demons! Alongside that he has the quick reload attribute which lets him shoot every turn with a penalty rather than having to spend a turn reloading between shots. Modelling wise he’s mostly from the WA kit, with a head from a Warhammer Empire kit (with a ludicrous set of feathers!) and a bag from some other Warhammer kit to represent all the projectiles he’s hoarding!
The junior officer is Lieutenant Iain MacRae, from the Black Watch. I wanted a more traditional officer in the unit, as a counterpart to the probably slightly mad monster hunting Major. I selected the great faith attribute for the Lieutenant, and gave him a silver sword. The model is straight from the Victrix kit, barring the pouch and the crucifix which are from a Warhammer Empire kit (the crucifix is a cut down dagger). He has his official headgear on as it matters a lot to Iain to be properly uniformed, even when fighting the supernatural.
Next up the red coats! From left to right:
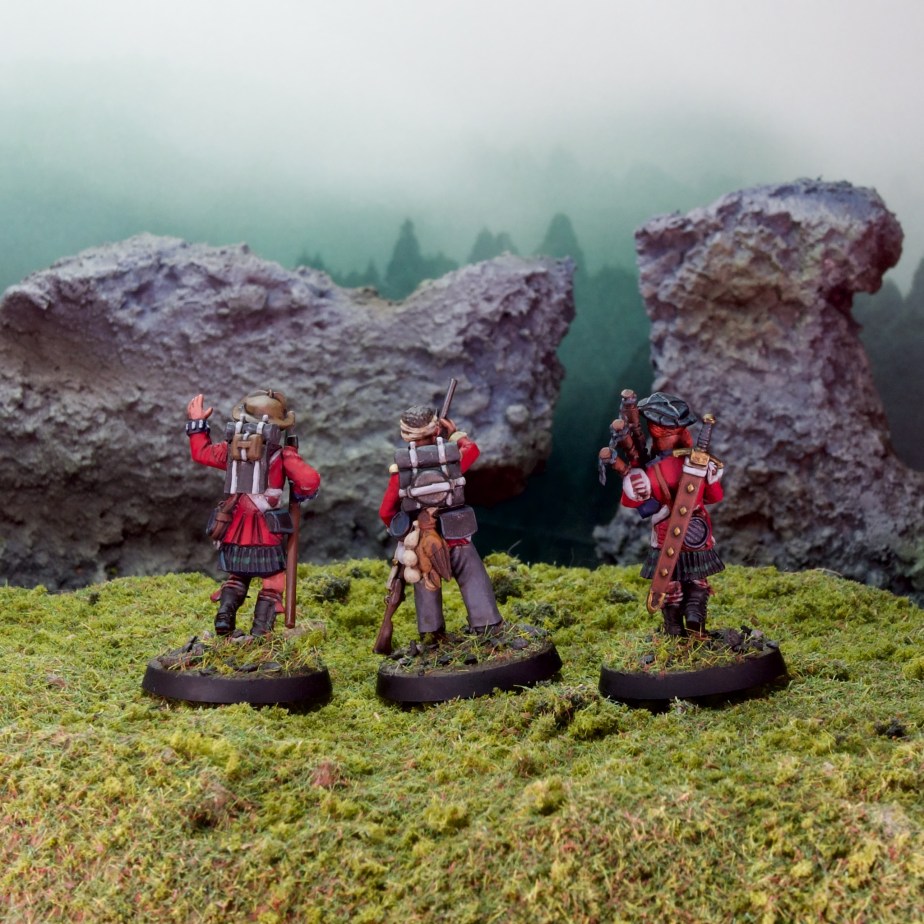
Private Ruairidh MacInnes, a highlander of the Black Watch, wielding a huge silver Lochaber Axe. The eagle-eyed amongst you will notice he’s wearing red epaulettes, which are not correct for a private! This is a modelling constraints, as I used the officer banner arms to create the axe. I rationalised this by painting them red like French Imperial Guard epaulettes, clearly MacInnes bested a guard and took them as a trophy! For the rest of the model the head of the axe is from a Perry Agincourt set, while the head is again from a Warhammer Empire kit (some great grizzled heads in these Warhammer sets!).
Private Jack Fenner of the Buffs. As mentioned above, this one is from a Perry kit, with these great reloading arms. The bandaged head is from Warlord WW2 British paratroopers, and his dinner is from the Bretonnian Men-at-arms kit. I picked the Buffs for the regiment from a family connection, one of my Great-grandfathers on my English side was in the Buffs in North Africa and Italy during WW2. On top of his musket he’s equipped with a salt bag to pepper unholy creatures with.
Private Callum MacPherson, also a highlander of the Black Watch, with a classic claymore and bagpipes combo. We have once again a Warhammer Empire head, albeit an older one, and the sword is from the Warhammer Empire Knights kit. The body and pipes are from the Victrix set. I’m treating the pipes as a holy item in the game, clearly bagpipes have some effect on monsters!
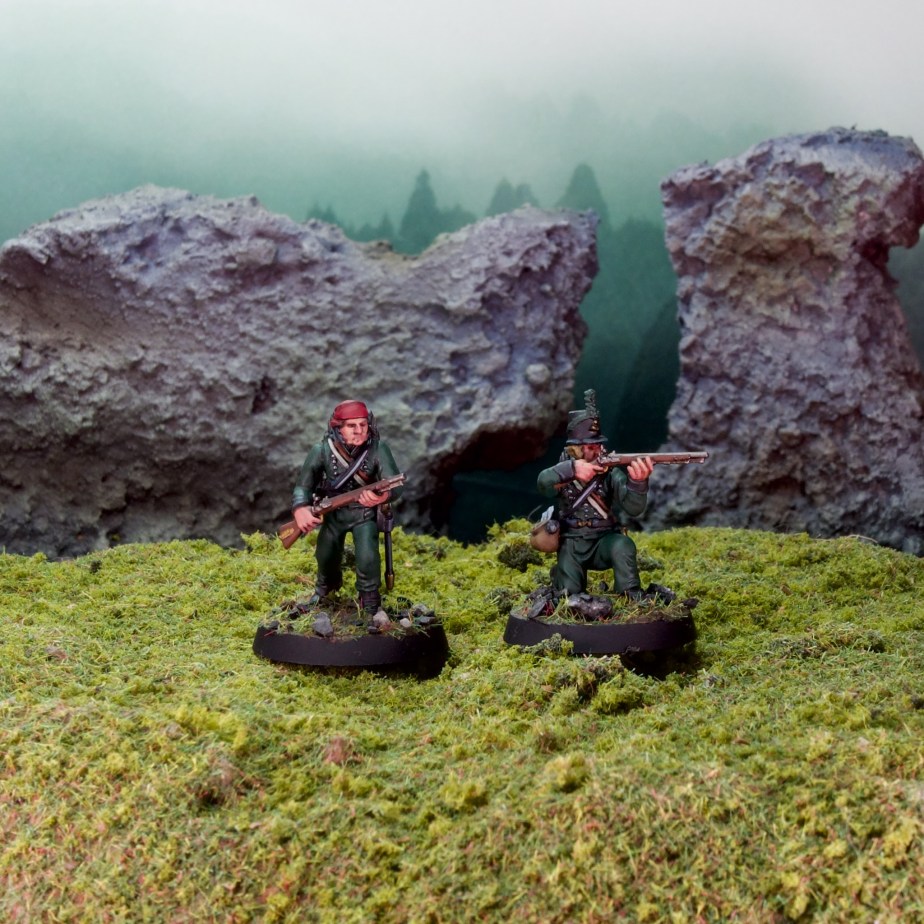
Last but not least we have the pair of riflemen:
Private Isaac Crowe, follows in the steps of his major and on his way to becoming a great monster hunter. The model is almost wholly from the WA riflemen kit, the only exception the small chest hung under his backpack, from the Bretonnian Men-at-arms kit. Clearly some precious loot! He’s carrying cold-iron shot.
Rifleman Benedict Pryor, more junior (hasn’t lost his hat yet!), more proper, and likely feels closer to MacRae than to his Major. Also almost entirely from the riflemen kit, he just has a small pouch with a bird in it from the same Men-at-arms kit (slightly hard to see in the photos). He’s carrying silver shot.
There you have it! These were very fun to put together, and very quick to paint, I finished them in a couple of sessions. It scratched the Napoleonic itch nicely, with a bit of research on the uniforms, and my first ever attempt at painting tartan.
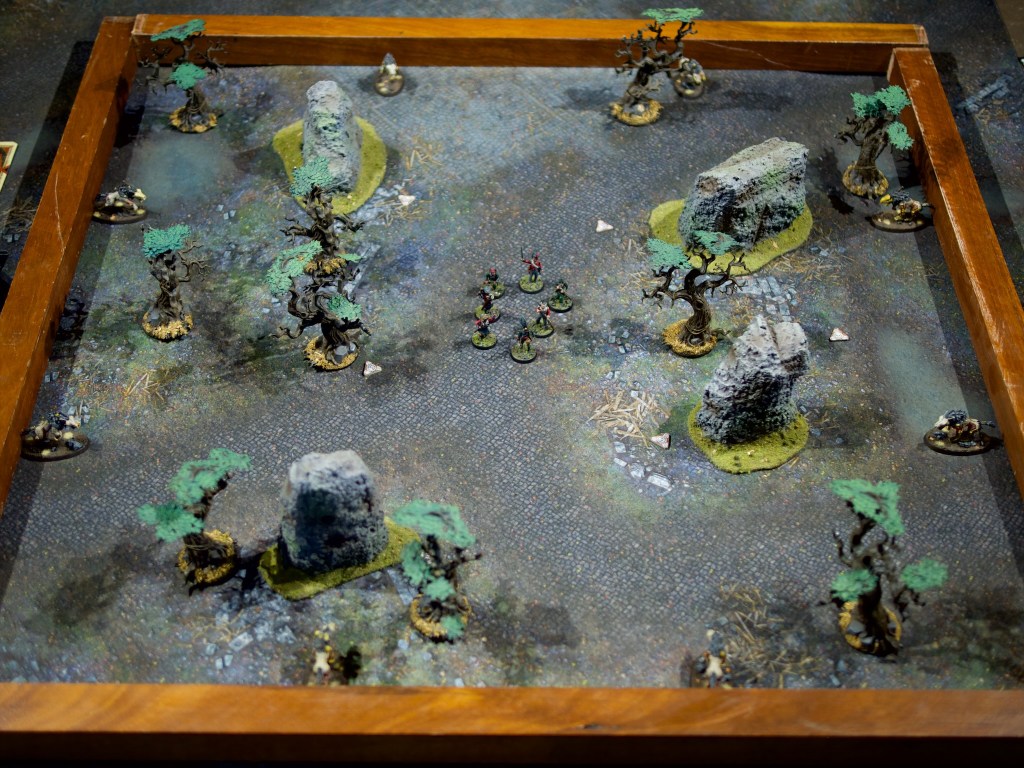
At the risk of making this post very long, Silver Bayonet also comes with a set of solo gaming rules, and I couldn’t resist trying the unit out so here’s a quick skirmish report for the first solo mission in the game: Wolf Hunt.
The premise behind the mission is my unit is looking for traces of another unit which has not reported in a while. While tracking them, my unit finds signs of a scuffle and starts looking around for clues as to what might have happened. The search is interrupted by wolf howls…
The setup at the start of the game.
The game is played on a small board compared to what I’m used to (2.5×2.5ft), so I marked off the area with some spare wood I had lying around (the marked off area is closer to 3x3ft but I did what I could with what I had!). The unit starts in the middle of the board and 8 wolves evenly spaced out 2 per edge. The clues I need to investigate are marked by the triangular tokens, there are 6 all up. My goal is to find a clue as to what happened to the missing unit(and recover their orders if possible to avoid them falling into enemy hands) and get off the board, the game ending when I have no models on the board. At the end of each turn I have to roll on a table that indicates what happens (usually more wolves arrive!). Unlimited turns with wolves arriving every turn means I need to get a move on investigating those clues! Behind each of the clues is something that will help or hinder the unit, as determined by a small number of playing cards shuffled into a clue deck. As a model investigates a clue, a card is drawn from the deck and a table consulted for what the model found.
The game uses 2 D10 for all its rolls, one blue (skill), one red (power). The dice are rolled together and added up to see if an action is successful. The colours are used to indicate damage in the case of attack rolls, with more skillful weapons using the roll of the blue dice for damage and more brutal weapons using the red die. This is a really simple mechanic, but quite engaging especially when combined with the fate dice described below. As an example, assume MacInness attacks a wolf with his axe (uses power die for damage), he rolls 2d10 (7 Blue, 6 Red), adds them up (13), and compares to a wolf’s defense (12). He equaled or beat the defense, so he deals the damage, which is 6 as per the power die (+1 for the weapon being heavy!). A wolf has 8 wounds, so we mark off 7 of those and the wolf gets to strike back!
In solo missions, players get two fate dice, one of each colour which allow for one re-roll per dice type. This can be quite important as a re-roll may not only allow a model to hit, but also to deal more damage!
Turn 1
The turns are split into a first player phase (P1), where I can act with half my models, then a monster phase (MP), followed by a second player phase (P2) where I can act with the rest of my unit.
P1
MacInnes moves towards the closest wolf and fires his pistol, killing it instantly (lucky!)
Fenner fires his musket at another killing it (after I used a fate die to re-roll the 1 on the skill die!)
Crowe fires his rifle at another and kills it too (3 shots – 3 kills so far! that has to be a record)
Pryor fires his rifle, hits but only deals 4 damage.
MP
The wolves all close in on the unit, all moving towards the closest member they can see.
One of the wolves is revealed to be a werewolf!
P2
Major Bellgrave fires a silver bullet at the werewolf, scoring a solid hit (7 damage)
Lieutenant MacRae bravely charges the werewolf and skewers it with his silver sword!
MacPherson charges the wolf closest to him, hits it for 6, the wolf bites back but misses.
End of round, two more wolves arrive.
MacRae’s foolhardy but extremely effective charge!
State of the board at the end of turn 1. (Sorry for the blurry photo, still don’t have a sensible way to take board photos!)
Turn 2
P1
MacPherson attacks the same wolf, misses. The wolf does not miss back however and hits hom for a massive 10 damage! Luckily highlanders have 11 health unlike most of my other troops so he clings on, but things are looking dicey!
MacInnes comes to his rescue and swings his axe at the wolf, killing it.
Lieutenant McRae pulls his sword out of the werewolf and continues his rampage, killing a wolf with a pistol shot, then moving to the clue closest to him.
Fenner moves onto his closest clue and investigates. Unfortunately, I draw the ace of spaces from the clue deck which means what drew Fenner’s attention was a lurking werewolf! Right before the monster phase too…
MP
The werewolf swings its massive claws at Fenner … and rolls snake eyes! Critical failure. Normally this would cause the model to lose its weapons, but luckily for the werewolf those claws are well attached. Fenner keeps his head together and bayonets the werewolf, unfortunately his bayonet is made of regular old steel and only deals two damage to the werewolf.
The remainder of the wolves close in further.
P2
Major Bellgrave uses his quick reload ability and fires at the werewolf, hits after I burn my power dice fate re-roll (no more re-rolls now!) and deals 6 damage with a silver bullet.
Pryor reloads his rifle and charges a wolf with his bayonet, but misses. The wolf bites back and inflicts 4 damage.
Crowe also reloads and charges the same wolf, he is luckier though and finishes the wolf off.
End of round, one more wolf arrives.
State of the board at the end of turn 2.
Turn 3
P1
Major Bellgrave quick reloads again and fires a silver bullet into the werewolf, killing it.
MacPherson investigates the clue next to him, discovers an ornate silver ramrod, which gives me an extra Skill die in my fate pool.
Crowe fires his rifle into the closest wolf, and scores a critical, killing the wolf instantly!
MacInnes investigates another clue and finds a bag of silver shot, meaning he can shoot effectively at werewolves if any others arrive!
MP
The wolves close in.
P2
Fenner reloads his musket.
Lieutenant MacRae investigates the clue he moved to last turn, and finds a silver knife (clearly whoever left all this stuff was prepared for werewolves!). He then charges the closest wolf, and deals 6 damage with his sword . The wolf bites back and deals 4.
Pryor investigates another clue and finds a silver medallion, giving me an extra power die in my fate pool (back up to one of each!).
End of round, one wolf arrives.
State of the board at the end of turn 3.
Turn 4
P1
Fenner fires his musket at the wolf Lieutenant MacRae attacked but misses
MacRae then charges back into the wolf, rolls horrendously on both dice and I decide to re-roll both with my freshly obtained re-rolls. The new rolls are excellent and the wolf is killed.
MacInnes moves closer to MacPherson and reloads his pistol (with his new silver shot!).
Major Bellgrave quick reloads and fires at the closest wolf, but misses. He moves towards the board edge, time to think about finishing this skirmish!
MP
The wolves close in.
P2
MacPherson decides to leave the board, his wounds are rather bad.
Pryor fires at the wolf close to him, misses, charges in with his bayonet and scores a hit for 5 damage. The wolf misses when trying to bite back.
Crowe charges in too, and bayonets the last wounds off the wolf.
End of round two more wolves arrive
State of the board at the end of turn 4.
Turn 5
P1
Crowe investigates the last clue, finds the missing unit’s orders! I need to get these off the table if possible.
Lieutenant MacRae reloads his pistol and moves right to the edge of the board. He;s looking to draw the wolves there towards him, away from Crowe, to give him a better chance to get away with the orders.
MacInnes fires his pistol at the closest wolf, misses, and moves towards the closest board edge.
MP
The wolves close in.
P2
Major Bellgrave quick reloads, fires at the same wolf, misses, then moves closer to the board edge.
Fenner reloads his musket and moves towards the board edge.
Pryor also reloads and moves towards a board edge.
State of the board at the end of turn 5.
Turns 6 & 7
Those two turns are rather uneventful, the unit simply retreats off the board and fires at any wolves getting too close.
Wrap-up
The unit achieved all the objectives and got maximum experience out of the scenario, not bad!
The game was very fun, I’ve never really tried playing a solo wargame before. The rules were very straightforward, and the scenario interesting and engaging to play. I think I got very lucky in the early rounds killing so many wolves in one hit, this would have been much harder with a few more wolves running around. There are 3 more solo scenarios in the the rulebook and I will be definitely playing through them. I’m not sure the top down photos are particularly great for these small skirmish battle reports, it’s a bit hard to follow what’s going on I think. I may try some other way of recording the action for future ones, open to suggestions if anyone has some!
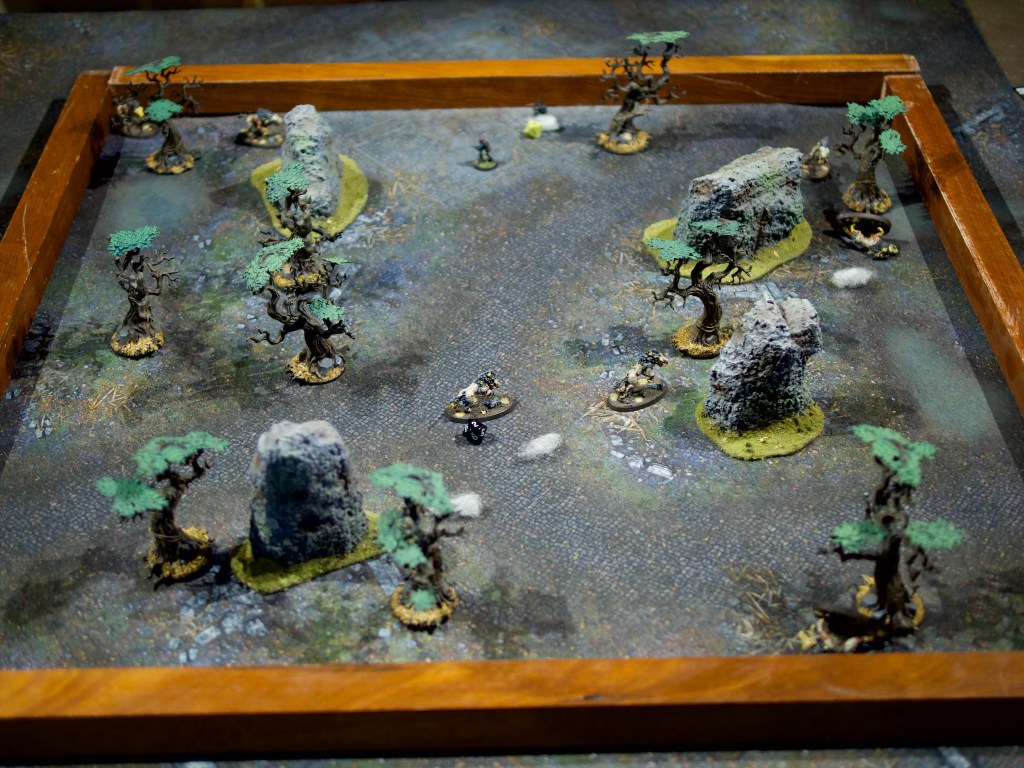
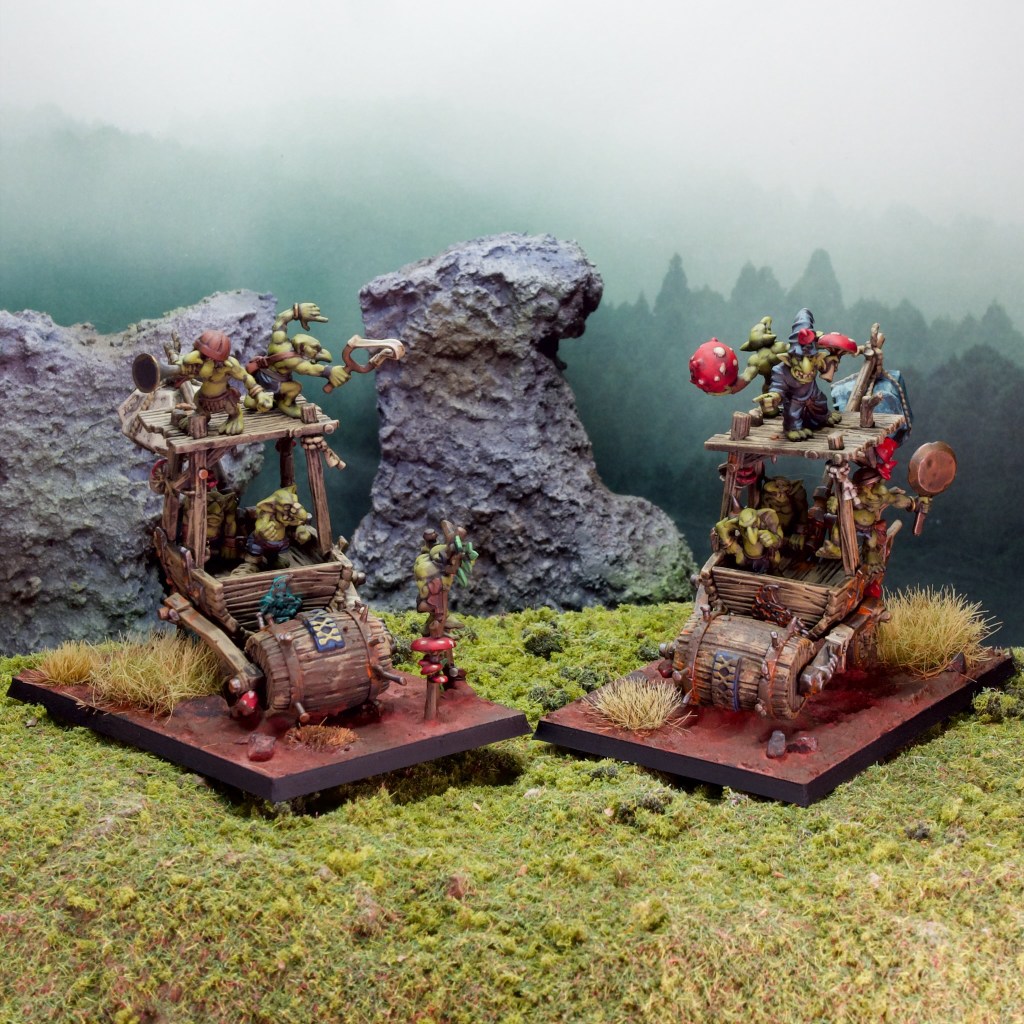
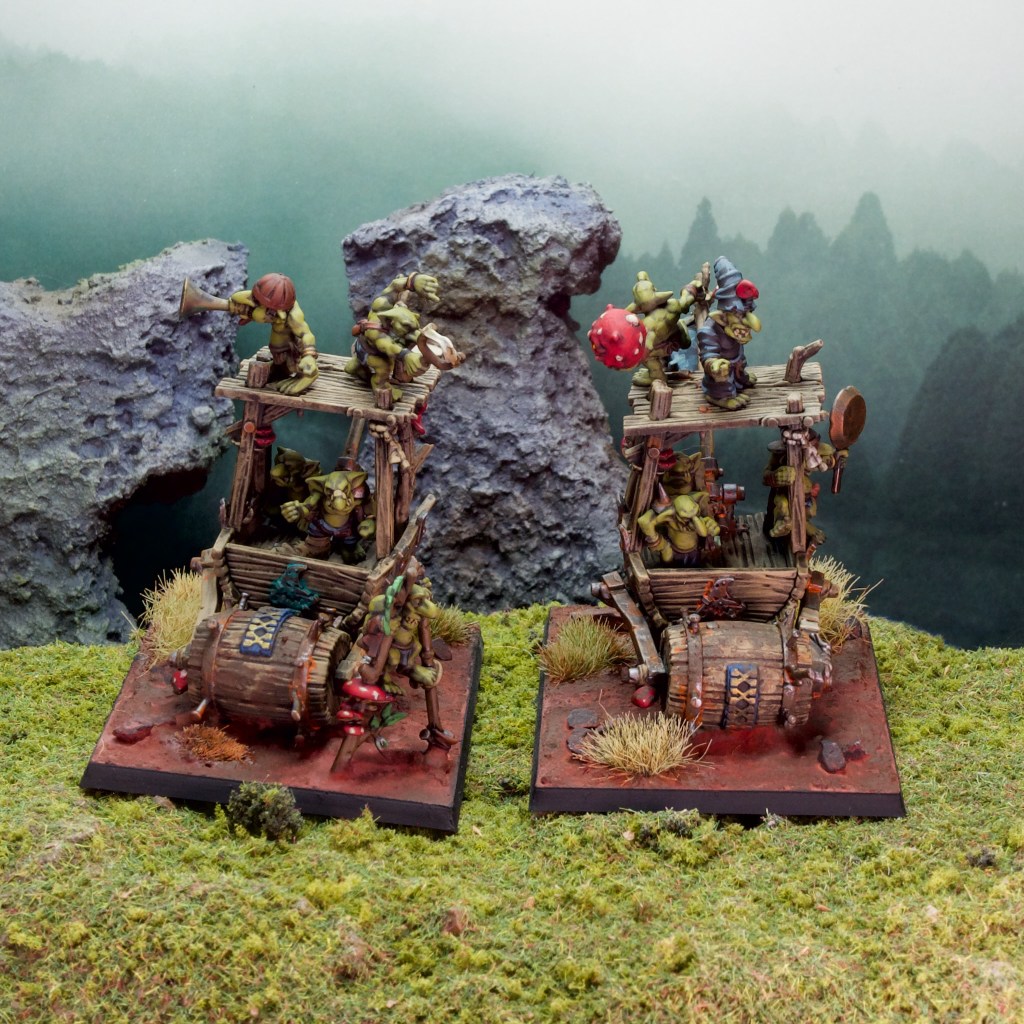
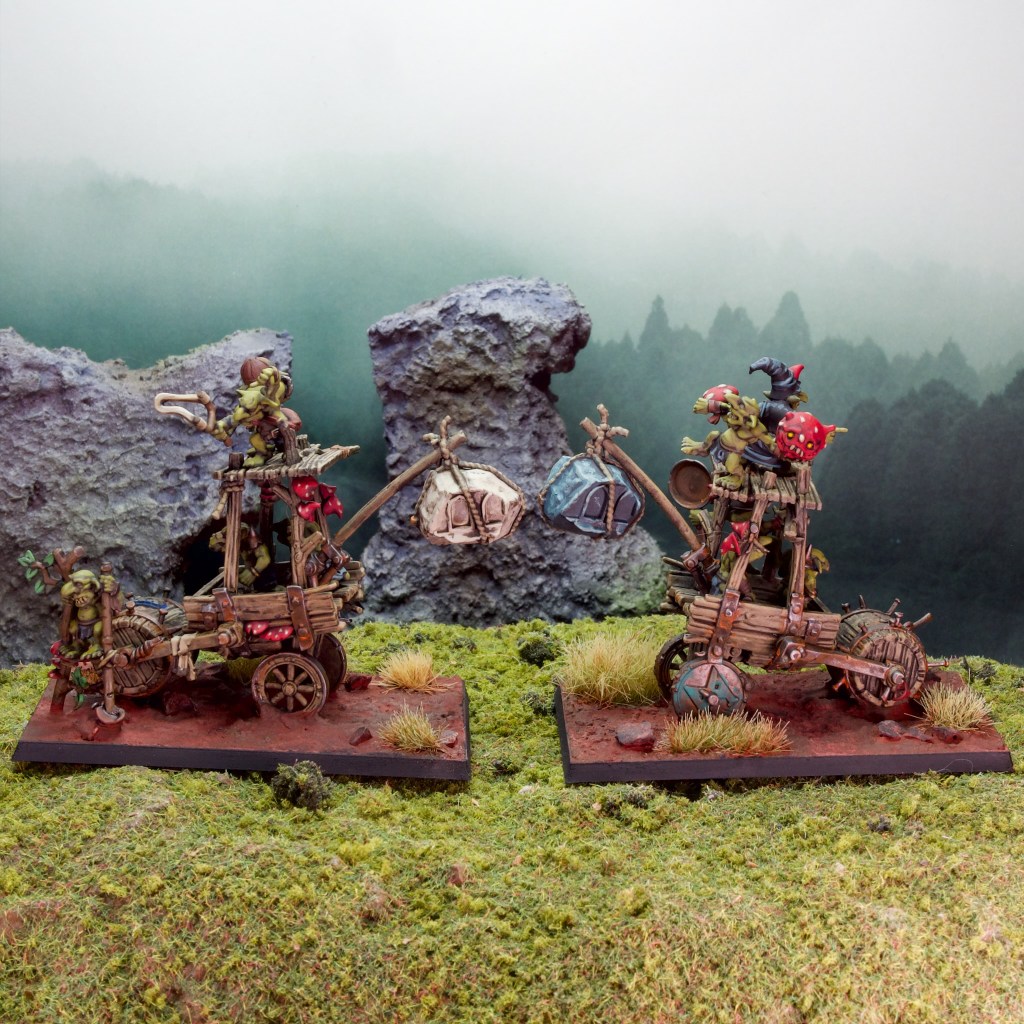
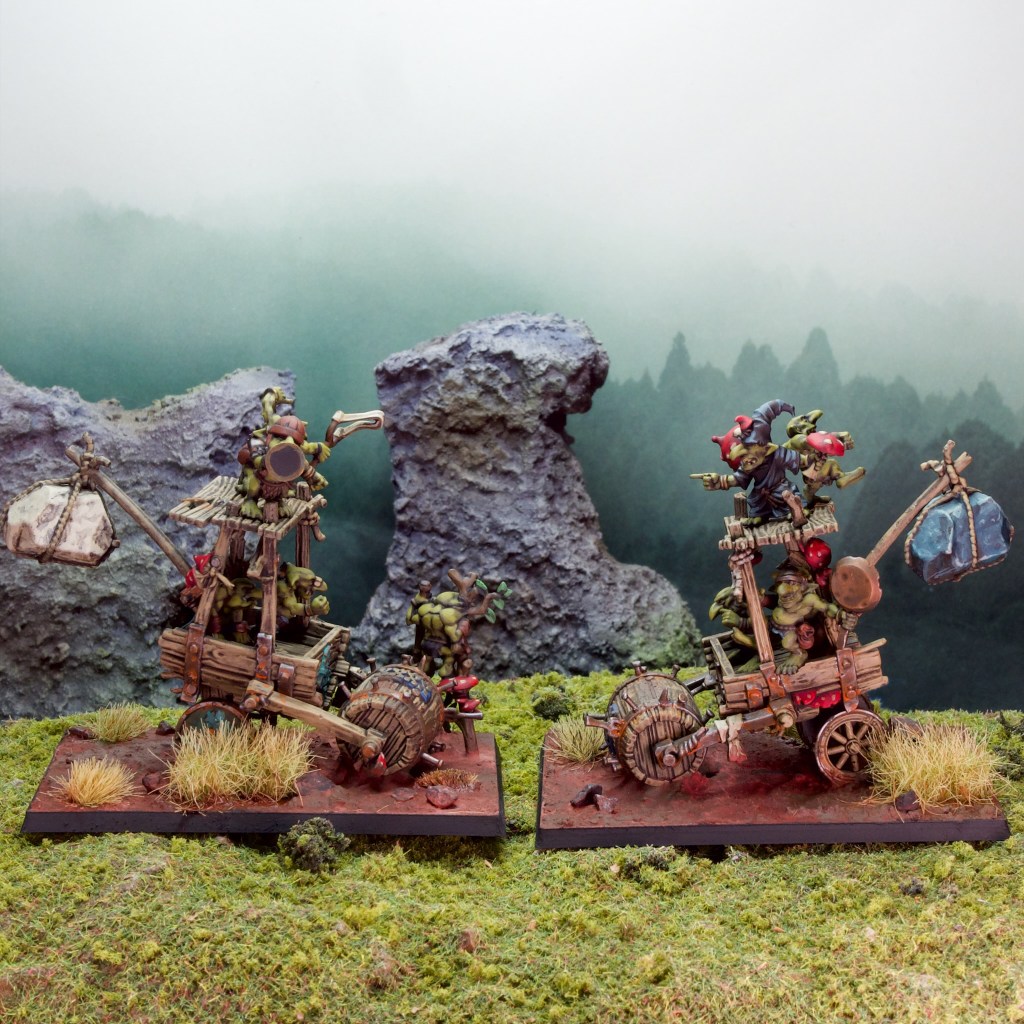
After last post‘s detour into card gaming, back this time with some more usual fare for this blog, models! I’m still pottering away at my Orcs and Goblins army and just finished these two extremely fun models: Snotling Pump Wagons!
For the non-initiated, Snotlings are what Orcs and Goblins call their even smaller cousins, which are even tinier goblins (The models are quite small as you might imagine!). Pump wagons are weird contraptions that are built, crewed, and powered by Snotlings, and as a result barely hang together but can surprisingly effective in the game … if they reach their target.
These models are actually the Blood Bowl Pump Wagons, which I much prefer to the proper Warhammer ones. Even though they’re plastic, they’re surprisingly fiddly to put together (to the extent that I think it’s on purpose to ensure they end up as rickety as if they’d been built by Snotlings!). They come as part of the Snotling Blood Bowl team which is packed full of characterful Snotling models, which meant I could cram them full of different sculpts.
While the models are the same model twice I tried to add some variety to them, mainly through the addition of different Snotlings as I mentioned, but also with some painting differences. The kit is also relatively flexible and lets you add pieces in a few different ways which is nice.
These were a lot of fun to paint as you might imagine. I had all the Snotlings separate for painting to make things a bit easier for myself, and gluing them to the pump wagon once everything was painted was very satisfying.
I’ve just embarked on a “small” side project which has my son very interested in miniature-related gaming so expect to see some (all?) of that next post!


