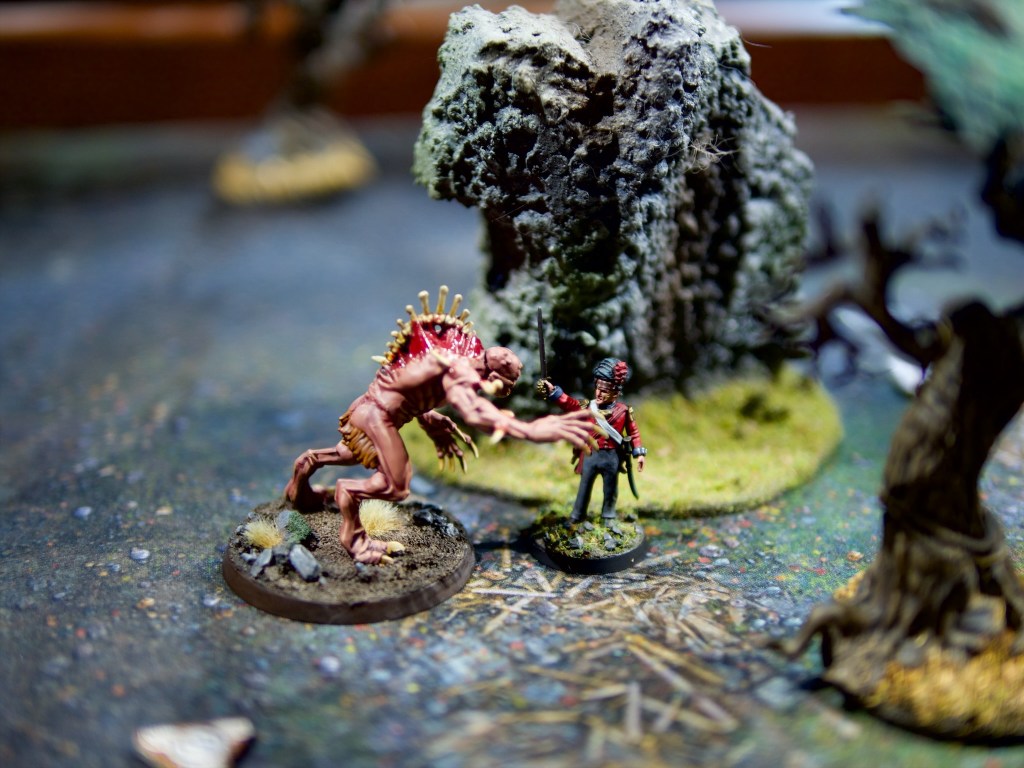
After last week’s fun with The Silver Bayonet I was keen to continue with more of the solo missons in the book. The second mission has the unit come across a ruined chapel and investigate it. Unfortunately for them, zombies have overrun it, and some more powerful undead are lurking about!
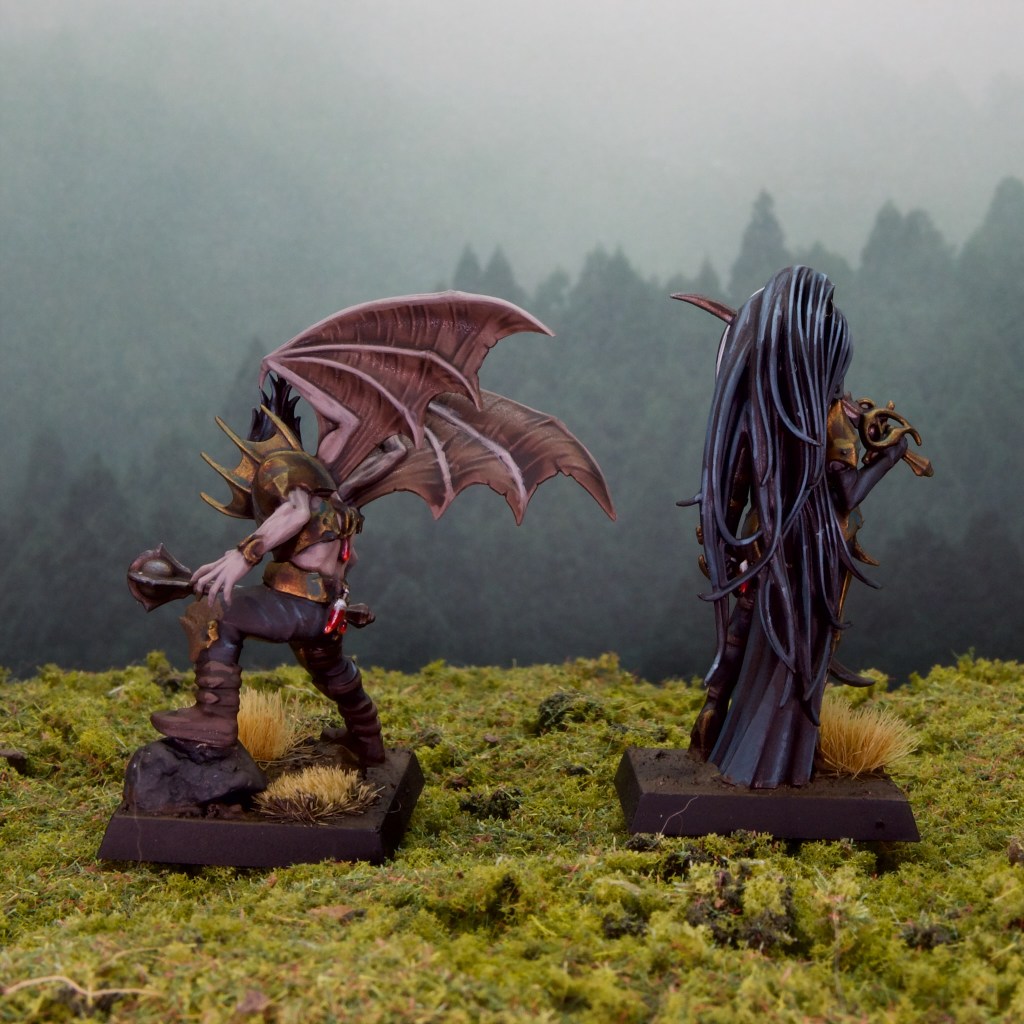
I was covered for the zombie miniatures, but needed some vampires that looked a bit less overtly warhammer-y, so I decided to paint up a couple of the less over the top miniatures out of the Crimson Court Warhammer Underworlds warband. I based them on square bases as I think I’m most likely to use them for Warhammer Old World going forwards.
I kept the colours very muted on these, with black cloth and the bronze dulled down. These models were really nice to paint, with nice crisp details but not too much going on. I love painting glass vials too so glad to see some on both these models, clearly they like carrying a top up with them!
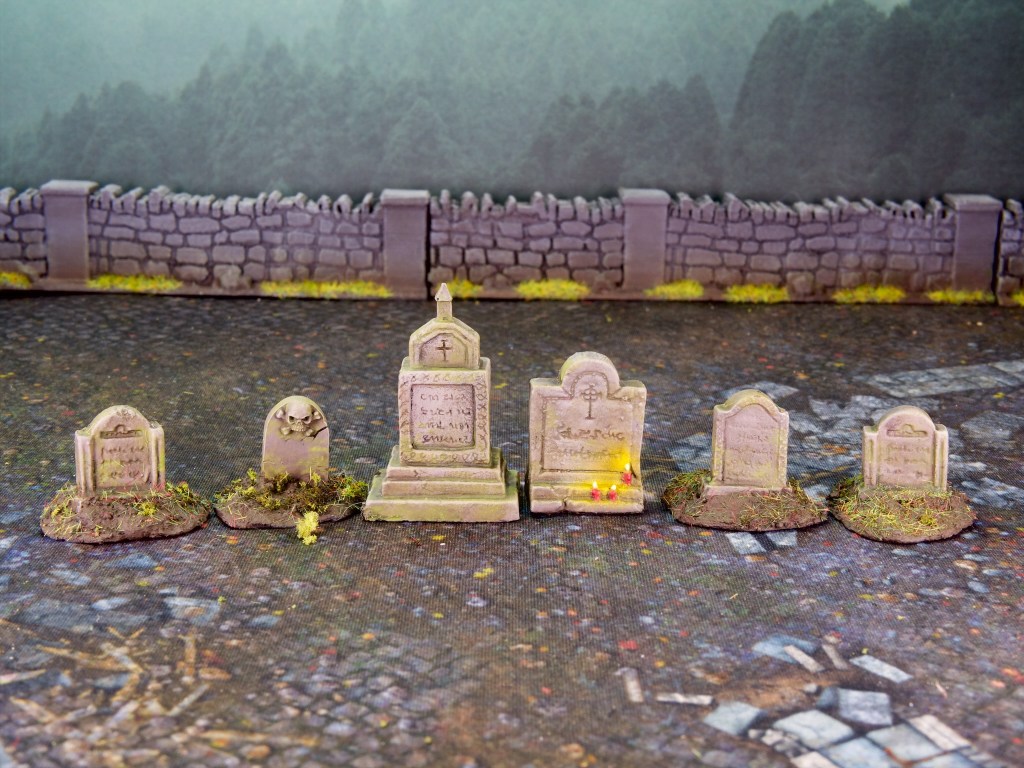
I also needed a bit more terrain for the scenario, namely a set of tombstones and a ruined chapel. The tombstones are really nice resin models from Tabletop World except the one with a skull and crossbones which is from the old Warhammer Skeleton sprue. I painted these pretty quickly, with a grey undercoat, brown wash, some grey and cream drybrushes. All topped off with some nice mossy greens using some enamel washes.
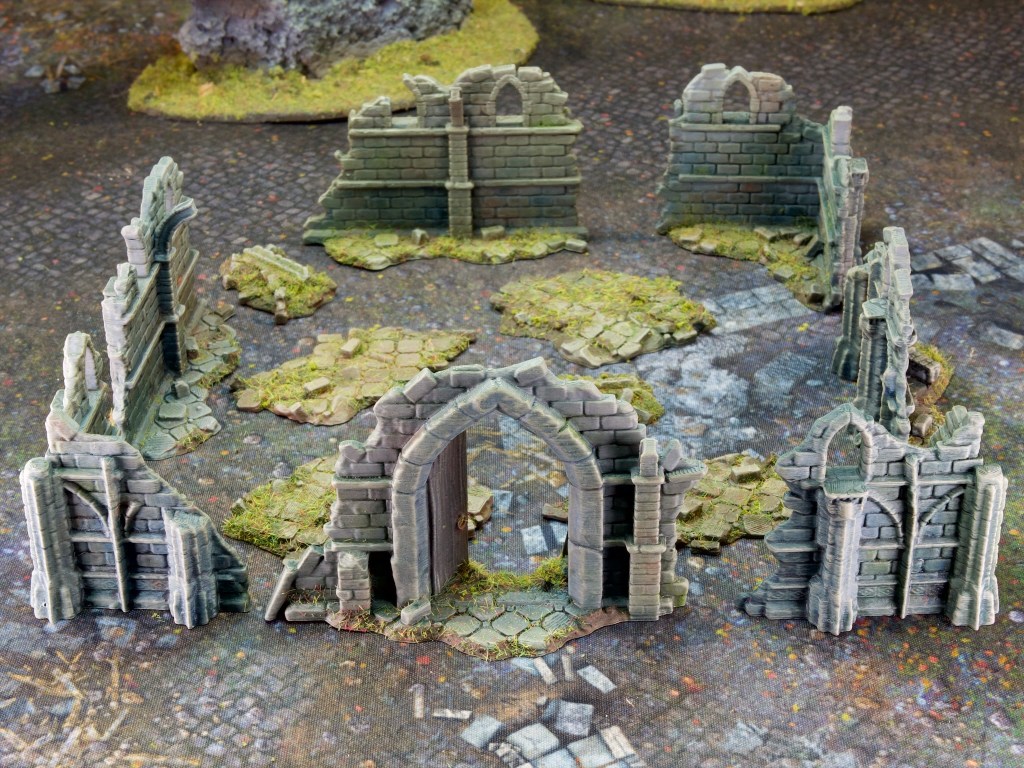
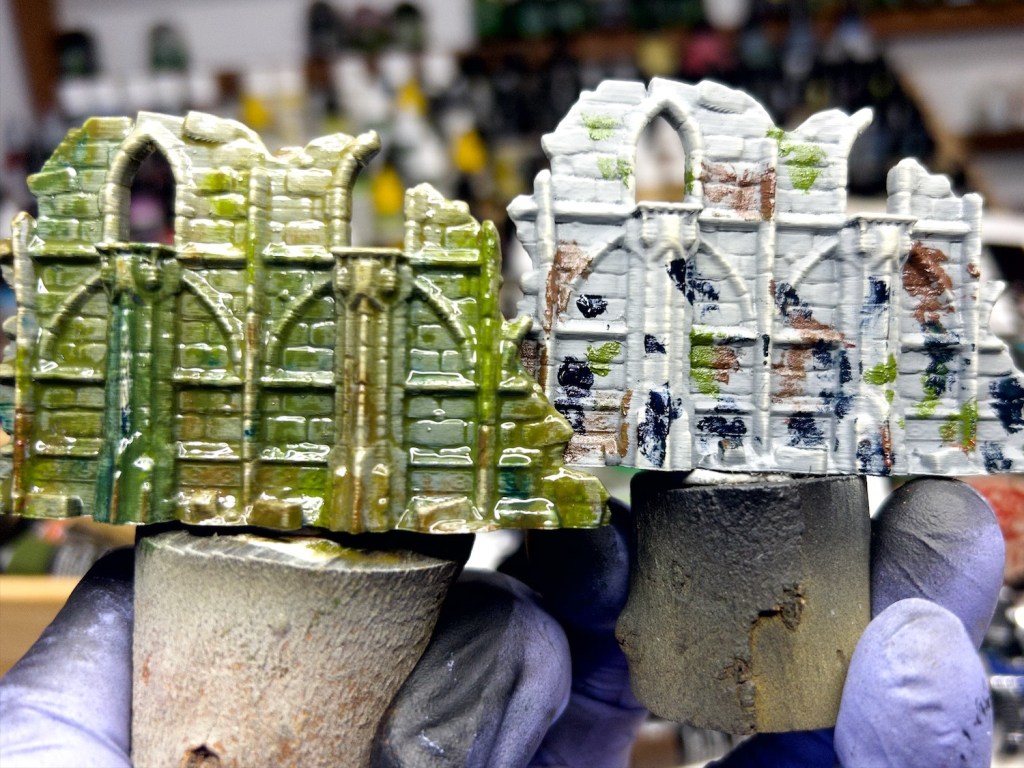
Finally, the ruined chapel. This is a nice modular ruined church STL set by Vae Victis Miniatures, which I printed at 50% size to make into a reasonable size for a chapel. The scenario calls for a 6″ x 6″ footprint for the chapel which the pieces you see above fit nicely into.
I had a bit of fun painting this, starting with a grey undercoat, then spotting on varied colours of oil paint. I then used some thinner to spread the oil paint around and create some nice variation. You can see what I mean in the photo below.
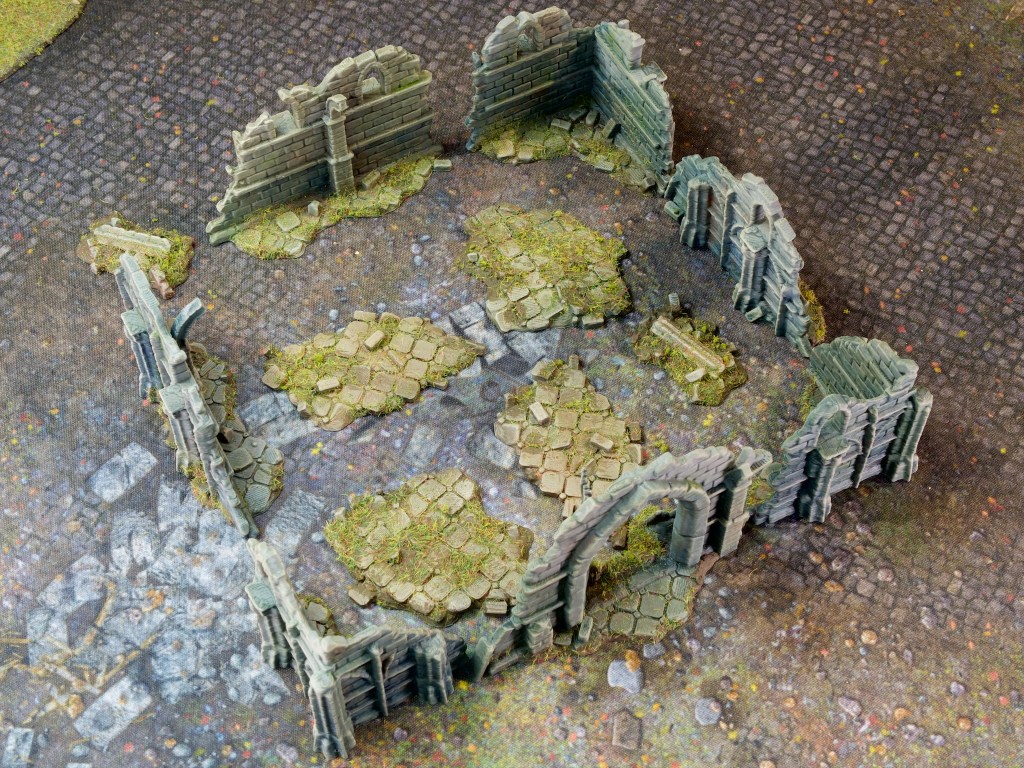
I left the wet pieces dry overnight, then wiped off the oil from the raised areas. I then left that all rest for a few days, and once fully dry, did a few drybrushes to pick out the raised areas. Was all quite fast apart from the drying! With the terrain and the antagonists ready, I set the board up for the mission and got started!
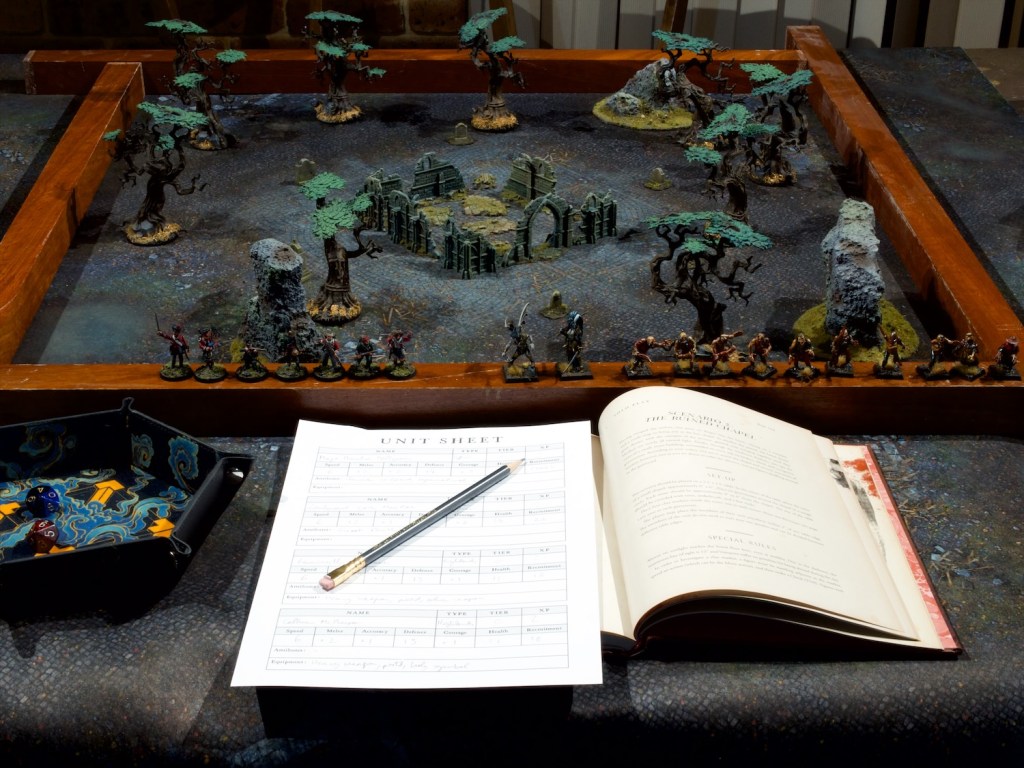
Ready to go!
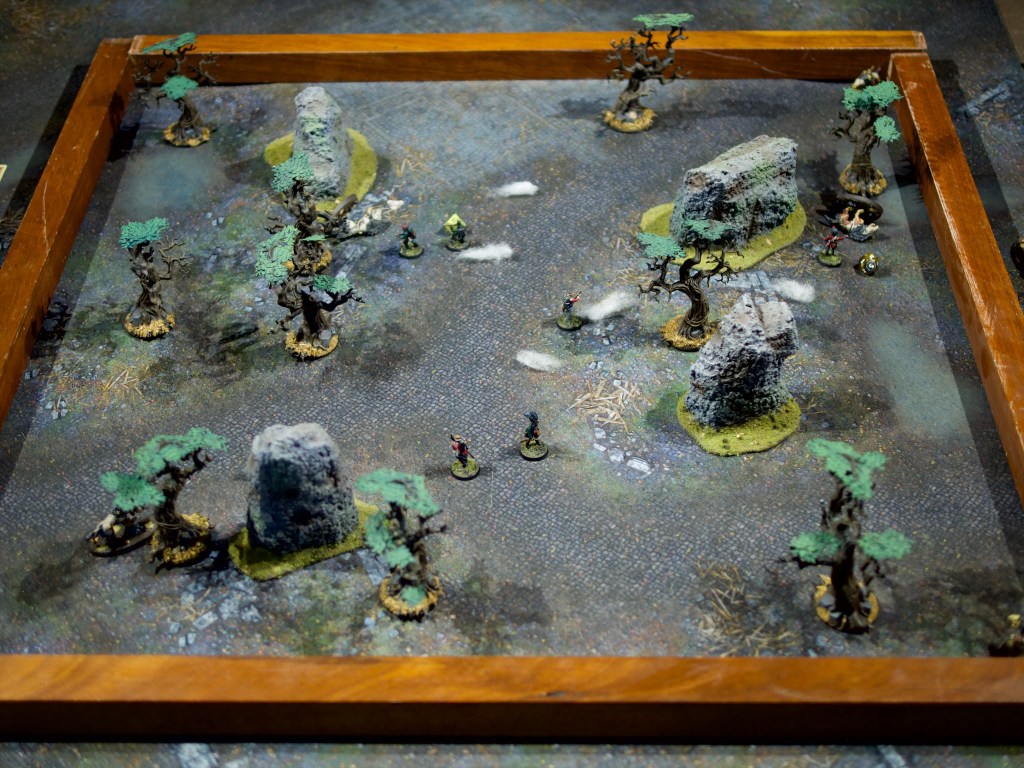
As I mentioned at the start, the premise behind the mission is that my unit is looking for a ruined chapel to investigate it, and at the mission’s start has just arrived at said chapel, but finds it swarming with undead. The unit needs to battle through revenants and investigate the clue tokens in the chapel and move anything they find off the table.
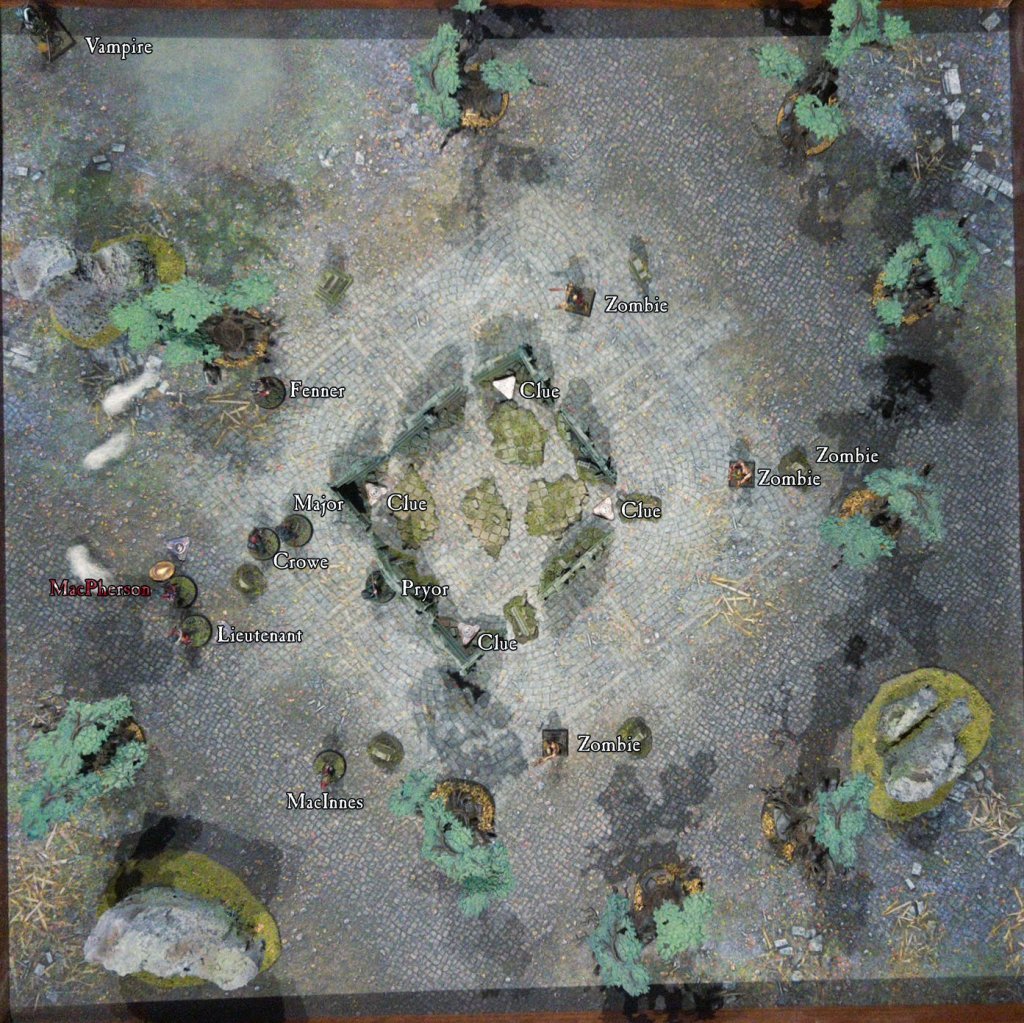
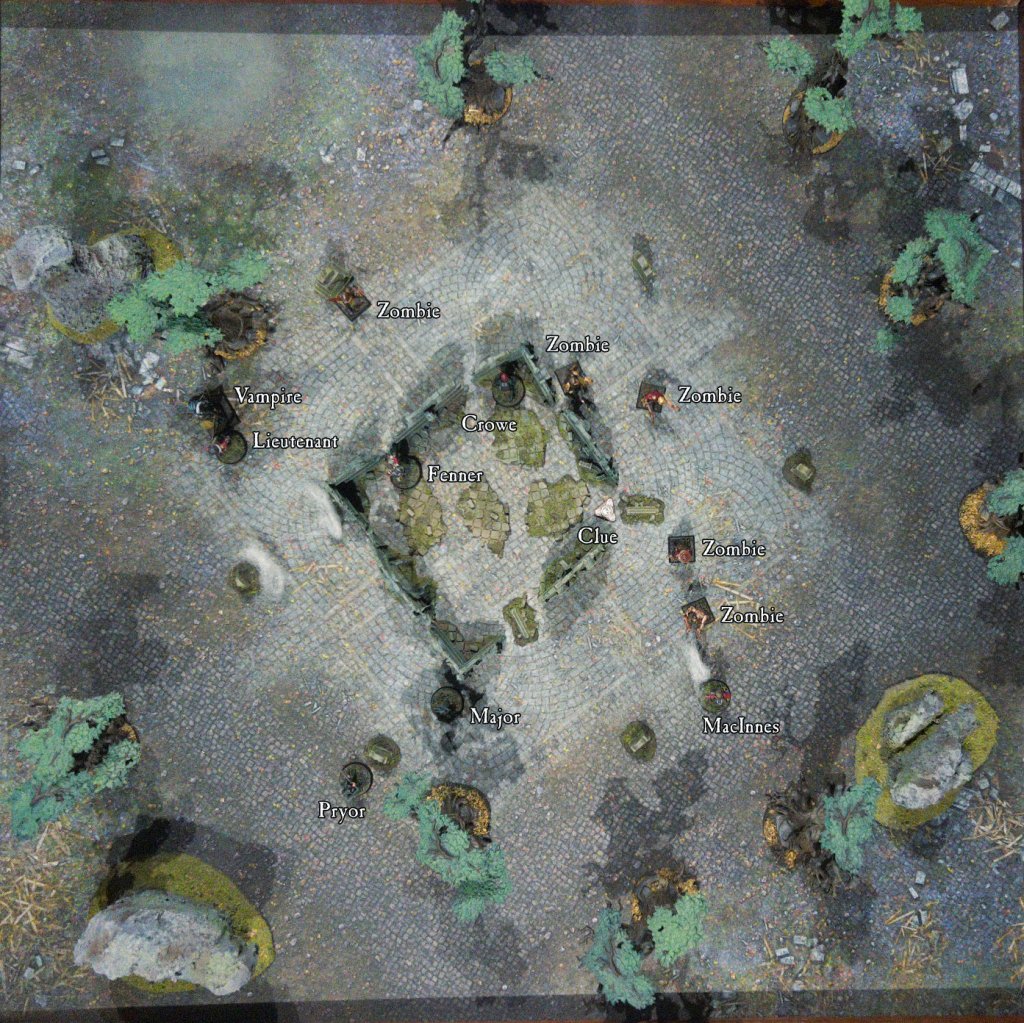
Initial setup.
The board is setup with the chapel at the center, a clue in each corner, a rough circle of grave stones around the chapel, with a zombie (these are called revenants in the game, but I keep forgetting!) at each grave stone. I was allowed to place my models within 2″ of any board edge, split up in as many groups as I liked. I remembered from the first game how useful it was to have backup so I decided to keep my full unit together, sacrificing searching power for increased survival chances. If you can’t remember the characters in the unit feel free to check out my earlier post. I also go into a bit of detail on how the rules work in that post so I would recommend reading it first if you’re interested in that.
Turn 1
Turn one starts very poorly, with MacPherson charging the closest zombie, hitting it with his claymore and dealing some damage, but the zombie’s return blow critically injures him and takes him out of the game. Lieutenant MacRae charges that same zombie and finishes it off with a blow from his sword.
MacPherson is taken out by the zombie’s blows, Lieutenant MacRae rushes in to avenge him!
Crowe fires his rifle at the next zombie, only dealing a small amount of damage as they are not particularly bothered by ranged attacks. MacInnes then finishes off that same zombie with a strike from his massive axe. All the while the zombies are coming closer.
The Major fires his rifle at the next closest zombie, injuring it. Fenner then fires his musket at that same zombie, misses, charges it with his bayonet and takes it out (after I used a skill re-roll). Pryor sprints towards the chapel doorway.
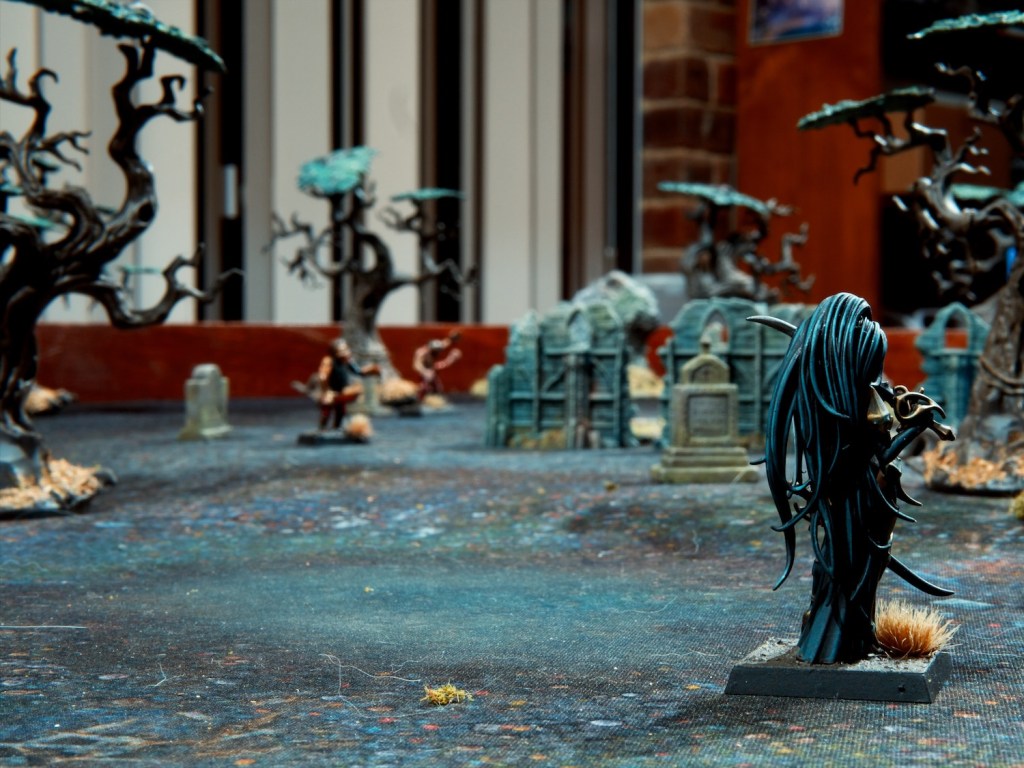
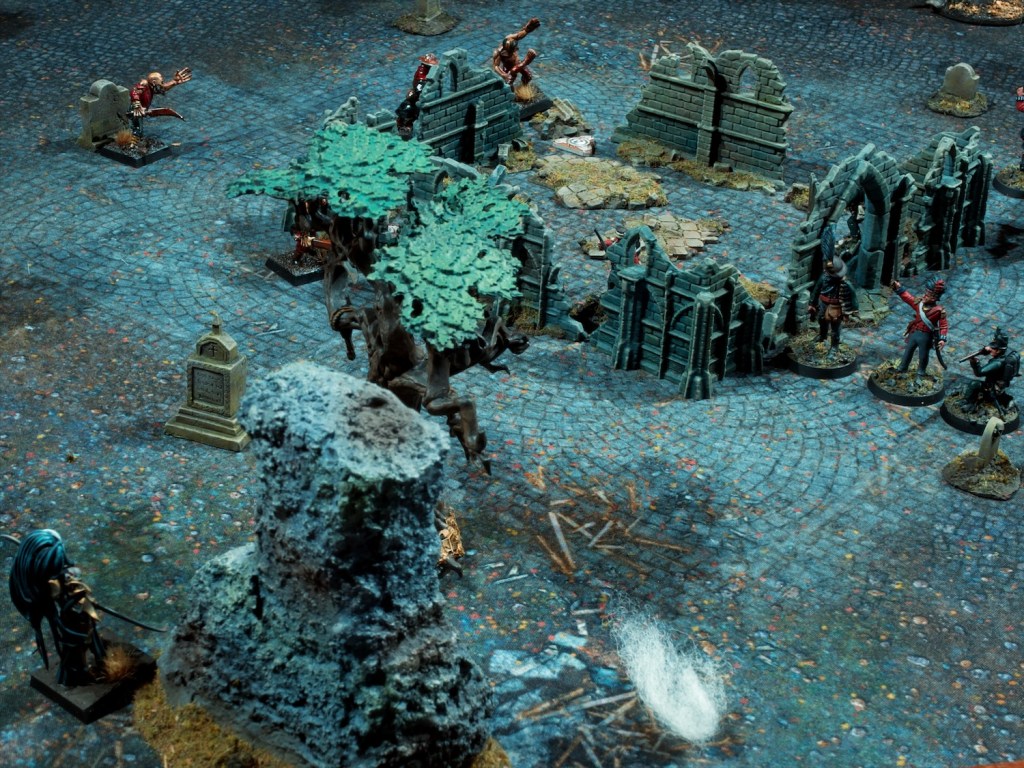
A mysterious form walks onto the battlefield…
At the end of the turn a vampire arrives, and another zombie springs up from a random gravestone.
The state of things at the end of turn 1.
Turn 2
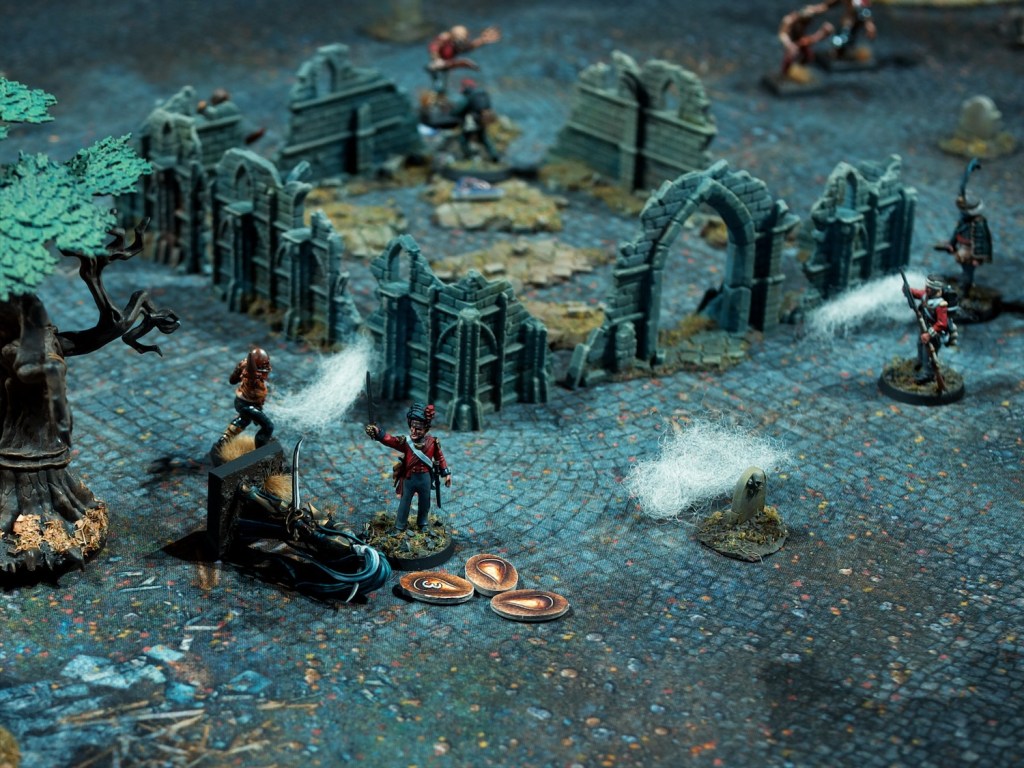
Fenner moves into the chapel, finding something of interest in the closest corner: a bag of silver shot! Crowe heads for another promising area of the chapel and scrounges up a silver knife. Both men feel a little bit more equipped for the horrors that await them outside of the chapel walls. Meanwhile, MacInnes continues his zombie hunt, charging the next closest and scoring a solid hit. The zombie’s strike back misses completely. The zombie then attacks MacInnes, but misses again, giving MacInnes the opportunity to finish it off with his own strike back. The rest of the zombies shamble forwards. In the far corner, the vampire approaches the Major and the men surrounding him.
The unit prepares a silver-filled volley for the approaching monstrosity.
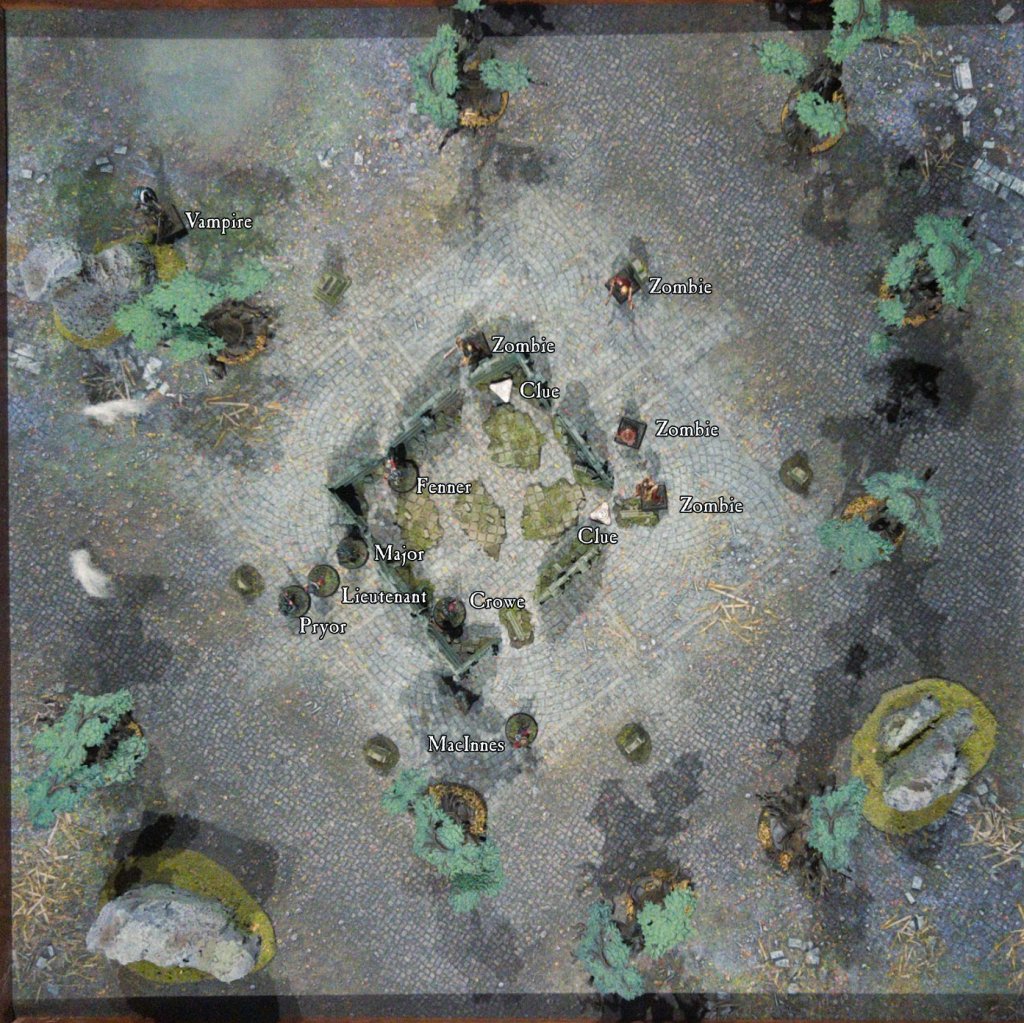
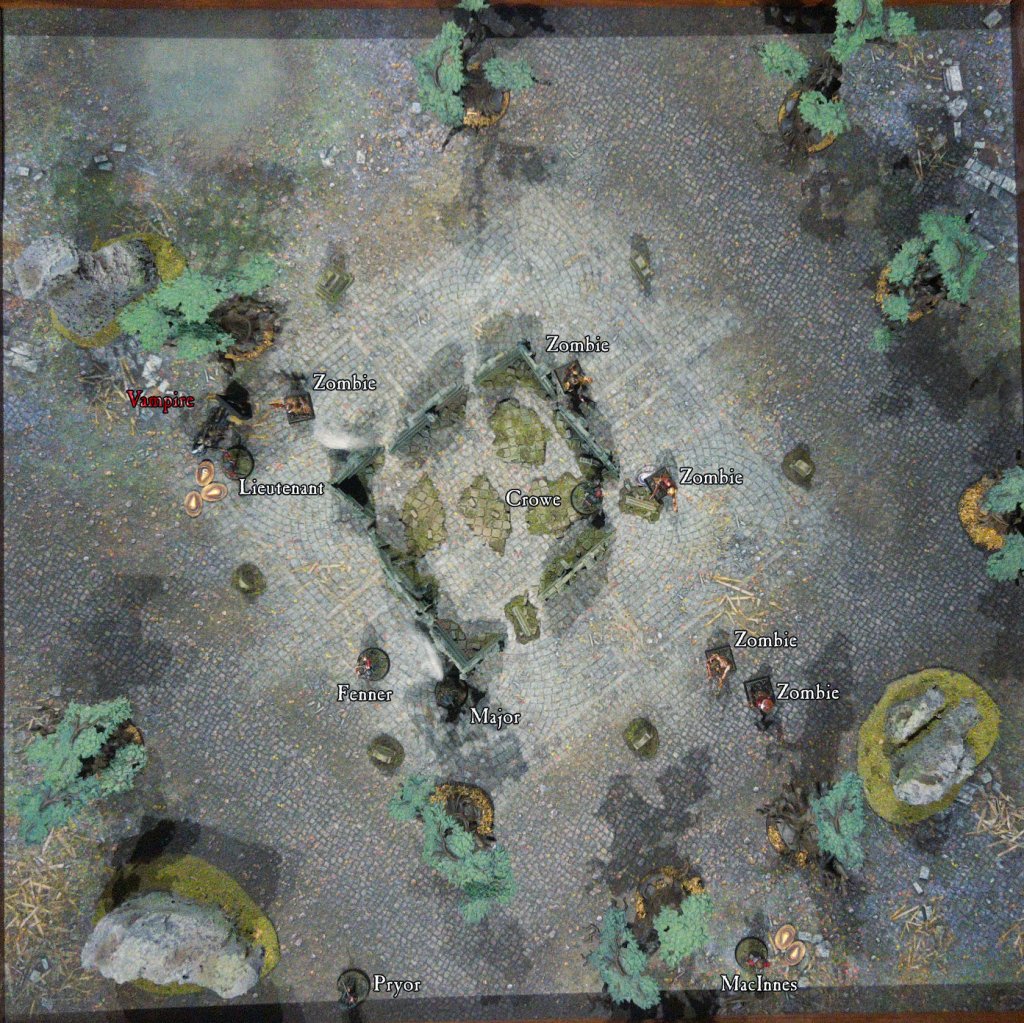
The major spots the shape coming towards him, loads silver shot into his rifle and backs away, closer to the chapel entrance. The Lieutenant and Pryor both line up next to the Major, ready to greet the new arrival with a well-timed volley. Another zombie claws its way out of a shallow grave…
The state of things at the end of turn 2.
Turn 3
Fenner loads one of his newfound silver bullets into his musket and sights through a crack in the chapel wall. Crowe keeps on searching the chapel and finds a small icon which gives me an extra power die in my fate pool (i.e. an extra re-roll!). To give the members of the team searching the chapel some more time, MacInnes fires his pistol at the zombies, misses, then rushes out towards them, drawing them away.
MacInnes draws the zombies away from the chapel.
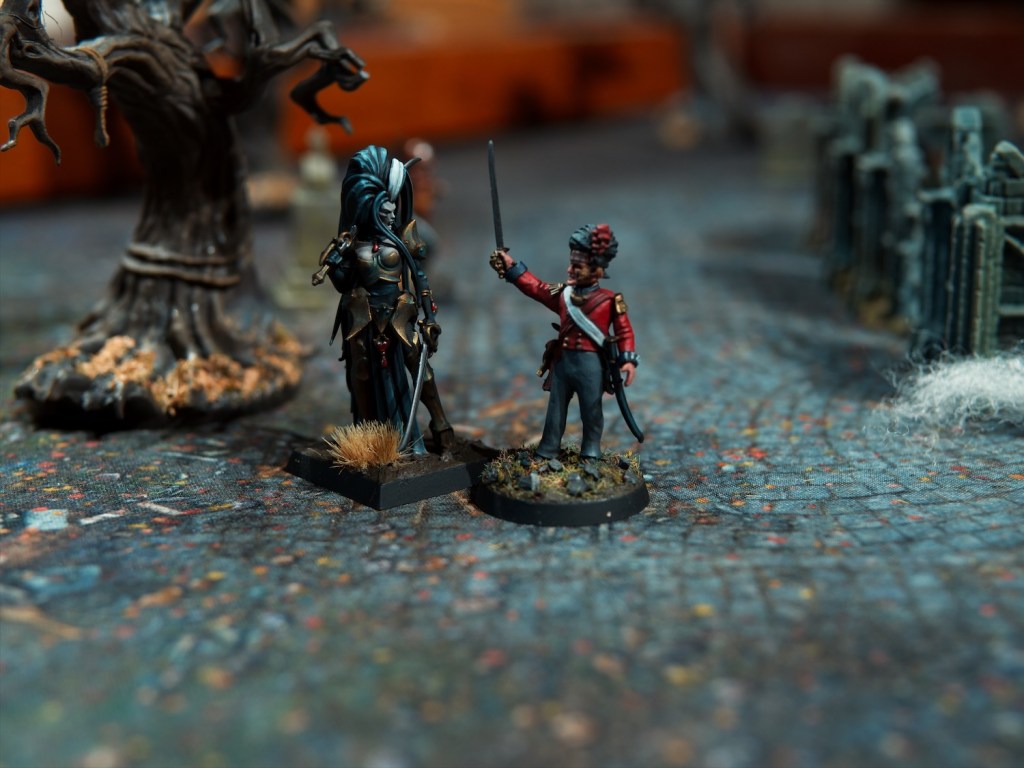
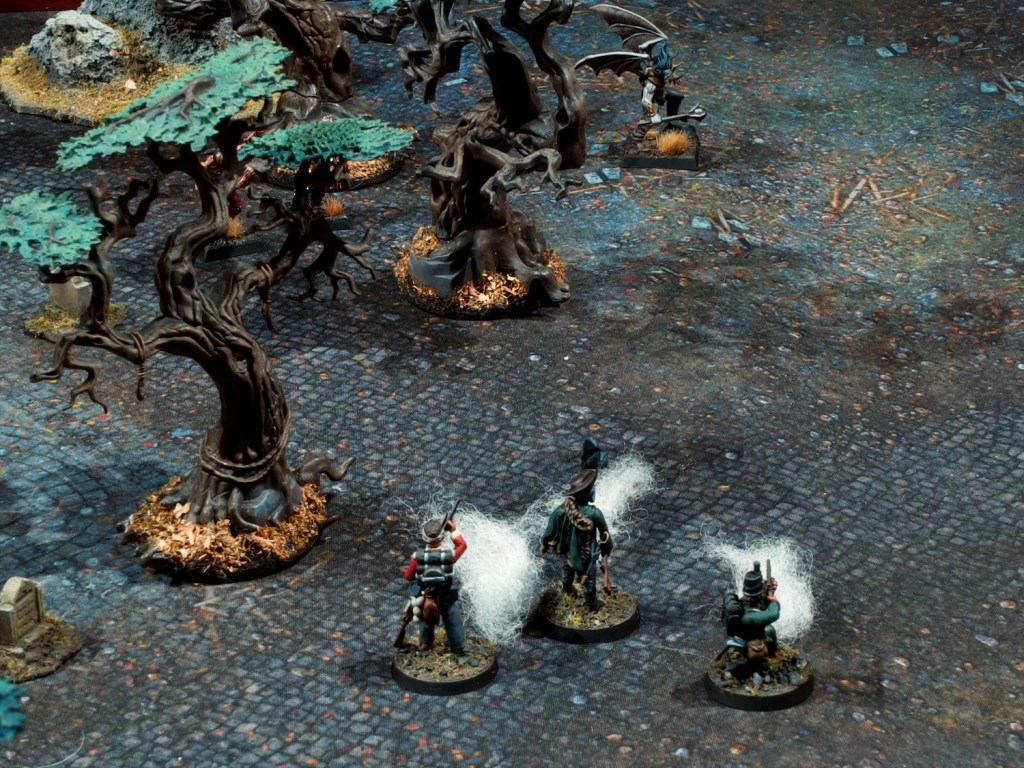
The vampire moves closer to the Major and his two sidekicks. All three open fire, but only the Lieutenant hits with his pistol. The Lieutenant is not equipped with silver shot, but his great faith means his attacks are blessed, which allows him to injure the Vampire. Bolstered by his success, the Lieutenant charges in, but locks eyes with the Vampire and its hypnotic powers freeze him in place.
Lieutenant MacRae might have bitten off more than he can chew…
With a groan, another zombie emerges from the soft ground.
The state of things at the end of turn 3.
Turn 4
Fenner now has a clear shot on the vampire and takes it, but misses. He rushes out the the chapel, time to sound the retreat! Crowe takes the time to investigate the last corner of the chapel and finds a strange candelabra. He packs away the relic and makes ready to leave the chapel. The Major quickly reloads his rifle and shoots at the vampire but misses.
On the far side of the chapel, McInnes is caught by one of the zombies he’s been baiting and suffers a nasty hit. He backs away to stay out of reach of the second zombie, but in so doing exposes Crowe who is attacked in turn. The zombie misses, and Crowe sticks his bayonet into the Zombie almost taking it out. MacInnes moves away from the zombies and reloads his pistol.
The Vampire attacks the hypnotised Lieutenant and scores a nasty hit, which causes the Lieutenant to have to take a terror test which he fails spectacularly and is paralysed with fear as a result.
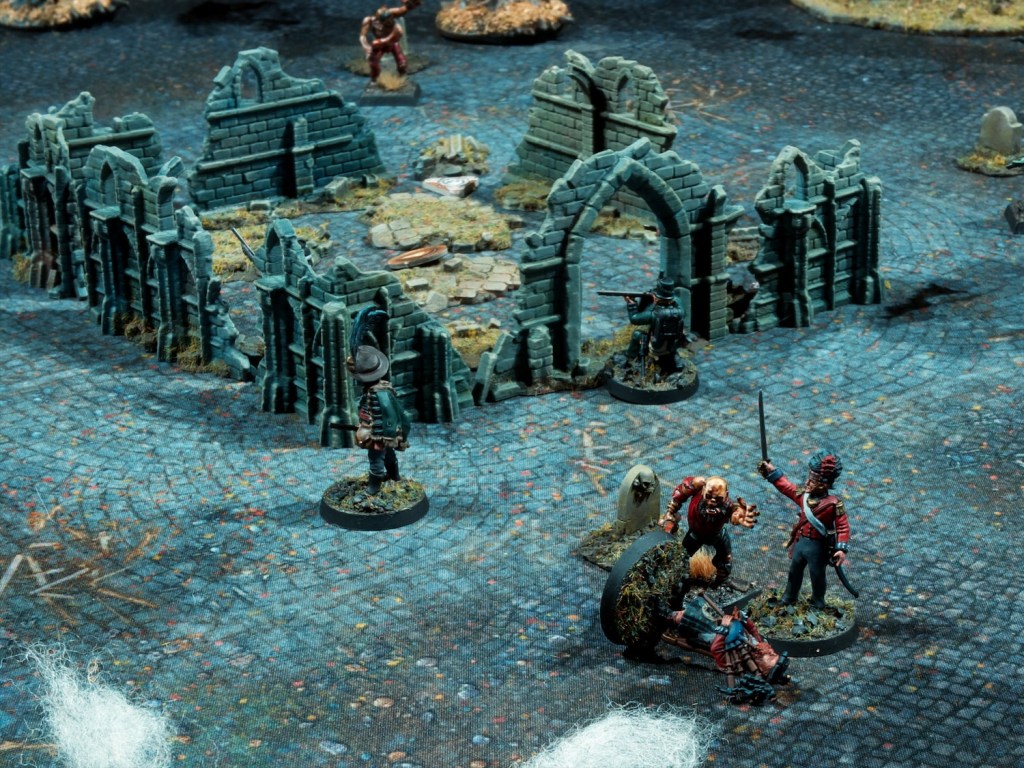
Lieutenant MacRae fights off his fear and the hypnotic powers of the vampire to strike at it. After the judicial use of a re-roll, his sword finds its target and the silver of his blade finishes off the vampire.
Lieutenant MacRae triumphant.
Fearing the arrival of another vampire, Pryor reloads his rifle and moves away from the chapel. Another zombie erupts out of the ground.
The state of things at the end of turn 4.
Turns 5 and 6
With the vampire slain and the chapel thoroughly searched it’s time to leave the area before the unit gets overwhelmed. MacInnes leaves the board first, with the rest of the unit moving towards their closest board edge and reloading their blackpowder weapons. At the end of turn 5 another vampire arrives right next to where MacInnes left the board (close call!).
Turn 6 sees the unit unloading a volley into the newly arrived vampire, and this time did not miss, killing it before moving off the board.
If they’d missed at least they’d have a nice cloud of smoke to cover their escape!
This mission felt a lot more tense than the first one, I came really close to losing more than just MacPherson, and I spent a lot of time retreating from fights. Last time, musketry was quite powerful, whereas in this mission the zombies were resistant to it, and the vampires completely immune if the musket wasn’t loaded with silver. MacPherson survived his injuries, but now has the shakes permanently, making his aim with his pistol much less good. Luckily for me he’s more of a close combat character!
Overall the mission was tremendous fun, and I’ll happily play through the rest of the solo missions in the book. Painting a few models and some terrain and getting to use them in a game immediately was very rewarding.
I tried to improve my battle report style with changes to how I wrote the action up and with the extra annotations on the top down photos. Keen to get any feedback on how you feel this reads compared to last week or if you have any idea how to improve it!
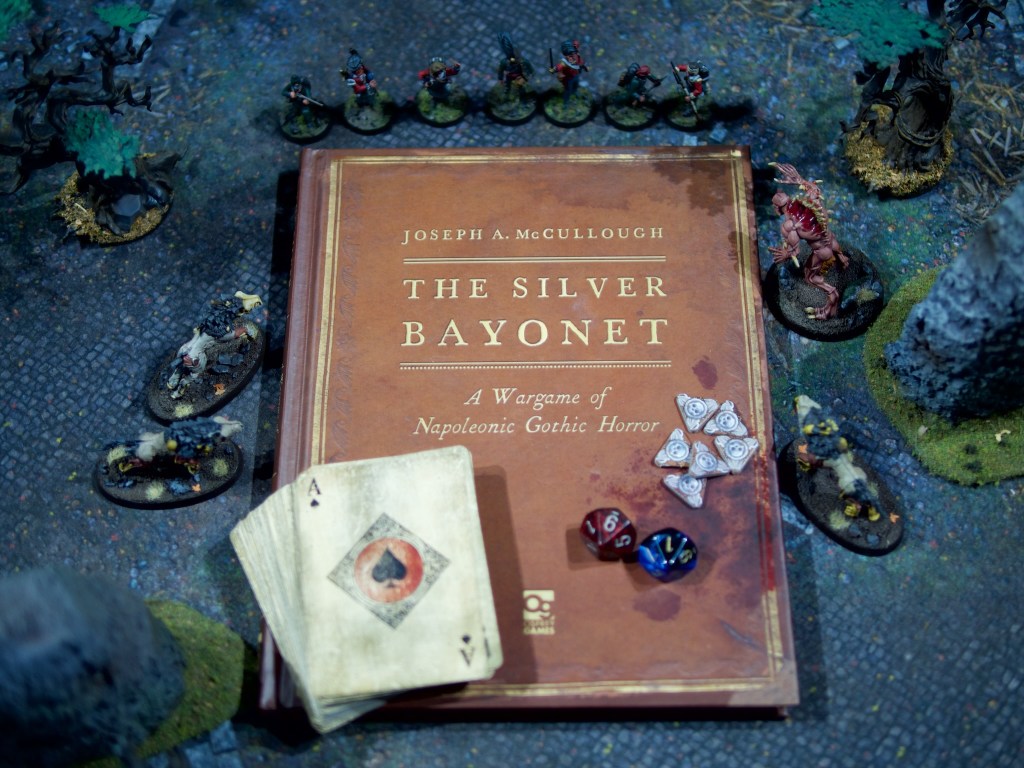
I wasn’t expecting to be working on this this week, but when inspiration strikes, seize it! I’ve been looking at running Rangers of Shadowdeep for my usual roleplaying games group, and while reading the books and doing some research I remembered one of Joseph McCullough’s other games that interested me while back: The Silver Bayonet. The Silver Bayonet is a skirmish game pitting Napoleonic era units against each other as well as against monsters brought about by the horrors of the constant wars of the era. This renewed interest in the game coincided with my reading of a book on the founding of “New France” (Canada/Quebec), so I was primed for some musket-based action. The game is really easy to pick up so I quickly threw together a unit roster (which can be up to 8 models), and started kitbashing!
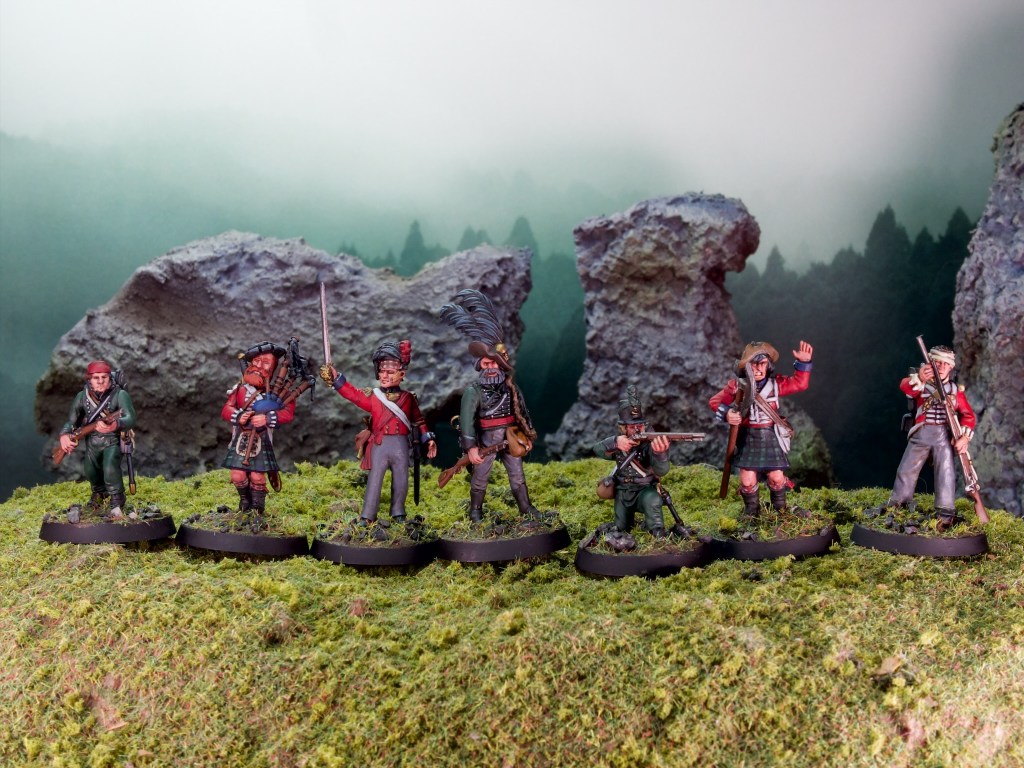
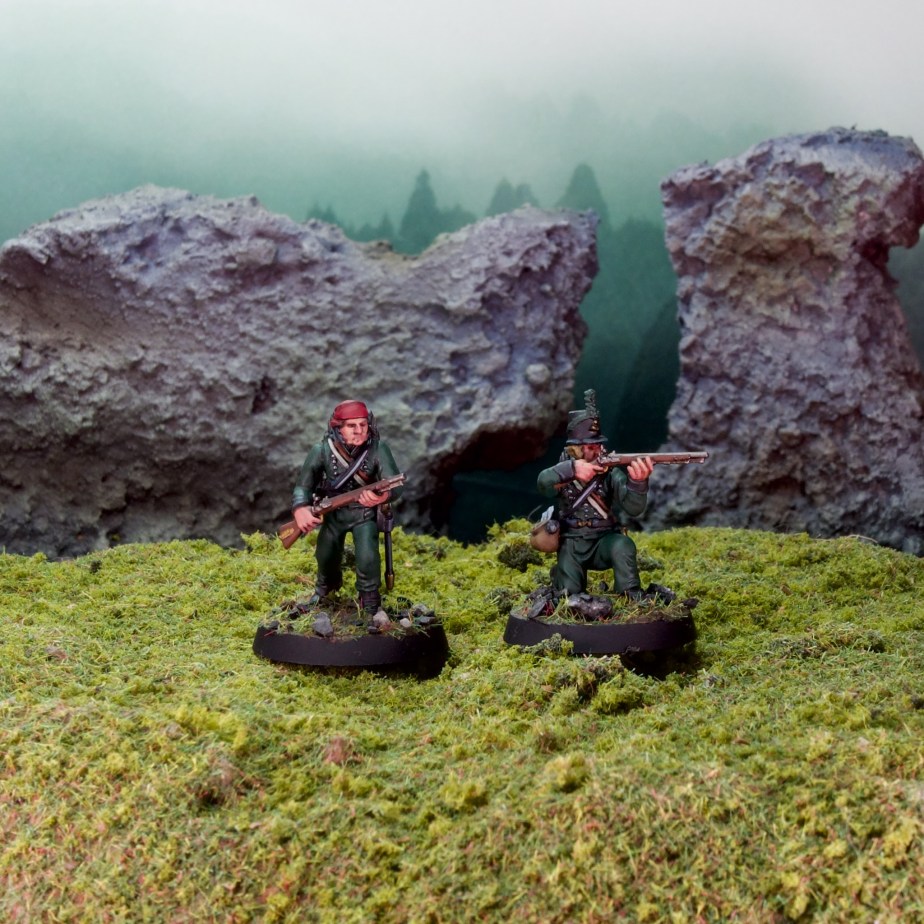
I bought a bunch of different Napoleonic sprues a while back to use for Chosen Men so I had plenty of models to turn into a Silver Bayonet unit. As you can see above I ended up with 7 models rather than the max 8, so a slightly elite unit composed of my officer, a junior officer, two highlanders, two riflemen, and an infantryman. This eclectic mix is pretty standard for these units, which are made of soldiers (and others!) that have survived encounters with the supernatural rather than any particular regimental affiliations. The officer and the riflemen are based on the Wargames Atlantic Riflemen kit, the highlanders and junior officer on the Victrix highlanders kit, and the infantryman is from a Perry Miniatures kit. I decided early on I wanted to minimise the amount of shakos in the models, I see these units as being on the road a lot and being in full battle-dress for these skirmish fights doesn’t seem very appropriate (plus I could see losing your hat very easily when running away from a Werewolf!).
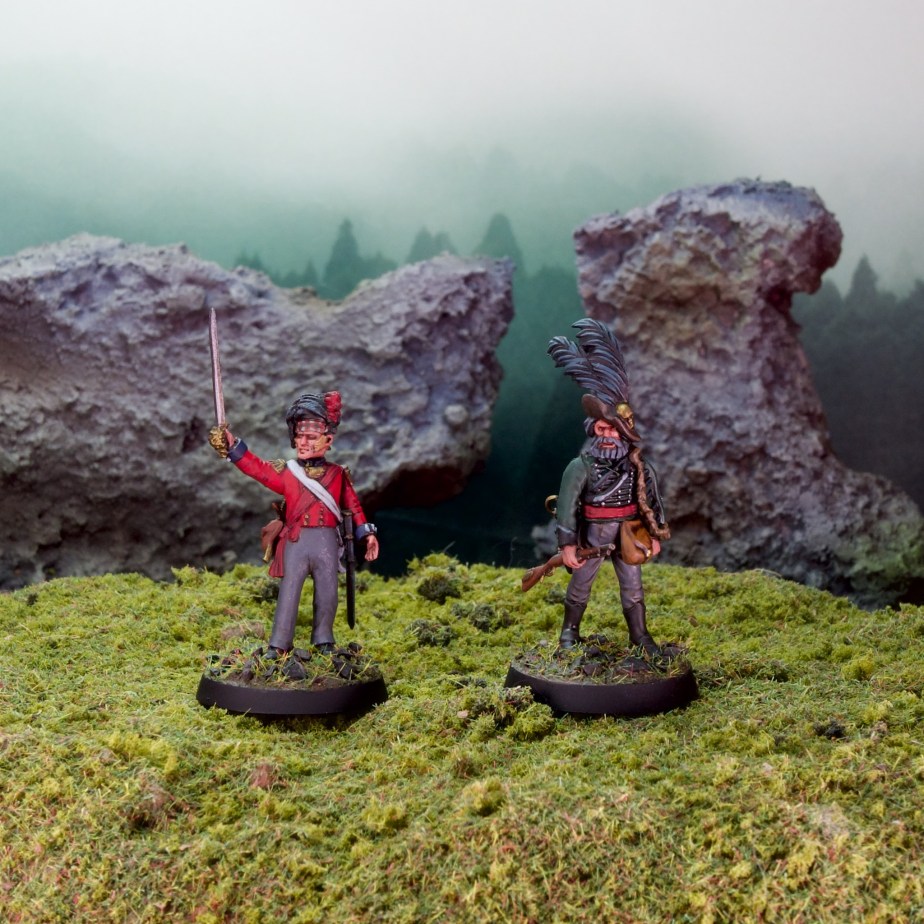
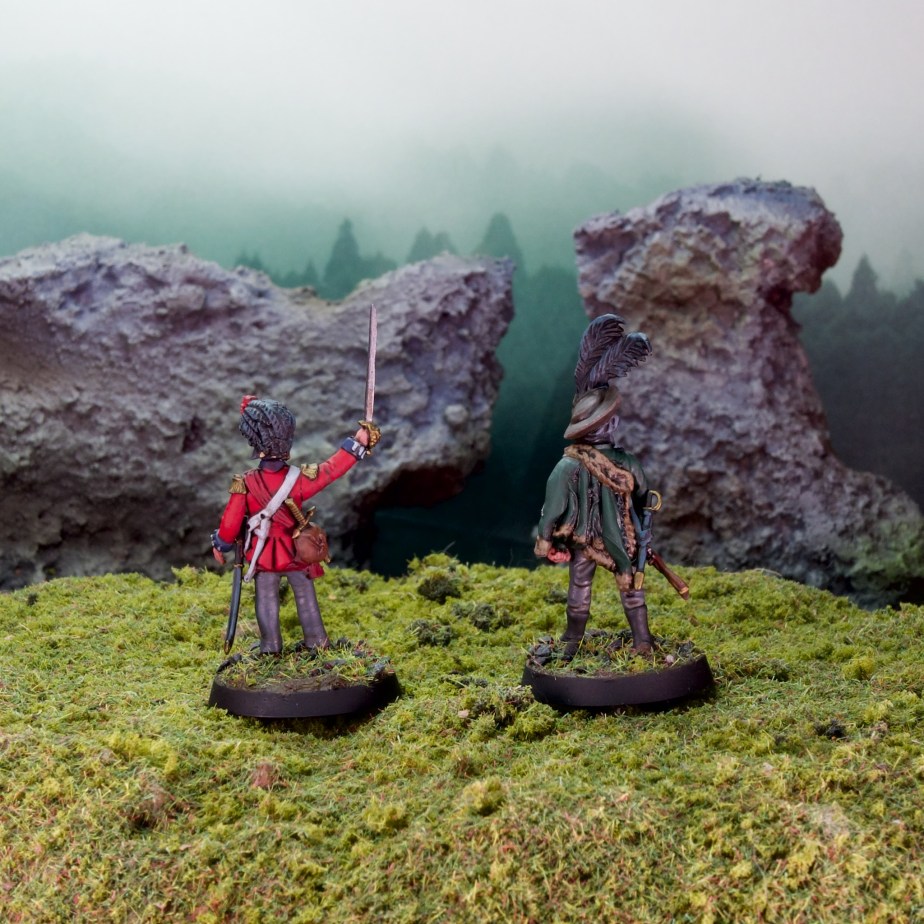
First let’s look at the officers:
My unit leader is Major Horatio Bellgrave, a 95th rifles officer reassigned to lead a Silver Bayonet unit and with a long history of hunting monsters. I selected the Supernatural Veteran attribute for him, which lets him pack extra supplies, which I used to cover all the super natural bases giving him silver shot, cold iron shot, and a salt bag for those pesky demons! Alongside that he has the quick reload attribute which lets him shoot every turn with a penalty rather than having to spend a turn reloading between shots. Modelling wise he’s mostly from the WA kit, with a head from a Warhammer Empire kit (with a ludicrous set of feathers!) and a bag from some other Warhammer kit to represent all the projectiles he’s hoarding!
The junior officer is Lieutenant Iain MacRae, from the Black Watch. I wanted a more traditional officer in the unit, as a counterpart to the probably slightly mad monster hunting Major. I selected the great faith attribute for the Lieutenant, and gave him a silver sword. The model is straight from the Victrix kit, barring the pouch and the crucifix which are from a Warhammer Empire kit (the crucifix is a cut down dagger). He has his official headgear on as it matters a lot to Iain to be properly uniformed, even when fighting the supernatural.
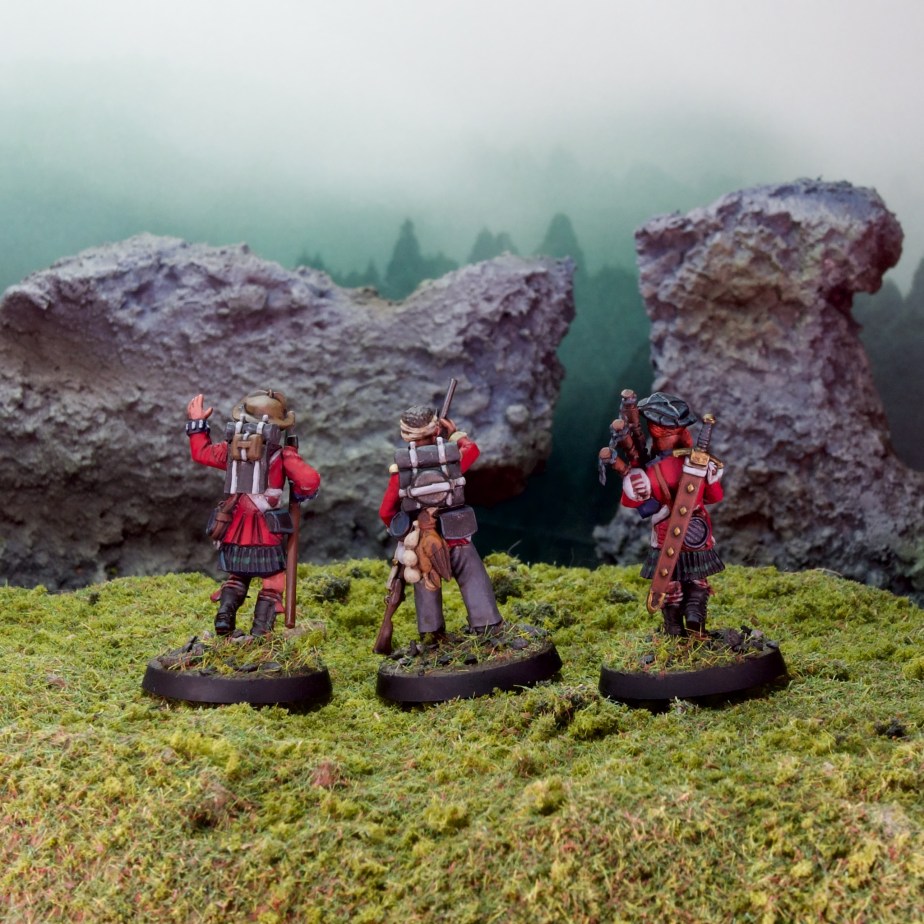
Next up the red coats! From left to right:
Private Ruairidh MacInnes, a highlander of the Black Watch, wielding a huge silver Lochaber Axe. The eagle-eyed amongst you will notice he’s wearing red epaulettes, which are not correct for a private! This is a modelling constraints, as I used the officer banner arms to create the axe. I rationalised this by painting them red like French Imperial Guard epaulettes, clearly MacInnes bested a guard and took them as a trophy! For the rest of the model the head of the axe is from a Perry Agincourt set, while the head is again from a Warhammer Empire kit (some great grizzled heads in these Warhammer sets!).
Private Jack Fenner of the Buffs. As mentioned above, this one is from a Perry kit, with these great reloading arms. The bandaged head is from Warlord WW2 British paratroopers, and his dinner is from the Bretonnian Men-at-arms kit. I picked the Buffs for the regiment from a family connection, one of my Great-grandfathers on my English side was in the Buffs in North Africa and Italy during WW2. On top of his musket he’s equipped with a salt bag to pepper unholy creatures with.
Private Callum MacPherson, also a highlander of the Black Watch, with a classic claymore and bagpipes combo. We have once again a Warhammer Empire head, albeit an older one, and the sword is from the Warhammer Empire Knights kit. The body and pipes are from the Victrix set. I’m treating the pipes as a holy item in the game, clearly bagpipes have some effect on monsters!
Last but not least we have the pair of riflemen:
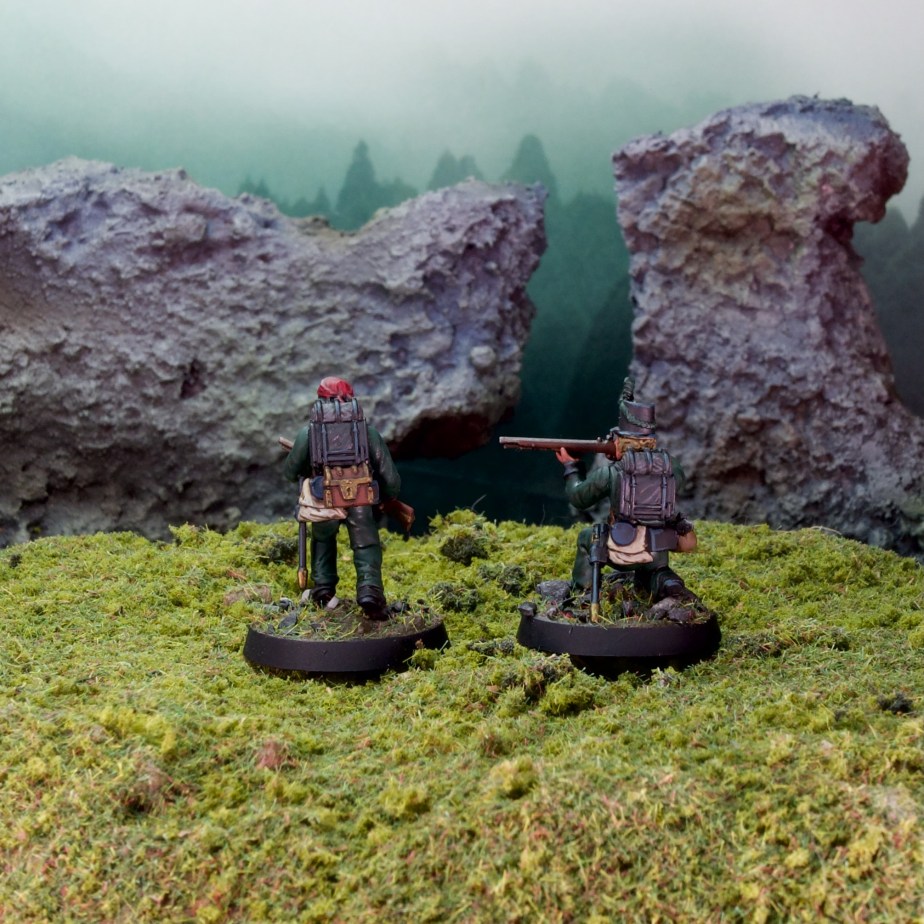
Private Isaac Crowe, follows in the steps of his major and on his way to becoming a great monster hunter. The model is almost wholly from the WA riflemen kit, the only exception the small chest hung under his backpack, from the Bretonnian Men-at-arms kit. Clearly some precious loot! He’s carrying cold-iron shot.
Rifleman Benedict Pryor, more junior (hasn’t lost his hat yet!), more proper, and likely feels closer to MacRae than to his Major. Also almost entirely from the riflemen kit, he just has a small pouch with a bird in it from the same Men-at-arms kit (slightly hard to see in the photos). He’s carrying silver shot.
There you have it! These were very fun to put together, and very quick to paint, I finished them in a couple of sessions. It scratched the Napoleonic itch nicely, with a bit of research on the uniforms, and my first ever attempt at painting tartan.
At the risk of making this post very long, Silver Bayonet also comes with a set of solo gaming rules, and I couldn’t resist trying the unit out so here’s a quick skirmish report for the first solo mission in the game: Wolf Hunt.
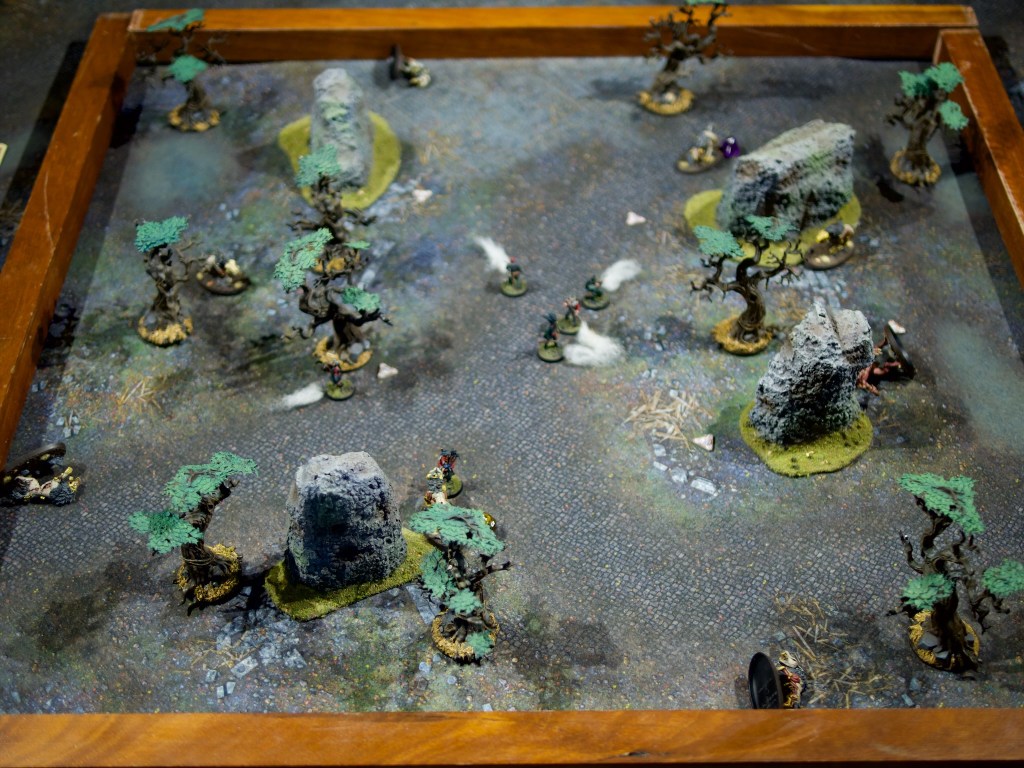
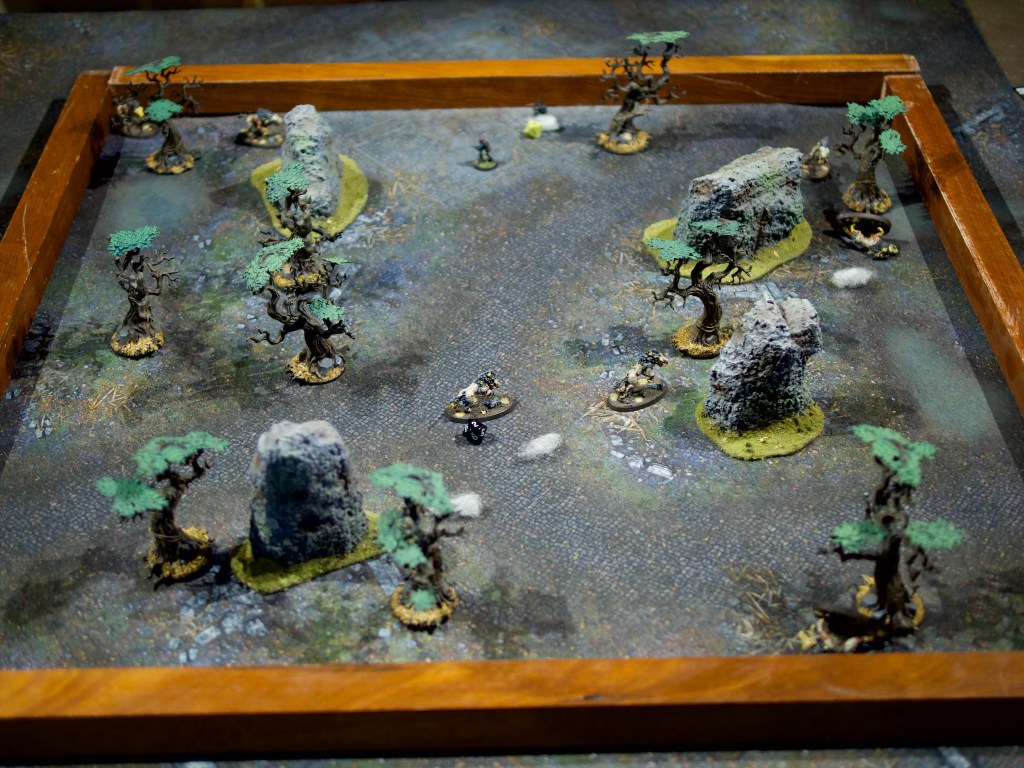
The premise behind the mission is my unit is looking for traces of another unit which has not reported in a while. While tracking them, my unit finds signs of a scuffle and starts looking around for clues as to what might have happened. The search is interrupted by wolf howls…
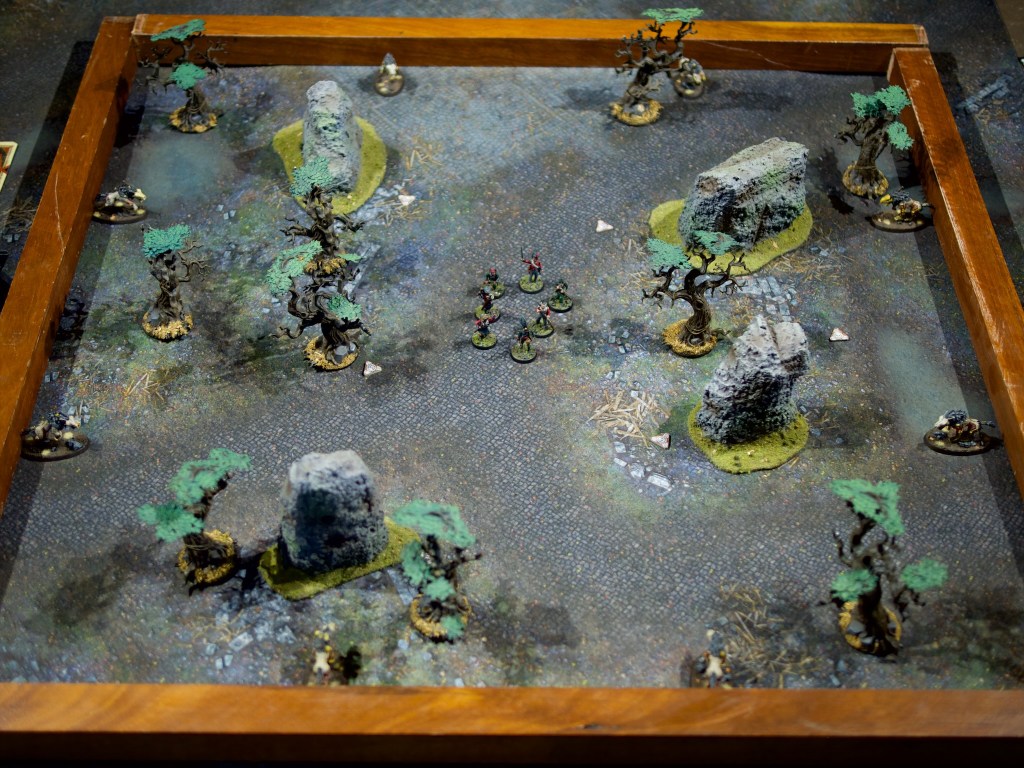
The setup at the start of the game.
The game is played on a small board compared to what I’m used to (2.5×2.5ft), so I marked off the area with some spare wood I had lying around (the marked off area is closer to 3x3ft but I did what I could with what I had!). The unit starts in the middle of the board and 8 wolves evenly spaced out 2 per edge. The clues I need to investigate are marked by the triangular tokens, there are 6 all up. My goal is to find a clue as to what happened to the missing unit(and recover their orders if possible to avoid them falling into enemy hands) and get off the board, the game ending when I have no models on the board. At the end of each turn I have to roll on a table that indicates what happens (usually more wolves arrive!). Unlimited turns with wolves arriving every turn means I need to get a move on investigating those clues! Behind each of the clues is something that will help or hinder the unit, as determined by a small number of playing cards shuffled into a clue deck. As a model investigates a clue, a card is drawn from the deck and a table consulted for what the model found.
The game uses 2 D10 for all its rolls, one blue (skill), one red (power). The dice are rolled together and added up to see if an action is successful. The colours are used to indicate damage in the case of attack rolls, with more skillful weapons using the roll of the blue dice for damage and more brutal weapons using the red die. This is a really simple mechanic, but quite engaging especially when combined with the fate dice described below. As an example, assume MacInness attacks a wolf with his axe (uses power die for damage), he rolls 2d10 (7 Blue, 6 Red), adds them up (13), and compares to a wolf’s defense (12). He equaled or beat the defense, so he deals the damage, which is 6 as per the power die (+1 for the weapon being heavy!). A wolf has 8 wounds, so we mark off 7 of those and the wolf gets to strike back!
In solo missions, players get two fate dice, one of each colour which allow for one re-roll per dice type. This can be quite important as a re-roll may not only allow a model to hit, but also to deal more damage!
Turn 1
The turns are split into a first player phase (P1), where I can act with half my models, then a monster phase (MP), followed by a second player phase (P2) where I can act with the rest of my unit.
P1
MacInnes moves towards the closest wolf and fires his pistol, killing it instantly (lucky!)
Fenner fires his musket at another killing it (after I used a fate die to re-roll the 1 on the skill die!)
Crowe fires his rifle at another and kills it too (3 shots – 3 kills so far! that has to be a record)
Pryor fires his rifle, hits but only deals 4 damage.
MP
The wolves all close in on the unit, all moving towards the closest member they can see.
One of the wolves is revealed to be a werewolf!
P2
Major Bellgrave fires a silver bullet at the werewolf, scoring a solid hit (7 damage)
Lieutenant MacRae bravely charges the werewolf and skewers it with his silver sword!
MacPherson charges the wolf closest to him, hits it for 6, the wolf bites back but misses.
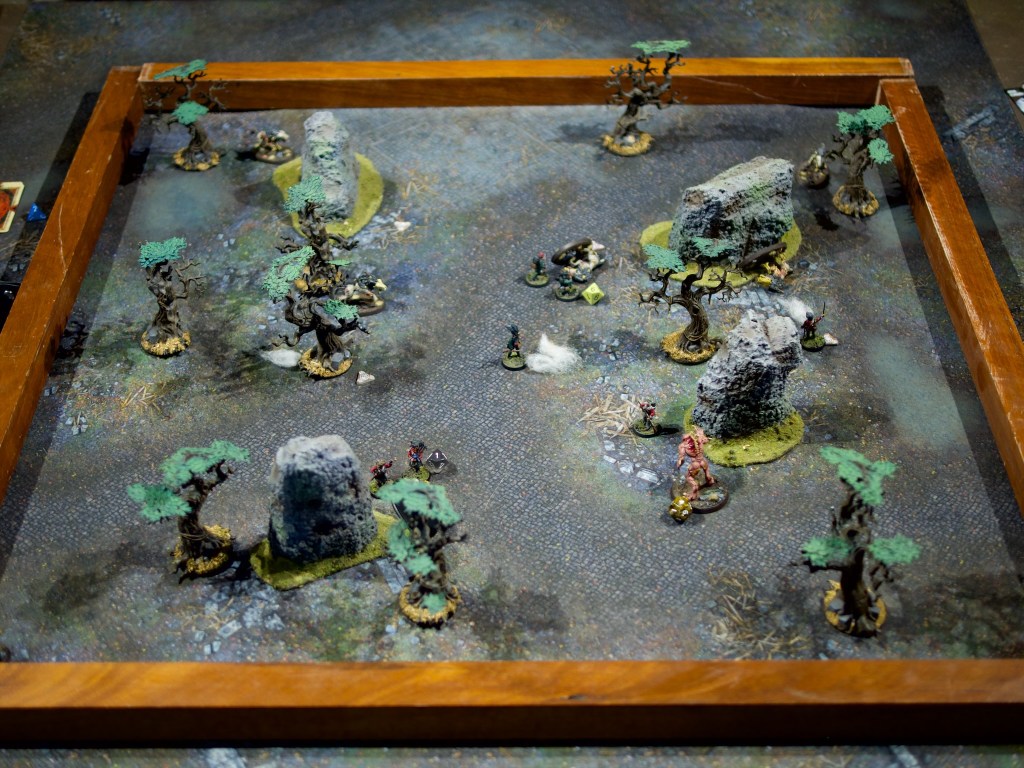
End of round, two more wolves arrive.
MacRae’s foolhardy but extremely effective charge!
State of the board at the end of turn 1. (Sorry for the blurry photo, still don’t have a sensible way to take board photos!)
Turn 2
P1
MacPherson attacks the same wolf, misses. The wolf does not miss back however and hits hom for a massive 10 damage! Luckily highlanders have 11 health unlike most of my other troops so he clings on, but things are looking dicey!
MacInnes comes to his rescue and swings his axe at the wolf, killing it.
Lieutenant McRae pulls his sword out of the werewolf and continues his rampage, killing a wolf with a pistol shot, then moving to the clue closest to him.
Fenner moves onto his closest clue and investigates. Unfortunately, I draw the ace of spaces from the clue deck which means what drew Fenner’s attention was a lurking werewolf! Right before the monster phase too…
MP
The werewolf swings its massive claws at Fenner … and rolls snake eyes! Critical failure. Normally this would cause the model to lose its weapons, but luckily for the werewolf those claws are well attached. Fenner keeps his head together and bayonets the werewolf, unfortunately his bayonet is made of regular old steel and only deals two damage to the werewolf.
The remainder of the wolves close in further.
P2
Major Bellgrave uses his quick reload ability and fires at the werewolf, hits after I burn my power dice fate re-roll (no more re-rolls now!) and deals 6 damage with a silver bullet.
Pryor reloads his rifle and charges a wolf with his bayonet, but misses. The wolf bites back and inflicts 4 damage.
Crowe also reloads and charges the same wolf, he is luckier though and finishes the wolf off.
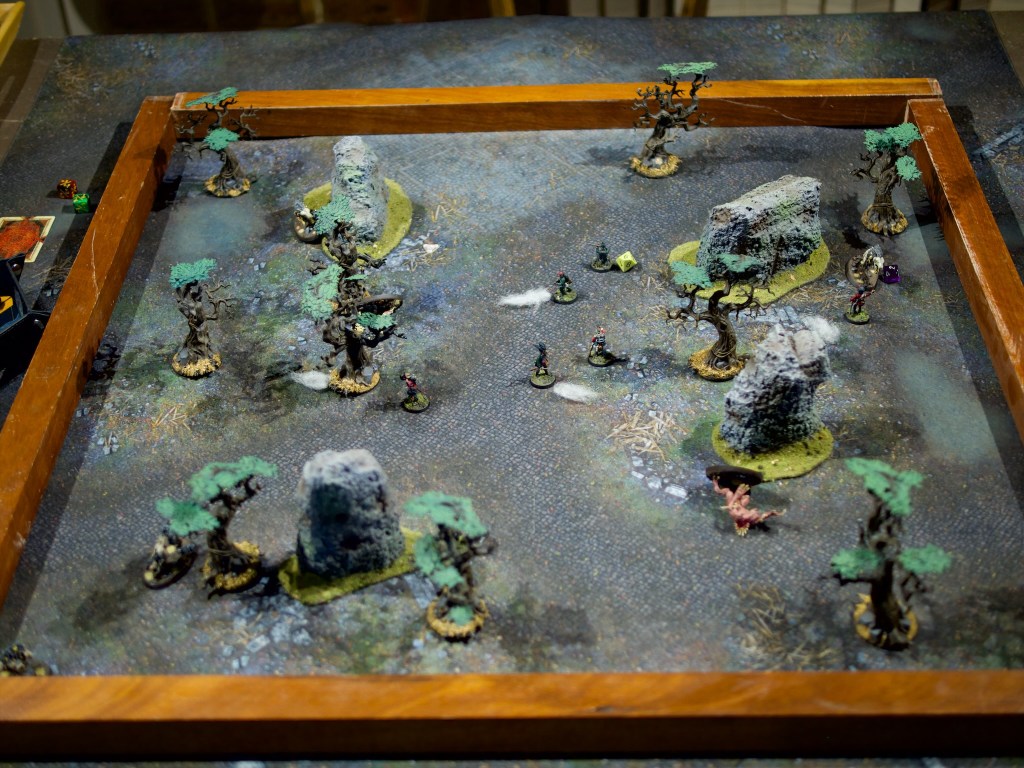
End of round, one more wolf arrives.
State of the board at the end of turn 2.
Turn 3
P1
Major Bellgrave quick reloads again and fires a silver bullet into the werewolf, killing it.
MacPherson investigates the clue next to him, discovers an ornate silver ramrod, which gives me an extra Skill die in my fate pool.
Crowe fires his rifle into the closest wolf, and scores a critical, killing the wolf instantly!
MacInnes investigates another clue and finds a bag of silver shot, meaning he can shoot effectively at werewolves if any others arrive!
MP
The wolves close in.
P2
Fenner reloads his musket.
Lieutenant MacRae investigates the clue he moved to last turn, and finds a silver knife (clearly whoever left all this stuff was prepared for werewolves!). He then charges the closest wolf, and deals 6 damage with his sword . The wolf bites back and deals 4.
Pryor investigates another clue and finds a silver medallion, giving me an extra power die in my fate pool (back up to one of each!).
End of round, one wolf arrives.
State of the board at the end of turn 3.
Turn 4
P1
Fenner fires his musket at the wolf Lieutenant MacRae attacked but misses
MacRae then charges back into the wolf, rolls horrendously on both dice and I decide to re-roll both with my freshly obtained re-rolls. The new rolls are excellent and the wolf is killed.
MacInnes moves closer to MacPherson and reloads his pistol (with his new silver shot!).
Major Bellgrave quick reloads and fires at the closest wolf, but misses. He moves towards the board edge, time to think about finishing this skirmish!
MP
The wolves close in.
P2
MacPherson decides to leave the board, his wounds are rather bad.
Pryor fires at the wolf close to him, misses, charges in with his bayonet and scores a hit for 5 damage. The wolf misses when trying to bite back.
Crowe charges in too, and bayonets the last wounds off the wolf.
End of round two more wolves arrive
State of the board at the end of turn 4.
Turn 5
P1
Crowe investigates the last clue, finds the missing unit’s orders! I need to get these off the table if possible.
Lieutenant MacRae reloads his pistol and moves right to the edge of the board. He;s looking to draw the wolves there towards him, away from Crowe, to give him a better chance to get away with the orders.
MacInnes fires his pistol at the closest wolf, misses, and moves towards the closest board edge.
MP
The wolves close in.
P2
Major Bellgrave quick reloads, fires at the same wolf, misses, then moves closer to the board edge.
Fenner reloads his musket and moves towards the board edge.
Pryor also reloads and moves towards a board edge.
State of the board at the end of turn 5.
Turns 6 & 7
Those two turns are rather uneventful, the unit simply retreats off the board and fires at any wolves getting too close.
Wrap-up
The unit achieved all the objectives and got maximum experience out of the scenario, not bad!
The game was very fun, I’ve never really tried playing a solo wargame before. The rules were very straightforward, and the scenario interesting and engaging to play. I think I got very lucky in the early rounds killing so many wolves in one hit, this would have been much harder with a few more wolves running around. There are 3 more solo scenarios in the the rulebook and I will be definitely playing through them. I’m not sure the top down photos are particularly great for these small skirmish battle reports, it’s a bit hard to follow what’s going on I think. I may try some other way of recording the action for future ones, open to suggestions if anyone has some!
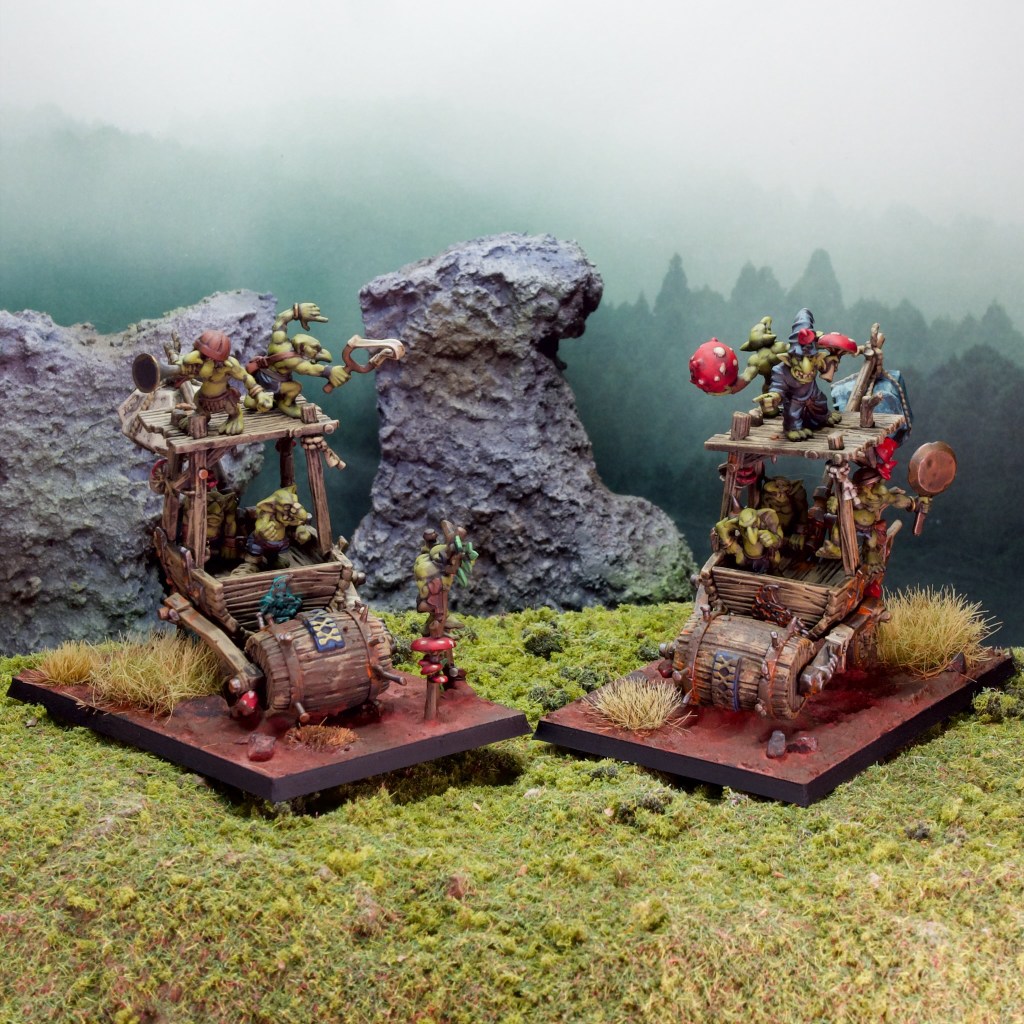
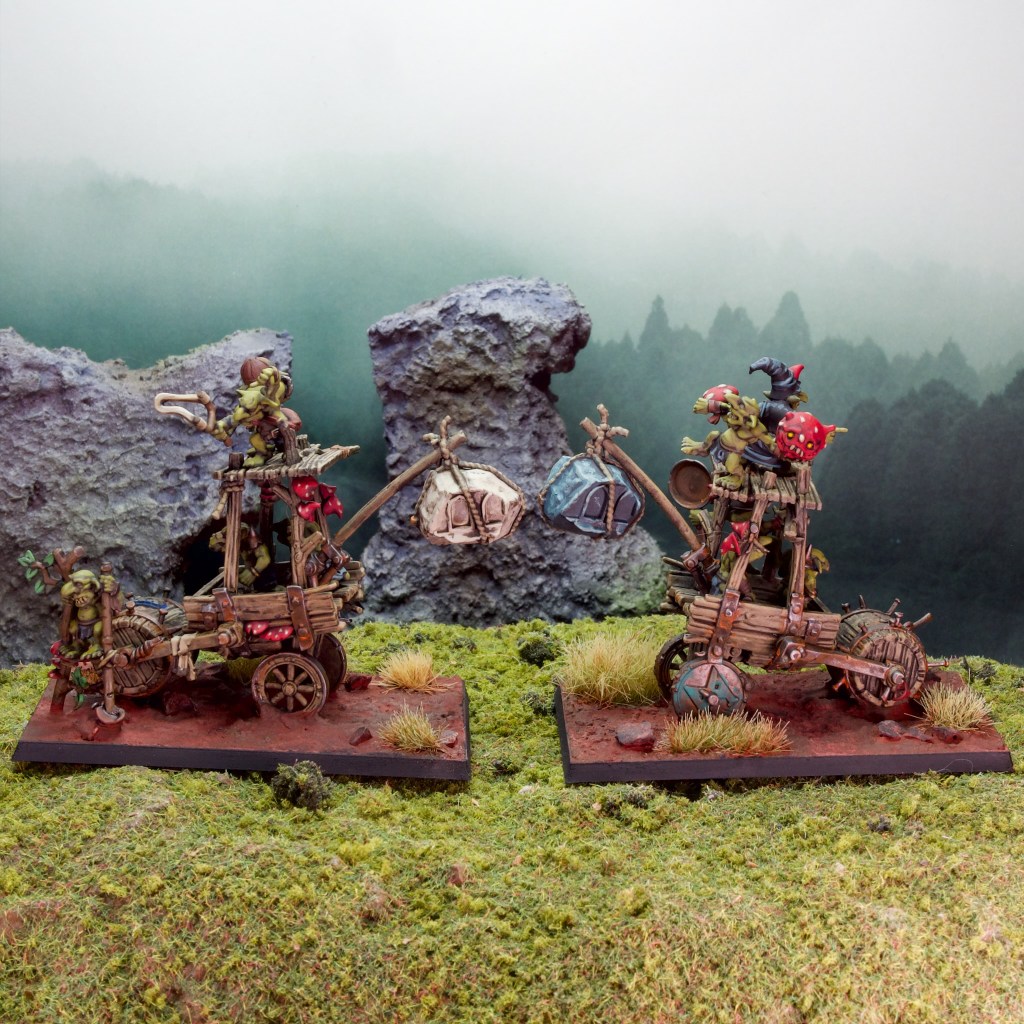
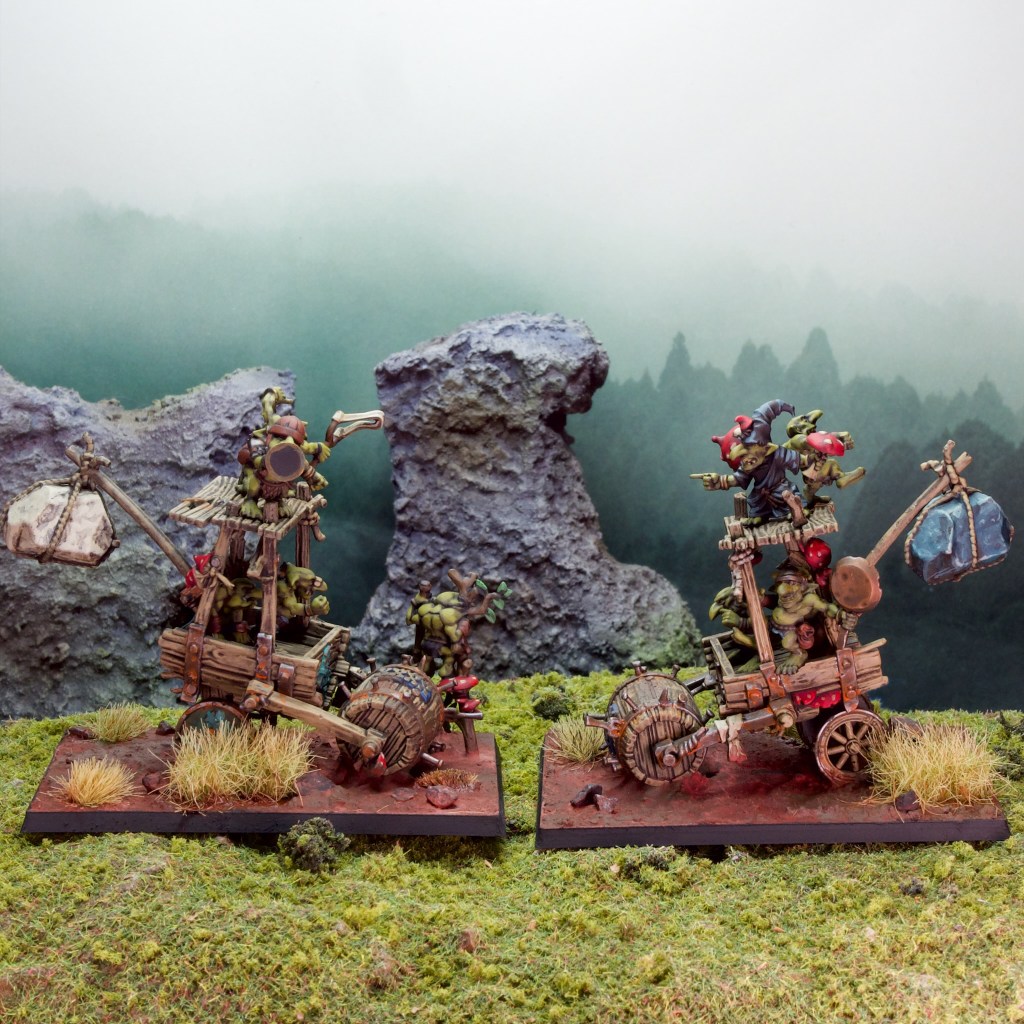
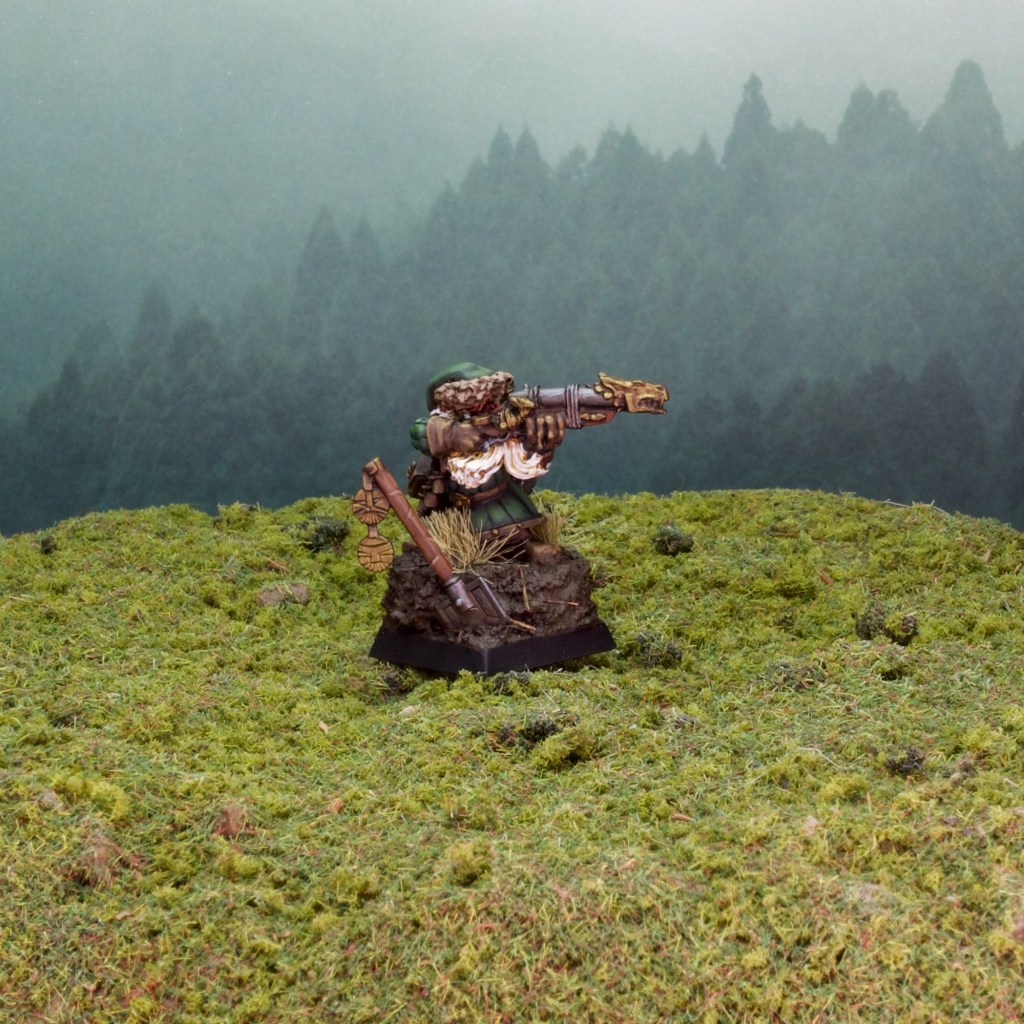
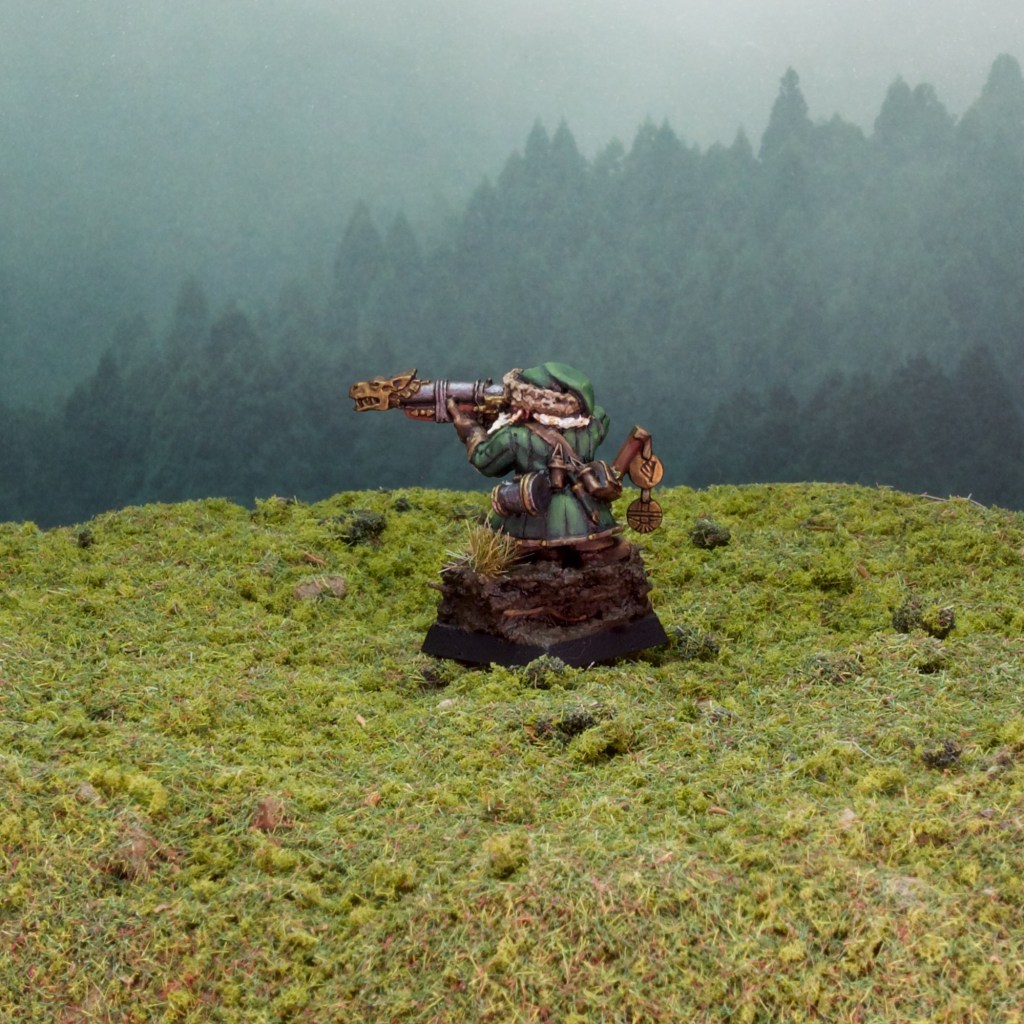
After last post‘s detour into card gaming, back this time with some more usual fare for this blog, models! I’m still pottering away at my Orcs and Goblins army and just finished these two extremely fun models: Snotling Pump Wagons!
For the non-initiated, Snotlings are what Orcs and Goblins call their even smaller cousins, which are even tinier goblins (The models are quite small as you might imagine!). Pump wagons are weird contraptions that are built, crewed, and powered by Snotlings, and as a result barely hang together but can surprisingly effective in the game … if they reach their target.
These models are actually the Blood Bowl Pump Wagons, which I much prefer to the proper Warhammer ones. Even though they’re plastic, they’re surprisingly fiddly to put together (to the extent that I think it’s on purpose to ensure they end up as rickety as if they’d been built by Snotlings!). They come as part of the Snotling Blood Bowl team which is packed full of characterful Snotling models, which meant I could cram them full of different sculpts.
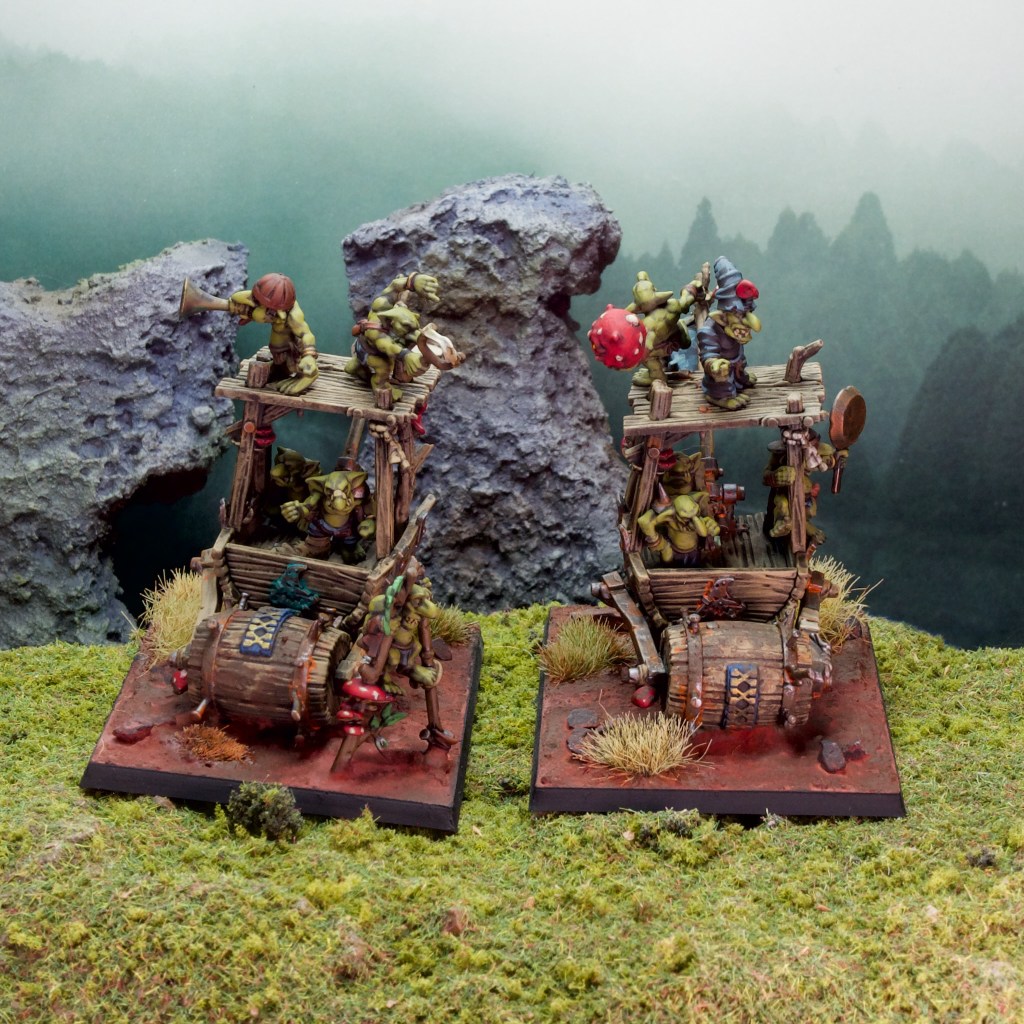
While the models are the same model twice I tried to add some variety to them, mainly through the addition of different Snotlings as I mentioned, but also with some painting differences. The kit is also relatively flexible and lets you add pieces in a few different ways which is nice.
These were a lot of fun to paint as you might imagine. I had all the Snotlings separate for painting to make things a bit easier for myself, and gluing them to the pump wagon once everything was painted was very satisfying.
I’ve just embarked on a “small” side project which has my son very interested in miniature-related gaming so expect to see some (all?) of that next post!
I’ve been thinking about card games a lot recently. So much so that I decided it might be interesting to get some thoughts down on the blog about them (if you like looking at pictures of miniatures, there’s none in this post, apologies!). Card games form the majority of my gaming these days, eclipsing wargames, boardgames, and video games by a wide margin. The only thing that comes close is pen and paper RPGs which I play most weeks.
Card games generally have the advantage of ease of setup and the low time and space required to play them. You can easily just take a deck with you and play some games before/in between other activities (at work over lunch, or before an RPG session!). This is not the case with most of the other gaming that I like to do which requires significant setup, and blocking off a half day or even a day dedicated to gaming. I used to do this all the time when I was a student, but this kind of big setup game just doesn’t fit that easily in my life anymore with work and fatherhood!
I’ve said card games a lot in these opening paragraphs so what card games am I talking about here? I’m going to discuss three card games that I play (or am starting to play in one case) regularly: Magic: the Gathering, Vampire: The Eternal Struggle, and Netrunner. These are all collectible card games (CCGs), and funnily enough were all created by the same person – Richard Garfield. Garfield created these three games in quick succession (1993, 1994, and 1996 respectively) and purposedly made them quite different to each other, which makes for some nice variety in gameplay and deckbuilding. I’m a relatively long time player of Magic (10+ years, not that long for a 30 year old game!) and have only recently (last few years) been playing the other two games. I think they’re excellent and this post is me attempting to convince you that you should check them out, by showing them to you from my perspective as a Magic player broadening his horizons.
Note before we get started: this post will heavily be coloured by my experience with these games, which is playing their modern incarnations. All three games have seen some pretty major changes to their rules over the years, so if you’ve only played these in the 90s and what I say here does not gel with what you remember, chances are the game has changed since then!
Magic the Gathering
If you’re familiar with CCGs this game needs no introduction (I’ll still introduce it though, not everyone will know it and it is useful to set up as a contrast to the other two). This is the forebear of all CCGs, and had a massive influence on the genre as a result. The basic premise is simple enough, at its core this is a two-player game, with each player bringing a deck of cards they assembled outside the game and competing against the other player. This basic formula is still the entry point for the game, however as a still popular 30+ year old game Magic has many, many, variants, including multiplayer (3+ players) and variants that include deckbuilding as part of the game (the draft and sealed formats). I’ll be mostly discussing constructed one vs one games (i.e. two player games where players bring decks they’ve pre-built) in this post as that is the closest to the initial intent of the game as I understand it and is the most common tournament format. Note that the most popular way of playing the game these days is the casual multiplayer format Commander which is quite different.
The Premise
Magic is set in its own original universe, with the players representing Planeswalkers, powerful mages that can move between the planes in Magic‘s universe. These Planeswalkers are battling against each other, using powerful spells or summoning creatures to attack each other.
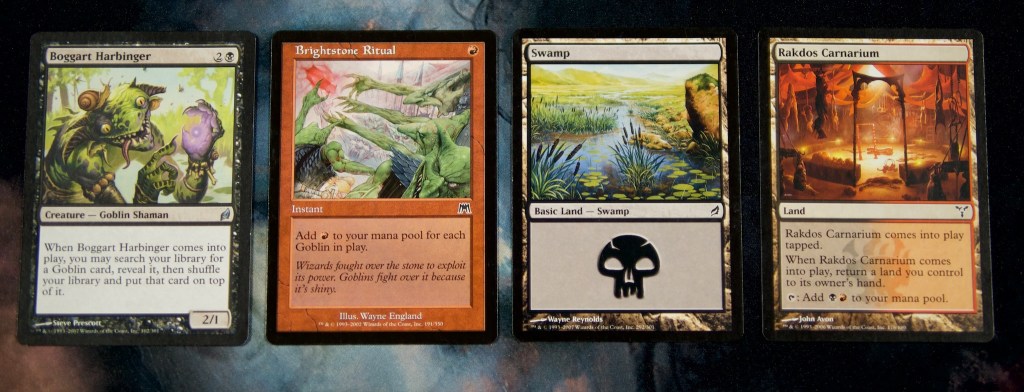
Example Magic cards, left to right: Creature, Instant (a type of non-permanent spell), Basic Land, Non-basic Land
Deckbuilding
Sticking with our one vs one basic game for now, here’s a quick overview. Players assemble their decks by selecting spells and lands. Spells are cards that can summon creatures, or create more ephemeral effects such as once-off damage. Spells require mana to be cast, which is the main resource of the game. Mana comes in five colours (White, Blue, Black, Red, Green), and spells generally cost a mix of coloured mana and generic mana (i.e. mana of any colour), and the more powerful the spell, the higher the amount of mana required by that spell. Lands are cards that produce mana, with basic lands being lands that only tap for one colour of mana, while other lands have additional abilities (tapping for one of two colours being the most common). Each specific card can only be included up to four times in a deck with the exception of basic lands which can be included as many times as desired. Generally the minimum deck size is 60 cards, and for tournament play, players can include a 15-card sideboard from which they can select cards between the games in a match (tournament matches are best of three games).
Deckbuilding then focuses on selecting one or more colours to play, adding a variety of spell costs to be able to play cheap spells early on and more expensive spells later on in the game, as well as including the lands required to cast those spells. The more colours a deck has, the more options it has, however this is balanced by the difficulty of assembling the lands required to cast spells of multiple colours. Most decks are 1-3 colours as a result, with 4 and 5 colour decks being much rarer and more specialised.
Gameplay
A core concept of magic is tapping cards, which generally happens when a card that can be activated only once a turn is activated. The card is physically turned sideways to indicate their having been activated and the fact it can no longer be activated. Players untap their cards at the start of their turn.
The basic gameplay can be summarised as follows: Players start with 20 life, seven cards in hand, and draw a new card at the start of each turn. Players can play one land from their hand per turn. They can tap these lands to produce mana which they can use to cast their spells. Spells are broadly categorised into permanent spells (they stick around after being cast, for example summoned creatures), and spells that place a temporary effect on the game (dealing damage to a player, increasing the power of a creature etc.).
Players once per turn can also attack the other player with their summoned creatures by tapping them. The player on the other side of the attack can block, sending their own creatures to intercept the attacking creatures as long as those creatures are untapped. This means generally creatures can only be used to attack or defend in a given turn cycle which is a key part of the decisions a player must make during the game.
Once a player has cast their spells for the turn (or decided not to!) and attacked (or decided not to!) the turn passes to the other player. This continues until a player’s life total drops to zero. Games of magic are pretty fast, with tournament play expecting players to finish a match (best of three games) in 45 minutes.
My Experience
I first played Magic in 2011-12 and got properly into it in 2013. Since then I’ve played a lot of Magic, built many decks, and explored many of the variants out there. I’ve played quite a few tournaments although nothing very serious. My favourite way to play Magic is constructed one versus one formats, leaning towards those that allows larger card pools (so called eternal formats), with my favourite being Legacy, a format that allows for cards from all of Magic‘s 30+ year history. As you might imagine that represents a lot of potential options for deckbuilding!
Vampire: The Eternal Struggle
Vampire: The Eternal Struggle (VTES), or Jyhad as it was originally known, was the follow up CCG from Richard Garfield, set in the universe of the World of Darkness RPGs (specifically Vampire: The Masquerade). The game was built from the ground up to be a multiplayer game (3+ players), immediately breaking from the Magic mold, and the games were meant to be loooong by Magic standards. These days VTES tournaments impose a two-hour time limit for games (compared to the 45 minutes for 2-3 games in Magic), and it is quite easy to play three or four hour games if no time limit is imposed. This interview of Richard Garfield is a good overview of his mindset going into this game. The initial guidelines for the game suggest estimating 30 minutes per player in the game, with 5 players being what most groups aim for.
VTES has had an interesting history, being first published by Wizards of the Coast (alongside Magic) 1994-96, then by White Wolf (publishers of Vampire: The Masquerade) until 2010. Between 2010 and 2018 the fanbase kept the game alive through PDF releases, and finally in 2018 the some of that fan-base created an organisation called Black Chantry that got the license to officially release cards for the game. Black Chantry have moved away from the booster pack model and only release cards as part of full decks or packs with known contents in a similar model to living card games which is excellent for fans.
The VTES card backs throughout the years.
The Premise
As I mentioned above, the game is based on the Vampire the Masquerade (VTM) role-playing game. In VTM the players usually play recently turned people, discovering the dark world around them. Part of that dark world are ancient vampires (1000+ years old) called Methuselahs which don’t really participate directly in vampire society but rather influence it from a distance, through proxies such as younger vampires. These Methuselahs are generally fighting over control of vampire society in a shadow war called the Jyhad.
In VTES the players assume the role of Methuselahs, and are attempting to defeat the other Methuselahs in the game. The game then represents the Jyhad, hence the original name (changed in 1995 – the name not being very media friendly for obvious reasons). As Methuselahs do not engage in vampire society directly often, they must perform actions in the game by influencing younger vampires to do their bidding.
Example VTES cards, left to right: Crypt card (The disciplines are the boxes and diamonds to the left of the card – The boxes are disciplines the vampire knows at inferior, and the diamonds are the disciplines the vampire knows at superior), Action card (Note the discipline required, and the different effects for inferior and superior), Modifier card (Modifies an action with the effect – also requires a discipline), Master card.
Deckbuilding
VTES departs from Magic’s deckbuilding in a few crucial ways:
You have two decks! One deck is your crypt, which contains the younger vampires (called minions) you are influencing to do your bidding. This has minimum 12 cards in it. The other is your library (60-90 cards), which contains cards your minions can play (as well as a few other card types).
There is no maximum on the number of times the same card can be included in either deck.
There is no lands and no mana in this game. Most of the cards in your library will require you to have a minion in play however, and those minions have disciplines which represent their vampiric powers. Different disciplines are good at different things, much like colours in Magic. It is therefore imperative to match your crypt deck up with your library. This is similar in spirit to the relationship between lands and spells in Magic, but is a nice new take on restricting deckbuilding.
These three attributes make building decks for VTES completely different to building Magic decks. In fact coming into this game I was at a complete loss as to how to approach deckbuilding.
Gameplay
First let’s address the multiplayer aspect of the game. The ideal size for games of VTES seems to be five players. Four is second best, while three feels too small, and 6 really starts dragging on. As you might expect, a game with five players where the players are all competing for the win could devolve into a right mess without some order imposed on the game. Luckily the game sets up clear rules on how the players are allowed to interact.
During game setup players are randomly assigned a seat at the table. The player to their left is their prey, and the player to their right is their predator (they are that player’s prey). Players by default are only allowed to attack (called bleeding in VTES) their prey. This naturally sets up some interesting dynamics at the table: in a five player game each player is either attacking or being attacked by two of the five players which means the remaining two players are de-facto allies of the player (generally called the cross-table allies/buddies). If the player is extremely aggressive towards their prey, their prey might have to go on the defensive which benefits the prey‘s prey (or grand-prey as the parlance goes!). This goes the other way for the predator and the grand-predator. With this simple rule, the game goes from a mad free-for all to a complex network of alliances (and plenty of opportunities for betrayal!). To win a game of VTES then requires good ability at the game and a willingness to engage in the political aspects of the game.
Now the nature of the game has been touched on, let’s discuss the actual playing of cards. As mentioned above, the Methuselahs are mostly indirectly affecting the game, and require minions to be able to play most of their cards. The exception to this rule are Master cards (and Event cards but I’m not even going there in this overview!). Master cards represents the Methuselahs acting directly on the game, but they can only play a single one of these cards per turn. To play the rest of the cards in the deck then, players need to control minions. Minions are brought under control by spending the primary resource of the game, Pool, which represents the player’s influence. Importantly pool is also the player’s life in the game, run out of pool and the player is ousted and their predator gains a victory point (VP). This means players need to carefully balance their spending of pool, should they bring out more minions to be able to take more actions or keep some pool reserves to survive the coming attacks?
Once a minion has been brought under control they can take generic actions, such as bleeding the prey (attacking their pool reserves), or more specialised actions through playing cards. As mentioned above, minions have disciplines that guide what cards they can play, meaning in VTESminions can be loosely considered to be a cross between Magic‘s lands and creatures. Minionstap (called lock in the game) to take actions, and must be untapped (unlocked) to block actions, much like Magic’s creatures. Unlike magic, there are quite a few ways to unlock during or after your turn, allowing minions to both go on the offensive and defend in the same turn cycle.
The biggest difference with playing cards in VTES when compared to Magic is the fact players always have seven cards in hand. They must re-draw after playing or discarding a card (and do not draw at the start of their turn, altough they can discard one card at the end of their turn (which forces a redraw)). This makes a dramatic difference to gameplay. In Magic players are incentivised to hold on to their cards for the right moment, while in VTES they are encouraged to play cards as often as possible.
My Experience
I started playing VTES around 2020/21 and coming from magic it was completely alien to me. The differences in mechanics meant that my card gaming heuristics were all useless. I would almost exclusively focus on my prey rather than consider the full table, as if I was playing a one versus one game with them. It took me a while to break out of that mindset, and I’m really enjoying the game. With VTES Garfield aimed to make a CCG that was very different to Magic and I can say from my own experience that he has utterly succeeded.
Netrunner
The third Garfield CCG, Netrunner, was a return to two-player gaming in the vein of Magic, but with a crucial difference: the game is asymmetrical. Unlike the previous two games where the players are embodying similar entities and differ solely through their deckbuilding choices, Netrunner sees one player play as a Runner, effectively a hacker attempting to break into a corporation’s servers, and the other as said corporation (Corp). This means the two players play with completely different decks, and with different mechanics altogether.
Similarly to VTES, Netrunner was initially published by Wizards of the Coast (1996-99) then abandoned. In 2012 Fantasy Flight Games produced a new Netrunner game (not backwards compatible with the first version) under licence from Wizards until 2019, at which stage the fan community took over (sound familiar?) and are actively producing cards for the game under a non-profit called Null Signal Games. As far as I understand Null Signal Games does not have the license to Netrunner however so their products are labelled as “Compatible with Netrunner”. They do however run the big Netrunner events and the like, so for all intents and purposes they run the game at the moment. It will be interesting to see if they can get the license proper one day, similarly to what has happened with Black Chantry and VTES. Both the FFG version and the Null Signal Games version operate as Living Card Games, i.e. there is no random booster packs, rather packs of cards have known contents so it is easy for players to get the cards they need
The Premise
I’ve covered this mostly in the opening paragraph, but in games of Netrunner one player takes on the role of the Runner and the other the role of the Corp. The Wizards version of the game was set in the Cyberpunk 2020 universe, while the Fantasy Flight Games (FFG) redo was set in FFG’s Android cyberpunk setting. The Null Signal Games version continues the story from the FFG game, although presumably as fan content rather than officially.
The game centers around the Runner attempting to break into the Corp’s servers and spoil their operations, while the Corp is building defenses and attempting to advance its (most likely nefarious) agendas. The Runner wins if they can spoil the Corp’s plans by stealing their agendas, and the Corp wins if they can advance enough of their agendas (or sometimes simply by killing the Runner with ICE (intrusion countermeasures electronics) and other nasty surpises).
As befits an asymmetrical game, the deckbuilding is … asymmetrical. The game has Corp cards and Runner cards. These are separate pools of cards – Corp cannot play Runner cards and vice versa.
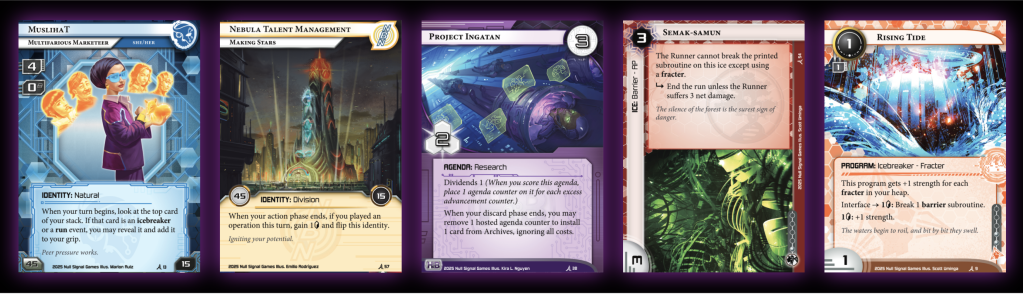
To build a deck players first choose an identity. This card, which is not part of the deck, dictates some of what can be in the deck. First of, the card specifies the faction of the deck. This is similar to colour in magic: different factions are good at different things. There are three Runner factions and four Corp factions. The identity also specifies the minimum size of the deck (usually 40 or 45 cards but this varies), and finally the faction specifies how much influence the player has to spend. Influence is used to “buy” cards from other factions (think playing a second colour in magic). Every card in Netrunner has a faction and an influence cost that dictates how much influence a deck of another faction needs to spend to include that card. No influence is required if the card and the identity are the same faction. Minimum deck size and influence are interesting balance levers for identities, as identities also have abilities that can be really quite strong. Generally smaller decks are better in card games (VTES being a weird exception), so identities with strong abilities can be balanced by increasing their minimum deck size. The same is true for influence, being able to patch your faction’s weaknesses by bringing in cards from other factions is very strong, so identities that offer more influence have a big advantage (and thus identities with strong abilities can be balanced by a drop in their influence).
As you might expect, Runner cards focus on breaking ICE and running Corp servers. These things tend to be expensive to do, so Runners also need ways to generate credits (more on that later), whether that be by using job cards, or some other mechanisms. Corps also need cards that generate credits, as well as ICE cards to protect their servers. In addition, the Corp player must include a certain amount of agendas based on their deck size which has a big impact on Corp deckbuilding.
There is a maximum of three of each card in a deck.
Players build both a Corp deck and a Runner deck, and take it in turns playing Runner and Corp.
Gameplay
Both players can take a limited number of actions per turn by spending clicks. Runners get four clicks, Corps get three. Actions can be playing cards or taking one of the default actions (gain a credit, draw a card, install a card etc.). The Corp always gets the first turn.
As the gameplay is quite different for Corp and Runner, I’ll start by explaining Corp gameplay. The Corp starts the game with three servers – Archives (their discard pile), R&D (their deck), and HQ (their hand). The can create additional servers called remote servers where they can install cards to use their abilities. The Corp starts each turn by drawing a card. To win the game the corporation needs to score seven points of agendas. To score an agenda, the Corp needs to install it in a remote server (takes 1 click) and advance it enough times to be able to score it (the number of advances required depends on the agenda, each advance requires a click and a credit). Generally this is hard to do in a single turn with only three actions, so the Corp needs to make sure its agenda in progress is protected from the runner who is going to try to steal it. All Corp cards are installed face down, and only revealed when the Corp player chooses (and can afford it), or if the runner successfully runs the server in the case of cards installed there. While the runner cannot be sure that the card on the server is an agenda in progress (some non-agenda cards can also be advanced), they are likely to try to get to any card that has some advancement counters on it. To stop the runner from doing just that, the Corp player can install ICE in front of that server (remember Corp cards are installed face down, this includes ICE – the Corp can spring some really nasty surprise on the runner). ICE cards have abilities that the Runner needs to get through to access the server, and if the runner can’t, more often than not, the run will end and the card will be safe.
On the other side of the table, the Runner is trying to win by stealing seven point of agendas from the Corp. The runner does that by accessing cards in the Corp’s servers and hoping to find an agenda there. By default the Runner accesses all the cards in a server (i.e. looks at them and can score any agenda they find there) if they successfully run it. There are two exceptions to this, when accessing HQ (the hand) the runner draws a card at random, and when accessing R&D (the deck) the runner accesses the top card only. Either way if the card is an agenda the runner can score it. This of course requires getting through the defenses the Corp has likely put on their servers, and therefore the Runner needs to balance running servers (costs a click) and installing hardware/software/resources to help with bypassing ICE (all of which also cost clicks). The runner does not draw at the start of their turn so they also might want to spend clicks on drawing cards. If the runner does nothing, the Corp will win through advancing agendas, so the Runner is forced on the offensive. Go too early and the Corp’s ICE can stop you dead in your tracks. This tension is at the core of Netrunner and makes it a great game.
My Experience
I think I played Netrunner before playing VTES, but I can’t remember for sure. What I do know however is that I’ve enjoyed all the games I’ve played, even if the game is a bit overwhelming at first. As the Runner there is a lot of hidden information in play, far more than in Magic or VTES where hidden information is limited to the other player(s)’ hand(s). There is also so many potential actions a player can take for each click, and it’s very hard to know what is the best course of action at any given moment. A few games in however, you start to understand what is important in the game and have a bit more direction. What’s held me from getting into the game proper (until now) is that the out of print FFG cards were somewhat hard to get a hold off (at least for any kind of sensible price!). Null Signal Games have however rotated out the last FFG cards from the Standard format (the most widely played format) which means the cards in that format are all Null Signal Games cards now which are readily available – to add to this, all the Null Signal Game cards are freely available on the Null Signal Games website as PDFs to print out and play, how good is that! They do accept donations if you’re into what they do.
Wrapping Up!
It’s been a long post, so thanks for reading all the way to here! I hope my experience as a Magic player trying out other CCGs was interesting and that you’ll check out VTES and Netrunner. They’re both really cool games and very unique. They both are easy to get cards for these days (thanks to their extremely engaged fan-bases), which is fantastic. What I described in this post is a very rough overview of all three games and there is a ton more to discover in each, I had to skip over a lot of detail and this post is still very long by the standards of this blog.
Both games showed that the CCG genre could do quite different things than what Magic did (Luckily! It would be sad if the first attempt at a new game type was the last time someone innovated). I hope that by juxtaposing these games you can see how similar concepts were addressed in different ways in all three games. I would like to highlight a couple here:
It should be impossible and/or a bad strategy to play all the best cards in one deck
Magic does this with the colour system, unless you’re willing to have an extremely clunky deck it is hard to play cards in all five colours, and therefore you need to pick a subset of colours to play.
VTES does this with the discipline system. No minion has all the disciplines and therefore you must pick a subset of disciplines to play.
Netrunner does this much more explicitly with the Faction and Influence systems, putting a cost and a cap on out of faction cards in your decks.
Players should be limited in what they can do in a turn
Magic does this with the mana system, lands can only be tapped for mana once per turn and once that mana is gone, very little can be done until the next turn. Magic also does this with card draw, with only drawing one card per turn, the late game of magic often sees players unable to use all of their mana as they do not have enough cards in hand to use it.
VTES does this with locking minions, and limiting actions. Once minions take an action, they lock and can’t be used for any more actions that turn. The more minions therefore the more actions a player can take, but more minions costs more pool so this is a dangerous game. VTES also generally prevents minions from taking the same action multiple times in cases where they can unlock (i.e. only one bleed action per turn).
Netrunner again does this much more explicitly with the click system. You have a set number of actions unless you have a way of gaining clicks. Netrunner does this implicitly with credits too, many actions cost credits so are off the table if a player runs out.
If you know/play any of the games (or any other card game!) I’d love to hear what you think of them and if you agree with my take on them. If you’re not a card gamer, I hope you enjoyed looking at how the CCG concept was iterated on in its early days!
This post is a bit of a departure for me, this is the first non-painting related post on this blog I believe. I’m not sure if I’ll do this type of post more, but one of the things that drew me to blogging over instagram or the like was the ability to do longer form text, which I haven’t really done yet on here. I did enjoy putting this post together, so I hope you enjoyed reading it.
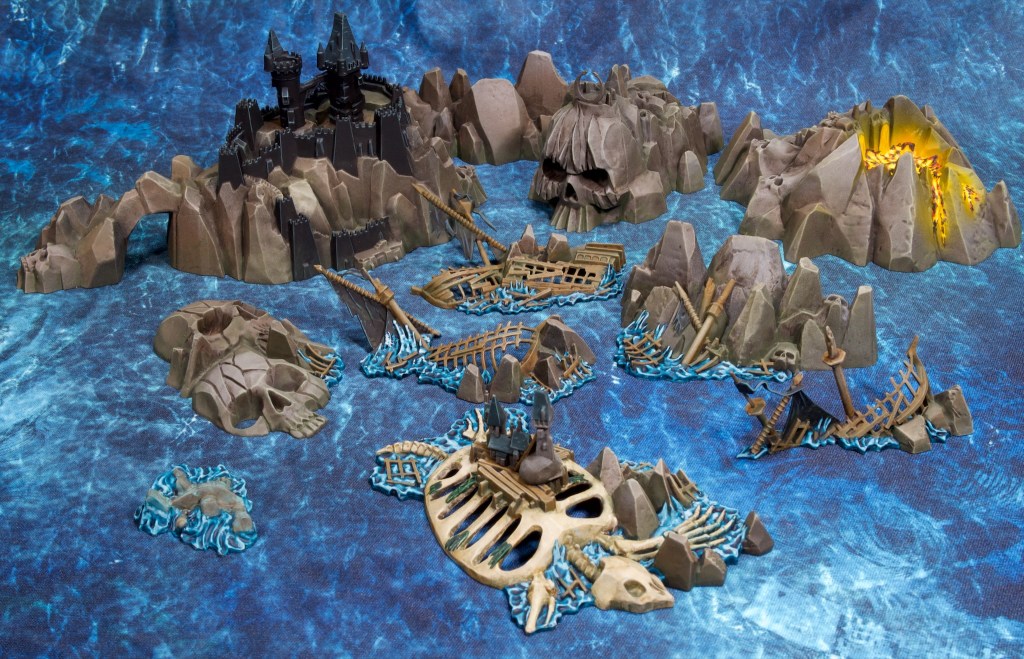
I’ve been busy building and painting a big unit for my Orcs and Goblins Old World army and needed a change of pace (read: a smaller project!). I had a look around my hobby room and my eyes stopped on my Dreadfleet box. I’ve used the game as a palette cleanser in the past (Back in April 2022!), and it delivered once again. At the pace I’m painting it I should expect to be able to play a game in 2040 or thereabouts.
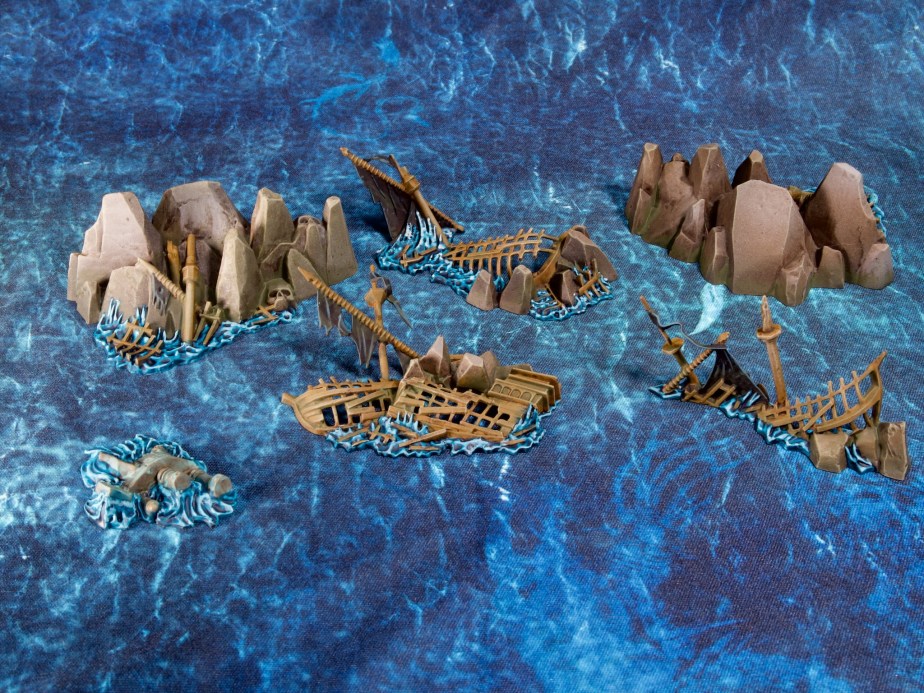
Rather than paint more ships, this time I decided to tackle the terrain pieces in the box. These are nicely varied and hold a ton of detail given the scale they’re representing. They also had the advantage of being mostly rocks and therefore were nice and quick to paint, which fit my purposes perfectly.
Painting them was quite relaxing, and apart from painting the water, they were really straightforward. The water was an issue for two reasons: 1) unlike the ships which have separate bases, this terrain has the water attached and mixed into all that detail I was talking about before, and 2) I never wrote down how I painted the water the first time around!
Considering “the first time around” was close to two years ago I was preparing myself for some hard trial and error. However I got extremely lucky there, and as I was painting remembered how I’d done it, as well as picking the right paint to use on the first try. I am preparing for the next long break between painting this set this time, and writing things down! So here goes:
Rocks:
VGA Dark Fleshtone [Airbrush] – All over
VGA Beasty Brown [Airbrush] – In generous patches
VGA Cold Grey [Airbrush] – Smaller patches, picked out some rocks entirely
VMC Stone Grey [Drybrush] – All over
MIG Panel Line Wash Deep Brown [Wash] – All over
AK Slimy Grime Dark [Stipple] – On the base of the rocks to add green algae
Wood:
VMC English Uniform [Basecoat]
VMC Stone Grey [Drybrush] – All over
MIG Panel Line Wash Deep Brown [Wash] – All over
AK Slimy Grime Dark [Stipple] – On the base to add green algae
Sails:
VGC Black [Basecoat]
VMC Dark Sea Blue [Highlight]
Bones:
VGC Bonewhite [Basecoat]
MIG Panel Line Wash Deep Brown [Wash] – All over
VGC Bonewhite [Highlight]
AK Slimy Grime Dark [Stipple] – On the base to add green algae
Castle Walls:
VGC Black [Basecoat]
50/50 AP Kraken Skin / VMC Dark Sea Blue [Line Highlight]
Castle Roof:
VMC Dark Sea Blue [Basecoat]
70/30 AP Kraken Skin / VMC Dark Sea Blue [Line Highlight]
Lava:
PA Titanium White [Underpaint – Brush] – Painted the lava areas in pure white
VMA White [Underpaint – Airbrush] – Painted next to the lava areas to create a glow
VGA Moon Yellow [Airbrush] – Center of the lava areas
VGA Orange Fire [Airbrush] – Outer areas
VGA Gory Red [Highlight] – Picked out the raised areas to make “cold” lava crust
VMC Black [Highlight] – Picked out raised areas within the red
Water:
Light Grey [Basecoat] – This was a mix to match the undercoat I used on the rest of the models in the set, a just off-white straying into grey.
GW Contrast Akhelian Green [Contrast]
VMC Light Sea Grey [Highlight]
GW Contrast Akhelian Green [Contrast] – Slightly watered down
VMC Light Sea Grey with a dash of GW Contrast Akhelian Green [Highlight]
Manufacturer codes: VGA – Vallejo Game Air, VMA – Vallejo Model Air, VMC – Vallejo Model Color, VGC – Vallejo Game Color, PA – ProAcryl, GW – Citadel/Games Workshop, AP – Army Painter, MIG – Ammo Mig, AK – AK Interactive
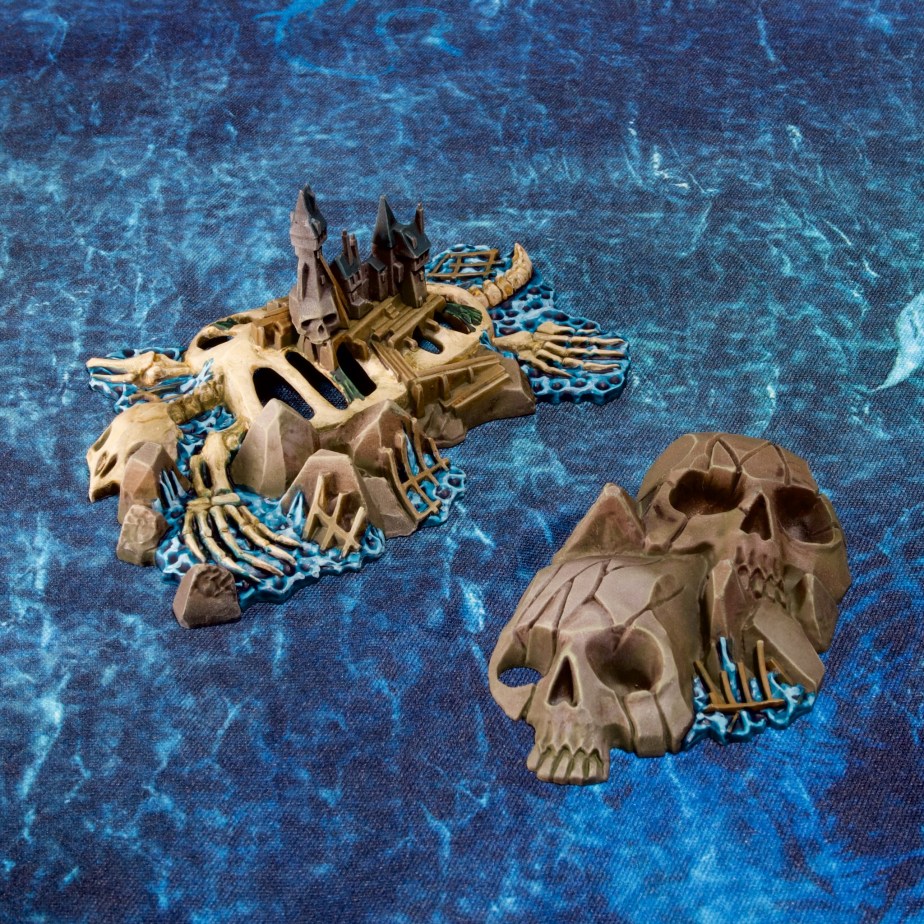
Here’s some detail shots of the terrain pieces. They’re all named in the rulebook so I’ve reproduced those in the captions.
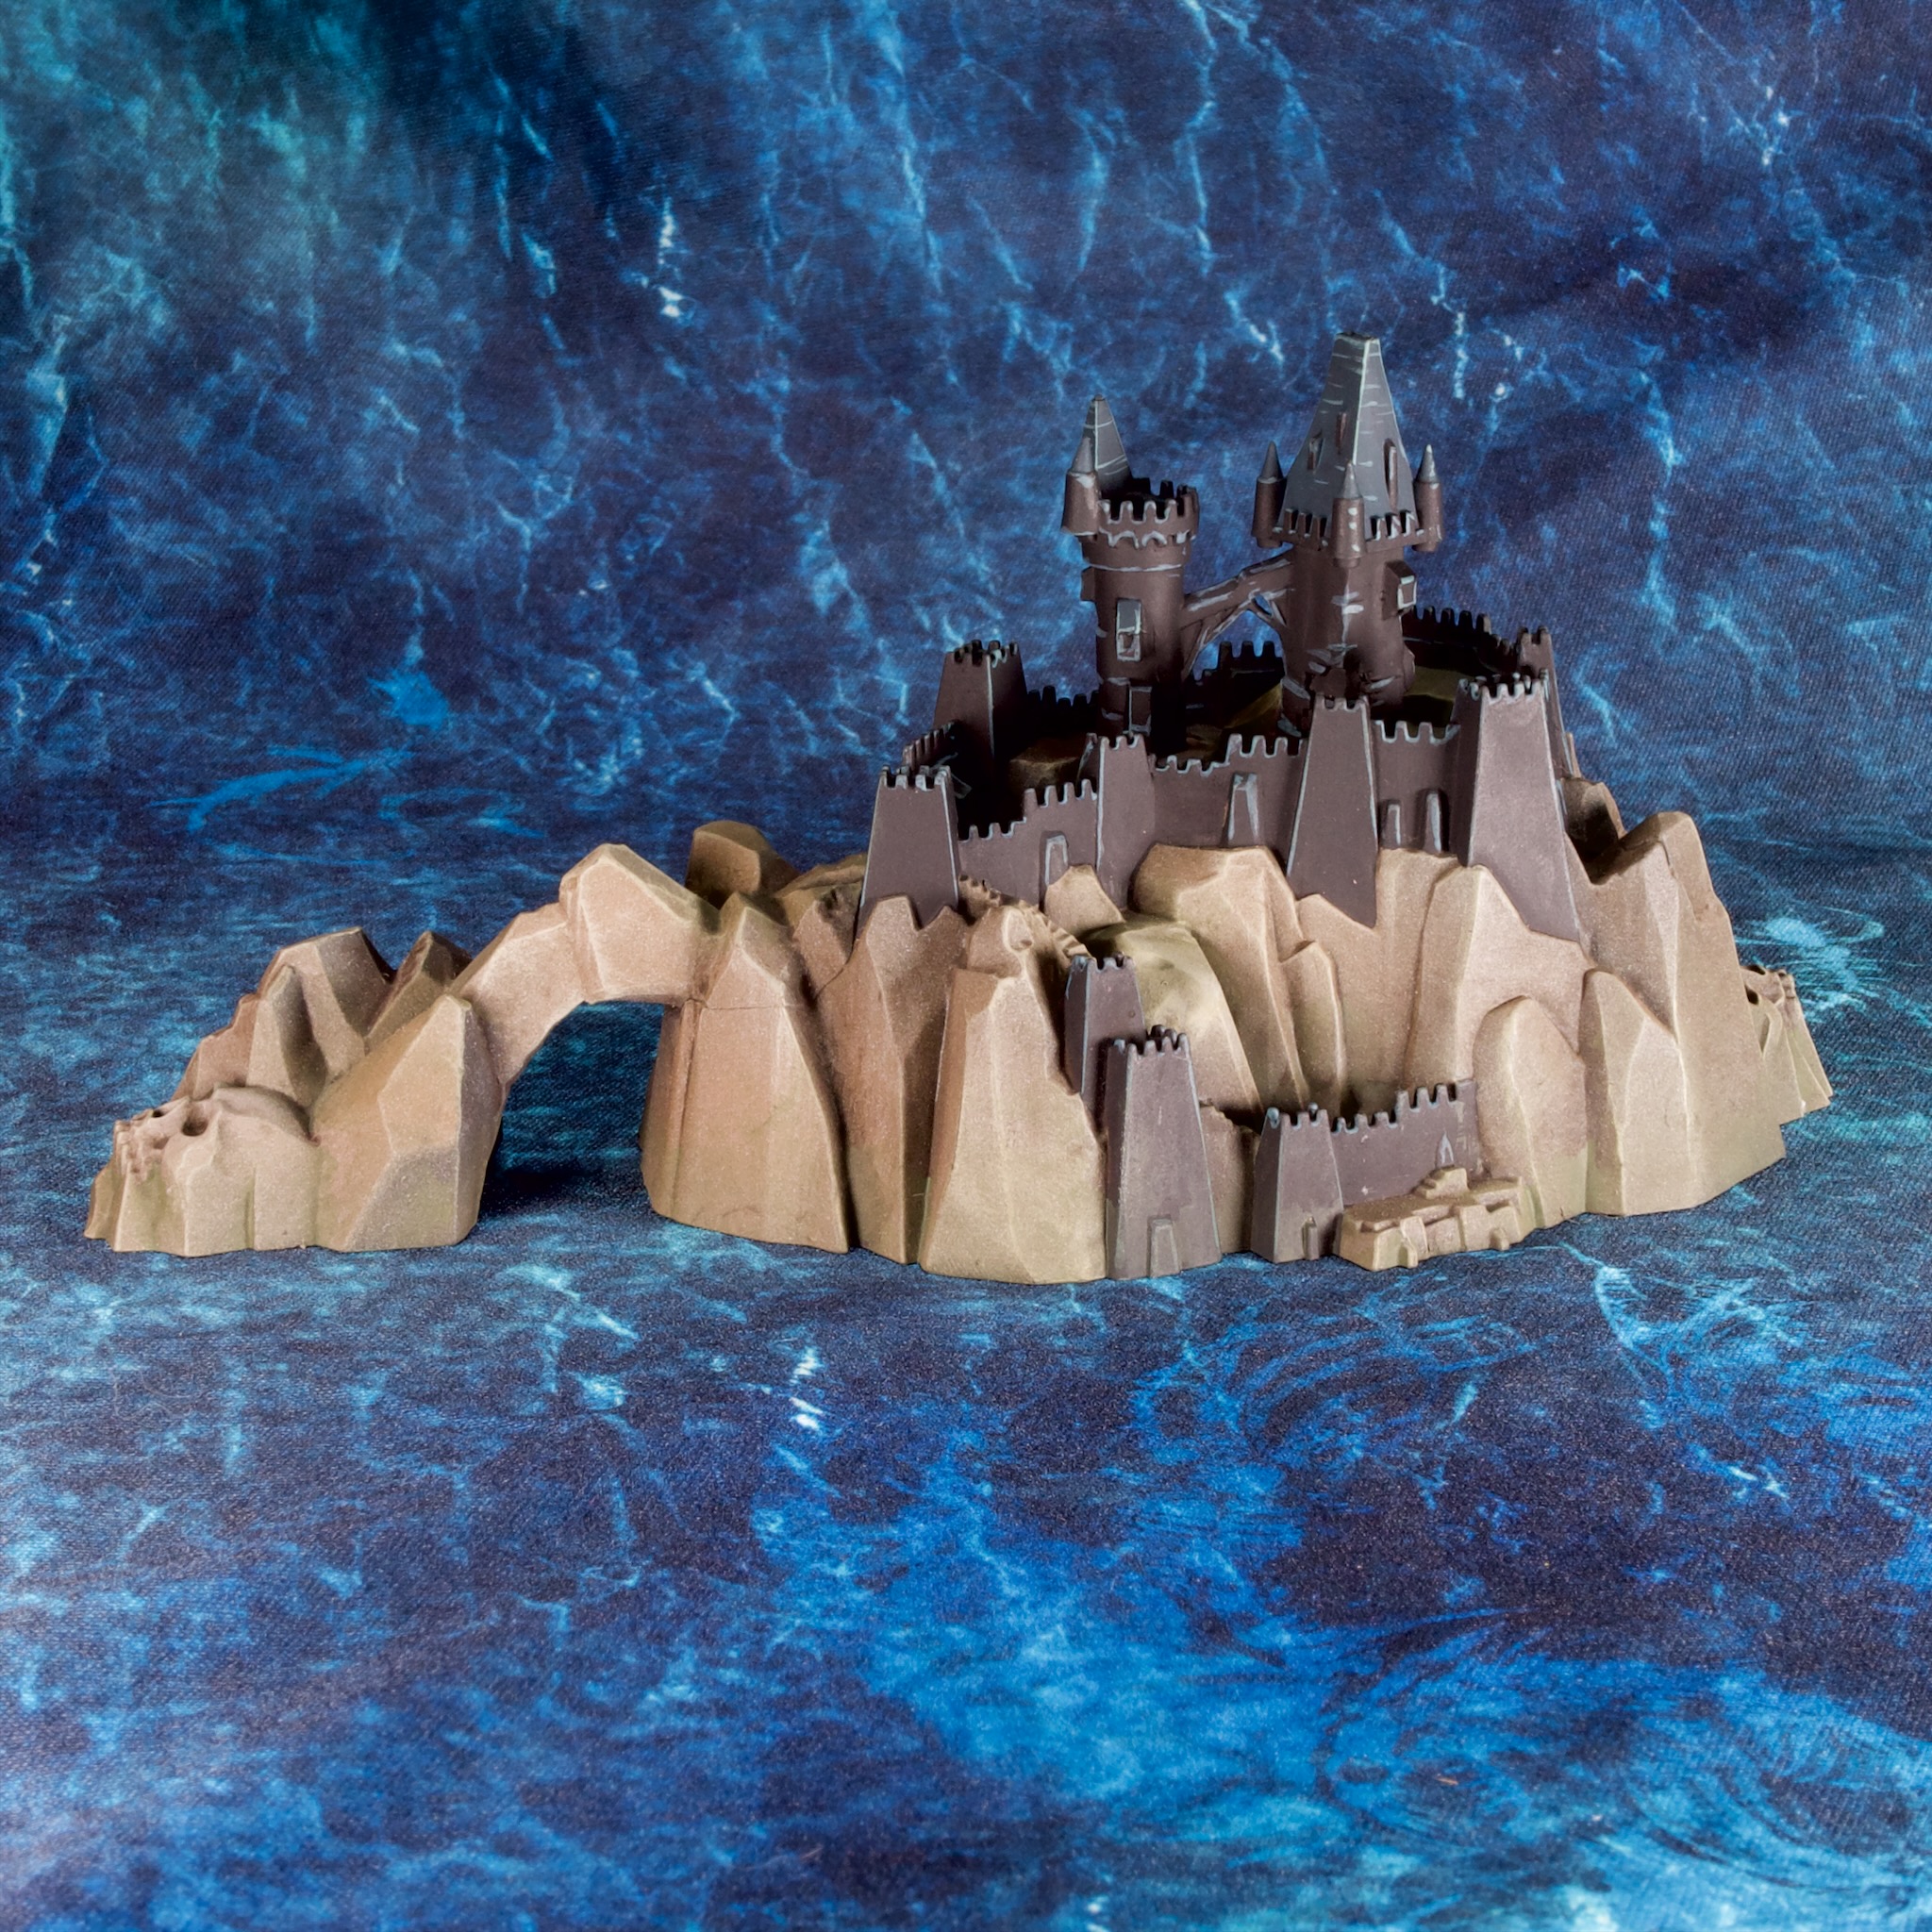
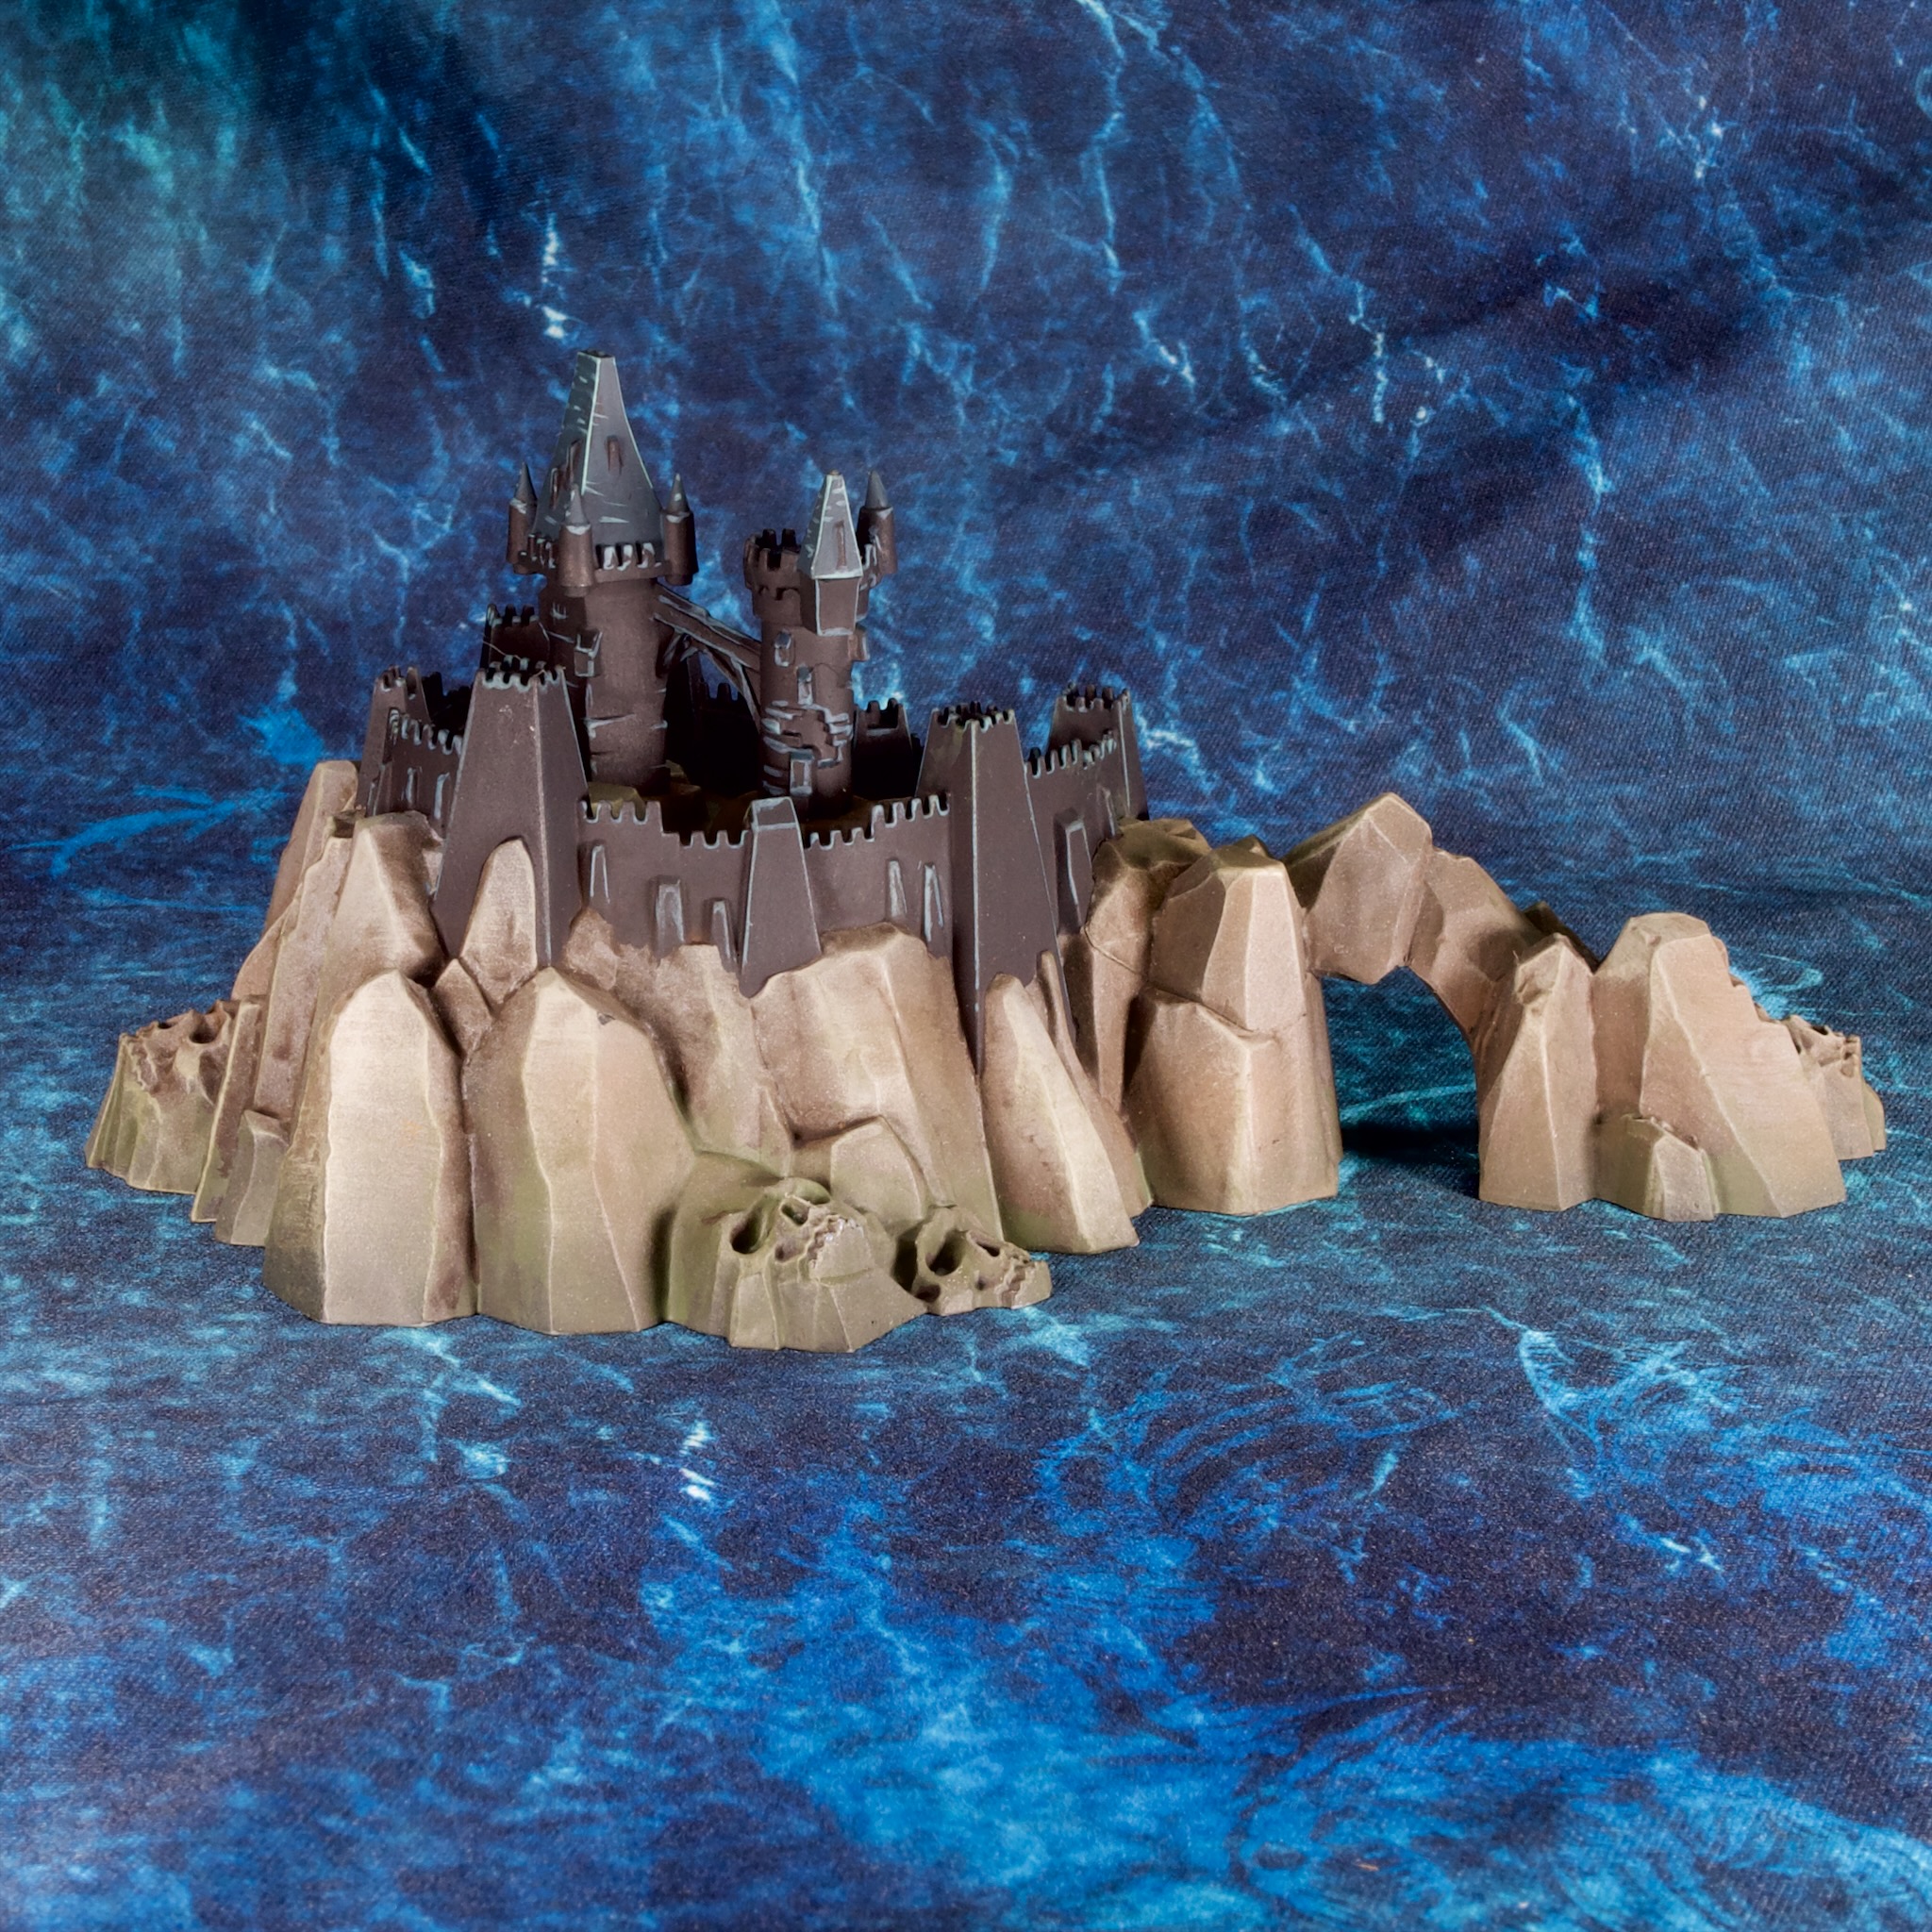
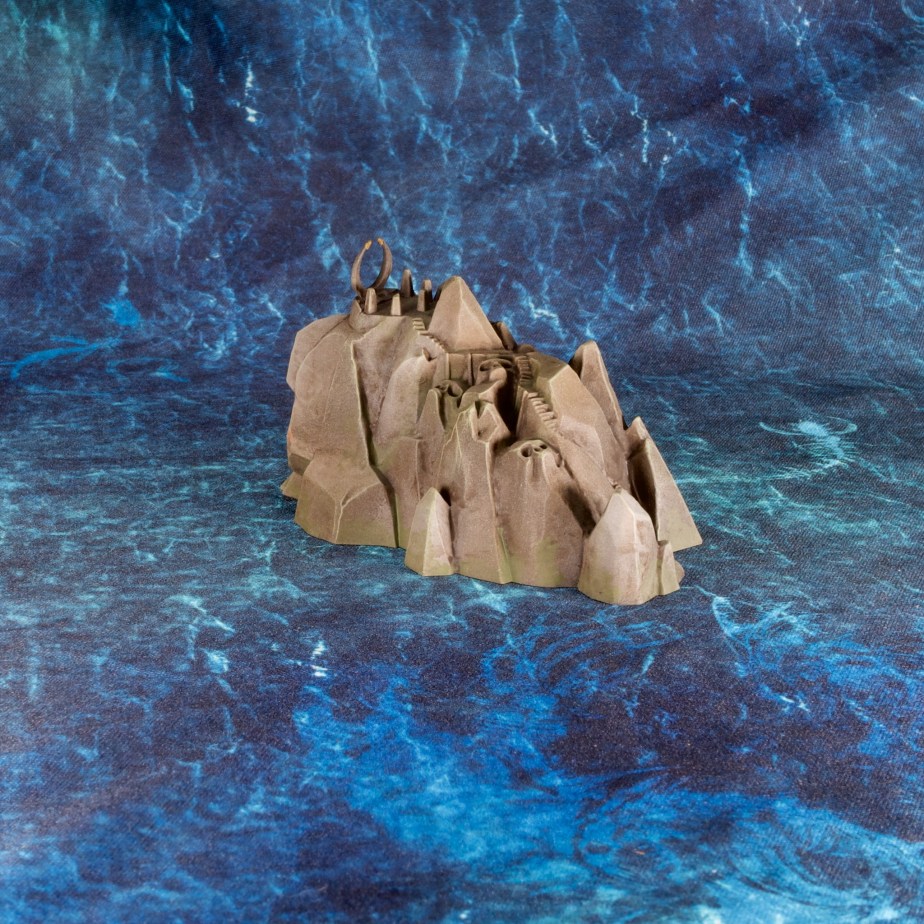
Castle Island
Castle Island
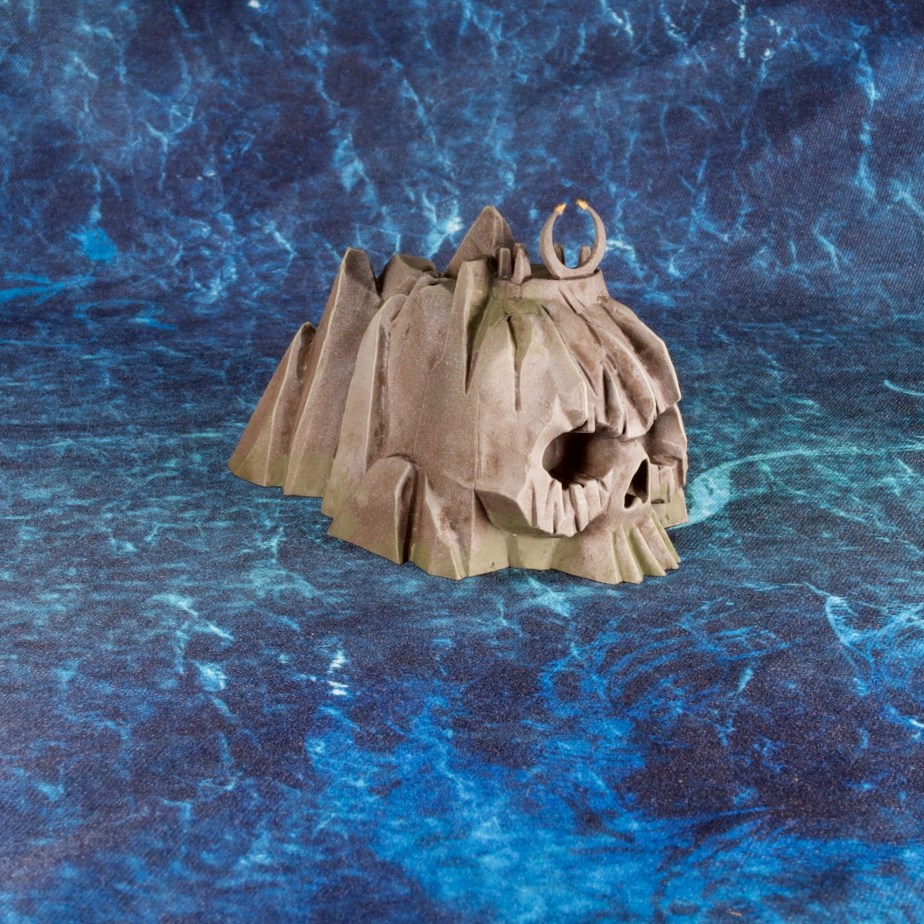
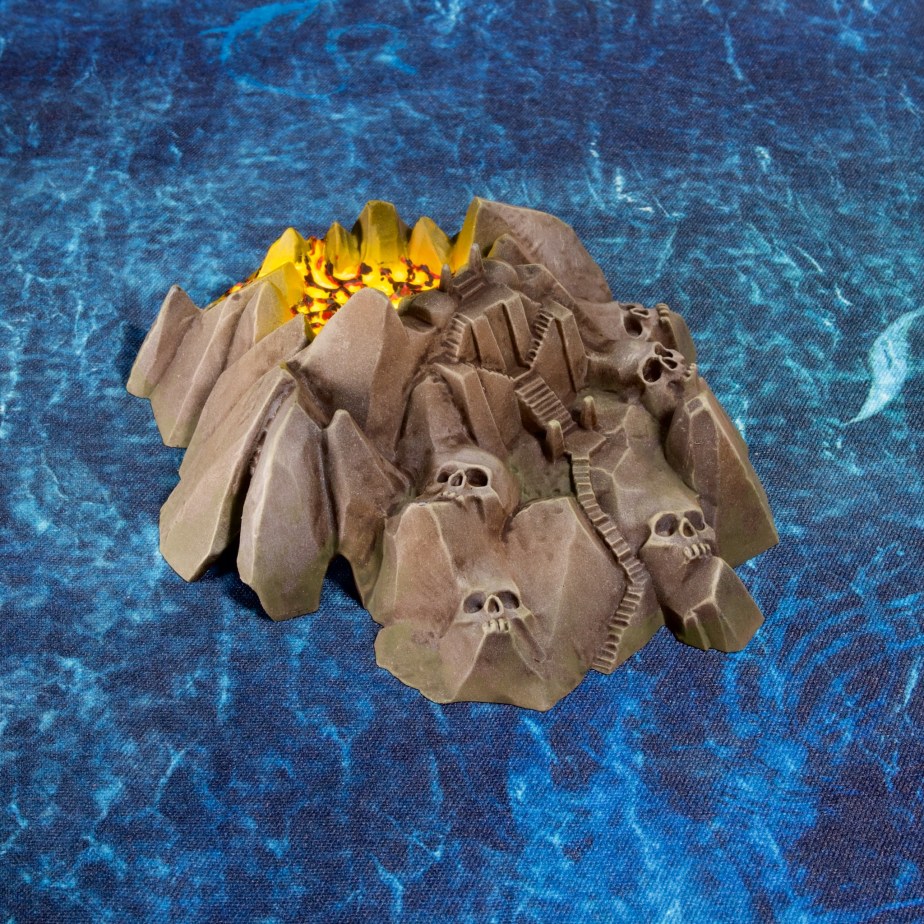
Corpseface Cliff
Corpseface Cliff
Shipwrecks
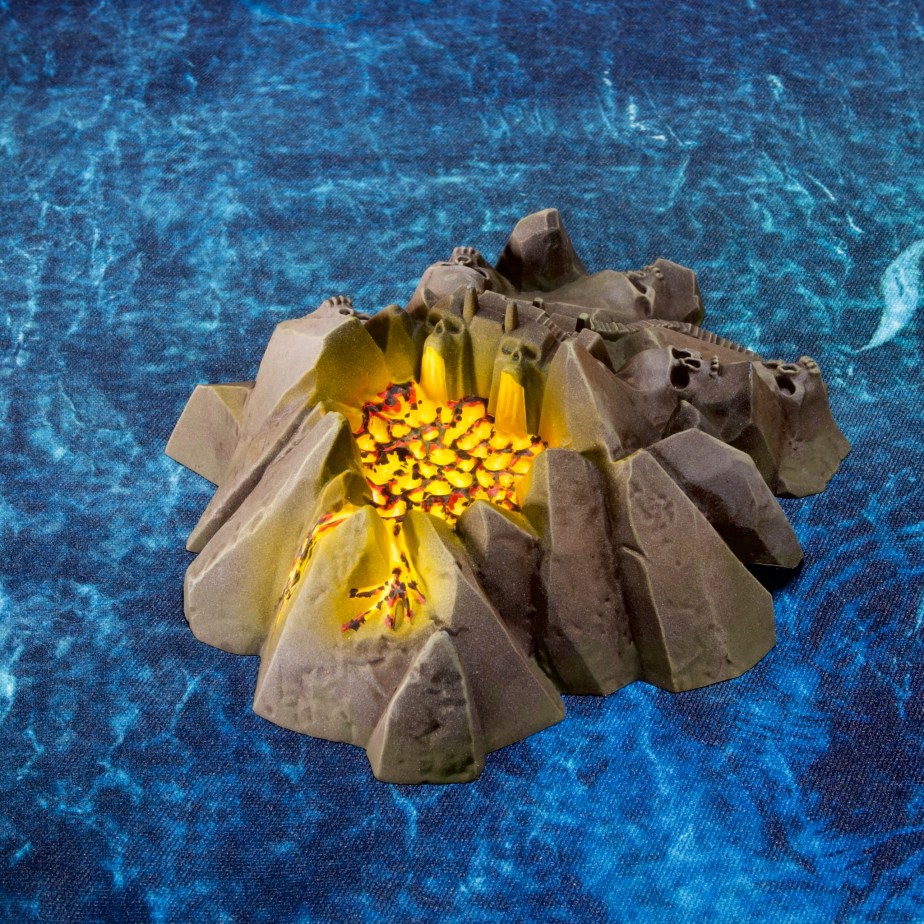
Volcano Island
Volcano Island
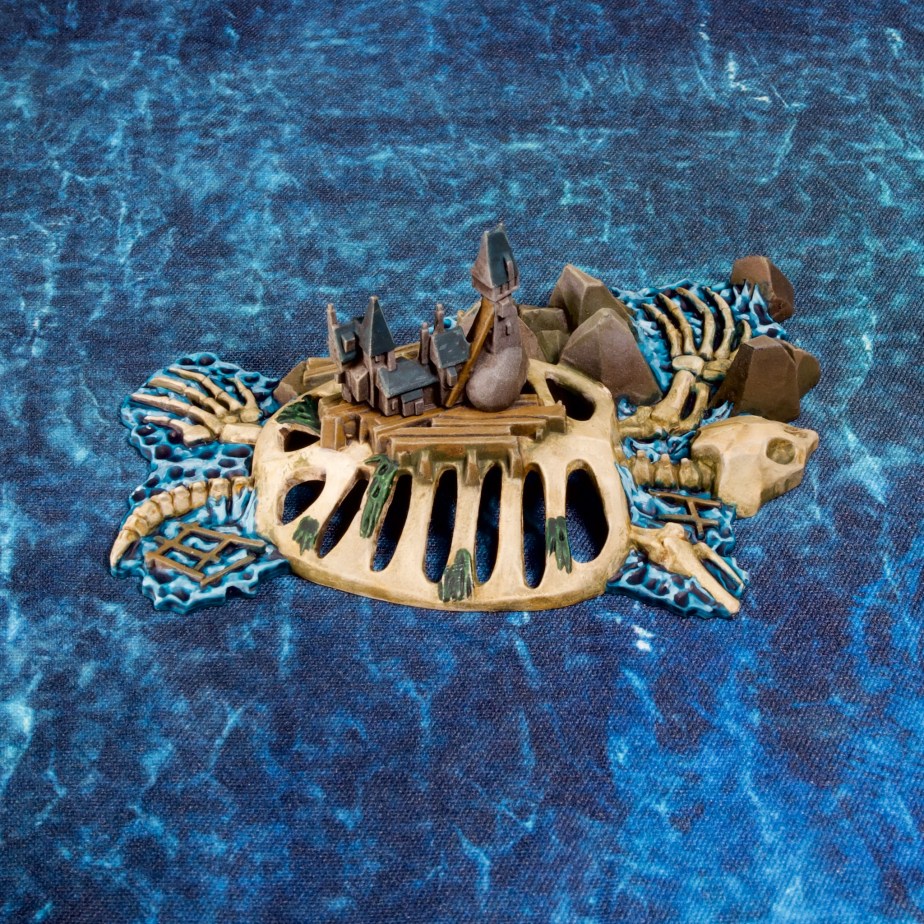
Leviathan Island and Skull Island
Leviathan Island
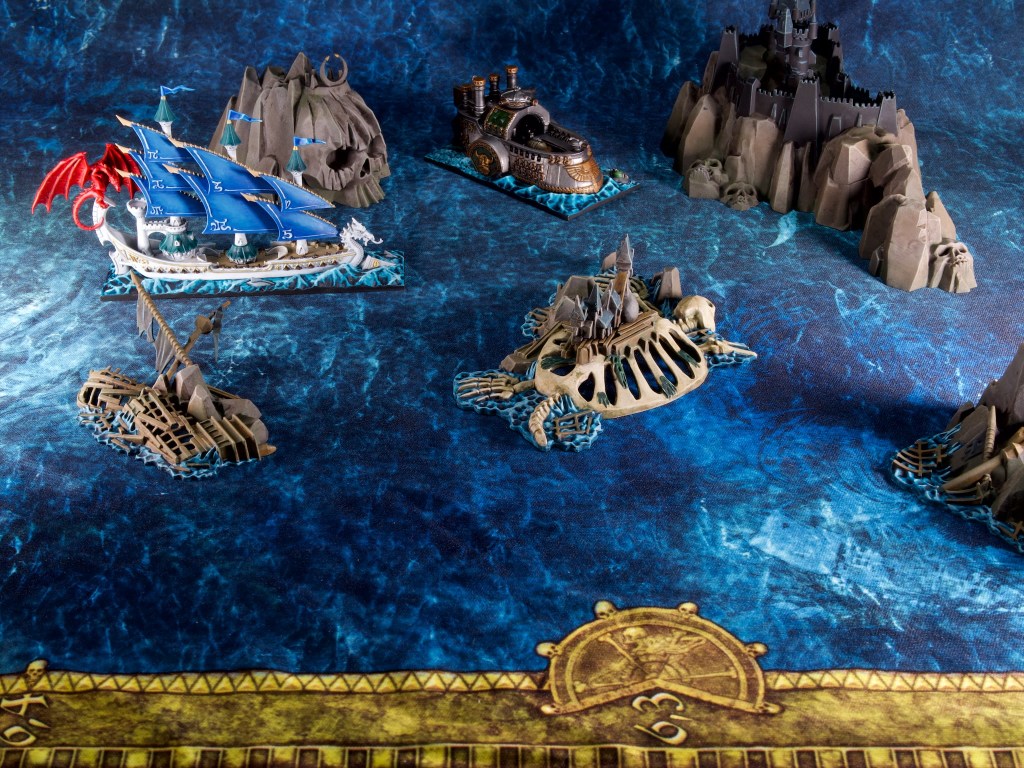
Finally here’s a shot of the terrain with the ships I painted earlier. Really gives you an idea of the fantastical scale the game’s ships are!
It was nice to have a small project to tackle, gave me a sense of having accomplished something after a few months of working away at a bigger project without results I can show! What is true is that the pandemic days are truly over, I have to get used to hobby productivity levels that are much reduced when compared to the enforced downtime we had in the early 2020s. One thing I promised myself when I started this blog is that painting is meant to be my fun time, and should never feel like a chore. That means posting to the blog is secondary to that, and even if I feel it’s been too long between posts (which I’ve felt all of last year and this year), life and fun comes first, and I’m not going to make myself paint just to post something.
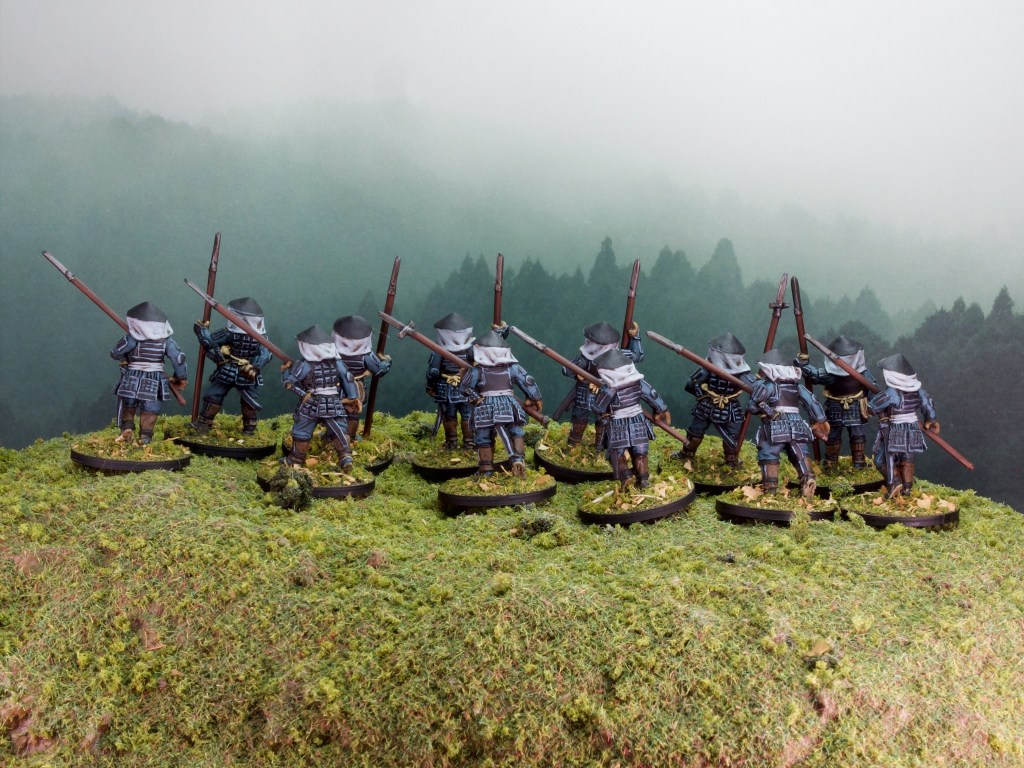
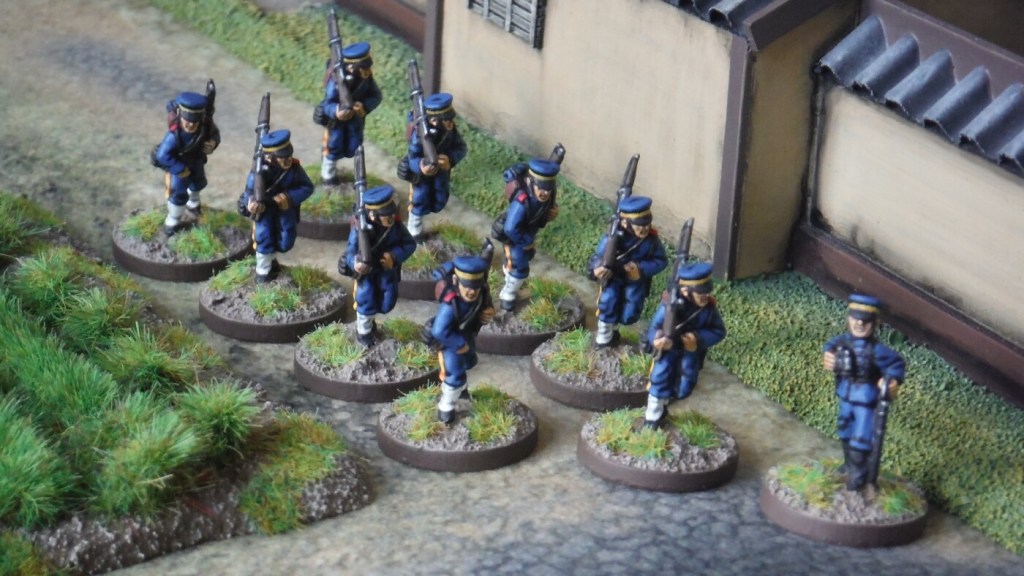
I’ve been in contact for a few months with John over at Just Needs Varnish!, over which time we decided to tackle some of our respective Japanese backlog. He had some turn of the 19th century Japanese forces in need of painting, and I’d been sitting on a collection of unpainted Sengoku era miniatures for a couple of years.
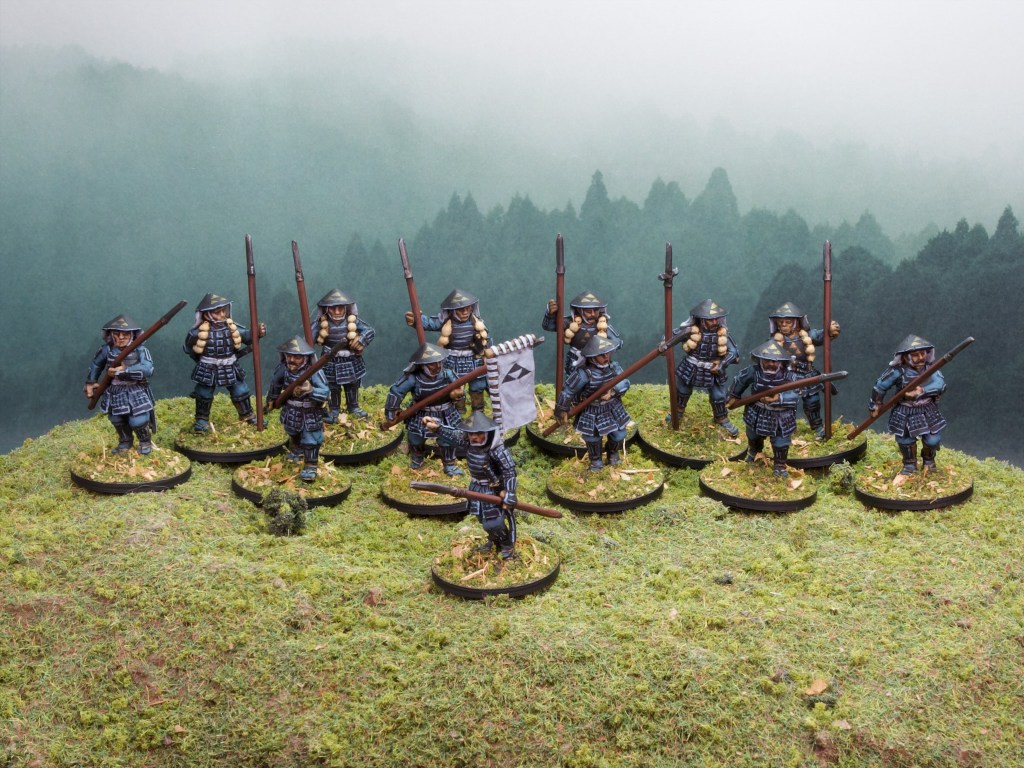
I decided to kick off my Sengoku collection with some spear Ashigaru. The models are from Perry Miniatures and come in boxes of 6 metal miniatures so what you see in the photo above is two boxes of spearmen and a lieutenant from the ashigaru command box also by Perry.
The resulting odd block of 13 models works well for my current target rules system for playing this era: a repurposing of the MESBG ruleset. It’s one of my favourite skirmish systems and I think lends itself very well to historical gaming. The game system is very flexible and makes it easy to represent mixed units as the models are individually placed and moved. In MESBG you pick armies by assembling warbands lead by character models, with 12 models lead by a minor “hero” being pretty standard for the game. This means this group of 13 above makes for a nice warband.
If you’re familiar with the period you might have recognised the mon (emblem) of Clan Hōjō, with it’s three triangles (representing fish scales if I understand rightly!). I decided to go with this clan as I visited some the region they ruled over during my first visit to Japan back in 2015 and really liked it, it’s one of my fondest memories from that trip. In fact the foggy forest photo I’ve been using as a backdrop to my miniature photos for quite a while now was taken there! So the backdrop is very appropriate for these models.
Painting-wise these were relatively simple, with the black and blue scheme heavily reliant on Vallejo’s Dark Sea Blue. I used it both for the cloth areas and the highlights on the black, just mixing in different levels of pale greys in for highlights to differentiate them. For the skin I followed the recipes in my previous Samurai post.
I was planning on tackling some buildings I 3D printed early in the month but simply ran out of time, so they will appear on the blog at a later date when I get around to them!
John got some great results out of our themed painting month, painting some very nice cavalry and some matching infantry that you can see pictured above. Overall this was a fun exercise, and got me to paint some models which I had no immediate plans to tackle which is always a nice plus! So thanks John for the motivation, and I recommend you all go check out the models John painted (and generally follow his blog, lots of great stuff on there).
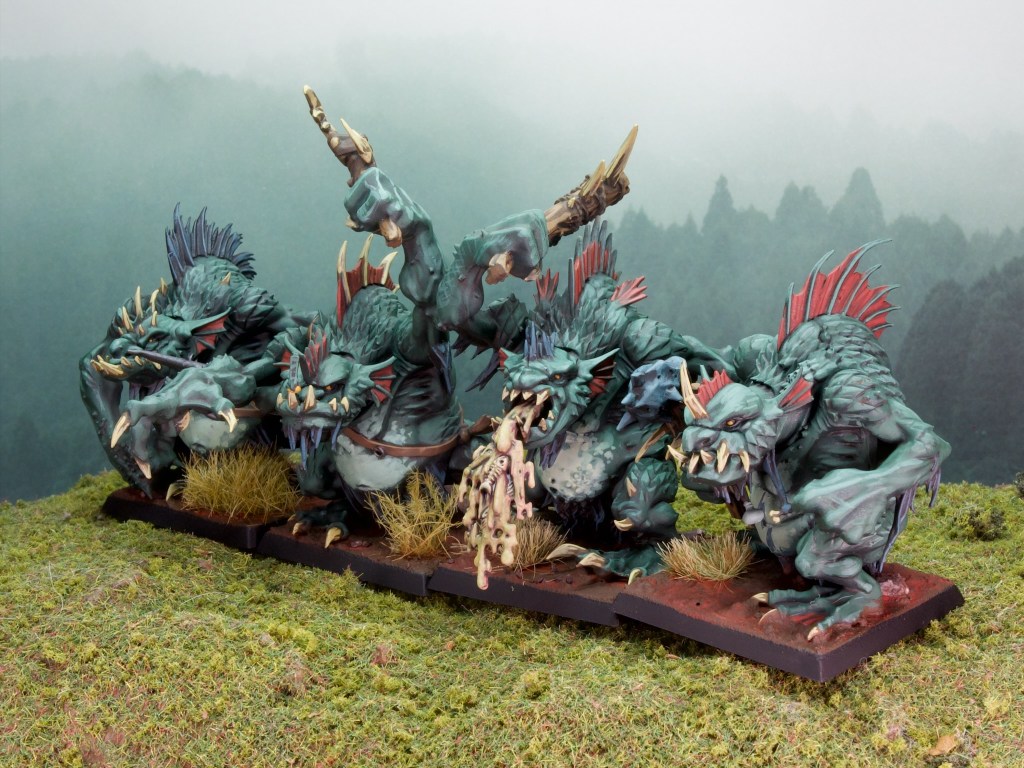
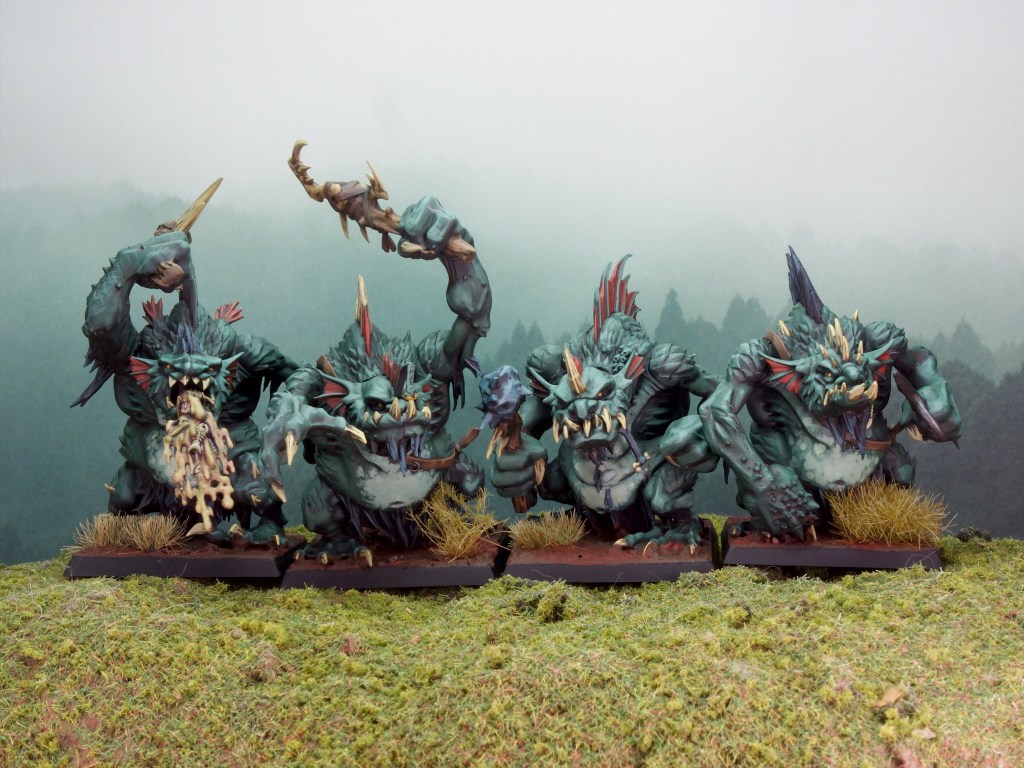
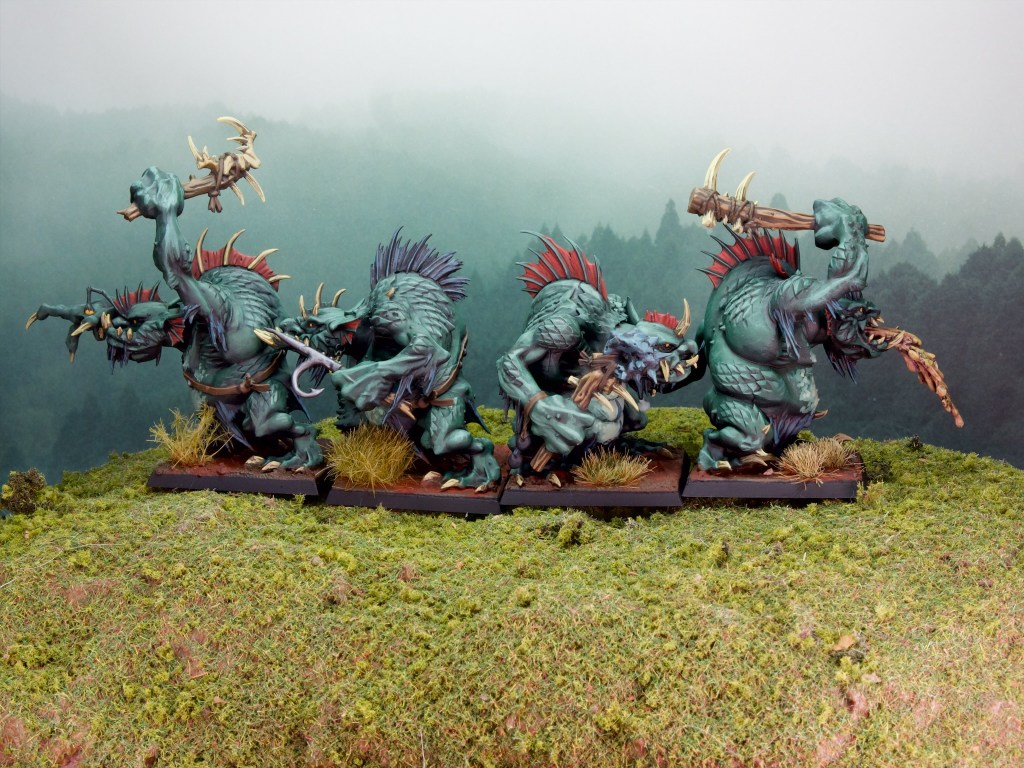
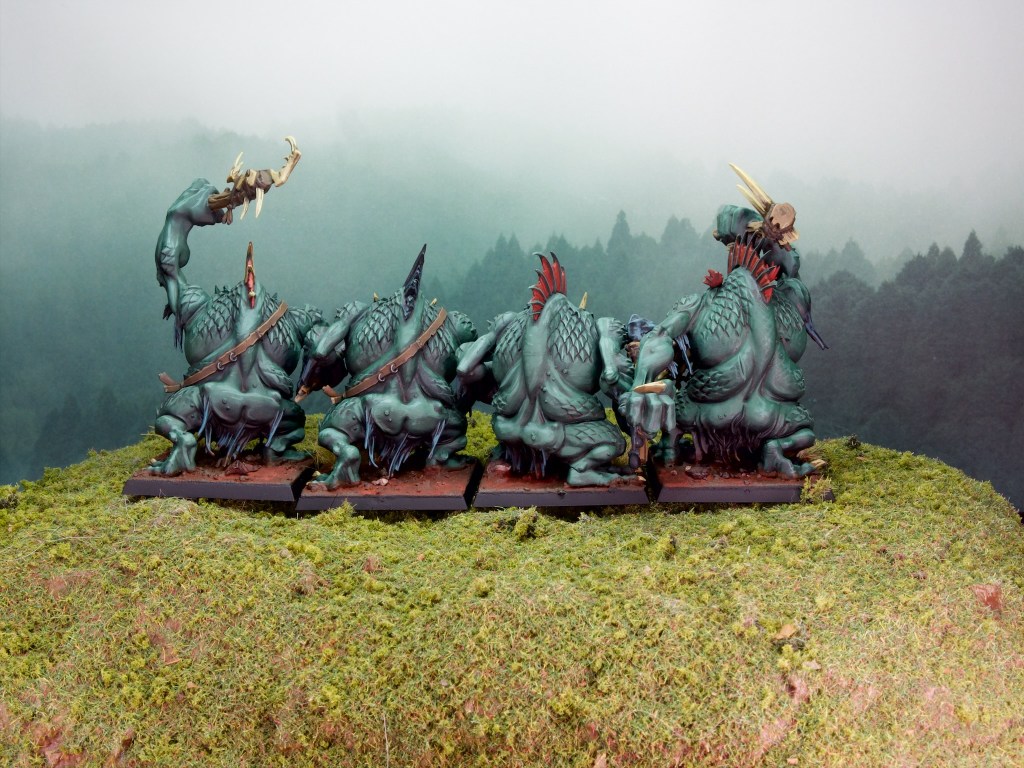
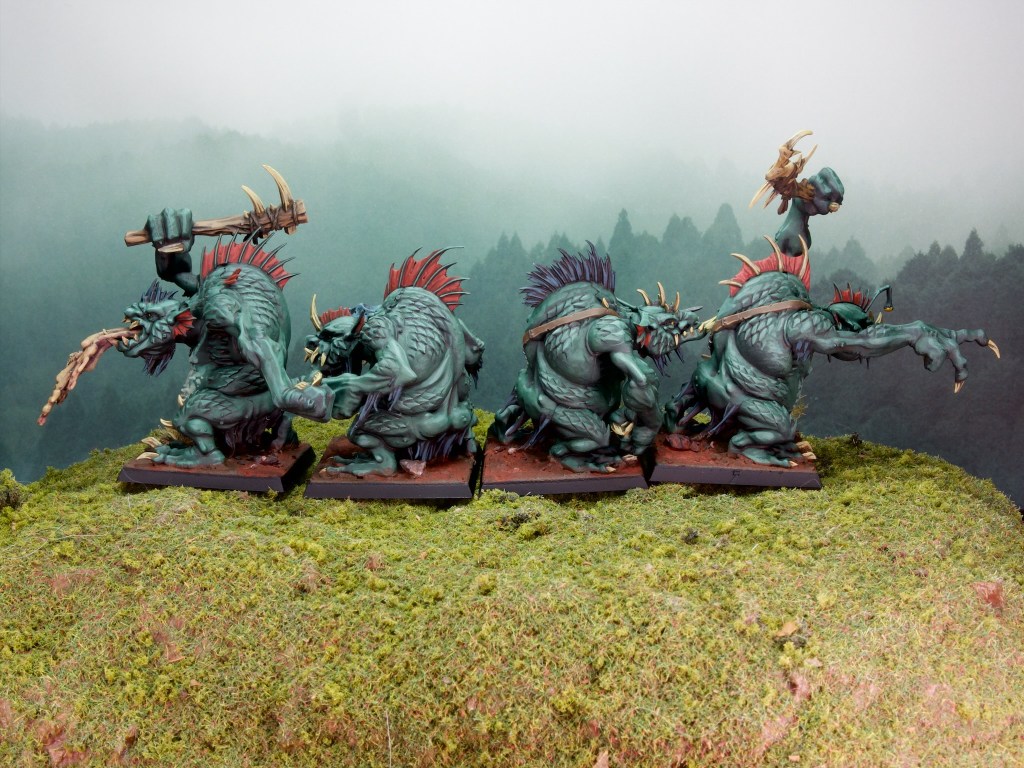
With some leave over the Christmas break I’ve had a bit more time to paint (and game!) and have managed to get through a unit that I’d applied a basecoat to back in September-ish: River Trolls!
I’ve had these models for quite a while. I originally bought them to make Chaos Trolls back in the early 2010s and instead left them unbuilt for 10 years. It’s therefore nice to have them done for this latest project.
The models themselves are quite fun to paint as they have a decent amount of detail, much of which is quite characterful (including the infamous troll vomit!).
For units that are relatively unique in armies (i.e. that I won’t have to paint again) I like to experiment a bit with my painting. In this case I played around with oil washes in a slightly different way than I usually do. Normally I dilute my oils heavily with thinner, apply, blast with the hairdryer for a minute and get wiping the raised areas away with a sponge. I’ve had issues in the past with oil washes looking but not actually being dry by the time I varnish the models and found a few months later that the model has gone a bit tacky. Luckily this is easy to fix with a fresh coat of varnish. Here instead I went for a heavier wash (less diluted) and let it sit for a day or so before touching it. I was a bit worried that would limit my ability to wipe off the excess wash, but those fears were unfounded, and in fact I found it easier to get nice gradients with the wash in this way. To make sure the wash was dry before continuing, I left the models for another day or so, monitoring the areas where the wash had pooled the most. It’s a time consuming process but the results are worth it. Luckily for me I had something else to paint while I was waiting, which I will show later!
I wanted a cold green for these models to match their “riverness”, so I went for a basecoat of Vallejo Game Color (VGC) Heavy Blackgreen, and progressively mixed in more and more Vallejo Model Color (VMC) Pastel Green. The red fins are VMC Mahogany Brown, highlighted with a mix of the same brown and VGC Dead Flesh. The hair/fur is a mix of VMC Dark Sea Grey and VMC Black, highlighted with a mix of VMC Dark Sea Grey and VMC Pastel Green. The teeth/nails were a basecoat of VMC English Uniform, highighted with VGC Dead Flesh. The leather was VMC Chocolate brown, highlighted with a mix of the same and VGC Dead Flesh. All of these received the oil wash discussed above, which was a mix of Abteilung 502 Midnight Blue and Brown Wash oil paints.
Overall I’m very happy with these, nice addition to my Orcs and Goblins army.
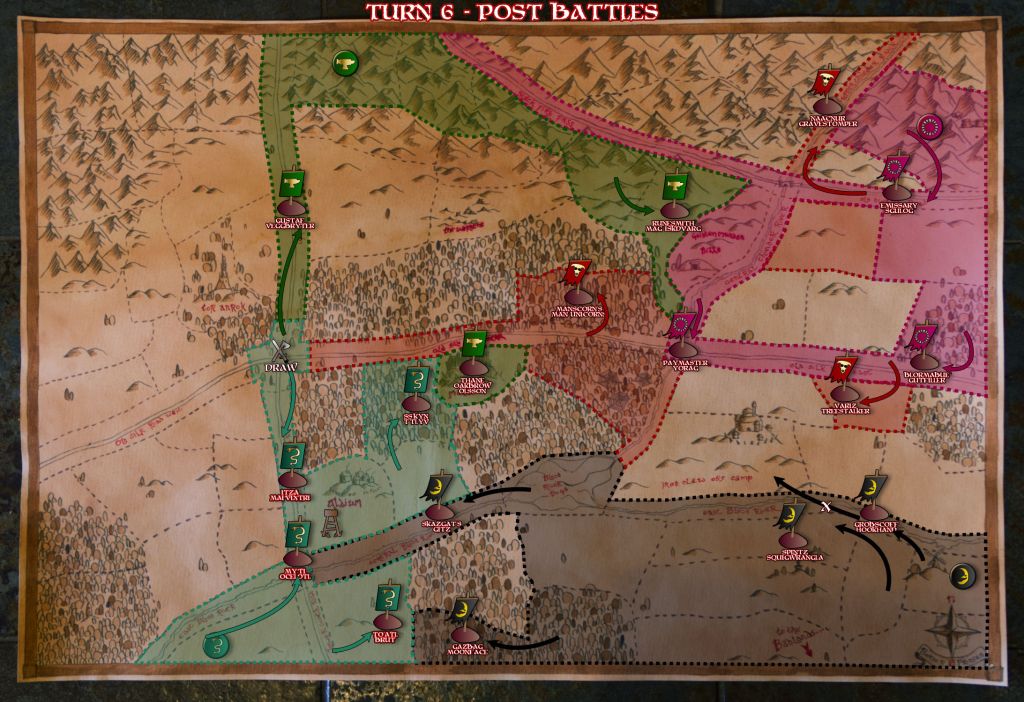
As I said in the opening lines, I got some gaming in too this break, with a campaign game for our Border Princes campaign. The campaign was on a bit of a hiatus after the back end of the year got very busy for most of us (including a few weeks where 3 of us were out of the country!). The next match due was my Dwarfs against the Lizardmen, battling over a major crossroads. The game was a lot of fun and as a result I completely forgot to take photos! The outcome was our first draw of the campaign so far, which results in both armies retreating from the area. Here’s the campaign map at the end of Turn 6.
We’re currently planning our moves for the next turn, so hopefully I should have some updates soon.
One thing that happened during the game is I tried out the new engineer rules from the Dwarfs Arcane Journal. These allow you to take a Sapper Engineer, which allows all kinds of things such as entrenching your artillery, and booby trapping the battlefield. I equipped said engineer with a handgun inscribed with some of the new ranged weapon runes also found in the book. He then proceeded to cause more damage single-handedly than most of the other units I had in the game! I decided that meant he deserved a proper model and set about to making one as there is no Sapper Engineer model in the range.
I used an old metal dwarf handgunner (one of the first models I ever bought!) which has a really cool dragon head muzzle on his handgun. This looked appropriate as a runic handgun, and I also liked the practical attire he was wearing. One thing that was missing was anything that screamed “sapper”. The distinguishing mark for a sapper in the Napoleonic era (at least for the French army) was the carrying of a great big axe, but a dwarf carrying an axe just blends in so I went for a spade instead.
I wanted to accentuate the digging aspect so I tried to make it look like he’s taking potshots while digging a trench. Hopefully that comes through!
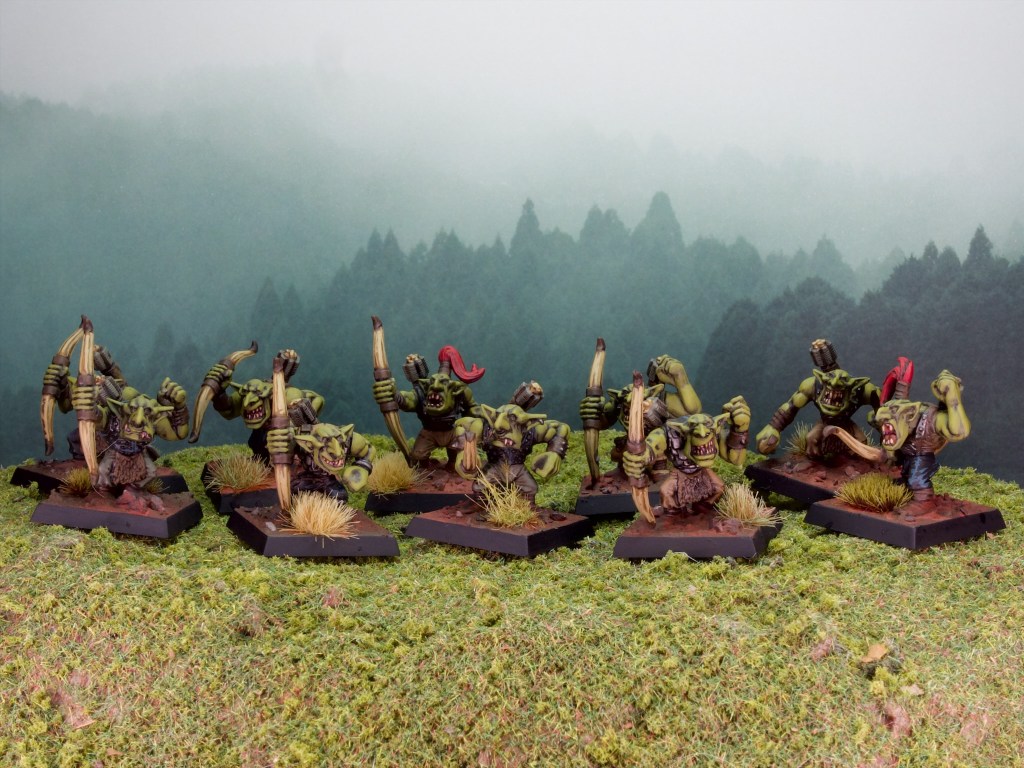
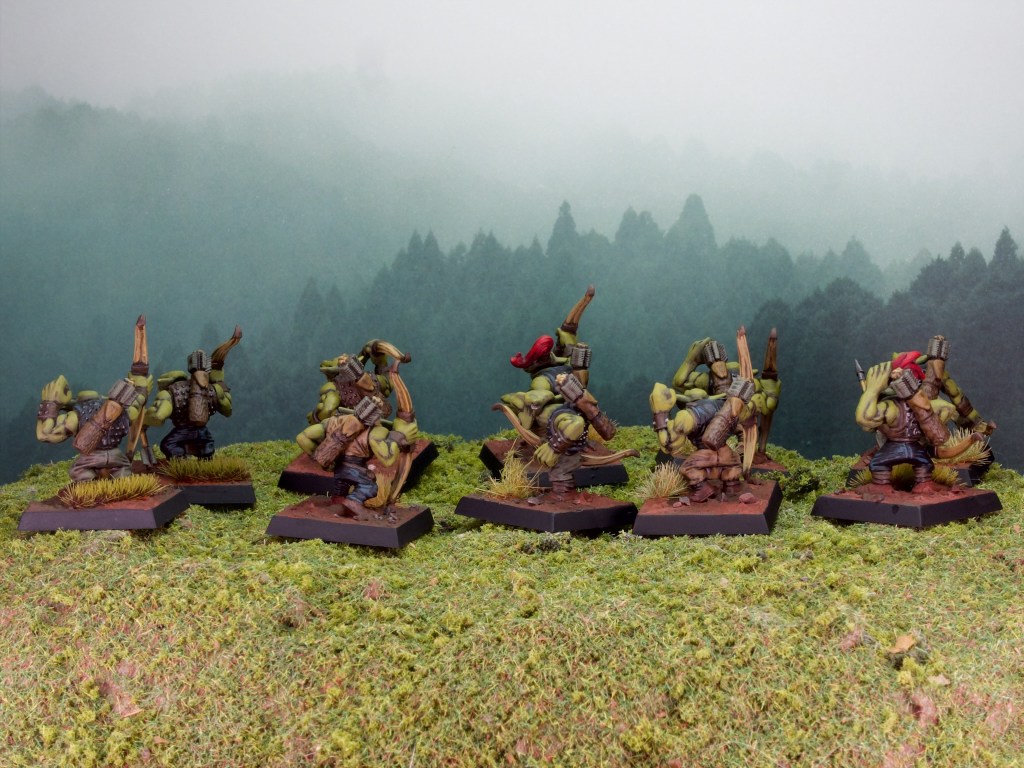
I’ve been chipping away at this small unit of archers for my Orcs and Goblins over the past few weeks. I have not been in any particular rush and it’s been quite nice painting at a sedate pace. I have a tendency to want to get things done fast, but with work quite busy lately it’s been good to do the fun things in life in a more relaxed fashion!
These are new casts of old models like much of the rest of the newly (re)released Orcs and Goblins models for Warhammer The Old World. These are pretty old sculpts now and were current when I started the hobby in the early 2000s. I’m absolutely the demographic for this nostalgia fueled set of releases!
I tried to make them look generally cohesive but in a haphazard manner, picking out their clothes in different colours. For my own future reference (I have plenty more of these to paint!) these are: Vallejo Model Color (VMC) German Fieldgrey WWII (also used for the fletching), VMC US Field Drab, VMC Black, and VMC German Camo Medium Brown (also used for the furs). The rest of the colours used are the same as for the rest of the army as detailed in my Orc Warboss post.
One nice discovery painting these was a new method (new for me at least!) for placing pigment powders on the bases in a much less messy way. So far I’ve been applying them dry, which tends to get them everywhere, and fix them using airbrushed varnish (at low pressure but still very messy). For these I experimented with mixing them with acrylic thinner before applying them in patches to the bases. I then dipped my brush in water and blended the patches into the uncovered section to get an uneven look. This method was much cleaner than dry application and was a lot easier to control. I’d recommend trying it out if you’re using dry pigments on your bases!
Back after what must have been the biggest break this blog has seen! I’ve been traveling for work and as such have had pretty much no time to paint in October between the trip itself and preparation for said trip. I’m back at home now, and started something I’ve been eyeing off for a while now: Legions Imperialis – the revamp of the old Epic 40,000 game system.
As I mentioned above, I’ve been thinking of getting started in Legions Imperialis since it launched – something about the scale of the battles really appeals to me (For the same reason, I’ve also been eyeing off Warlord’s epic scale offerings). What prompted actually diving in was a couple of happy occurrences: I was lucky enough to stumble on someone selling all of the books second hand for a steal, and my local game store had a sale a few weeks later during which I picked up the Battle Group box for the marines.
While I was travelling I re-read Legion, which might well be my favourite Horus Heresy novel, and (re-)enjoyed it so much that I decided these marines should be painted as Alpha Legion.
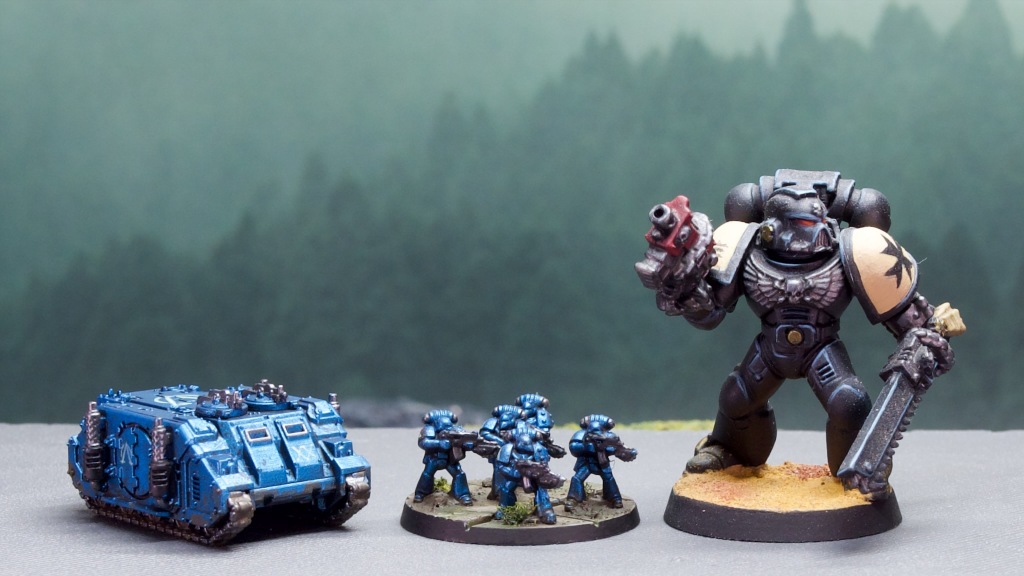
When I popped open the box I finally realised how tiny these models actually are. Looking at pictures online isn’t quite the same as holding the models in your own hands and as you can see from the comparison shot with the 28mm marine above, this is quite a departure from what I’m used to painting!
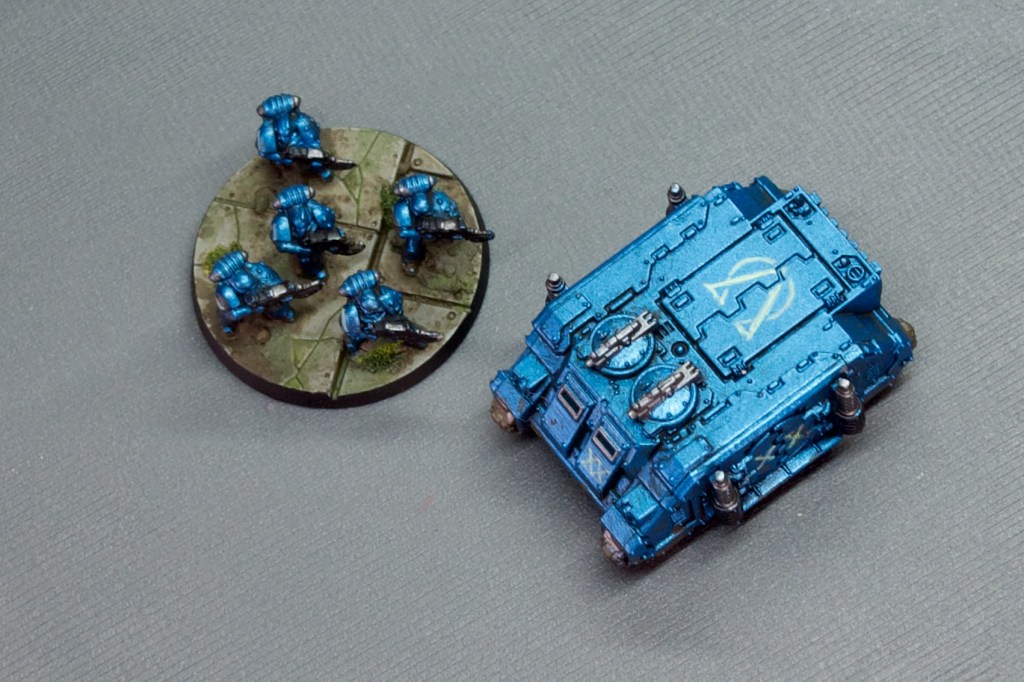
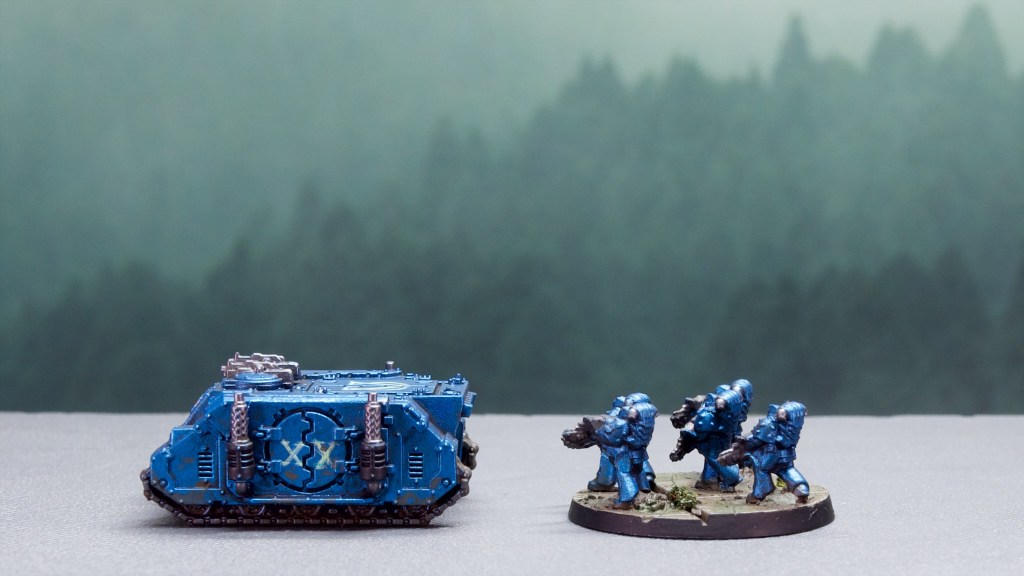
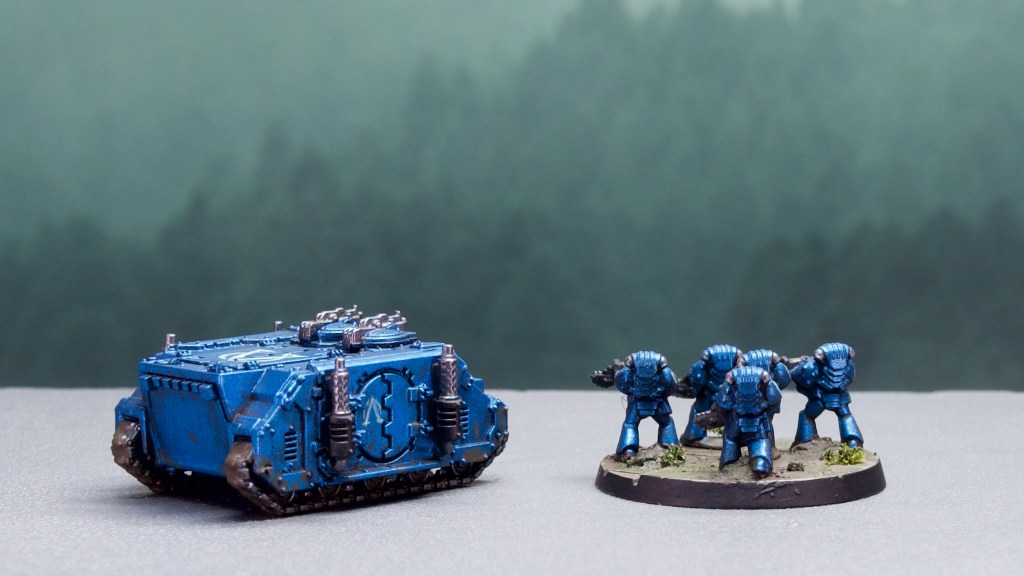
I often see Horus Heresy era Alpha Legion painted in a metallic blue/green colour. I decided to stray closer to blue here, with the markings in a minty green. The painting (by necessity!) is really simple. I started with a black undercoat and airbrushed some Ammo Mig Warhead Metallic Blue all over the models. The exhaust covers on the rhino and the boltguns on the marines were then picked out in Vallejo Model Color Black, and the bare metal details were painted in Scale 75 Black Metal. The markings were painted in Army Painter Kraken Skin. The models then got an all over wash of Ammo Mig Deep Brown Panel Line Wash, which was wiped off the raised areas to keep things clean.
The models come with these nice textured bases that I wanted to use rather than cover up, so I decided to go for an overgrown ruins look. I basecoated the surface with Vallejo Game Color Heavy Bluegrey, followed by the same panel liner as the models. I then applied a wash of heavily diluted AK Muddy Ground texture paint (a tip I picked up from the Cult of Paint youtube channel) all over the base. This adds a bit of texture and a nice gradient brown to the base while not hiding the texture modelled into the base. I then glued on a few bits of foam turf from Woodland Scenics, and applied some light washes of AK Slimy Grime Dark and Slimy Grime Light to add some green colour in patches. I’m satisfied with the outcome, it looks in scale to me, keen to hear what others think.
Overall these were fun and quick to paint, I think the metallic paint does a lot of work here, and makes the models pop despite their size. Unlike pretty much all my other models I did not varnish these as I didn’t want to lose the shine contrast between the marines and the base. I have a whole lot more of these to paint now, but I’m happy with the scheme so can safely proceed from here!
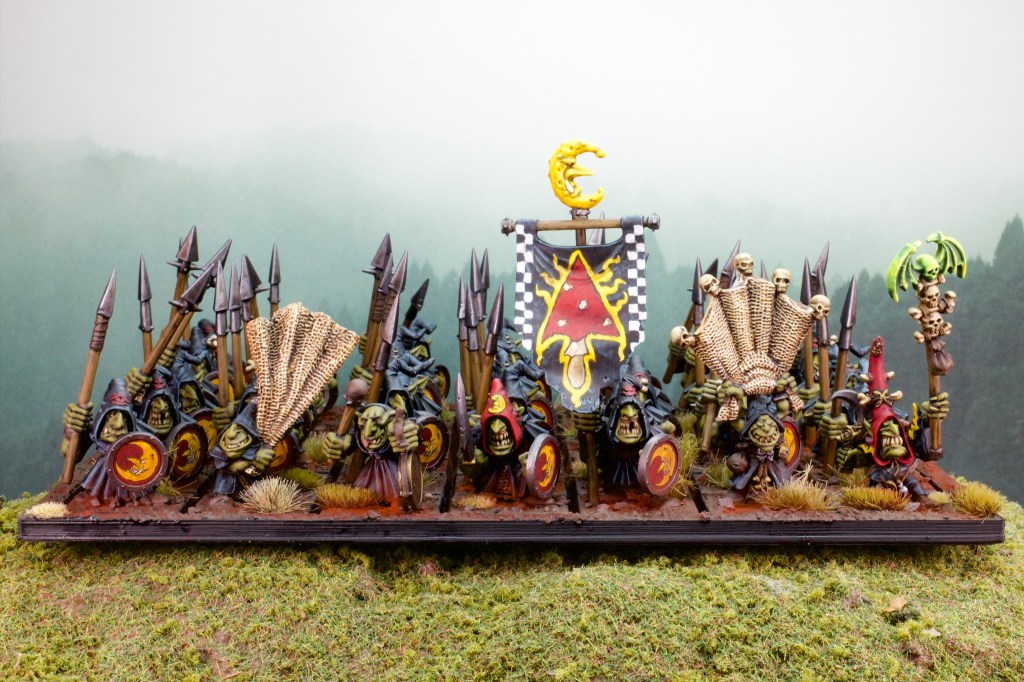
After a few posts promising a unit of goblins as the next addition to my Orcs and Goblins army (and a few posts apologising for failing to deliver!) I’ve finally finished this large unit of Night Goblins!
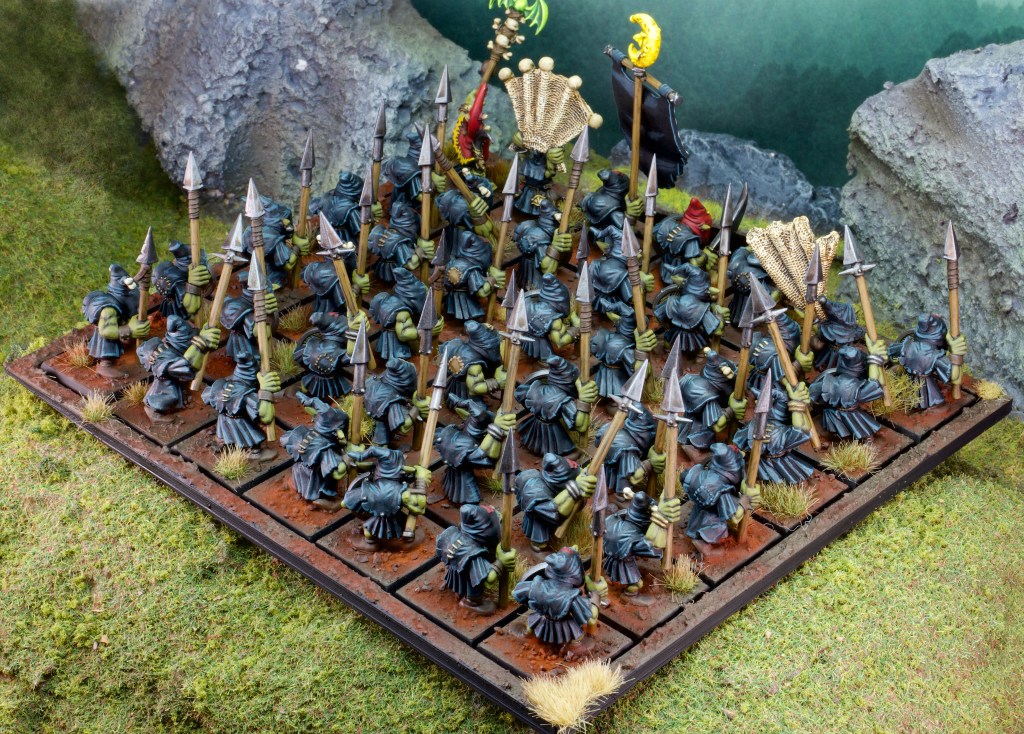
With a cool 42 models in it it is one of the largest units I’ve ever painted, and took me quite a while to get through. With its rather sizeable footprint it was a bit awkward to photograph too, a lot like a large terrain piece.
I ended up batch painting the unit row by row (i.e. seven models at a time), except the shields and the basing which were done for the whole unit at once. Each row was relatively quick to do, but together this added up to a lot of work (Basing took me a whole evening!).
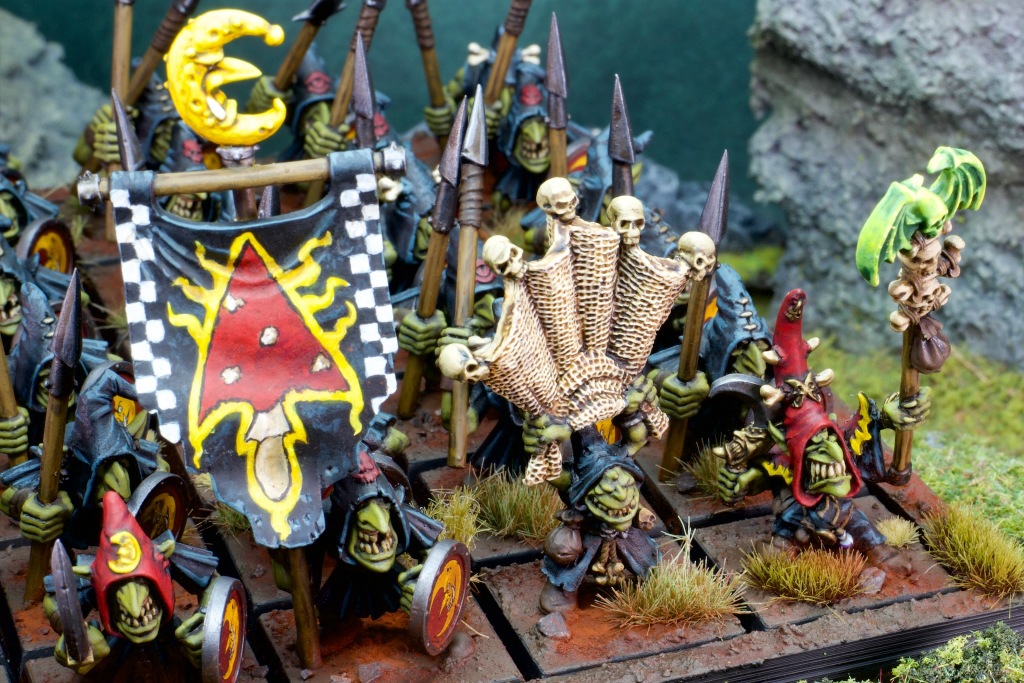
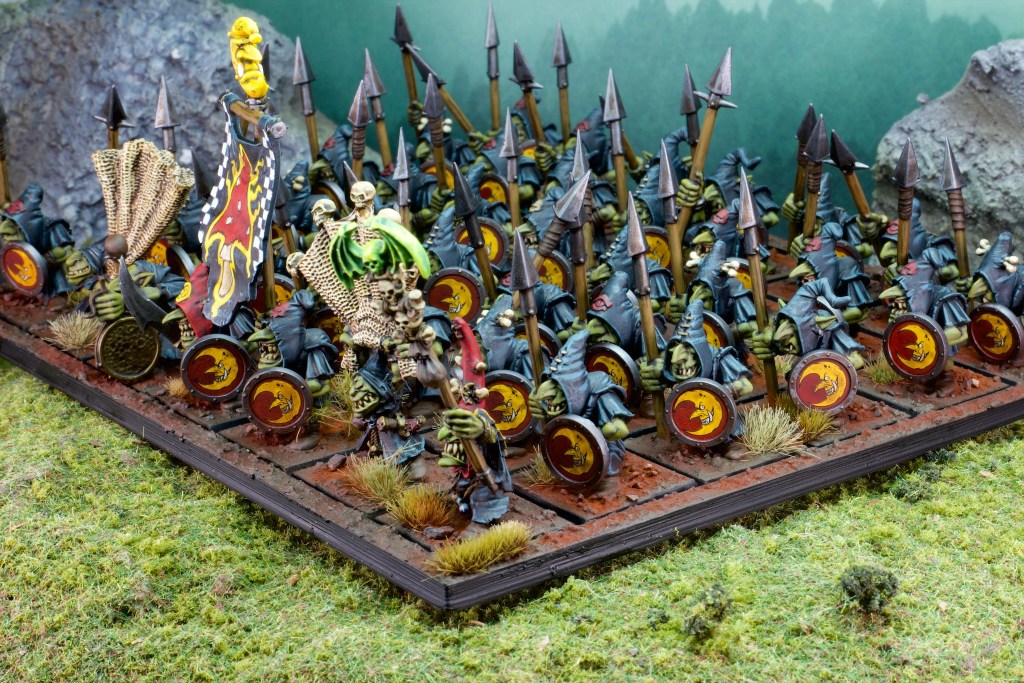
The banner was quite fun to paint, although I went in to it without a good idea of what to put on it. I decided a mushroom would be a good option given the Night Goblin moon was already represented at the top of the banner pole. I painted on a mushroom and then wasn’t sure where to go from there. I ended up taking a photo of the banner and doodling on the photo on my iPad to test out designs to add to my mushroom and I settled on what you see below. It was great to be able to experiment with designs without painting over and over again so I’ll do that again, a good lesson learned.
You might have noticed the shaman holding the green-headed staff on the right of the unit. This is one of the army’s characters, in fact the only wizard I have planned in there at the moment. This is a classic model that I picked up on eBay alongside the netters you see in the unit.
The night goblin models are the newly re-released plastics that were the standard kit back in 6th edition. There is a more modern night goblin box which is from the 7th edition era which is now marketed as an Age of Sigmar set. I really like the older plastics and I’d been looking for a second hand box when GW announced they were re-realeasing them. That made me and my wallet very happy, those second hand prices were getting sky high.
This new set came with a transfer sheet with a couple of designs for the shields. I loved the moon design on those transfers so that was an easy pick. I’ve never applied this many transfers in a single sitting!
I’m glad to see the end of this one, I’ve been painting it on and off for what must be a couple of months now (inter-spaced with a few other small projects such as the Fanatics I did a while back, which will be launched from this unit), and it took some determination (and a fair few hours) to get them finished this week. I love the look of these models as a massed unit and am chuffed with how they came out. I’m going to paint up a smaller scale project next I think!