6th Airborne

I painted this army for Bolt Action back in June-July 2020, before I’d started this blog and I’ve been wanting to document it on the blog for a while now, but haven’t made time for it. Seeing other blogs post about WW2 models ( the tipping point was the latest post from John over at https://justneedsvarnish.wordpress.com/) has finally motivated me to get these models photographed and uploaded!

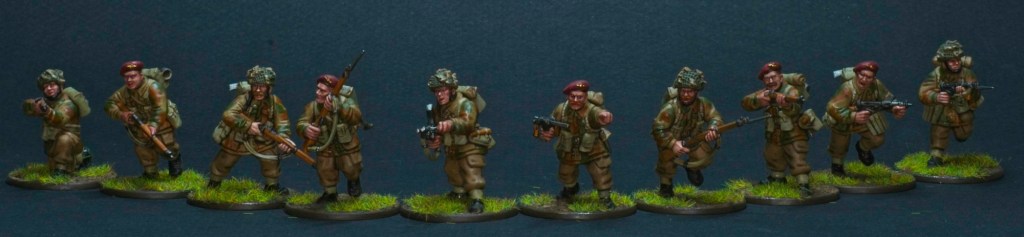
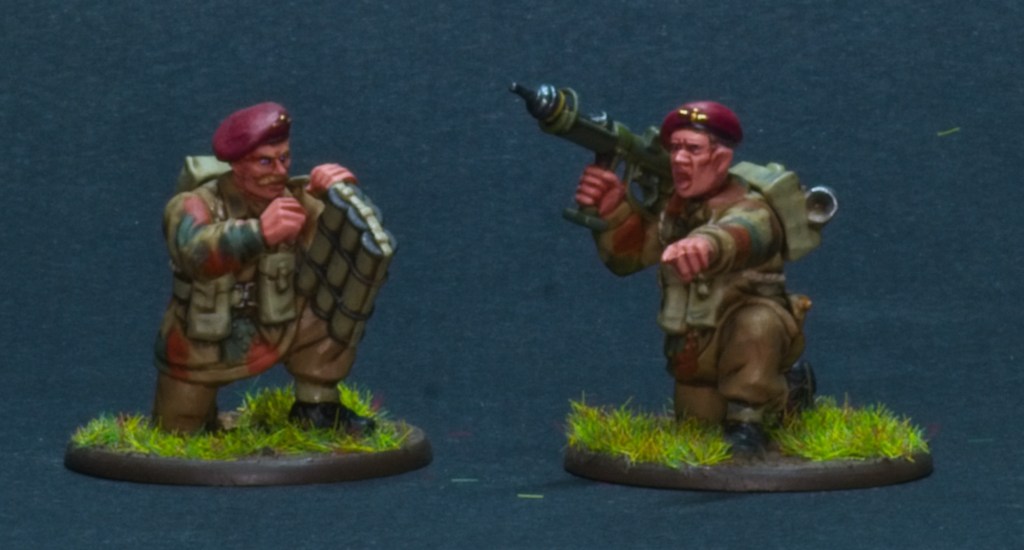
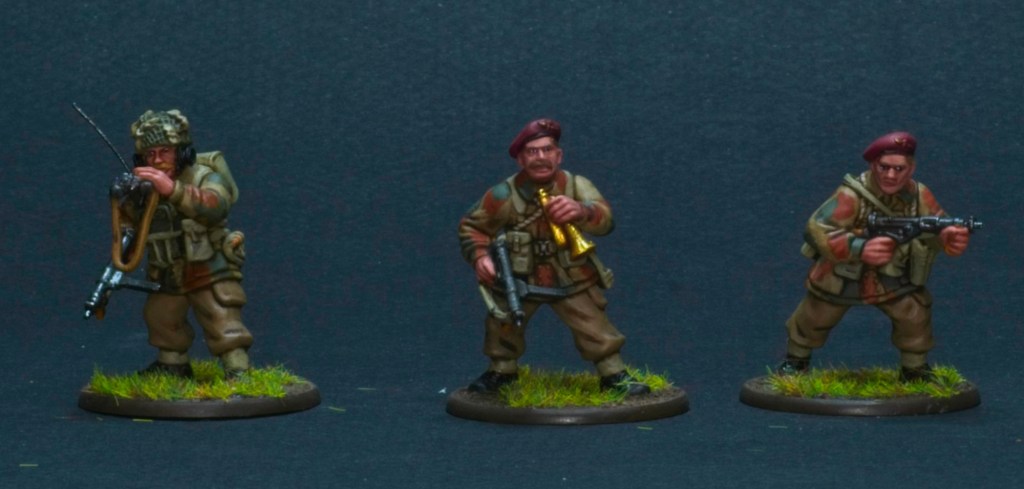
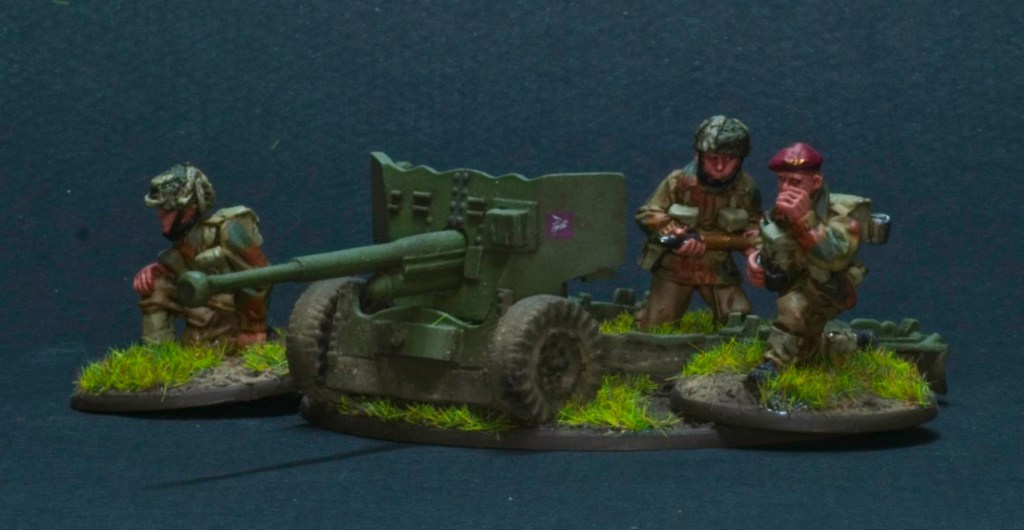
I’ve had a soft spot for the British airborne regiments and their operations in Normandy on and after D-Day for a while, so when some friends and I decided to break away from our usual fare of Fantasy and Sci-fi wargaming to try out historical games (Bolt Action in this case) these models caught my attention very quickly.

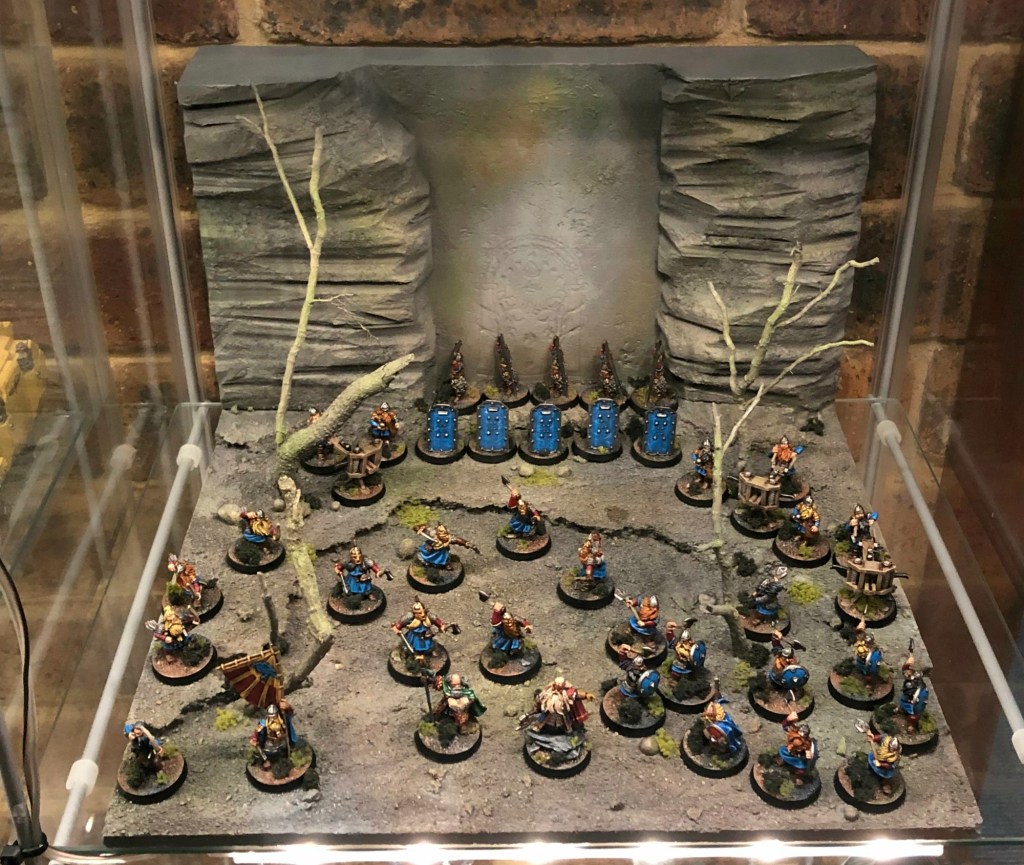
I didn’t aim for any particular operation when deciding what to include, rather focusing on including units that would make sense in the period following D-Day, when the 6th AARR started using Cromwells rather than the Tetrarch for example. The force is a 1000pt army made of a single reinforced platoon under Bolt Actions army selection rules.

10-man Section
Another 10-man Section
A smaller 6-man section
PIAT Team
Sniper Team
Artllery Observer (Left) and Lieutenant with a bodyguard (Right)
Six Pounder
6th AARR Cromwell

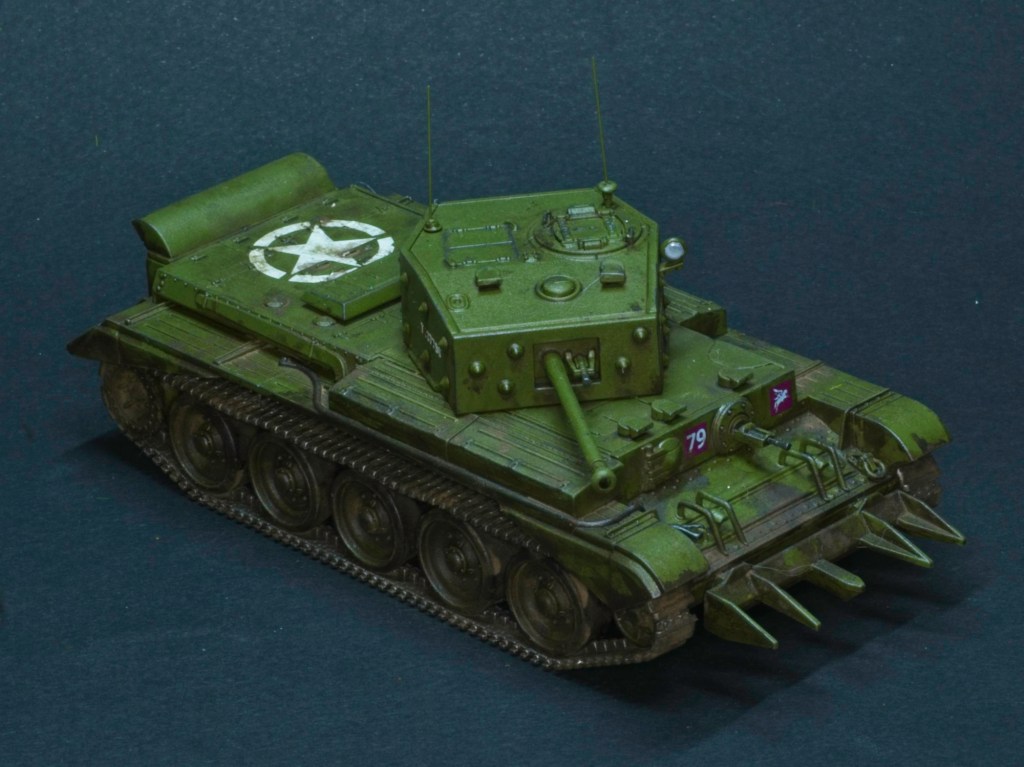
This was my first foray into historical wargaming and I thoroughly enjoyed immersing myself in research material, learning about the actions of the troops the models represent and trying to get markings right! (Although I could never find a photo of the AARR Cromwells so I improvised the markings on those using pictures of Tetrarchs and Locusts)

I have 3 more cromwells to paint at some stage for when we want to play with the tank war rules, and a second Bolt Action army unbuilt, waiting for its day, so there will be more WW2 content in the future!

Mordheim Ruined House

It’s been a little while since the last post, but I’ve been busy, this time not only painting but also building. Over the last few weeks I’ve been playing Warhammer Vermintide 2 with some friends, and the game’s environments have tapped right into my nostalgia for the first wargame I ever played, Mordheim. Playing the game made me want to build some Mordheim terrain even though I have no real plans to play Mordheim any time soon, but when I get inspired I like to act on that inspiration!

There were a few directions that this specific inspiration pushed me into:

  1. I wanted to build a house
  2. It needed to be half-timbered
  3. It needed to have elements that pushed it from historical looking into the warhammer universe, i.e. skulls, weird motifs etc.
  4. I wanted to build it from scratch rather than use my 3D printer

That last post is interesting, I’ve had a filament 3D printer and I’ve printed a ton of terrain with it over that time, enough for a full table for Bolt Action, Star Wars Legion, Middle-Earth Strategy Battle Game, and a lot of pieces of post-apocalyptic scatter terrain for This Is Not A Test. It’s been really nice to have, there are a ton of great free and paid models online done by amazing artists, and it’s produced some very nice looking tables.

Building tables for Mordheim was my first serious foray into terrain-making, and back then I mostly used cardboard as the material of choice, cutting out shapes and assembling them into the ruined streets of Mordheim. I think playing Vermintide triggered 1) a want to build something in the world of Mordheim, and 2) a nostalgia for building terrain from raw materials.

I built the main structure out of foam board, which is nice and easy to work with. I then cut a balsa wood plank I had into 7mm strips to build all the timber frames, and into sections to represent the floors. I carved board shapes into the floors with a knife. The tiles were traced onto a sheet of foam board with one of the cardboard sides peeled off, while the cobbles outside were cut individually from XPS foam. To texture the outside walls I used tile grout, for the inside walls I used plaster filler. The stone details in the walls were lifted from a variety of bits, the sun face for example is from the old Warhammer 8th edition templates, using thermo plastic molds.

Overall I’m happy with the results, and really enjoyed the process, so I can see myself building more when the inspiration strikes again. Maybe one day I’ll again have a full table of Mordheim terrain!

Riders of Rohan pt1

I had a little break from painting last week, but back in the saddle this week with the first mounted Rohan warriors!

The riders were painted as per my last post, the focus for these and where I spent the most time was on the horses. I’m painting these one by one rather than coming up with a repeatable scheme, the goal being to have some nice variety there, but also to keep things interesting.

For each horse I looked up some photos until I found a colour that I found nice or interesting and tried to replicate it. I kept things on the simple side this time around, by mostly sticking to single colour coats, but I’m keen to try some more complex ones on the next batch of riders.

We’ve just entered a snap lockdown over here, which is unfortunate, but if last time around is anything to go by I should get a fair bit of painting time over the next few days.

Rohan Warriors on Foot

The Middle-Earth motivation train is still rolling forward and showing no signs of slowing down! I’ve started building and painting the current starter set for the game, centered around the battle of Pelennor Fields, with Rohan and the Army of the Dead versus Mordor. I’ve wanted to do a Rohan army for a very long time, they are the focus of some of the most evocative scenes in the books/movies in my opinion.

For me Rohan means Riders of Rohan primarily, and I’m mostly excited about putting together a set of models that will let me represent Eomer’s exiled warband that serves as the relief force at Helm’s Deep and the charge of the Rohirrim at Pelennor. These warriors on foot are most likely to be used as dismounted riders rather than starting models, which made them excellent test subjects for a colour scheme.

This army is less about a mad dash to the finish, and more of a passion project, so I’m planning on spending more time on the painting than I did on my goblins.

The rohan plastics are close to 20 years old now (I feel old!), and it shows with some pretty soft details in some places. Overall though the models do a good job of capturing the feel of the movies, which makes them enjoyable to paint. I’ve tried a new format for recording my paint scheme, based on what I’ve seen in some of the official publications, which hopefully is a bit more informative than just listing the paint colours in a paragraph. Feel free to let me know what you think about it or how it could be improved in the comments.

Next step is to get cracking on the rider models, there’s 12 in the starter set and I’ll need around 24 all up to put together the armies I’m interested in, which is a fair few horses to paint!

Goblin Town

The excitement about Middle-Earth SBG has not died down yet, and after completing my dwarves I went around looking for more of the game’s models to paint. Turns out I had two of the Hobbit Goblin Town starter sets on my shelves, sitting with their contents unbuilt for many many years.

I don’t have any particular attachment to the goblin models, but I thought they would be a neat army to have ready for the tabletop, and likely easy to paint fast. After doing a stocktake of the models, I figured out I had 72 goblin warriors and 4 characters available to me.

I set out to paint them as efficiently as possible, keeping down the number of steps so I could get through the lot in as short an amount of time as possible.

To speed up the process I attached all the models to bits of cardboard so I could batch paint them as groups of five to eight models, and making it easy to get base colour and the skin wash down with an airbrush. I kept the models attached to the cardboard for all other steps apart from the basing, minimising the number of models I had to individually handle. Picking up and putting down 70+ models multiple times in a row actually adds up pretty fast!

As a rough guide, I used the airbrush to undercoat the models in a bone colour, then did a quick zenithal highlight with white to add a bit of depth to the models. I then turned the airbrush pressure right down and sprayed on GW Guilliman Flesh Contrast paint cut 50/50 with the GW Contrast Medium to not overly tint their skin colour (They’re very pasty in the movies). Then I switched to a brush and base coated the non-skin elements, which then had an GW Agrax Earthshade wash applied to them. For a final touch I applied some GW Carroburg Crimson wash to the faces and boils on the goblins, which added a bit more variation to the skin. The bases were simply done with Vallejo white texture paste, and then dipped into GW snow flock.

Overall I painted all of these models over the course of a week, which I’m very happy with from a time investment to end-result ratio. They’re not my best painted models by any stretch, but I do think they look cool as an army.

I painted the goblin king separately from the others, taking my time to get a better finish, as befits such an imposing model. He followed the same steps as the goblins, but I highlighted the skin back up afterwards, and added a few purple and red glazes to add a bit more variation in his flesh tones.

Display Board for the Moria Dwarves

I’ve been working on this board for a little while, mostly while stages on the dwarves themselves were drying. The idea was to make a display board to take to tournaments, that also doubled as a place to put the models at home. This meant it had to fit in my display cabinet, the ubiquitous Ikea glass cabinet, which has shelves roughly 30cm x 30cm. This is quite small for a display board, but this is a pretty elite army so the model count is relatively low, so I wasn’t too worried about managing to fit all the models.

I wanted to re-create the famous Durin’s Door, probably one of the more recognisable Lord of the Rings visuals, but not all lit up as it is mostly seen in the movies, but the simple engraving it appears at at the start of the scene. I also wanted to match the bases of my army, which have greys tinted with greens, brown-reds, and blues.

Here’s the board empty of models. I kept the painting fairly simple, this needs to be a backdrop to the army after all, not overpower them. Just as I did for the bases, I started from a grey base all over, and tinted it with washes. This time they weren’t the GW washes I used on the model bases, but very diluted mixes of inks, water, matt varnish, and detergent to help everything flow into the cracks. Rather than use a brush, I tried running these at a very low pressure through my airbrush, applying them pretty liberally.

I then misted the trees with some Vallejo Khaki, to differentiate them from the rocks a bit, and added the same bits of foam as on the models bases to add a bit of vegetation.

Here’s the army on the board.

Here is the army at a slightly higher angle so the models can be seen better.

The construction was relatively straightforward, I used cork tiles to make the floor sections, layering them to add some height. The rock wall was made from XPS foam, which is quite easy to carve. The rocky pillars were cut with a hot wire cutter, and all of the surface was textured with a ball of aluminium foil.

The door itself was carved into the rock by tracing a printout of the door with a pen. By pushing hard enough and using a ball point I was able to leave an impression of the door into the foam without tearing the paper.

I then added some trees made of roots from bushes that were cut down in my garden, simply attached by pinning them into the cork, with super glue (CA glue) to keep them fixed. A rough mix of sane was then applied to the cork surface. I used filler to smooth the edges of the foam and fill a few gaps in the construction.

Here’s the board and army in the display cabinet!

800 Points of Moria Dwarves

After a painting filled week, I’ve capped off the 800 points of Kingdom of Moria. This last batch has all of the warrior models, and the characters. The characters were already painted, so I can’t really count them, but I did rebase them and touch up a few areas to help them fit into the army some more.

Warriors with shields
Warriors with bows
Warriors with two-handed axes
A warrior with banner, a captain, Balin, and Flói Stonehand

These were painted in the same manner as described in the two previous posts (Vault Warden Teams, More Moria Dwarves), the only new material is the yellow banner, which was painted with Vallejo Heavy Goldbrown, and highlighted with the same colour after the overall Agrax Earthshade wash. The characters were painted so many years ago I can’t remember what was done there I’m afraid!

Overall pretty happy with that outcome for a week’s work. The tournament I painted these for is not till April, which means I actually have time to play practice games for once! I’m also working on a display board for this army, sized to fit in my display cabinets. That will be the subject of the next post, and I’m saving full army shots for when that is done.

More Moria Dwarves

I’ve kept up the momentum for my Middle-Earth SBG army, and have painted up two more batches of models over the last couple of days: some Iron Guard, and 3 ballistas.

These were all painted following the steps I described in the Vault Warden Teams article, with the exception of a few new items those models the teams did not have.

  • Hair: The hair was painted one of three colours, each time in a simple base coat/wash/highlight pattern
    • Blond: Mig Zinc Yellow/Citadel Agrax Earthshade/Mig Zinc Yellow
    • Red: Vallejo Parasite Brown/Citadel Agrax Earthshade/Vallejo Parasite Brown
    • Black: Army Painter Black/Citadel Agrax Earthshade/50-50 Army Painter Black and Vallejo Cold Grey
  • Skin: The skin was painted with a base coat of Vallejo Beige Red, washed with Citadel Contrast Guilliman Flesh, and highlighted with Vallejo Elf Skintone
  • Wood: The wood on the ballistas was basecoated with Vallejo Leather Brown Primer (my undercoat for all these models), washed with Citadel Agrax Earthshade, and highlighted in two stages with first Vallejo Khaki and then 50-50 Vallejo Khaki and Vallejo Bonewhite, with both sets of highlights done in lines in the direction of the wood grain.

I’ve now committed to playing in an 800 point Middle-Earth SBG tournament here in Perth in April, so I now have a goal for these models. I have an 800 point list planned out, and am over half-way to painting it with what I’ve done so far. Hopefully I can finish it this week and work on a display board for them.

Vault Warden Teams

I wasn’t expecting to paint Lord of the Rings models this weekend, but there we are. I watched a couple of friends play a game of the current ruleset (Middle-Earth Strategy Battle Game) a few days back and it got me excited to play some games of my own, and by extension paint some models for the game. I used to play the Lord of the Rings SBG (as it was called back then) a lot during its peak, so this is a fun trip down memory lane for me. I dug up and dusted off the case my Moria dwarves were stored in and found the army as I’d left it, about half painted in a scheme I’d decided back then I no longer liked and abandoned. Armed with a new enthusiasm and a paint scheme that is pretty much just primary colours I’ve started repainting these models.

First up, the vault warden teams. I have 5 teams in the army (a team is a shield dwarf and a spear dwarf).

The paint scheme is simple, I didn’t want to spend too much time on these models so I used a method I use quite a lot for army models: basecoat the models, wash one colour across their entirety, and a single round of highlights.

You can see the models after the base coat stage above. The scale mail and other gold bits were basecoated with Citadel Balthasar Gold, cloth and shields with Vallejo Heavy Blue, chain mail with Vallejo Metal Colour Magnesium, secondary cloth with Vallejo Heavy Red, leather with Vallejo Armor Brown and finally the bases with Vallejo Cold Grey.

After the basecoat was dry, I covered the models in Citadel Agrax Earthshade, taking care to not overload any sections, and leaving the bases a little bit patchy to add some variation.

Once the Agrax Earthshade was dry I moved on to painting the bases. I wanted to try something new here, so I decided to use washes to tint the sand a variety of colours. First I did some underpainting by dry brushing the sand with Vallejo Cold Grey, followed by Vallejo Bone White. Then I applied Citadel Reikland Fleshade, Drakenhof Nightshade, and Athonian Camoshade in patches all over the base, and with a brush loaded with water I smoothed the transitions between the washes. Once dry I added some Woodland Scenics clumping foliage and some green foam to represent heaths.

The goal was to stick to single highlights to keep the process fast, so the mail received a highlight of Vallejo Chainmail Silver, the gold Vallejo Glorious Gold, the leather 50/50 Vallejo Armor Brown and Vallejo Beasty Brown, the red cloth Vallejo Gory Red and the blue cloth Vallejo Magic Blue.

For the shields, a single highlight would have been far too stark, so I first did a 50/50 Vallejo Heavy Blue and Vallejo Magic Blue highlight, followed by pure Magic Blue. I tried to give it a rough texture to make it look pretty beat up. To add to the effect I added scratches with Vallejo Metal Colour White Aluminium.

Overall I’m happy with how these models turned out, I painted them on and off today, so they were relatively quick to paint. If I can keep the momentum going I’d like to keep this rhythm up and paint the rest of the army relatively soon.

Bats!

I’m playing a few games with some friends tomorrow and wanted to add this unit of fell bats to my death army for the occasion. I’ve had these models for quite a long time, so it was nice to have an excuse to get them painted up.

I painted these relatively quickly, starting by base coating all of the main colours (wings, flesh, fur, fangs) as a flat colour (Vallejo Dark Sea Blue + black, Vallejo Heavy Skintone, Vallejo Beasty Brown, Vallejo Heavy Goldbrown, respectively) and then washing them with GW Agrax Earthshade. I then highlighted the flesh with the base colour and added another wash of GW Reikland Flesh shade to add a bit of warmth to the flesh tone. The final highlight for the flesh was Vallejo’s Elf Skintone, and I applied some GW Carroburg Crimson around the mouth and nose. The wings got a simple highlight of Dark Sea Blue. The fangs were highlighted with Vallejo Desert Yellow and Vallejo Bonewhite successively. The fur was left as is.

They are based to match the rest of my Death army, which has been my main tournament army for Age of Sigmar for the last few years (not that I get to play in tournaments very often). There are quite a few models in that army that suffer from the painted the night before the event syndrome, and aren’t quite finished. I’ll probably be painting some now and then and posting them here.