I’ve been working on a cyberpunk version of Masse d’Armes as I’m a fan of cyberpunk media and been wanting to play some miniatures games in the genre. There was a slight problem with that, which is that I don’t really have suitable models and terrain! The closest I do have is the terrain and models I made for This is not a Test, which is firmly in the post apocalyptic genre so not really appropriate. I therefore decided to start at the beginning and make a game board.
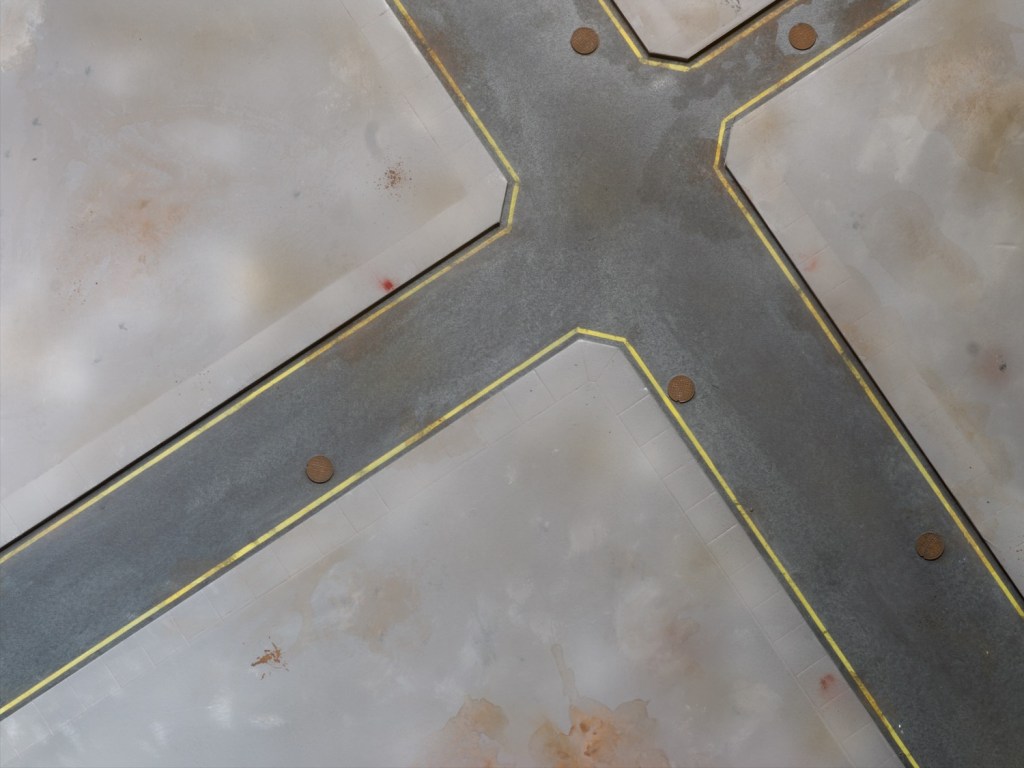
The finished product.
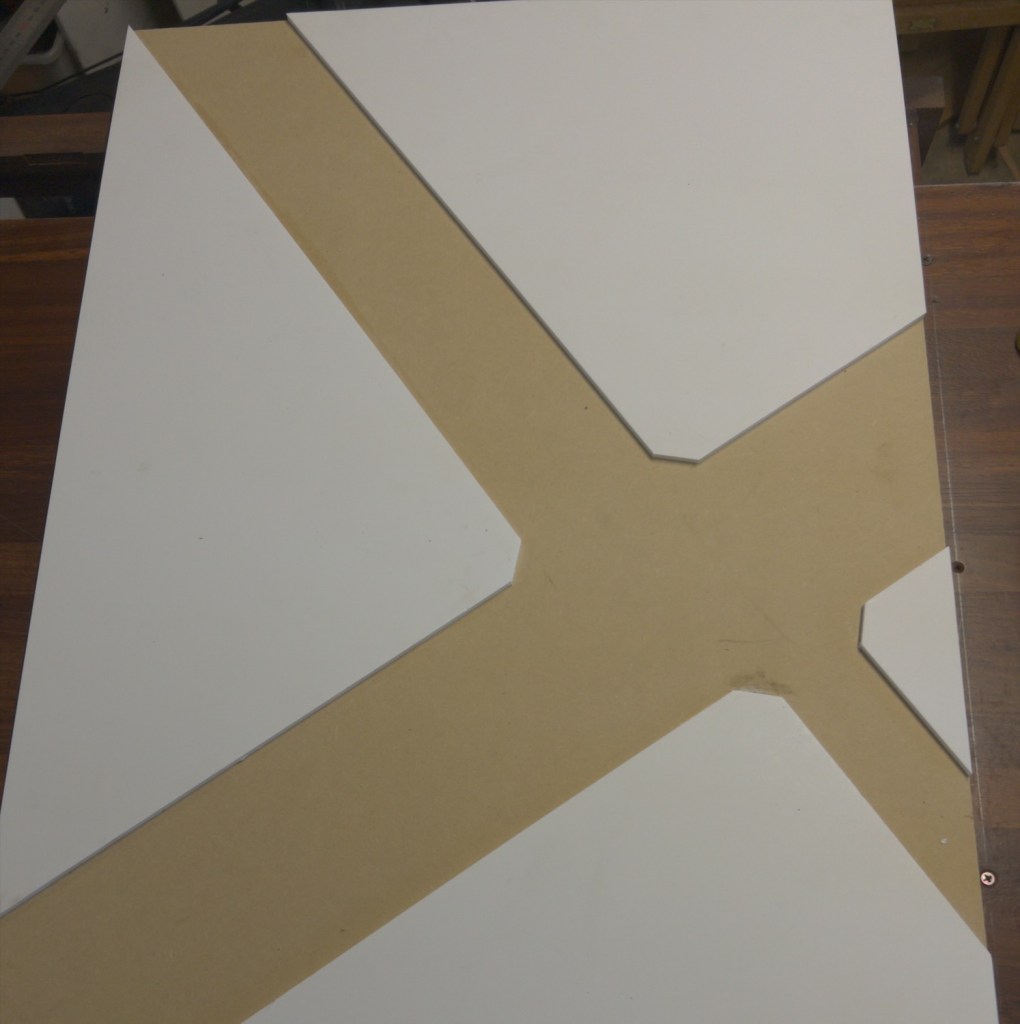
Rather than get a game mat, I decided to make my own, starting with a 900x400mm (~3x2ft) MDF board from the local hardware shop. I then cut out the shapes for the raised footpath areas using 5mm foam core panels.
I glued these down with PVA glue and left them overnight weighted down.
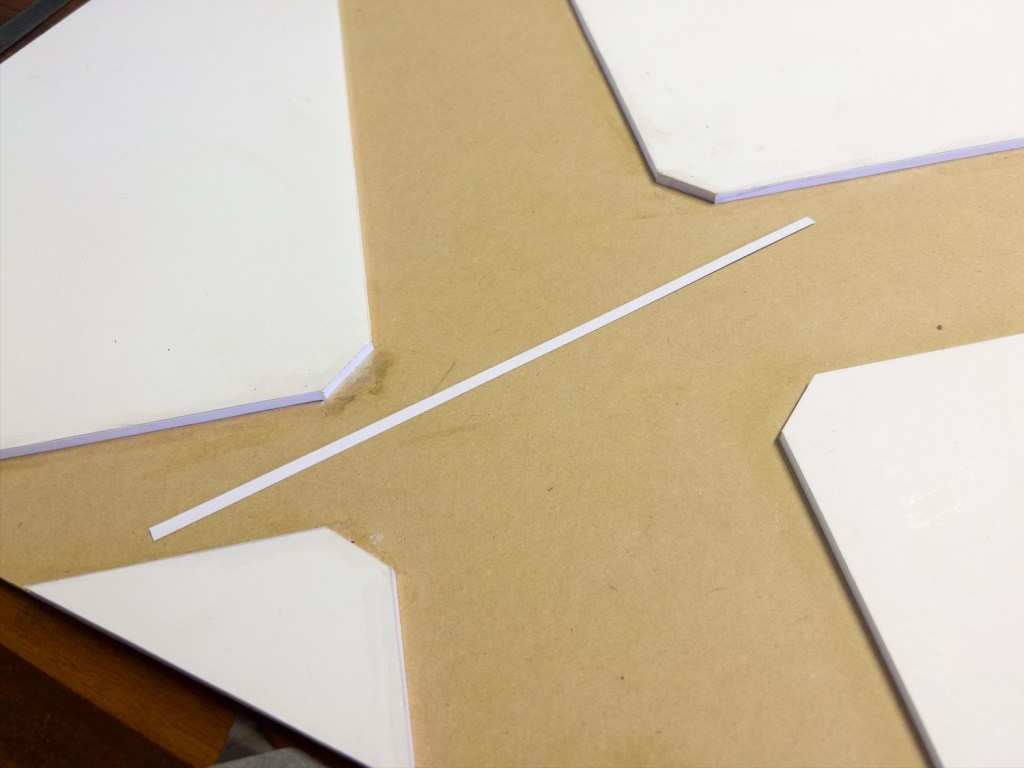
To cover up the exposed foam on the sides of the foamcore panels I cut 5mm strips of thick paper and glued them to the exposed edges.
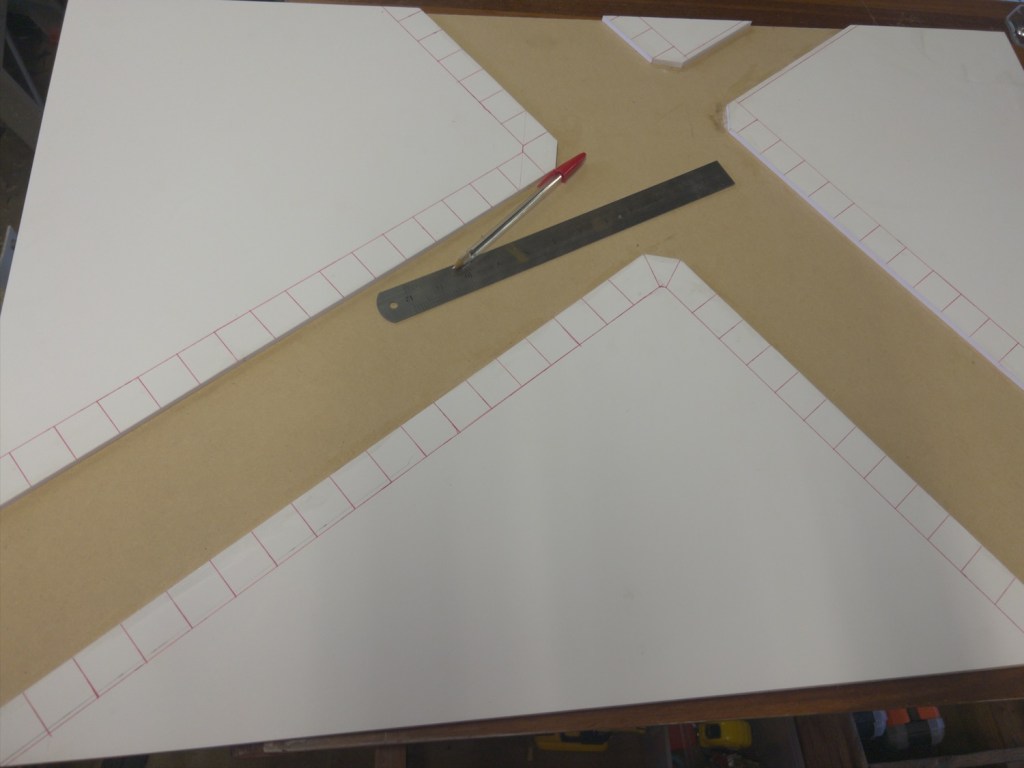
I used a ballpoint pen and a straight edge to mark some lines in the foam core to represent separate sections for the footpath. I tried to keep the pressure hard enough to mark the surface but not too hard so as not to tear through the outer layer of card.
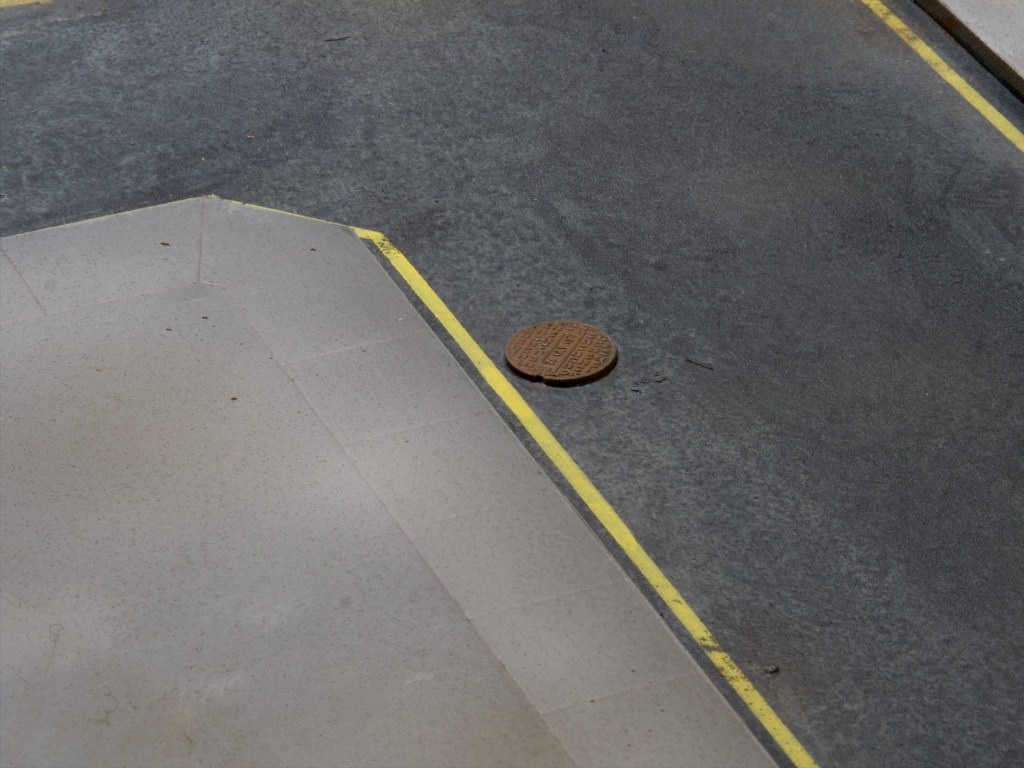
I 3d printed some manhole covers (https://www.thingiverse.com/thing:3246148 – shrunk to 20mm diameter) to add some details to the road sections. I glued these down using PVA.
I had a little bit of Citadel Roughcoat left in an old can so I sprayed some in patches, concentrating on the road sections, but making sure to dust all areas. I then undercoated the whole board with some grey undercoat, painted the road sections over with a mix of black and blue paint, aiming for that asphalt colour.
For the lines on the roads I used a Sharpie paint pen (Creative Marker I think is the name). I used some foam core offcuts to act as a spacer, pushing them against the raised edge. This worked really well and I’ll do this again if I have to paint road lines again in the future.
Fresh lines! Time to dirty this up.
I then got into weathering all this. No photos from this stage I’m afraid, was having too much fun to remember to take photos! I used quite a few washes of diluted acrylic paint, as well as some drybrushing and stippling paint using a torn sponge. Finally I broke out the airbrush and sprayed on some patches of browns and greys.
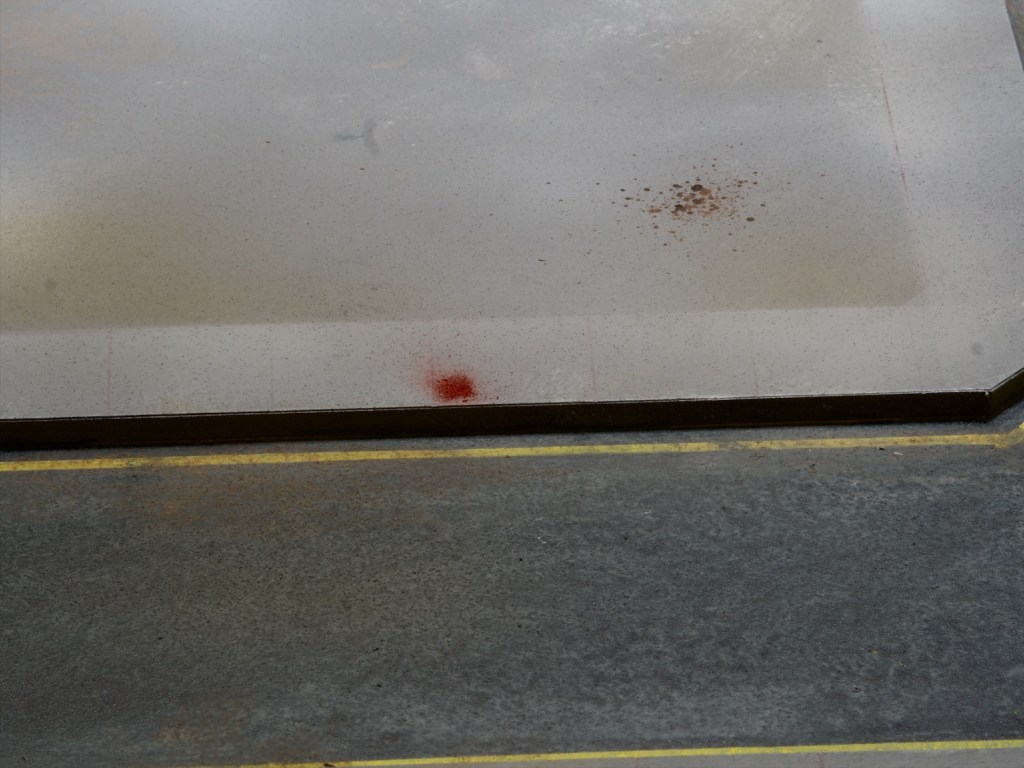
I also used the airbrush masked with a piece of paper to spray a mostly clean line along the paved area to separate it from the rest of the non-road sections.
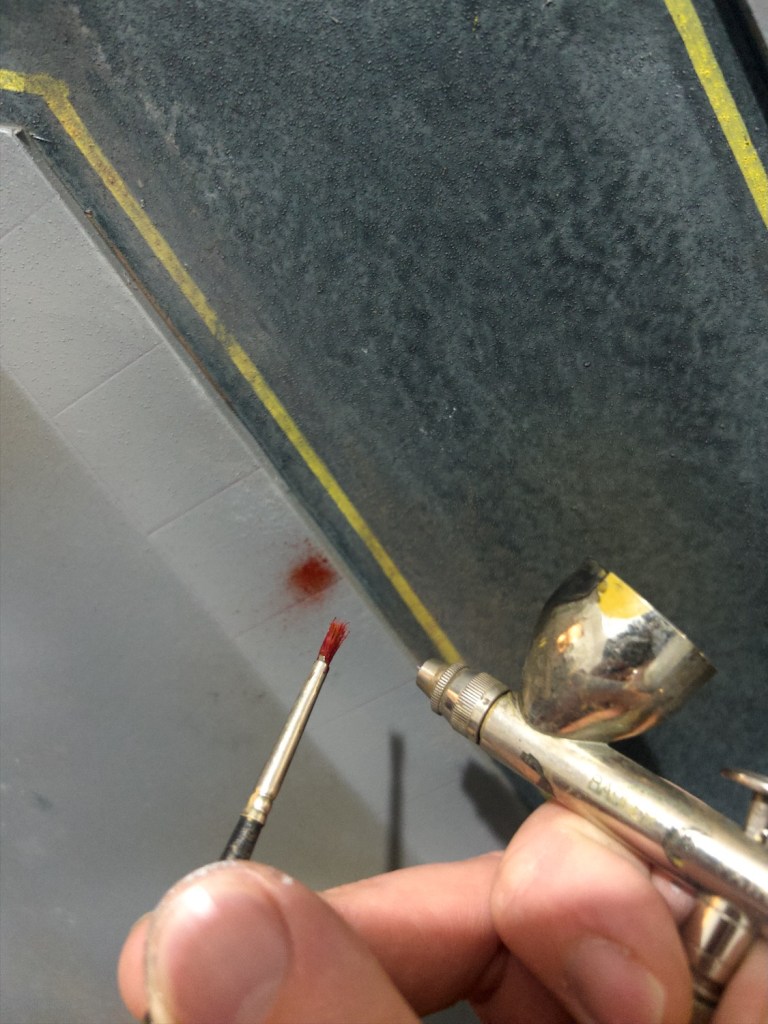
Finally I sprayed a few splatter effects with the old trick of loading up your brush with some paint/wash and using the air from the airbrush to flick it everywhere.
A few splatters. You can also see the effect of masking off the footpath area in this photo.
The manhole covers were just painted with a burnt umber and drybrushed with a gunmetal. These really should be level with the road surface, but I wasn’t keen enough to cut a recess for these to sit in.
I really enjoyed putting this together, and now need some terrain to go on top! Luckily enough I have some 3D printed buildings ready to go (ready for painting at any rate!) so should be able to get started on these.
This is likely my last post before Christmas, so for those of you that celebrate it I hope you have a lovely time (and lots of miniatures under the tree)!
I’ve been thinking about game rules quite a bit over the past few weeks (which prompted my Midgard review last post!), and have been reading rulesets not so much to play them, but to think about wargaming rules in general. In so doing I came across a subset of wargaming rules written as pamphlets or zines published by individuals (mostly on itch.io), in the vein of some lightweight roleplaying games that have become fairly popular over the last few years. These generally seek to address issues they see with big rulebooks in the role-playing and wargaming worlds, which is that there are just too many rules in games, and they can be stripped down while keeping their essence. This lightweight approach to rules is quite compelling for me, as my game time is much reduced these days and I don’t really enjoy re-learning complex rules every time I do get to play. More importantly, I found seeing “regular people” produce their own rulesets quite inspirational and I decided to give it a shot myself.
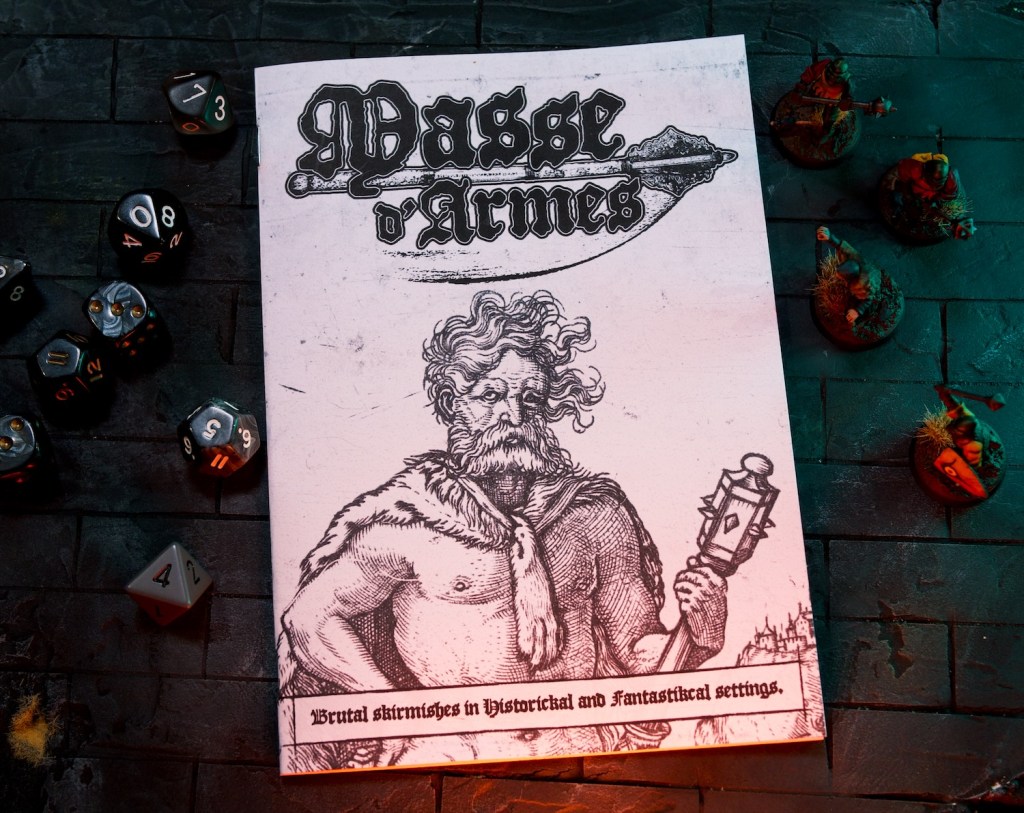
The result of this is Masse d’Armes, a small ruleset for playing out skirmish games (~4-8 models) in settings both historical and fantastical. It’s fine for any setting where the technology level is blackpowder era or below, and has rules for magic for more fantastical settings. I’ve put up the latest version of the rules over at https://lair-of-the-lagomorph.itch.io/masse-darmes as a free download, it’s likely to get updates sooner or later, but at least I’m past the constant tweaking phase.
The game itself is derived from quite a few other games I enjoy playing, making use of mechanics or mechanics inspired by other wargames and role playing games. The basic concept is that of opposed rolls, where models add a characteristic die (d6 to d12 depending on skill level), to their weapon die (also d6 to d12). Highest roll wins, and the amount they win by determines the outcome. This means combat is resolved in a single roll and makes the game quite quick. Shooting and magic are variations on this theme.
Assembling warbands is quite straightforward too, there are no points, players simply add traits to their models to represent equipment/skill/abilities up to a maximum of 15 traits. Models must have at least one trait, so players can either have a few models with many traits or many models with fewer traits.
Overall I think the rules are simple and the games pretty quick. If you’re interested do check them out, I’d love to get some feedback from people outside my gaming group!
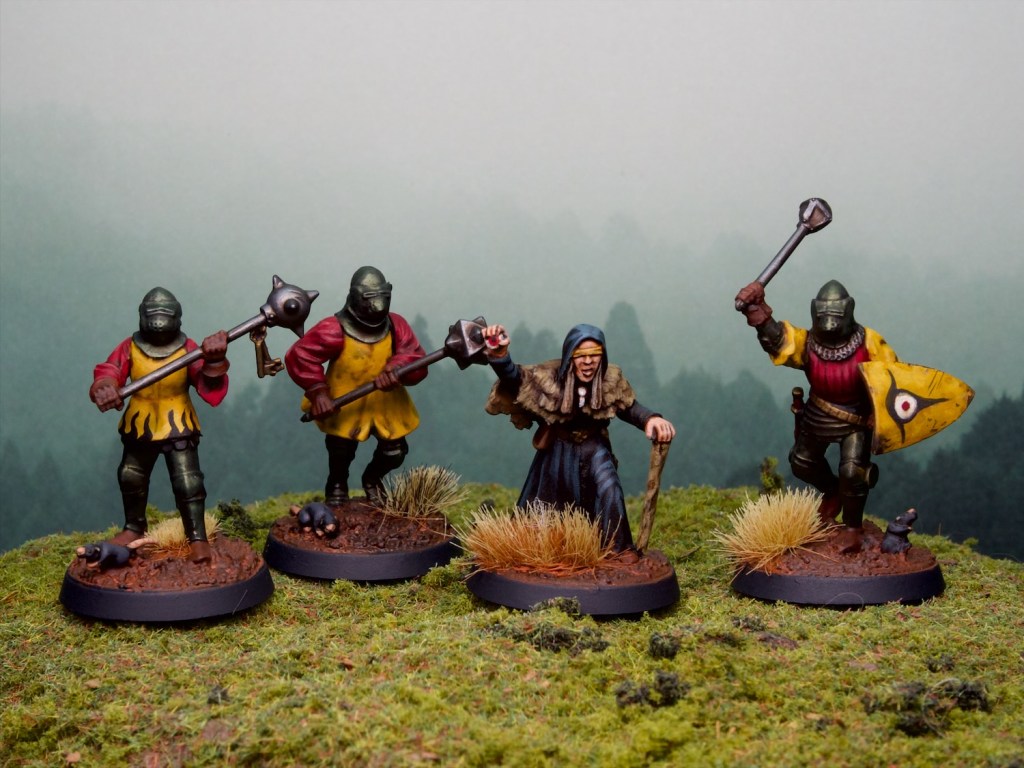
With the rules in place I decided to put a warband together as a fun small painting project. This warband is quite elite with only 4 models. The leader is the seer with Sorcery d10 (3 traits), then two heavily armoured knights with weapon die of d10 and great weapons (4 traits each), and a heavily armoured knight with weapon die of d8, hand weapon and shield (4 traits).
The Seer model is from Bad Squiddo Games which I’ve had for a little bit, and this seemed like a great time to use it. Yes that’s a giant’s eye she’s holding! The knights are Perry Miniatures, from their Agincourt French Infantry set, with some Warhammer mace heads (for the great weapons), and a mace from the Morannon Orcs from MESBG. The shield is from Wargames Atlantic’s Foot Serjeants set.
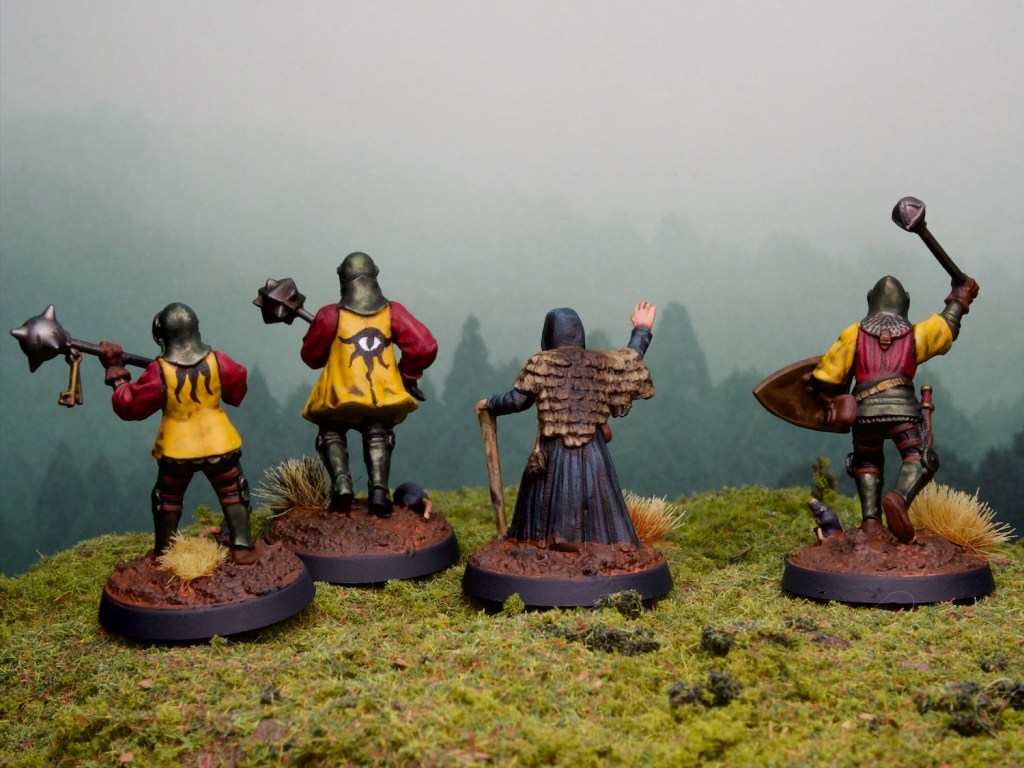
I decided that the knights are there to form the bodyguard for the seer and added some eye-related iconography to tie them all together. They were quite fast to paint, and I enjoyed myself throughout the process (kit bashing and painting!).
It’s been fun looking at other aspects of the hobby, and to think about how a game could work given my own preferences. I’ll keep working on Masse d’Armes, and might even try my hand at some other games in the future. If you do read the rules, let me know what you think!
After last week’s fun with The Silver Bayonet I was keen to continue with more of the solo missons in the book. The second mission has the unit come across a ruined chapel and investigate it. Unfortunately for them, zombies have overrun it, and some more powerful undead are lurking about!
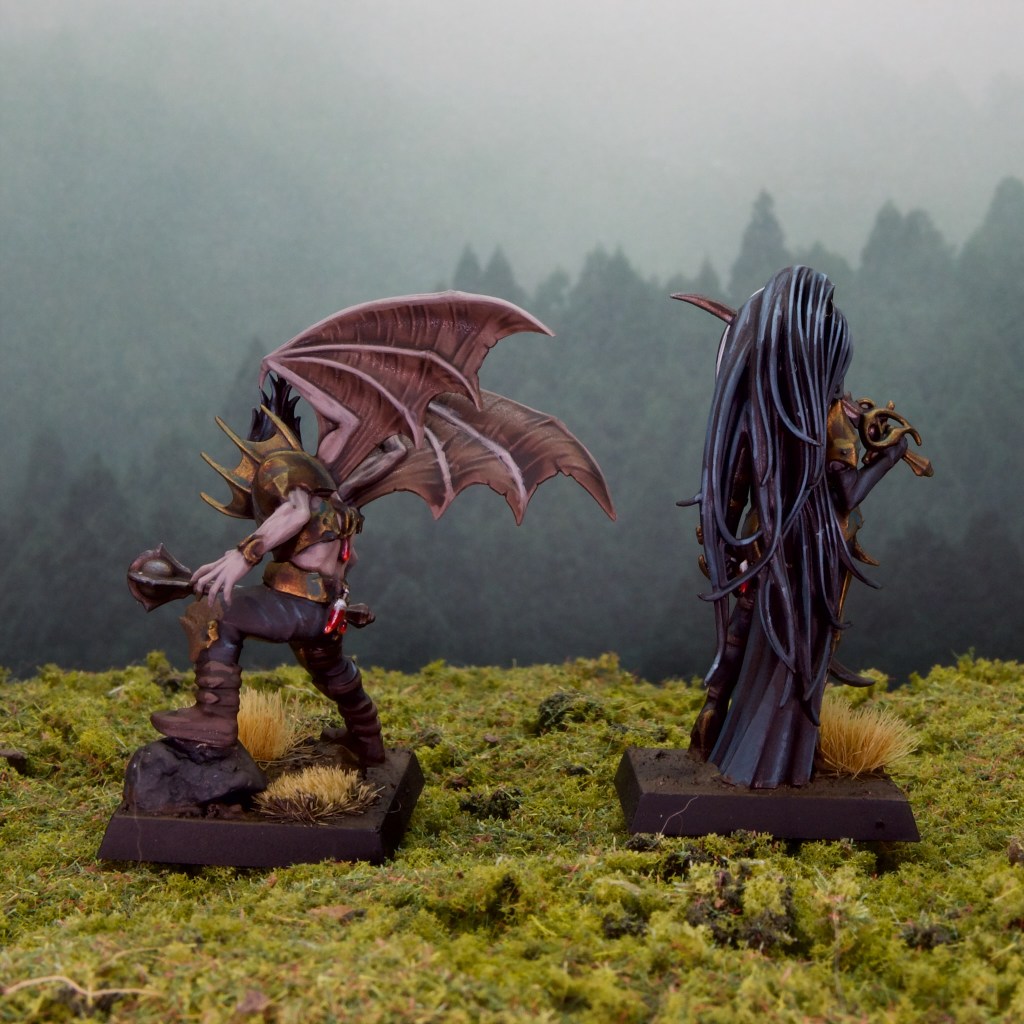
I was covered for the zombie miniatures, but needed some vampires that looked a bit less overtly warhammer-y, so I decided to paint up a couple of the less over the top miniatures out of the Crimson Court Warhammer Underworlds warband. I based them on square bases as I think I’m most likely to use them for Warhammer Old World going forwards.
I kept the colours very muted on these, with black cloth and the bronze dulled down. These models were really nice to paint, with nice crisp details but not too much going on. I love painting glass vials too so glad to see some on both these models, clearly they like carrying a top up with them!
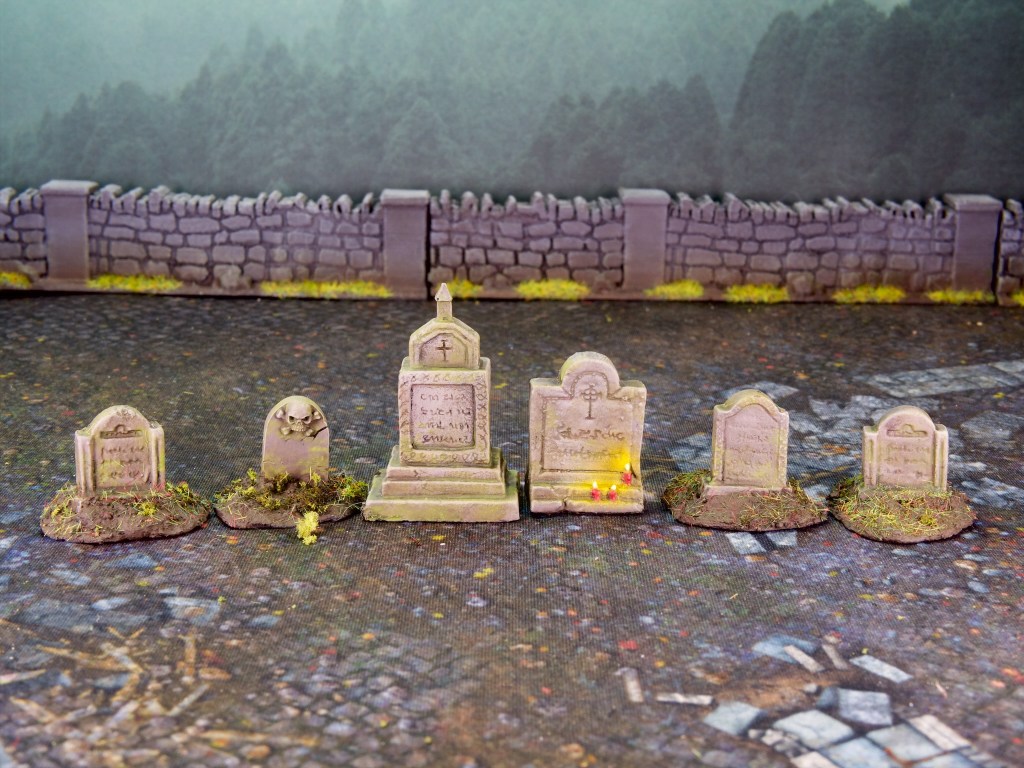
I also needed a bit more terrain for the scenario, namely a set of tombstones and a ruined chapel. The tombstones are really nice resin models from Tabletop World except the one with a skull and crossbones which is from the old Warhammer Skeleton sprue. I painted these pretty quickly, with a grey undercoat, brown wash, some grey and cream drybrushes. All topped off with some nice mossy greens using some enamel washes.
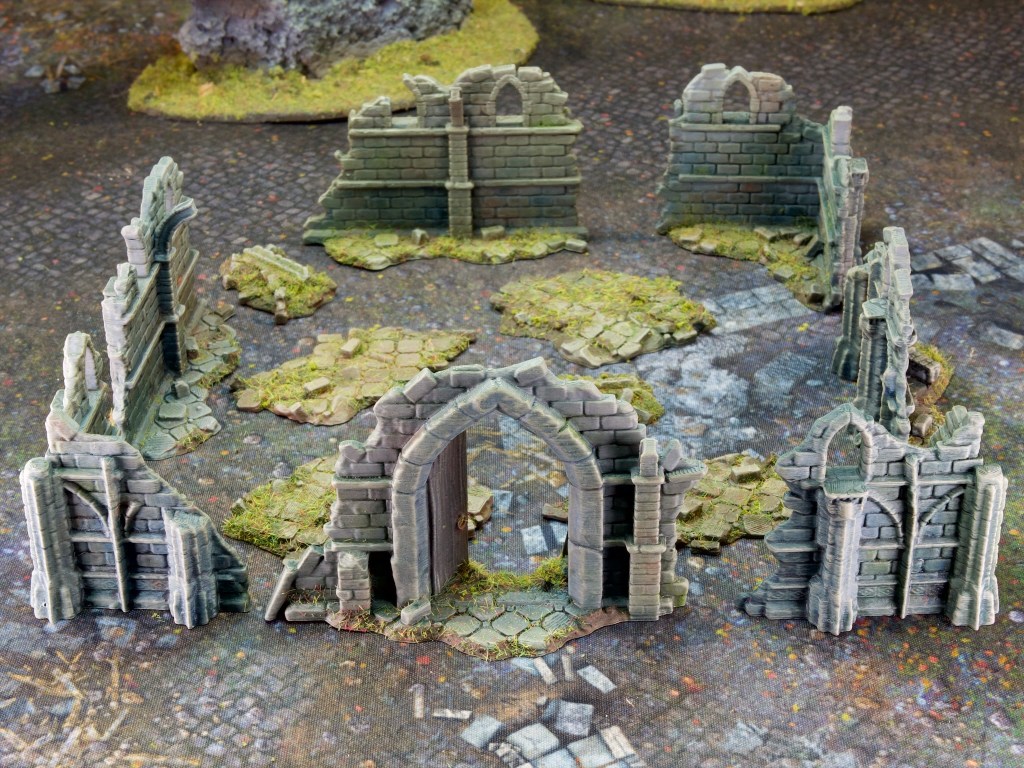
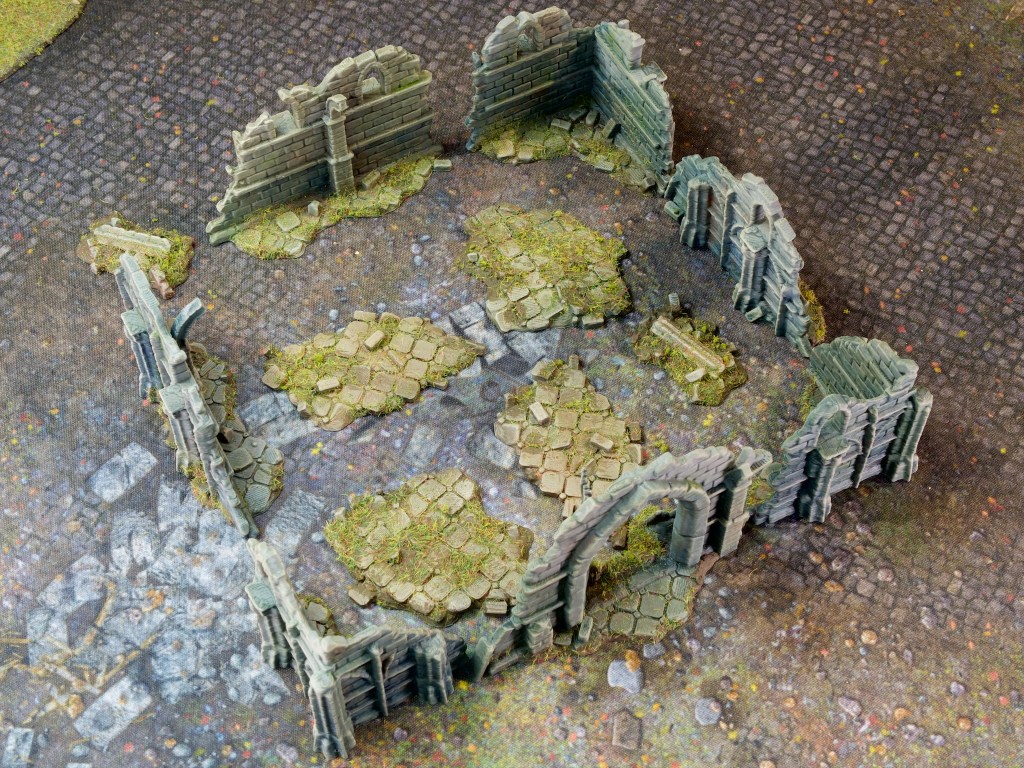
Finally, the ruined chapel. This is a nice modular ruined church STL set by Vae Victis Miniatures, which I printed at 50% size to make into a reasonable size for a chapel. The scenario calls for a 6″ x 6″ footprint for the chapel which the pieces you see above fit nicely into.
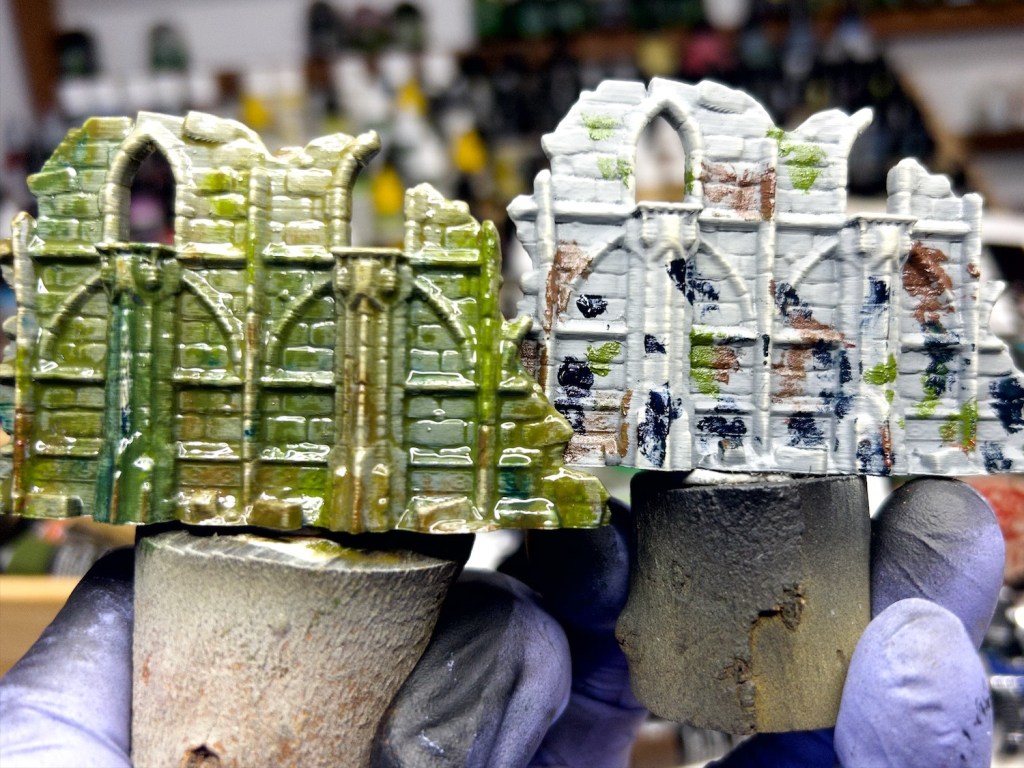
I had a bit of fun painting this, starting with a grey undercoat, then spotting on varied colours of oil paint. I then used some thinner to spread the oil paint around and create some nice variation. You can see what I mean in the photo below.
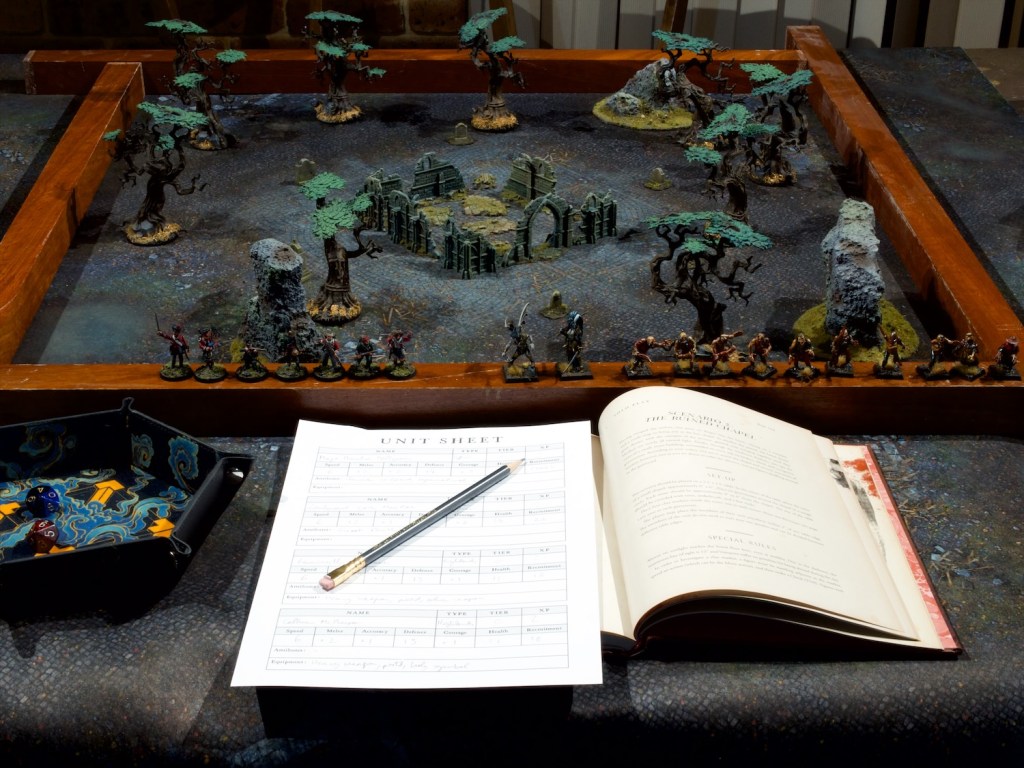
I left the wet pieces dry overnight, then wiped off the oil from the raised areas. I then left that all rest for a few days, and once fully dry, did a few drybrushes to pick out the raised areas. Was all quite fast apart from the drying! With the terrain and the antagonists ready, I set the board up for the mission and got started!
Ready to go!
As I mentioned at the start, the premise behind the mission is that my unit is looking for a ruined chapel to investigate it, and at the mission’s start has just arrived at said chapel, but finds it swarming with undead. The unit needs to battle through revenants and investigate the clue tokens in the chapel and move anything they find off the table.
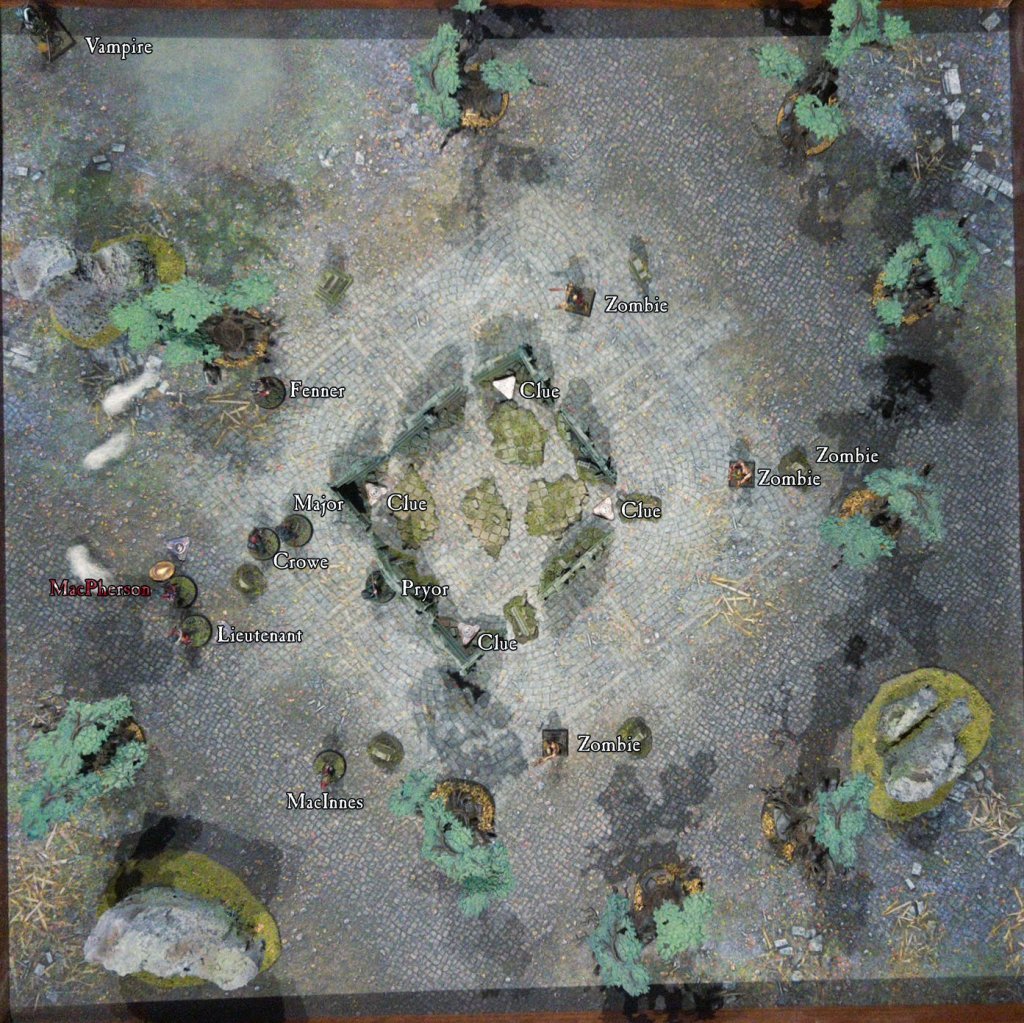
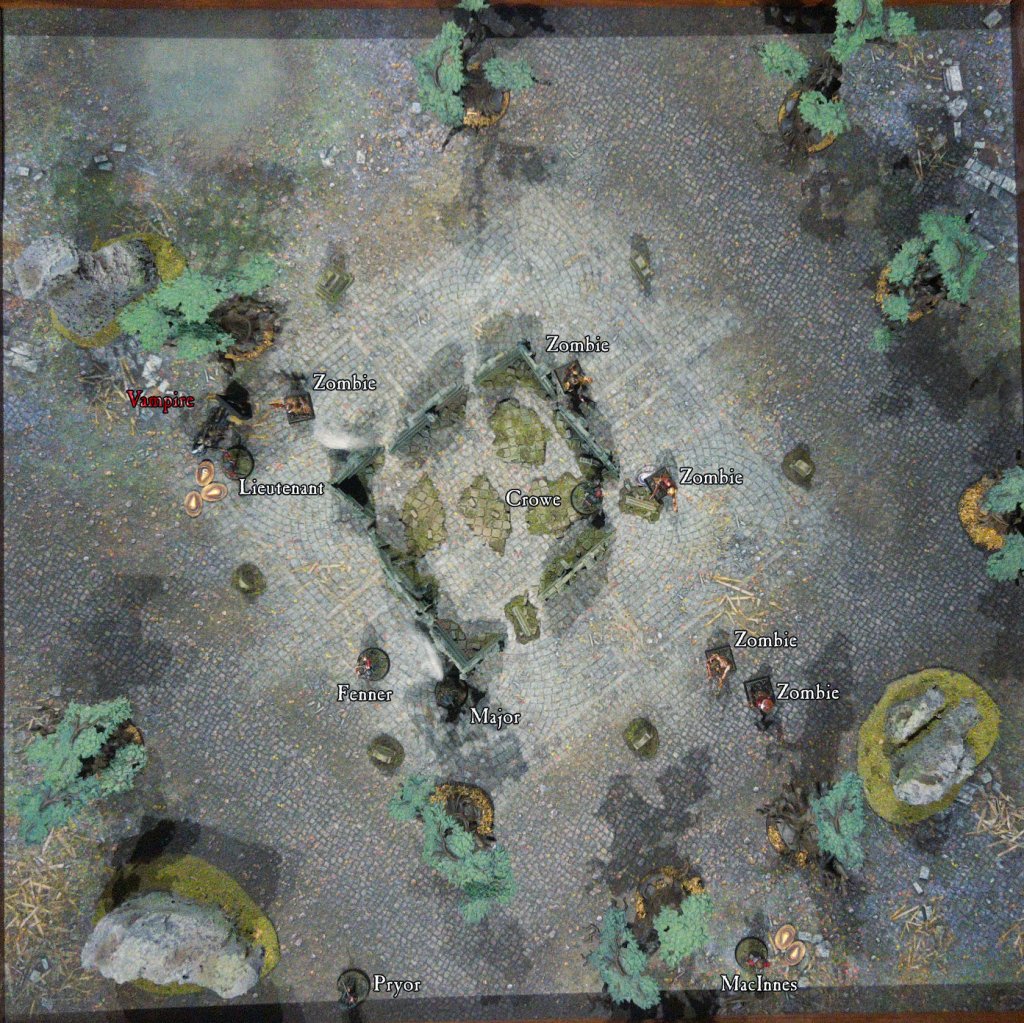
Initial setup.
The board is setup with the chapel at the center, a clue in each corner, a rough circle of grave stones around the chapel, with a zombie (these are called revenants in the game, but I keep forgetting!) at each grave stone. I was allowed to place my models within 2″ of any board edge, split up in as many groups as I liked. I remembered from the first game how useful it was to have backup so I decided to keep my full unit together, sacrificing searching power for increased survival chances. If you can’t remember the characters in the unit feel free to check out my earlier post. I also go into a bit of detail on how the rules work in that post so I would recommend reading it first if you’re interested in that.
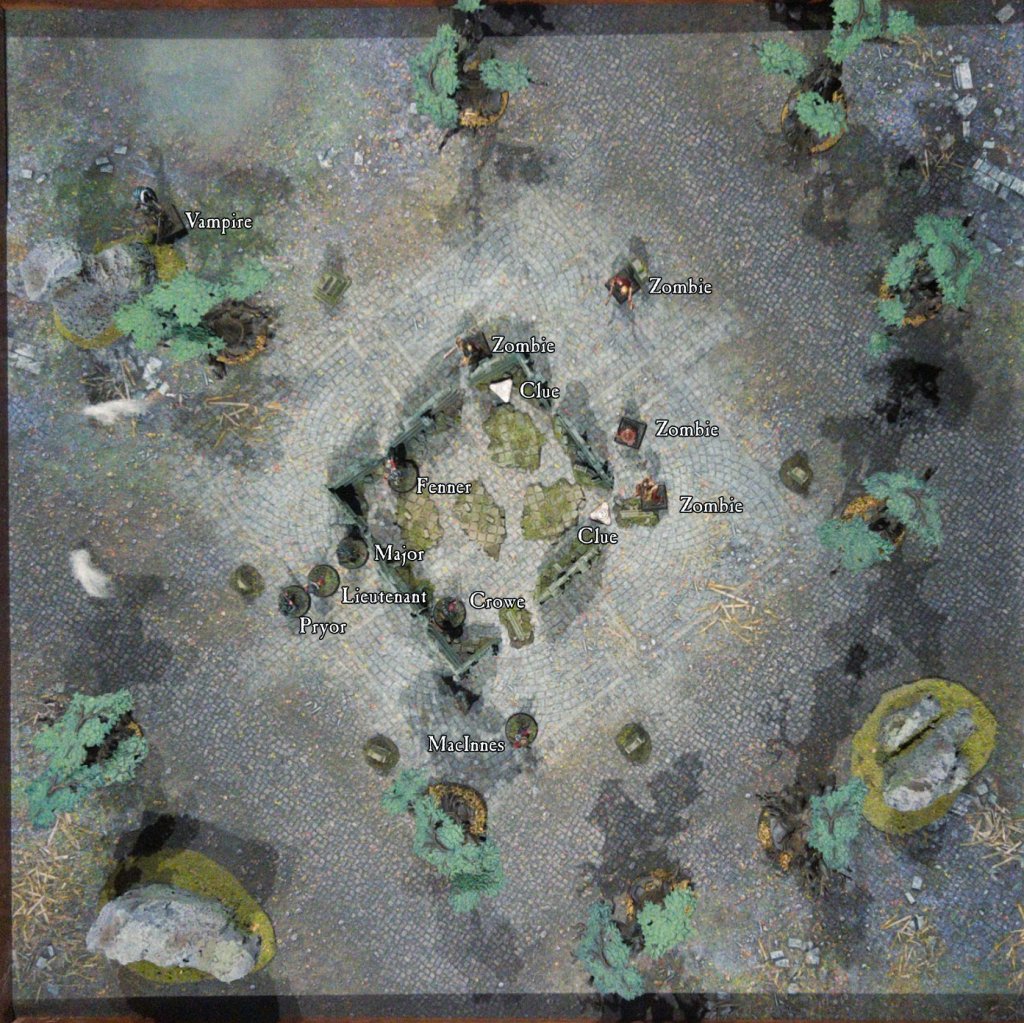
Turn 1
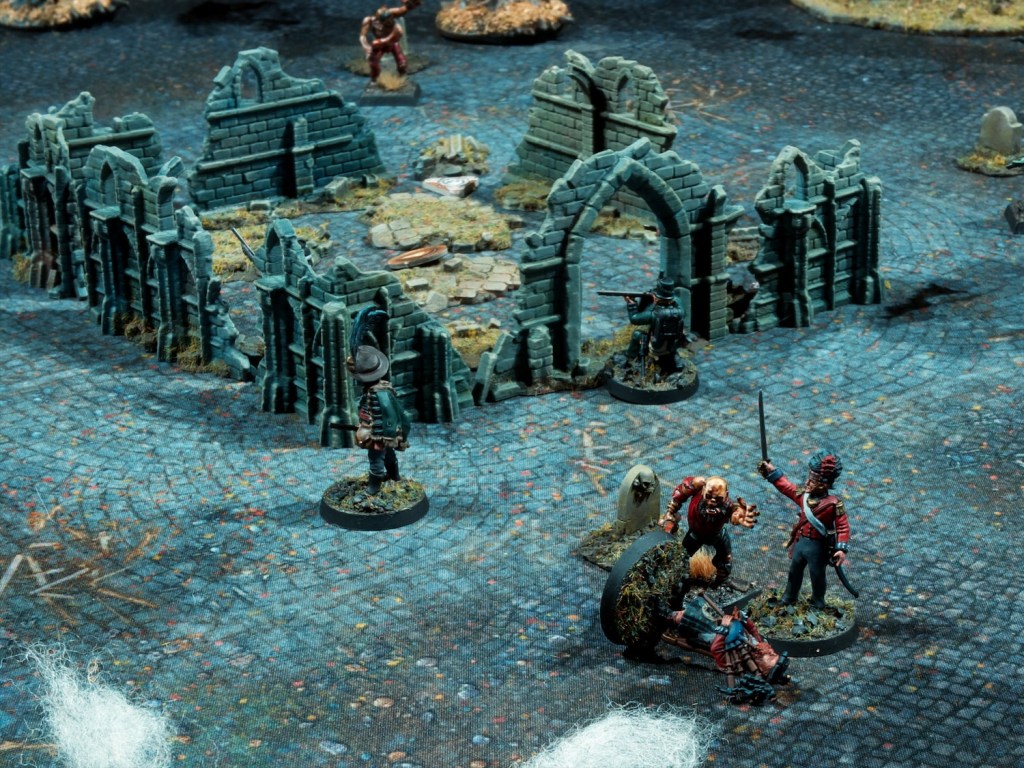
Turn one starts very poorly, with MacPherson charging the closest zombie, hitting it with his claymore and dealing some damage, but the zombie’s return blow critically injures him and takes him out of the game. Lieutenant MacRae charges that same zombie and finishes it off with a blow from his sword.
MacPherson is taken out by the zombie’s blows, Lieutenant MacRae rushes in to avenge him!
Crowe fires his rifle at the next zombie, only dealing a small amount of damage as they are not particularly bothered by ranged attacks. MacInnes then finishes off that same zombie with a strike from his massive axe. All the while the zombies are coming closer.
The Major fires his rifle at the next closest zombie, injuring it. Fenner then fires his musket at that same zombie, misses, charges it with his bayonet and takes it out (after I used a skill re-roll). Pryor sprints towards the chapel doorway.
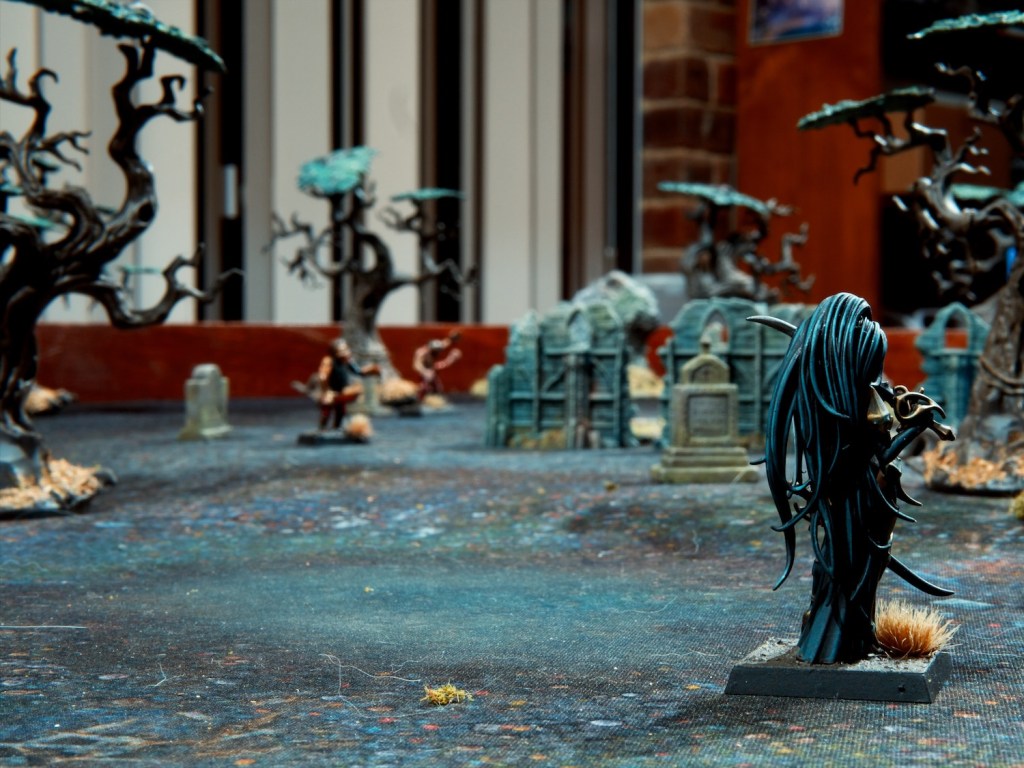
A mysterious form walks onto the battlefield…
At the end of the turn a vampire arrives, and another zombie springs up from a random gravestone.
The state of things at the end of turn 1.
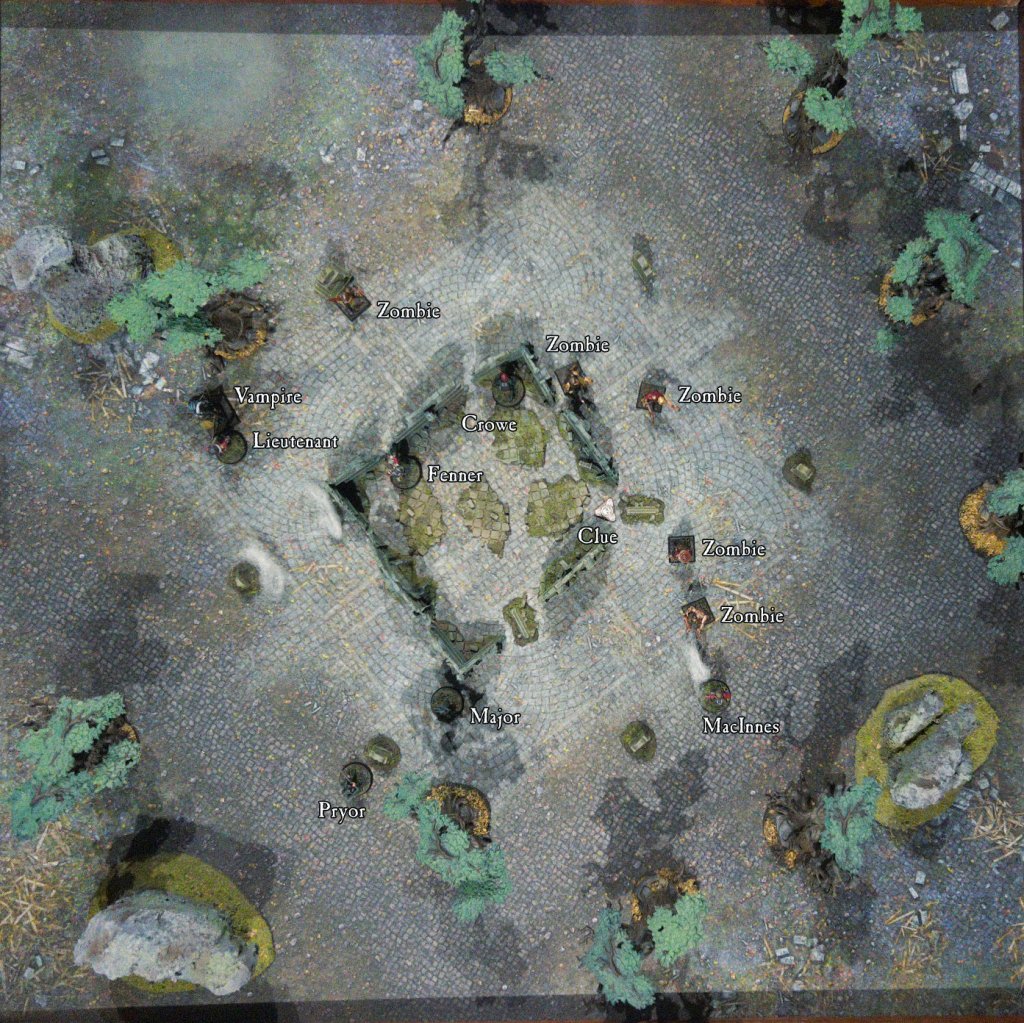
Turn 2
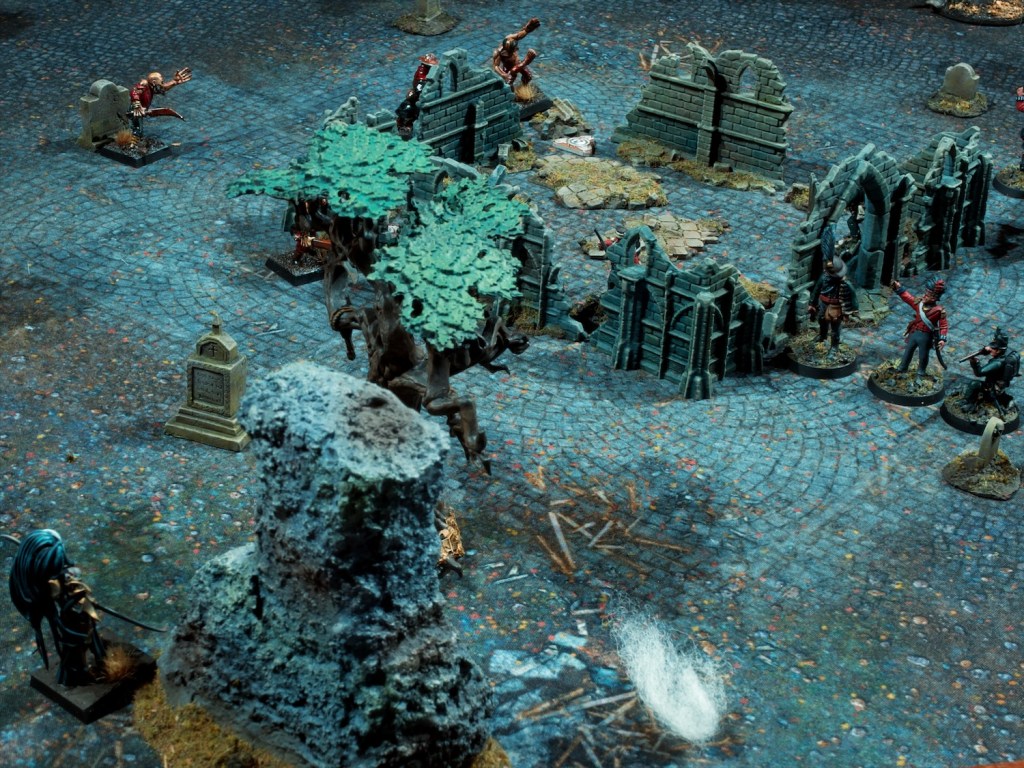
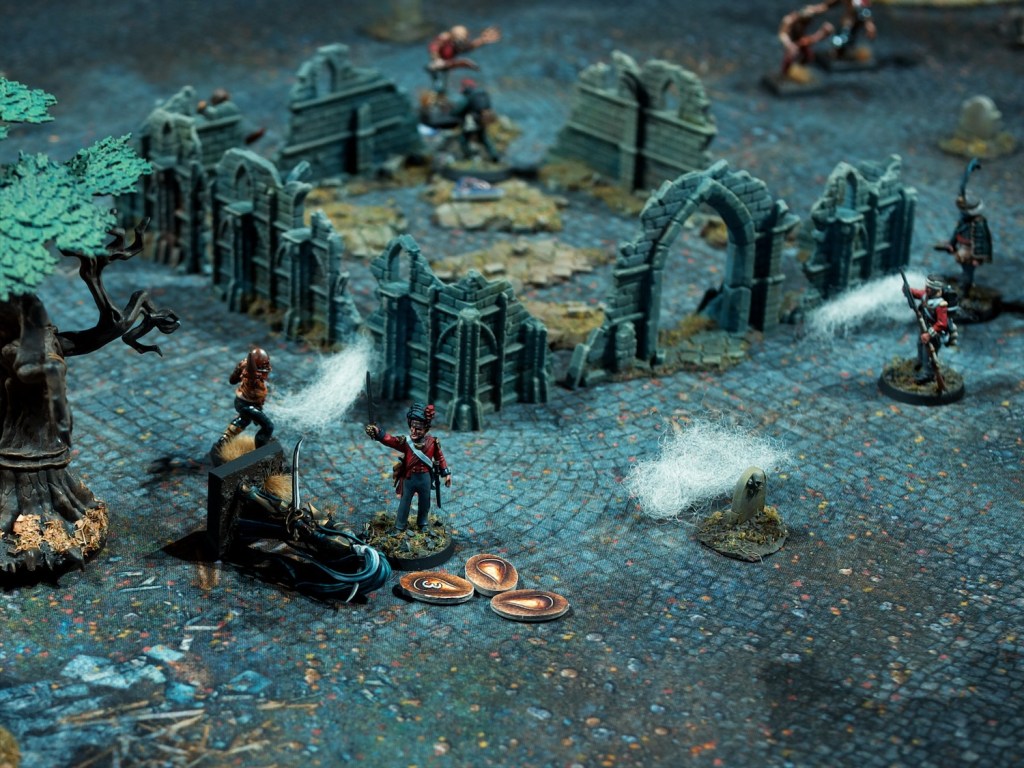
Fenner moves into the chapel, finding something of interest in the closest corner: a bag of silver shot! Crowe heads for another promising area of the chapel and scrounges up a silver knife. Both men feel a little bit more equipped for the horrors that await them outside of the chapel walls. Meanwhile, MacInnes continues his zombie hunt, charging the next closest and scoring a solid hit. The zombie’s strike back misses completely. The zombie then attacks MacInnes, but misses again, giving MacInnes the opportunity to finish it off with his own strike back. The rest of the zombies shamble forwards. In the far corner, the vampire approaches the Major and the men surrounding him.
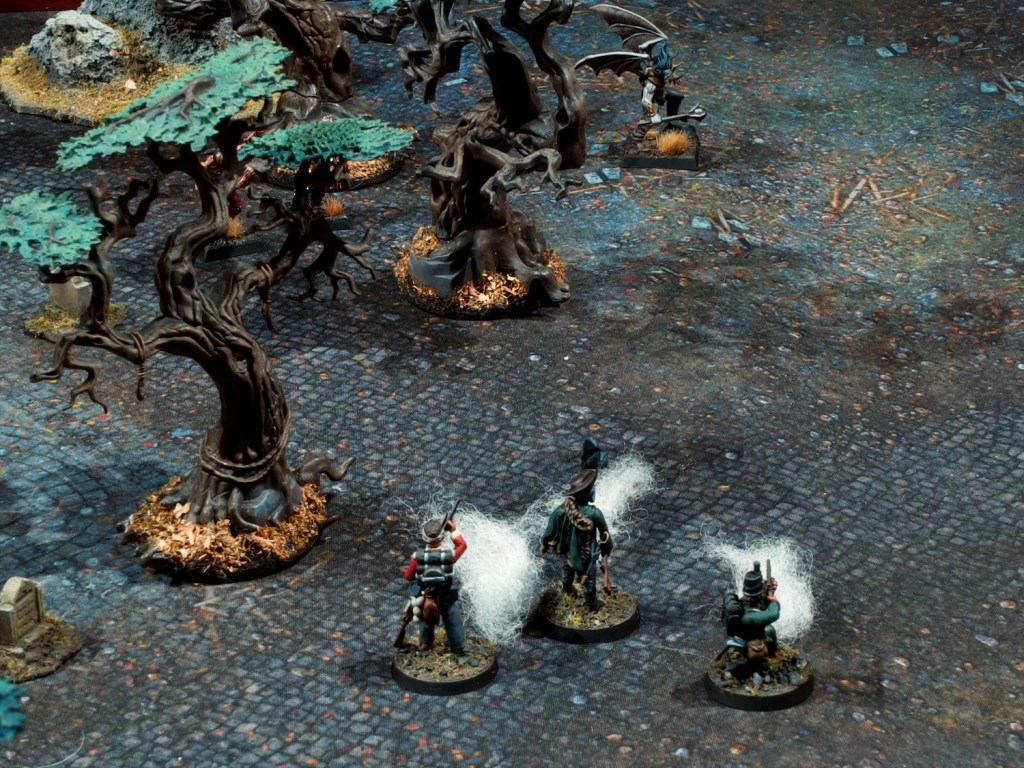
The unit prepares a silver-filled volley for the approaching monstrosity.
The major spots the shape coming towards him, loads silver shot into his rifle and backs away, closer to the chapel entrance. The Lieutenant and Pryor both line up next to the Major, ready to greet the new arrival with a well-timed volley. Another zombie claws its way out of a shallow grave…
The state of things at the end of turn 2.
Turn 3
Fenner loads one of his newfound silver bullets into his musket and sights through a crack in the chapel wall. Crowe keeps on searching the chapel and finds a small icon which gives me an extra power die in my fate pool (i.e. an extra re-roll!). To give the members of the team searching the chapel some more time, MacInnes fires his pistol at the zombies, misses, then rushes out towards them, drawing them away.
MacInnes draws the zombies away from the chapel.
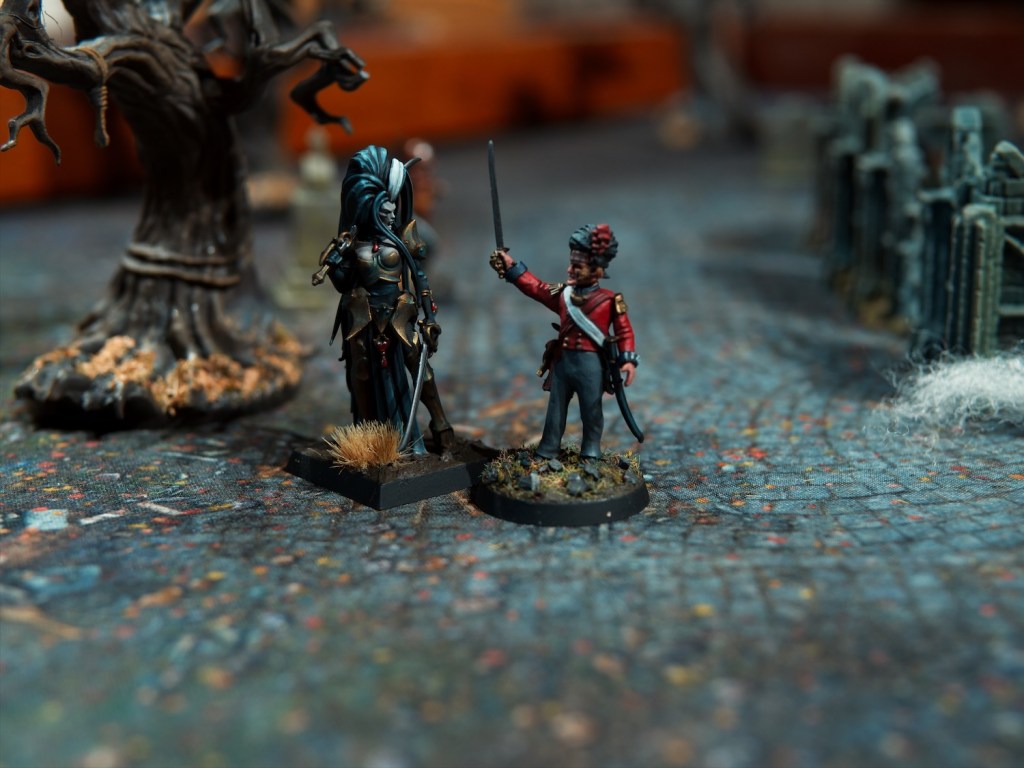
The vampire moves closer to the Major and his two sidekicks. All three open fire, but only the Lieutenant hits with his pistol. The Lieutenant is not equipped with silver shot, but his great faith means his attacks are blessed, which allows him to injure the Vampire. Bolstered by his success, the Lieutenant charges in, but locks eyes with the Vampire and its hypnotic powers freeze him in place.
Lieutenant MacRae might have bitten off more than he can chew…
With a groan, another zombie emerges from the soft ground.
The state of things at the end of turn 3.
Turn 4
Fenner now has a clear shot on the vampire and takes it, but misses. He rushes out the the chapel, time to sound the retreat! Crowe takes the time to investigate the last corner of the chapel and finds a strange candelabra. He packs away the relic and makes ready to leave the chapel. The Major quickly reloads his rifle and shoots at the vampire but misses.
On the far side of the chapel, McInnes is caught by one of the zombies he’s been baiting and suffers a nasty hit. He backs away to stay out of reach of the second zombie, but in so doing exposes Crowe who is attacked in turn. The zombie misses, and Crowe sticks his bayonet into the Zombie almost taking it out. MacInnes moves away from the zombies and reloads his pistol.
The Vampire attacks the hypnotised Lieutenant and scores a nasty hit, which causes the Lieutenant to have to take a terror test which he fails spectacularly and is paralysed with fear as a result.
Lieutenant MacRae fights off his fear and the hypnotic powers of the vampire to strike at it. After the judicial use of a re-roll, his sword finds its target and the silver of his blade finishes off the vampire.
Lieutenant MacRae triumphant.
Fearing the arrival of another vampire, Pryor reloads his rifle and moves away from the chapel. Another zombie erupts out of the ground.
The state of things at the end of turn 4.
Turns 5 and 6
With the vampire slain and the chapel thoroughly searched it’s time to leave the area before the unit gets overwhelmed. MacInnes leaves the board first, with the rest of the unit moving towards their closest board edge and reloading their blackpowder weapons. At the end of turn 5 another vampire arrives right next to where MacInnes left the board (close call!).
Turn 6 sees the unit unloading a volley into the newly arrived vampire, and this time did not miss, killing it before moving off the board.
If they’d missed at least they’d have a nice cloud of smoke to cover their escape!
This mission felt a lot more tense than the first one, I came really close to losing more than just MacPherson, and I spent a lot of time retreating from fights. Last time, musketry was quite powerful, whereas in this mission the zombies were resistant to it, and the vampires completely immune if the musket wasn’t loaded with silver. MacPherson survived his injuries, but now has the shakes permanently, making his aim with his pistol much less good. Luckily for me he’s more of a close combat character!
Overall the mission was tremendous fun, and I’ll happily play through the rest of the solo missions in the book. Painting a few models and some terrain and getting to use them in a game immediately was very rewarding.
I tried to improve my battle report style with changes to how I wrote the action up and with the extra annotations on the top down photos. Keen to get any feedback on how you feel this reads compared to last week or if you have any idea how to improve it!