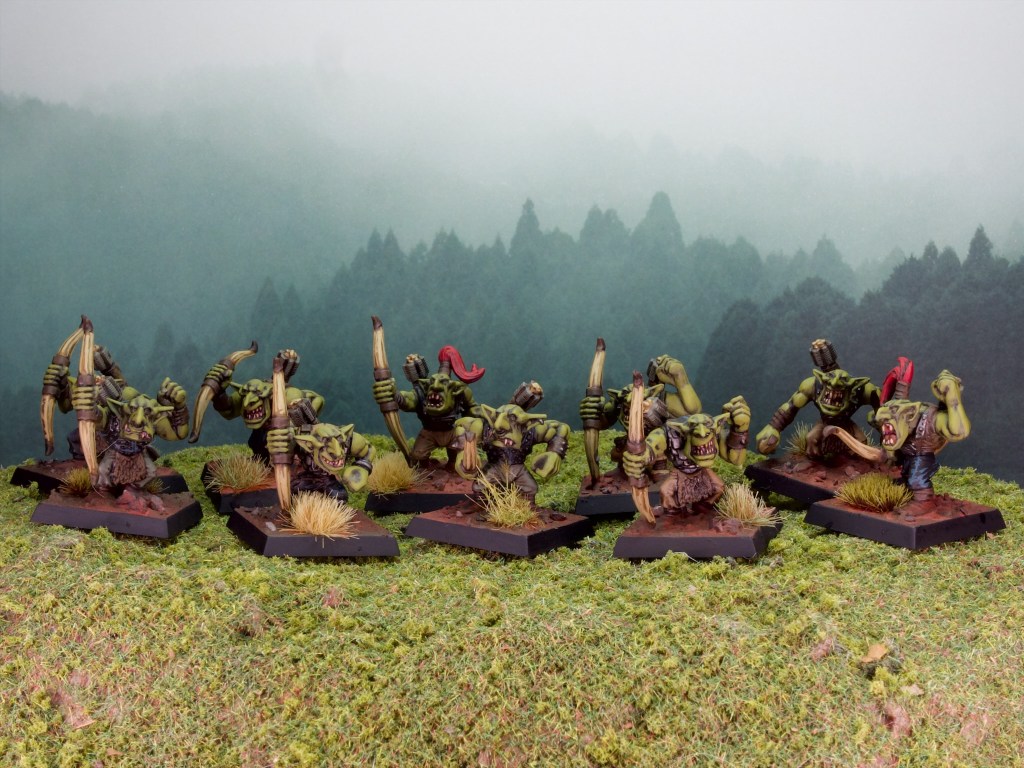
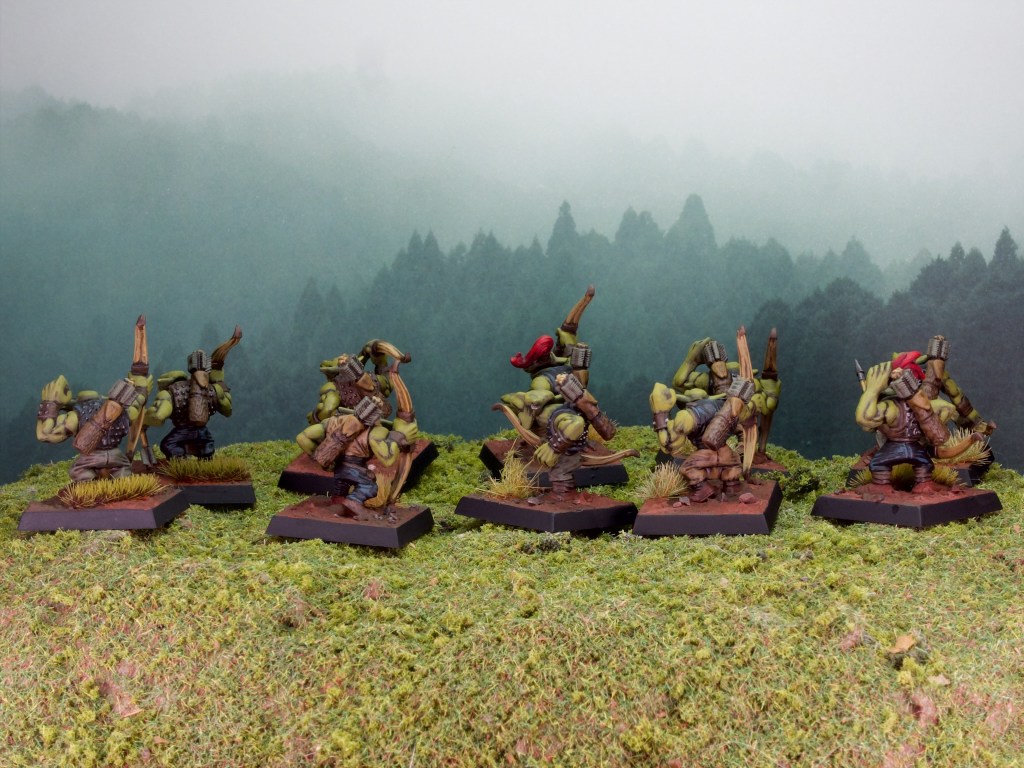
I’ve been chipping away at this small unit of archers for my Orcs and Goblins over the past few weeks. I have not been in any particular rush and it’s been quite nice painting at a sedate pace. I have a tendency to want to get things done fast, but with work quite busy lately it’s been good to do the fun things in life in a more relaxed fashion!
These are new casts of old models like much of the rest of the newly (re)released Orcs and Goblins models for Warhammer The Old World. These are pretty old sculpts now and were current when I started the hobby in the early 2000s. I’m absolutely the demographic for this nostalgia fueled set of releases!
I tried to make them look generally cohesive but in a haphazard manner, picking out their clothes in different colours. For my own future reference (I have plenty more of these to paint!) these are: Vallejo Model Color (VMC) German Fieldgrey WWII (also used for the fletching), VMC US Field Drab, VMC Black, and VMC German Camo Medium Brown (also used for the furs). The rest of the colours used are the same as for the rest of the army as detailed in my Orc Warboss post.
One nice discovery painting these was a new method (new for me at least!) for placing pigment powders on the bases in a much less messy way. So far I’ve been applying them dry, which tends to get them everywhere, and fix them using airbrushed varnish (at low pressure but still very messy). For these I experimented with mixing them with acrylic thinner before applying them in patches to the bases. I then dipped my brush in water and blended the patches into the uncovered section to get an uneven look. This method was much cleaner than dry application and was a lot easier to control. I’d recommend trying it out if you’re using dry pigments on your bases!
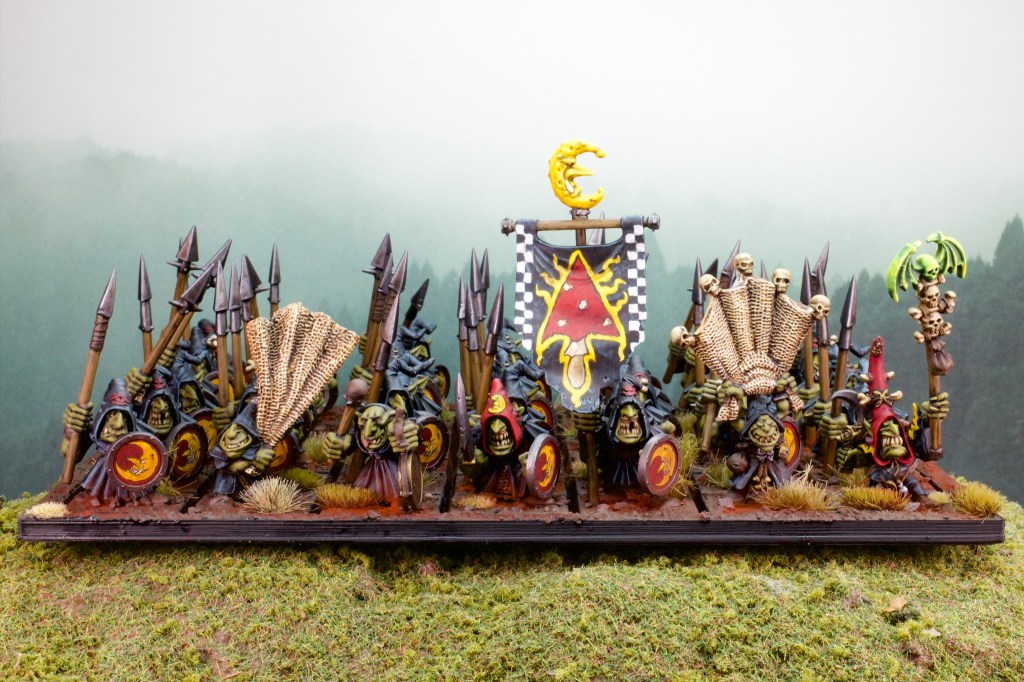
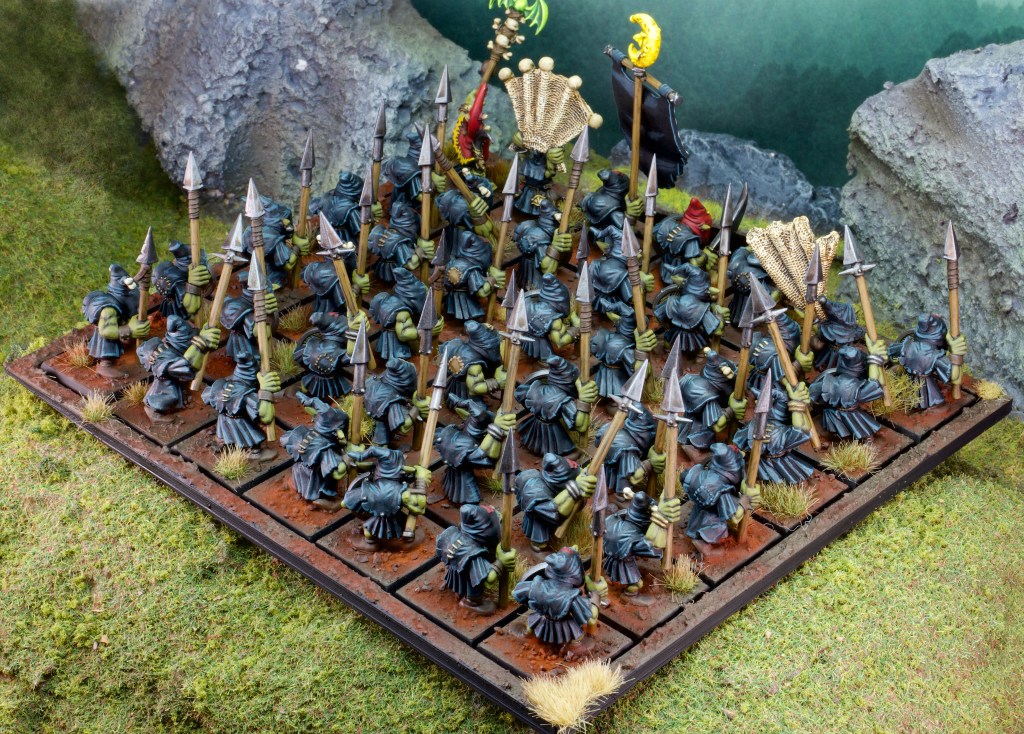
After a few posts promising a unit of goblins as the next addition to my Orcs and Goblins army (and a few posts apologising for failing to deliver!) I’ve finally finished this large unit of Night Goblins!
With a cool 42 models in it it is one of the largest units I’ve ever painted, and took me quite a while to get through. With its rather sizeable footprint it was a bit awkward to photograph too, a lot like a large terrain piece.
I ended up batch painting the unit row by row (i.e. seven models at a time), except the shields and the basing which were done for the whole unit at once. Each row was relatively quick to do, but together this added up to a lot of work (Basing took me a whole evening!).
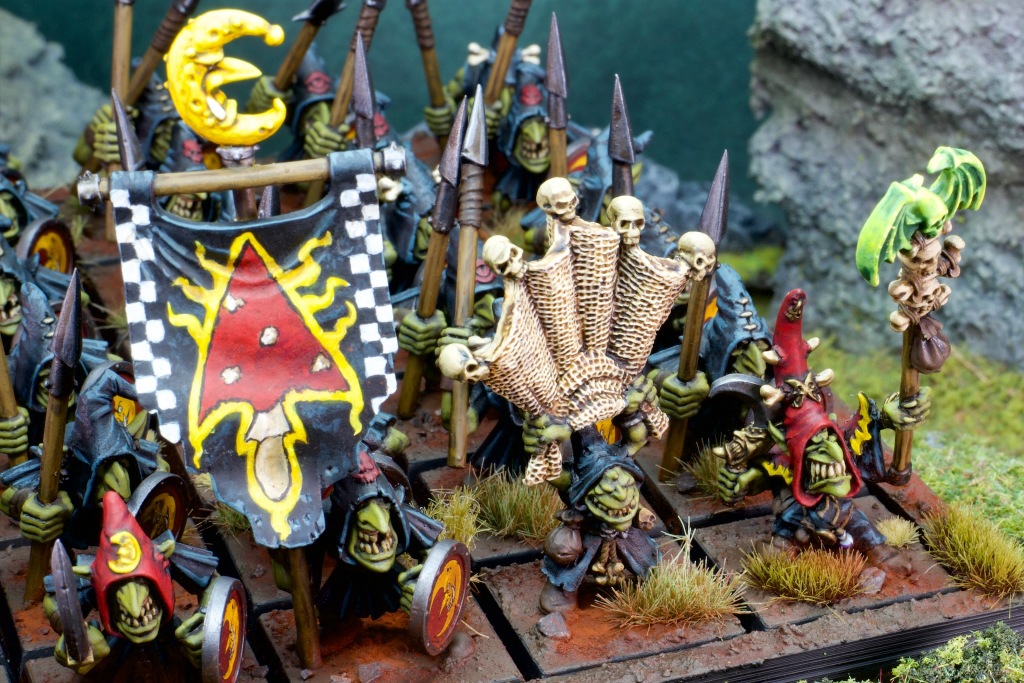
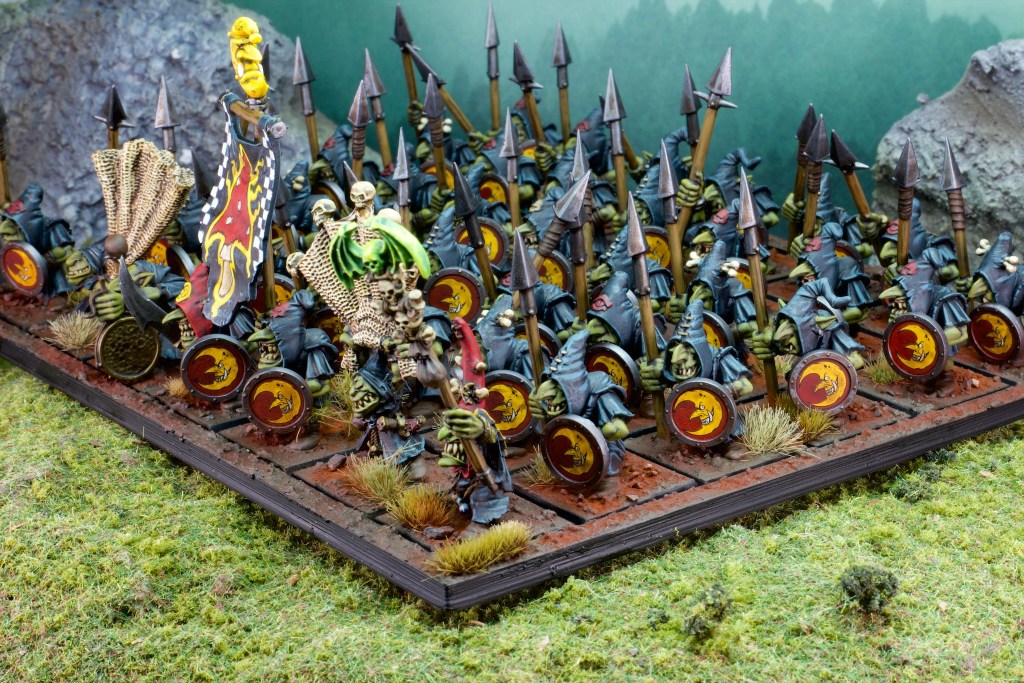
The banner was quite fun to paint, although I went in to it without a good idea of what to put on it. I decided a mushroom would be a good option given the Night Goblin moon was already represented at the top of the banner pole. I painted on a mushroom and then wasn’t sure where to go from there. I ended up taking a photo of the banner and doodling on the photo on my iPad to test out designs to add to my mushroom and I settled on what you see below. It was great to be able to experiment with designs without painting over and over again so I’ll do that again, a good lesson learned.
You might have noticed the shaman holding the green-headed staff on the right of the unit. This is one of the army’s characters, in fact the only wizard I have planned in there at the moment. This is a classic model that I picked up on eBay alongside the netters you see in the unit.
The night goblin models are the newly re-released plastics that were the standard kit back in 6th edition. There is a more modern night goblin box which is from the 7th edition era which is now marketed as an Age of Sigmar set. I really like the older plastics and I’d been looking for a second hand box when GW announced they were re-realeasing them. That made me and my wallet very happy, those second hand prices were getting sky high.
This new set came with a transfer sheet with a couple of designs for the shields. I loved the moon design on those transfers so that was an easy pick. I’ve never applied this many transfers in a single sitting!
I’m glad to see the end of this one, I’ve been painting it on and off for what must be a couple of months now (inter-spaced with a few other small projects such as the Fanatics I did a while back, which will be launched from this unit), and it took some determination (and a fair few hours) to get them finished this week. I love the look of these models as a massed unit and am chuffed with how they came out. I’m going to paint up a smaller scale project next I think!
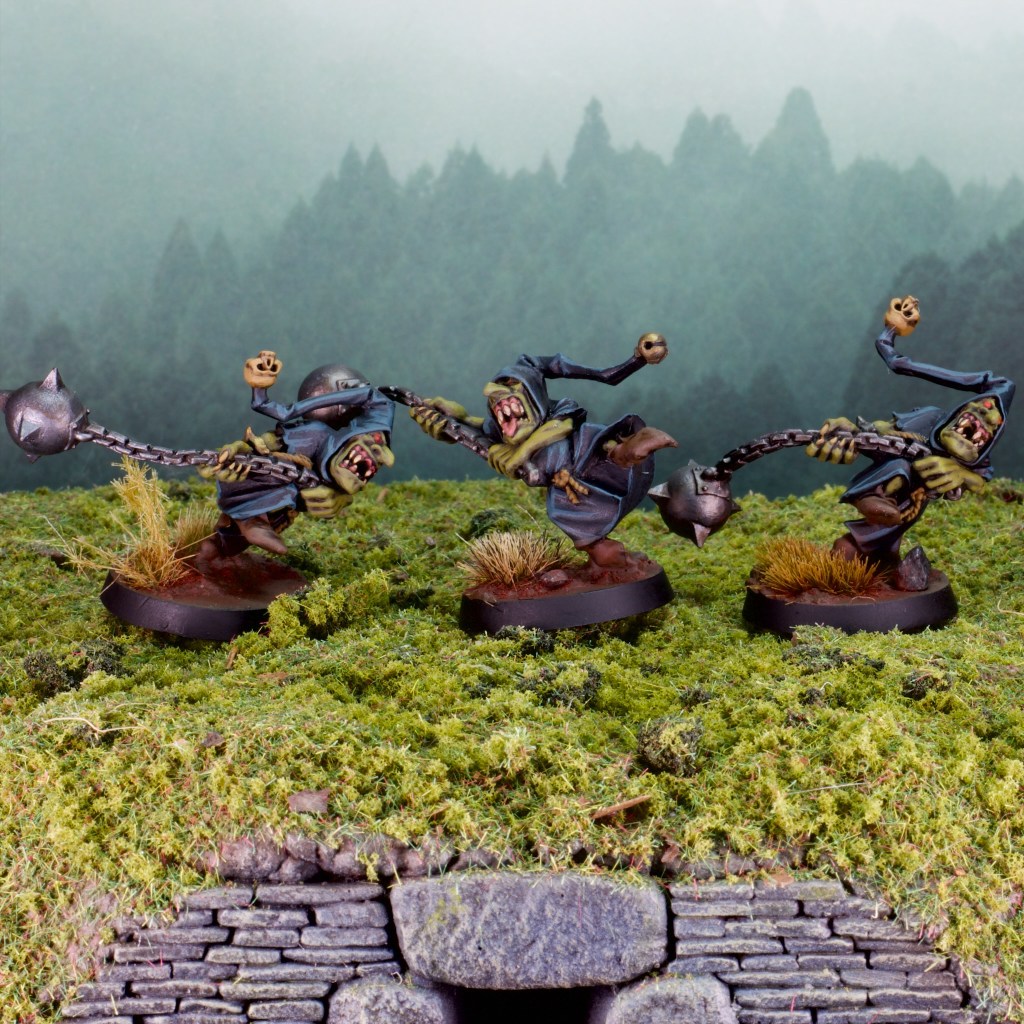
It’s been almost two months since the last post, probably the biggest gap in a while! It’s been a rather busy period family-wise (lots of birthdays in my family in July/August) and work-wise so I haven’t gotten much painting time lately. I’ve also chosen this period to paint a rather large unit of night goblins for my Orcs and Goblins army, so rather than wait another month to post something I decided to take a break from the big unit and paint up some supporting models, namely these fanatics!
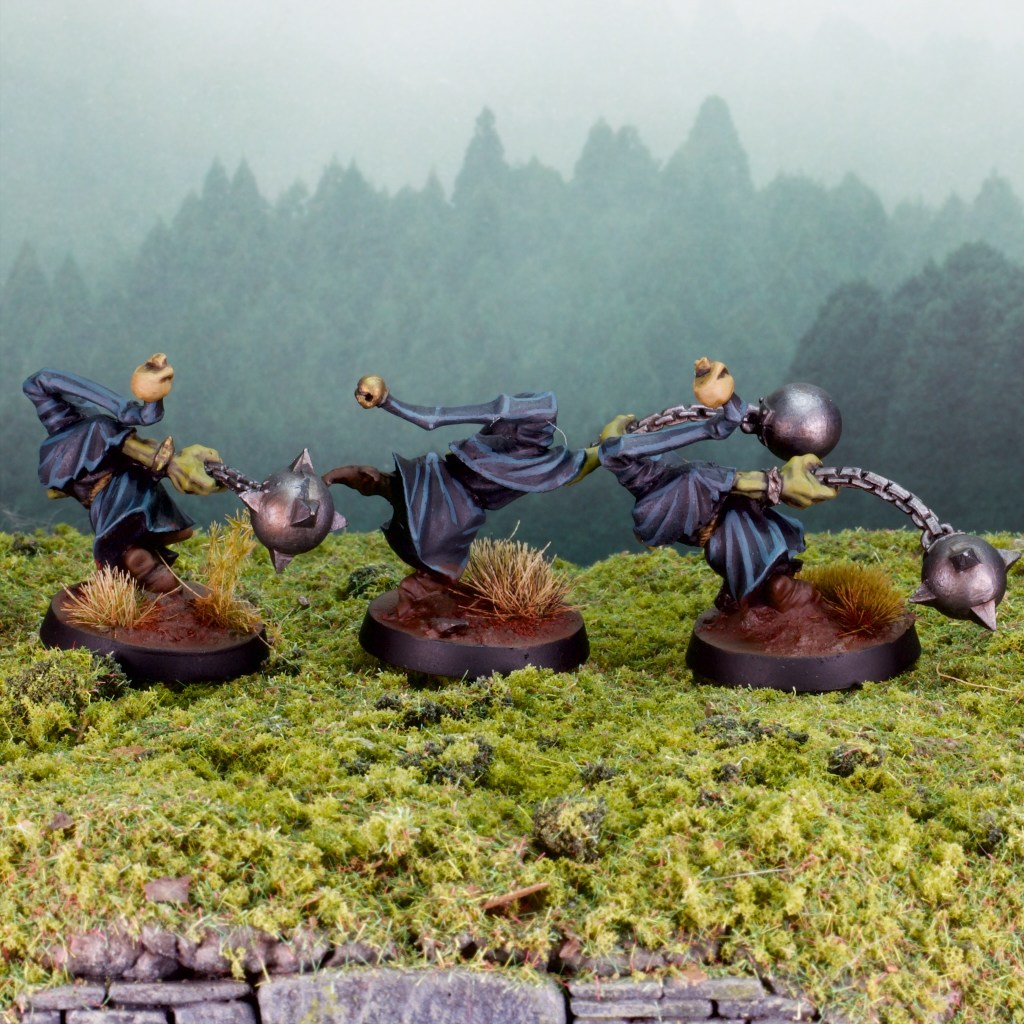
For those of you unfamiliar with these rather fun models, fanatics are Night Goblins that have consumed a concoction of “special” mushrooms that give them the strength and willpower to twirl about while wielding oversized flails. They are hidden in Night Goblin units and get released when enemy units get close.
These models are older metal versions that I’ve had for quite a while now, so nice to get some paint on them. They are painted much like the rest of the army, although with more black cloth! For the recipes, check the first post on the army, which featured a Night Goblin perched atop an Orc Warboss!
That’s it for painting updates, but some campaigning happened since the last update on that so here is where things stand.
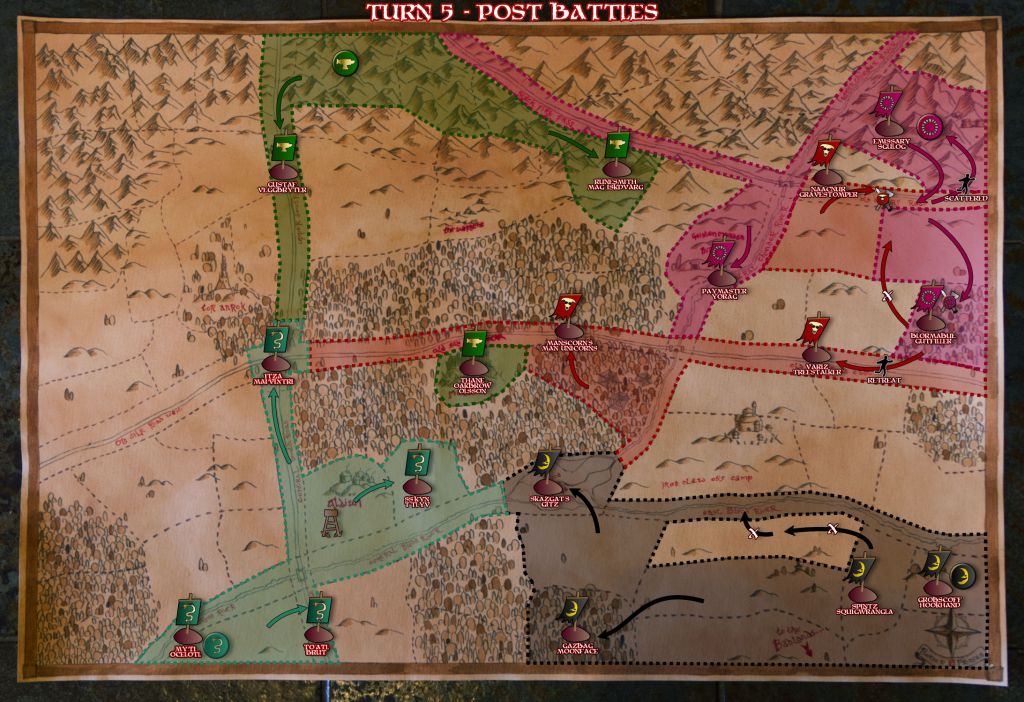
We had a win each for the Beastmen and Ogres in Turn 5, with the Ogres capturing the Beastmen’s home territory as a result of the first battle, but the beasts held their own in the second battle, scattering the Ogre army back to its own home territory.
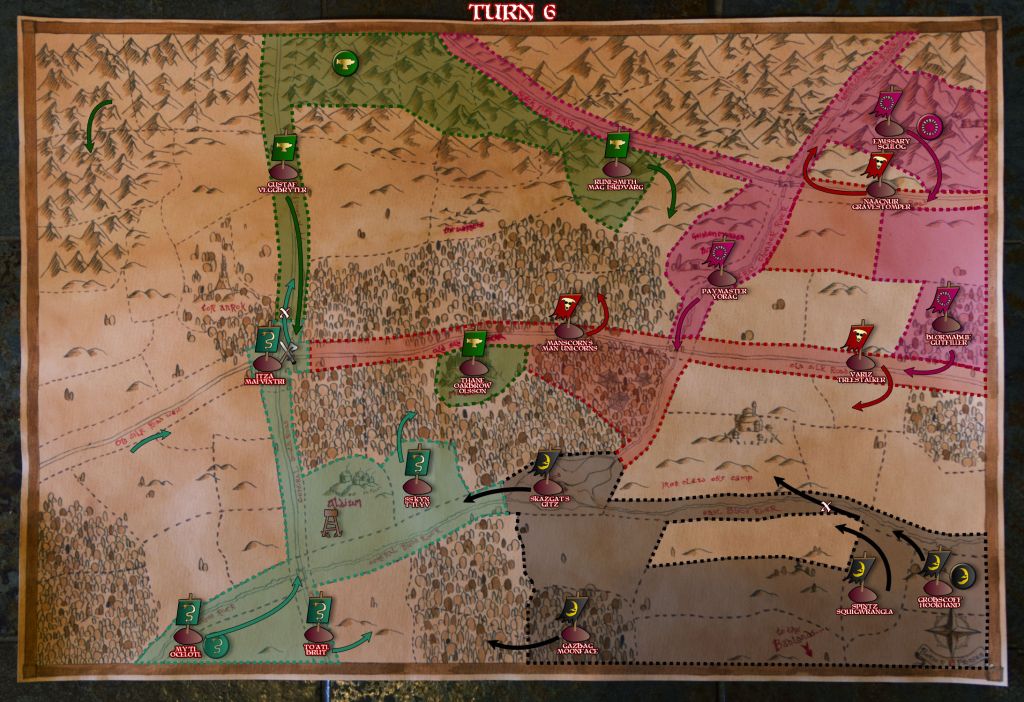
The moves for turn 6 have been planned and we have one battle this round: my Dwarfs against the Lizardmen encroaching on my territory from the south!
Here’s hoping I can get through this busy period soon and resume more frequent posting!
It’s been a little while between updates, but I’ve been slowly chipping away at the miniature I’ll be showing today over the past month. Slowly because it’s getting chilly here down under and my hobby table is in a cold part of the house (and therefore is being visited much less often than usual!) and slowly because I’ve been really enjoying the process on this model!
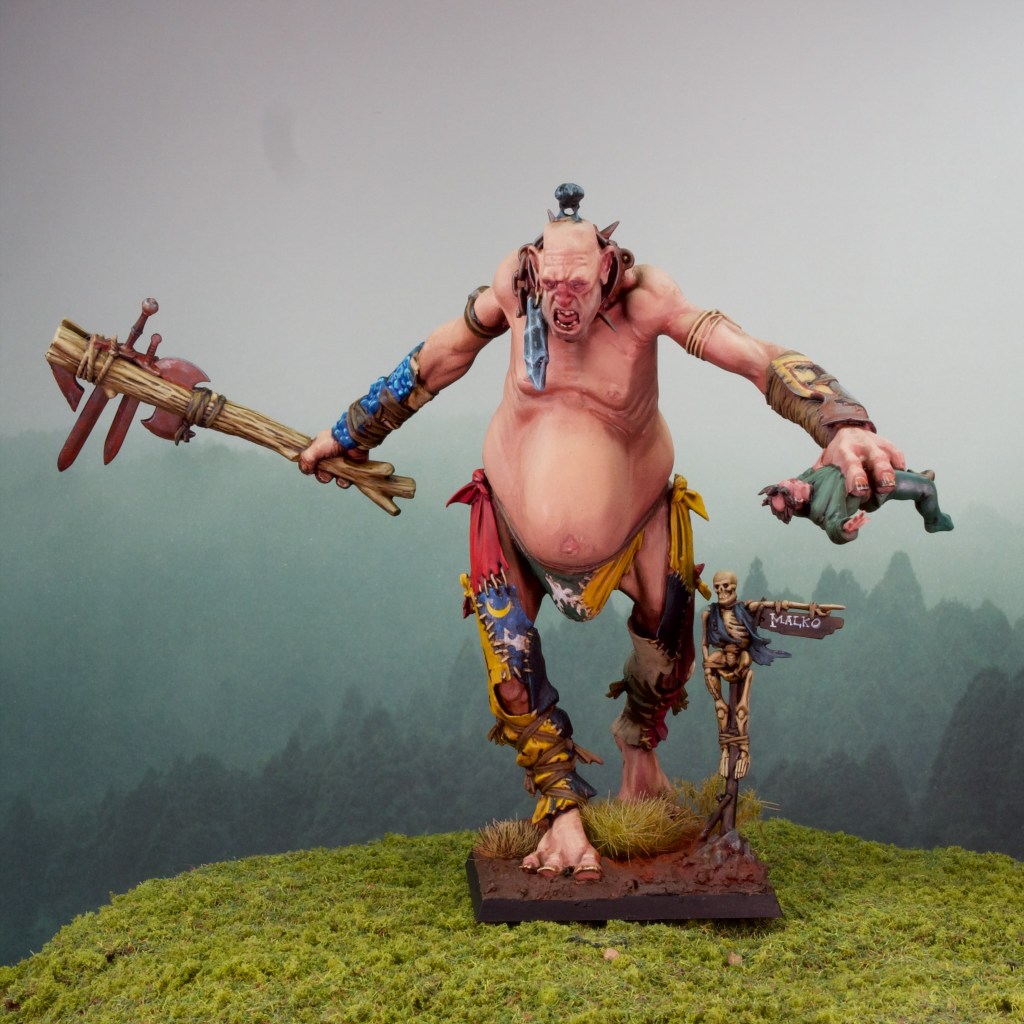
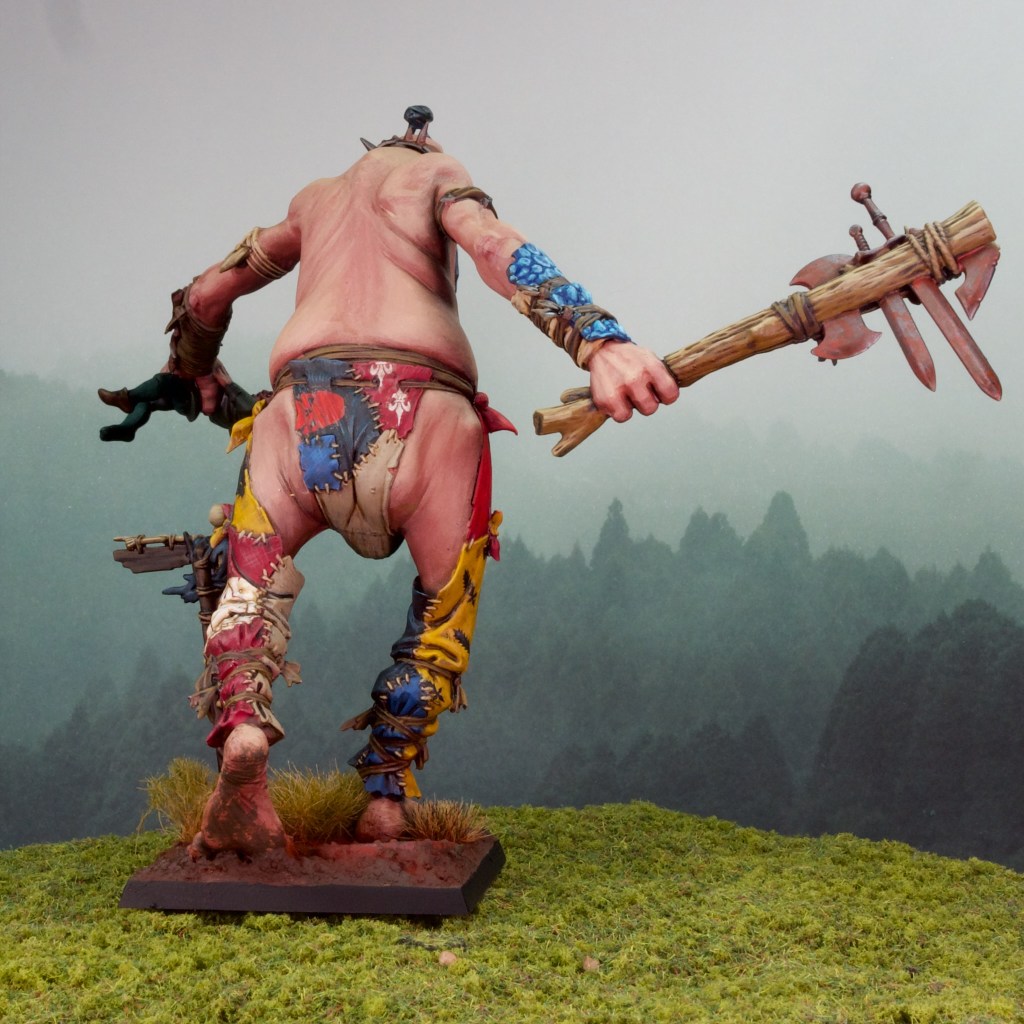
The model as you probably realised from the post title is a giant! This is the plastic Warhammer giant from the mid 2000s, which is still current in the range. I got mine during 8th edition for my Ogre army, and like many other models from that era it has sat mostly unpainted since then. I rebased that army for Age of Sigmar so this model was transplanted onto an oval base, before being cut off that and put back on a square base for the return to classic Warhammer.
As I mentioned above, I thoroughly enjoyed myself painting this model and I went probably above and beyond what I would usually do for an army model, although I always do tend to try to spice up centerpiece models!
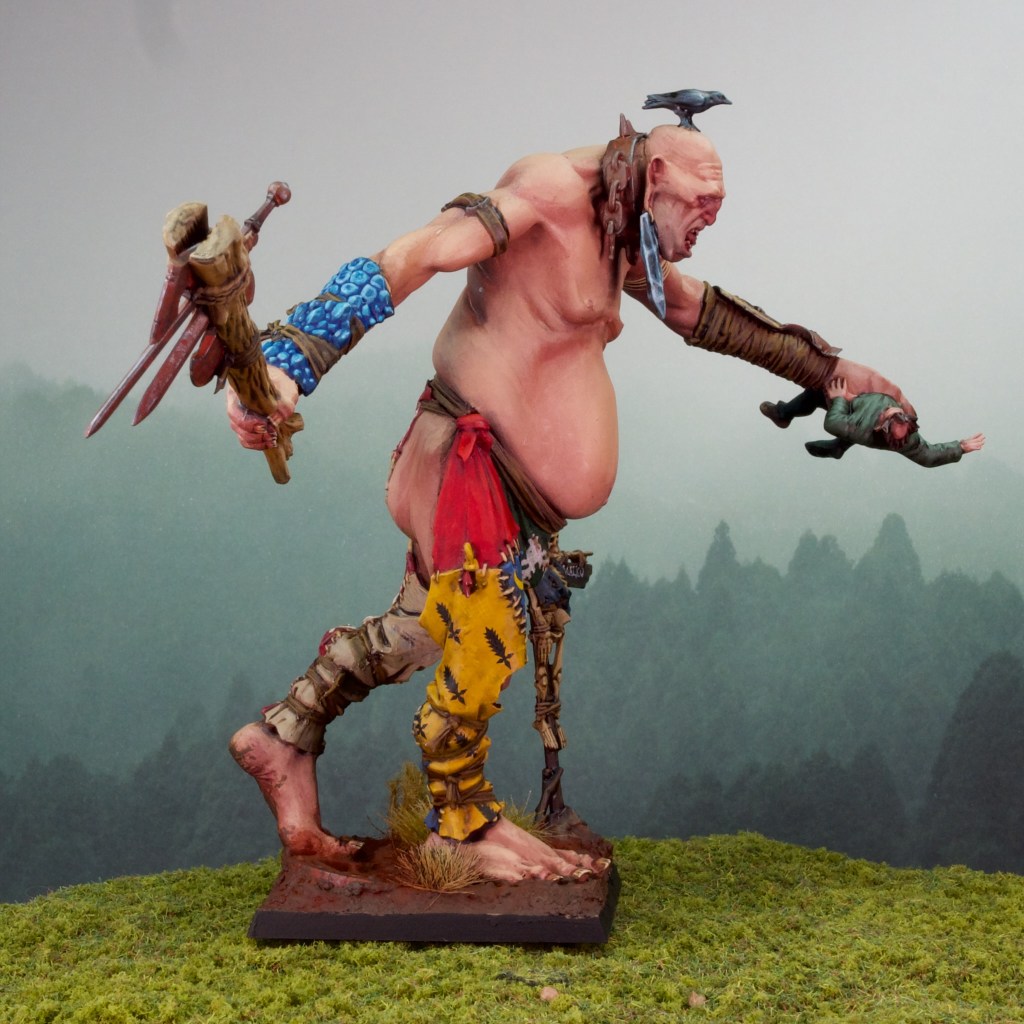
I really wanted to make it look like his pants were made from banners he’d collected over the years, so I painted them in a patchwork of colours, and applied transfers from all kinds of sheets I’d collected over the years to add some interesting patterns to the patches. From memory there are transfers from the Bretonnian, Eldar, Imperial Knights, and Space Wolf ranges on his pants.
Another detail I enjoyed painting because of the scale of the model was the nails, I tried to go for a dirty nail look with some muck caught under there. This might be a bit hard to see in the photos though, I think the best example is in that top photo on the hand that is holding the hapless man.
I spent a bit of time on his face, I don’t get to paint large scale heads very often given my usual subjects, so this was a fun new thing for me to do. I tried to go for the classic pale/red/blue zones on the face which I think worked out nicely, but I’m keen to see how you find it.
Overall I had a great time painting this giant, but it’s time to move on to smaller models again! I have the largest unit in the army lined up next, a big unit of night goblins which will likely keep me busy for quite a while so the next post may also be a bit further away than usual!
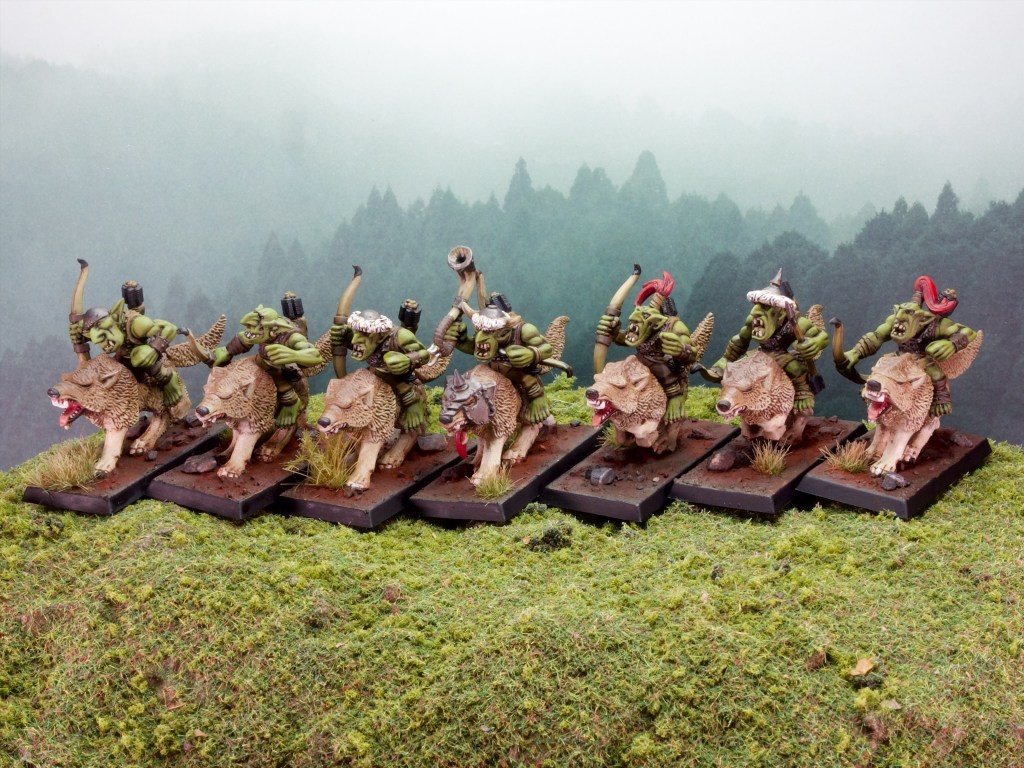
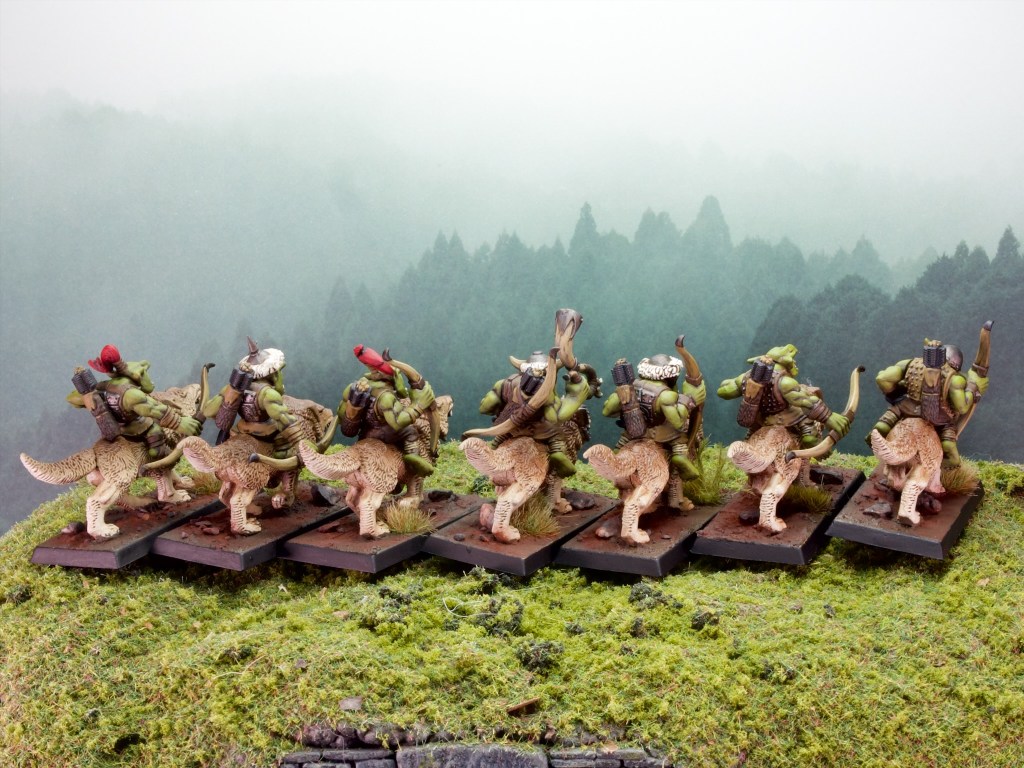
Back this week with more models for my Orcs and Goblins army: some Goblin Wolf Riders!
These are classic models (late 90s I believe!), which have been re-released as part of the current set of Warhammer Old World releases. This might be laziness on GW’s part, but I’m loving the fact you can buy some of these models without having to go through exorbitant eBay prices! These are the models that were current when I started the hobby, and couldn’t afford them at the time so this is very much an exercise in nostalgia for me!
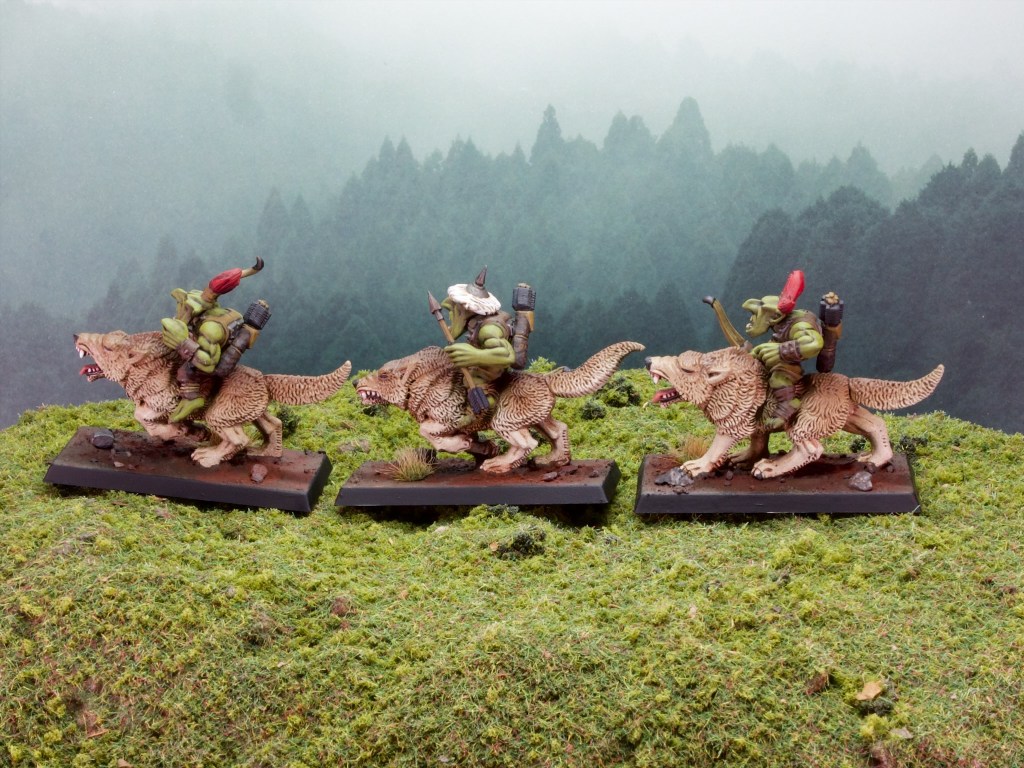
I really enjoyed painting these, the goblin riders are so characterful and the old style “big” detailing is a joy to paint. For the wolves I tried something a little bit different. I really wanted a nice gradient on the furs so I basecoated them using the airbrush, starting with a cream colour all over then doing narrower and narrower bands of darker browns over their backs. I chickened out of doing highlights over this gradient so I decided to use oils to shade the furs so I could wipe them off of the raised areas. You can see the effect in the photo below.
I think that worked out pretty well, it’s not quite as clean as properly highlighting things, but it is much more expedient which is exactly what I’m after when painting army models. I have a second unit of these to paint up for the army, so I’ll be reusing the technique although I will be changing the colours to have some grey wolves for those.
For the Goblins themselves, I reused the recipes I laid out last post for the Warboss, so check that out if you’re interested!
Now I promised a couple of posts ago to post some photos of the first games of our Border Princes campaign and promptly forgot to include them in the last post, so here they are, better late than never!
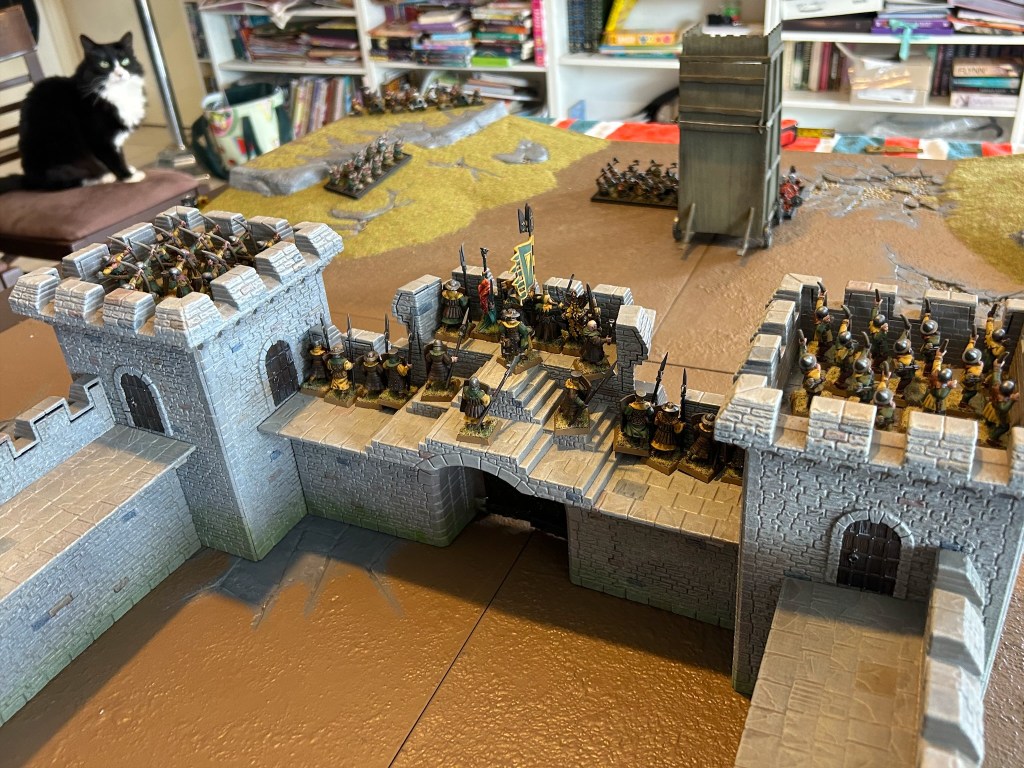
If you remember the last update, my Dwarfs were attacking the Fortress at the center of the map, defended by the Bretonnian force I’d painted up for this purpose. As I was the attacker, one of the other players stepped in to play the defenders and we had a siege game!
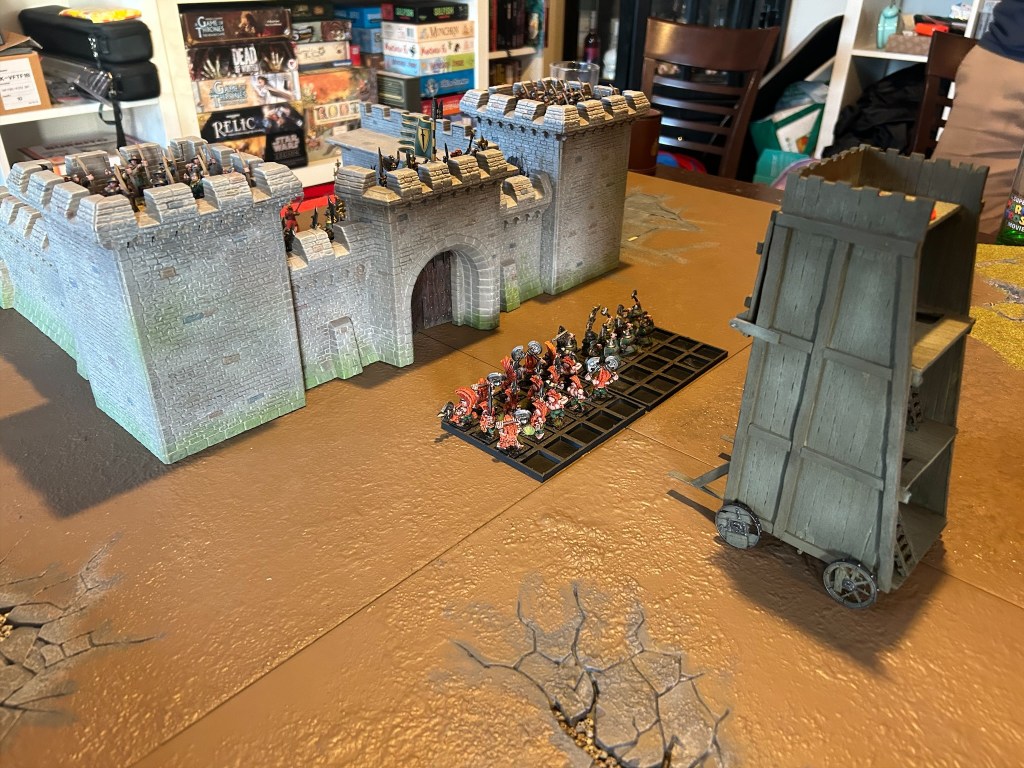
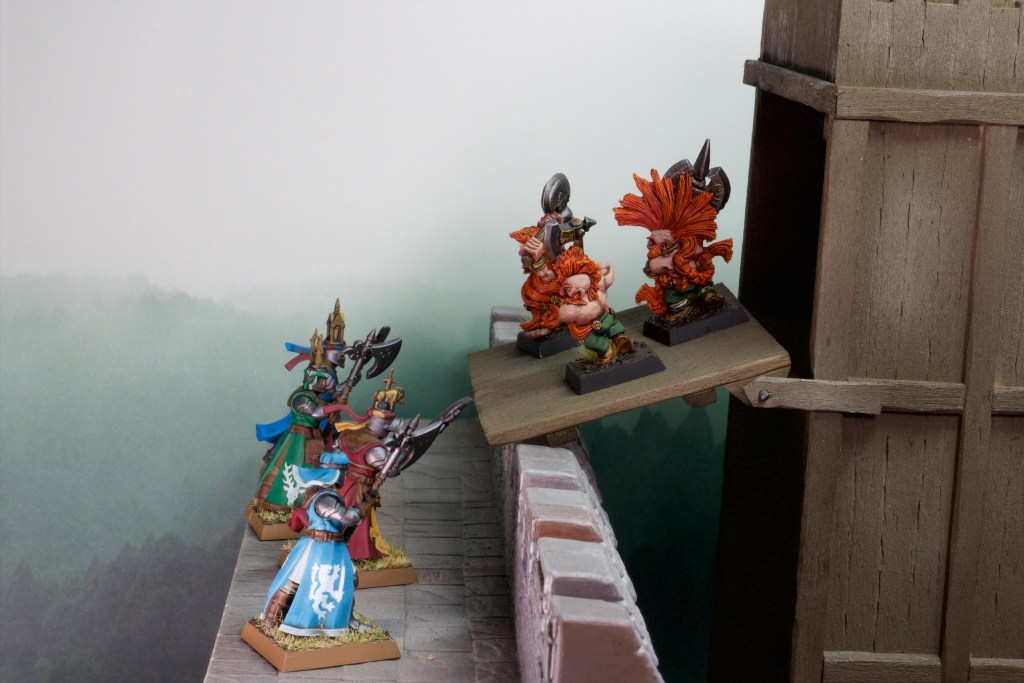
The initial setup: two blocks of dwarf infantry pushing the siege tower and ranged units on the hill. On the defending side the walls are occupied by archers and men-at-arms, and surprising the attackers the unit of knights deployed outside the walls!
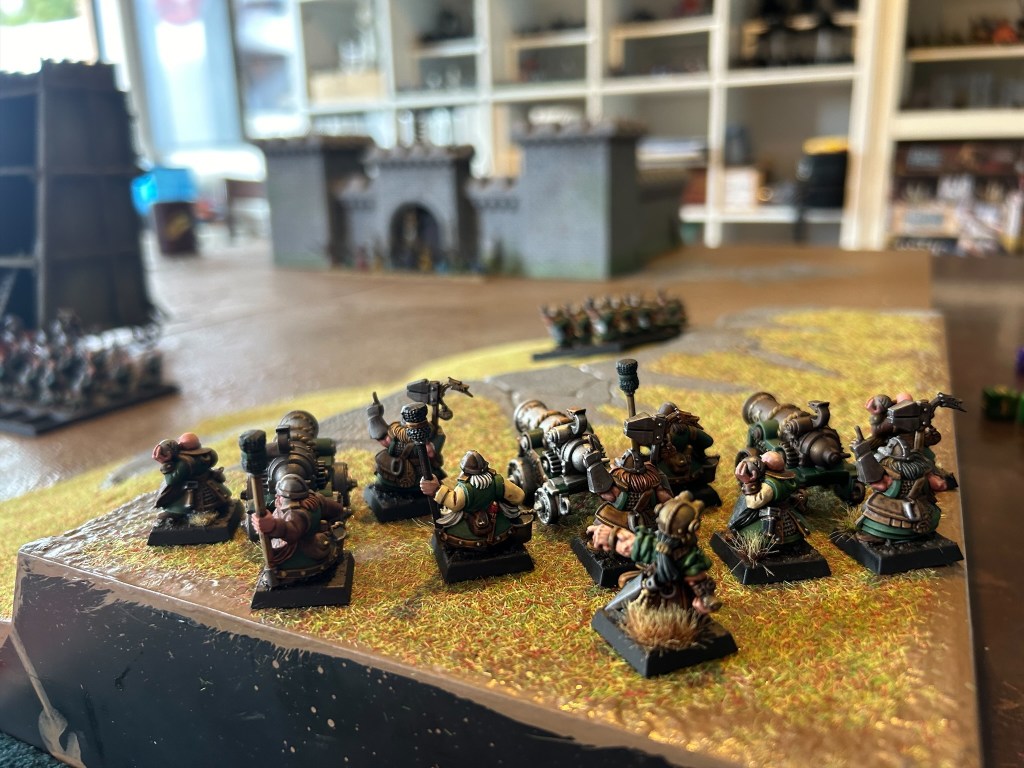
Cannons lining up the castle gate
The defenders look on as the attacking forces assemble.
The knights form up … outside the gates!
The cannons started shooting the gates, failing to do much and one of them misfired even with the engineer there to give it a re-roll! Luckily it only had to skip a turn, losing a war machine this early in the game would have been dreadful! The Siege tower was pushed forward by the dwarf infantry. On the defending side the knights advanced, resolved to chop that siege tower to scrapwood with their axes! On the walls the archers started shooting at the siege tower and managed to inflict some damage to it (presumably some critical ropes cut!). The following turn the knights managed to close in on the tower and almost destroyed it in combat!
The knights close in on the siege tower… and start hacking!
The dwarfs did not take kindly to this attempt to cut down their handywork and retaliated, closing in on the knights. The Demon Slayer and his rune axe made short work of the knights, but the damage was done, the siege tower on a single wound was more of a liability than anything else at this stag. The dwarfs abandoned it, taking a page out of the Knight’s book and deciding to use their own axes on the fortress gate.
The Dwarfs abandon their tower.
Under a hail of arrows the Dwarfs approached the gatehouse and got to work hacking down the gates. The cannons had finally started doing some damage to the gates and the rune axe of the Demon Slayer crashed through the wood of the gates soon enough.
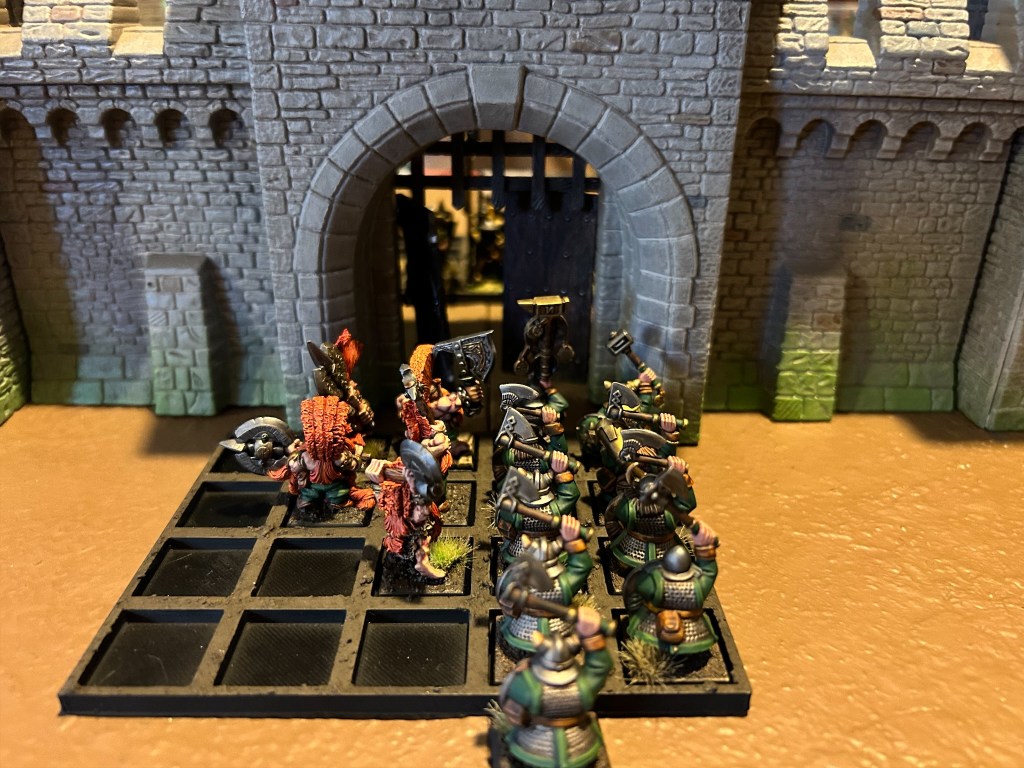
The gates crash open!
Once inside the walls, a desperate melee started between the Dwarfs and the Men-at-arms led by the Baron started. The combat was inconclusive, but the last turn had arrived and the Dwarfs won the day, having taken the gatehouse and slain the knights for no full units of their own lost (although as you can see above those archers did a lot of work on those units!).
This battle resolves turn 4 and the map above shows the state of things as the turn ends.
The players made their moves for turn 5, and we have two battles lined up for this turn! Both feature the Ogres and the Beastmen, with the Ogres attempting to seize the starting location of the Beastmen, and the Beastmen trying to take the river section off the Ogres.
The defense of the Beastmen home territory has already been fought, although unfortunately I did not get to take many photos.
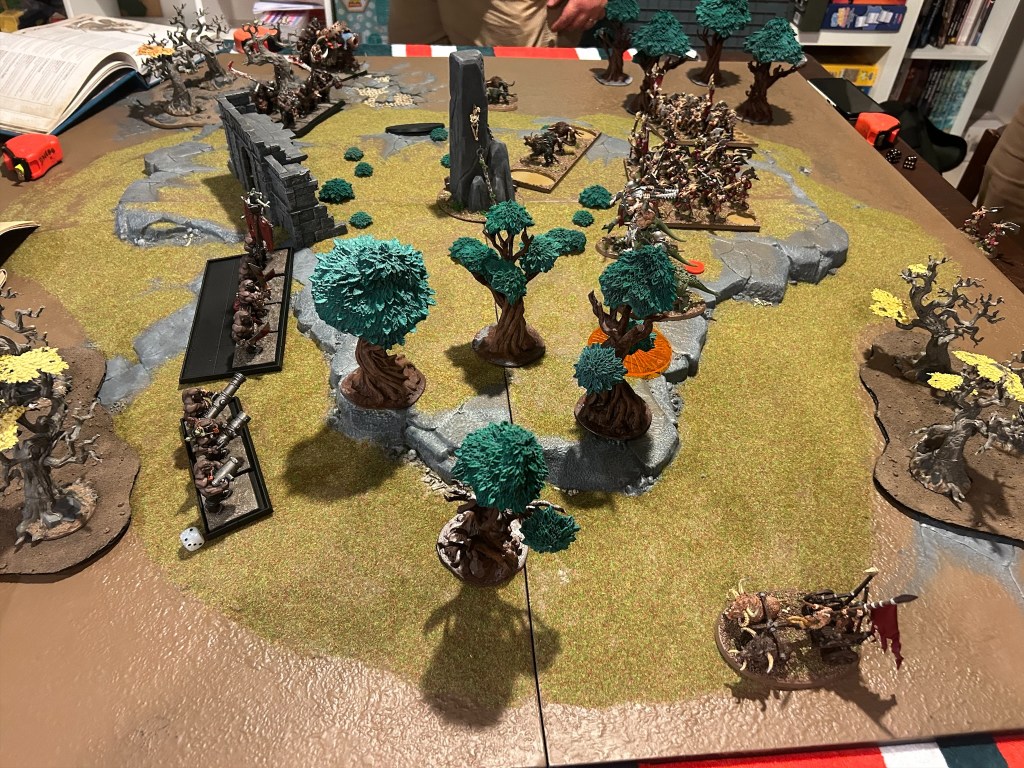
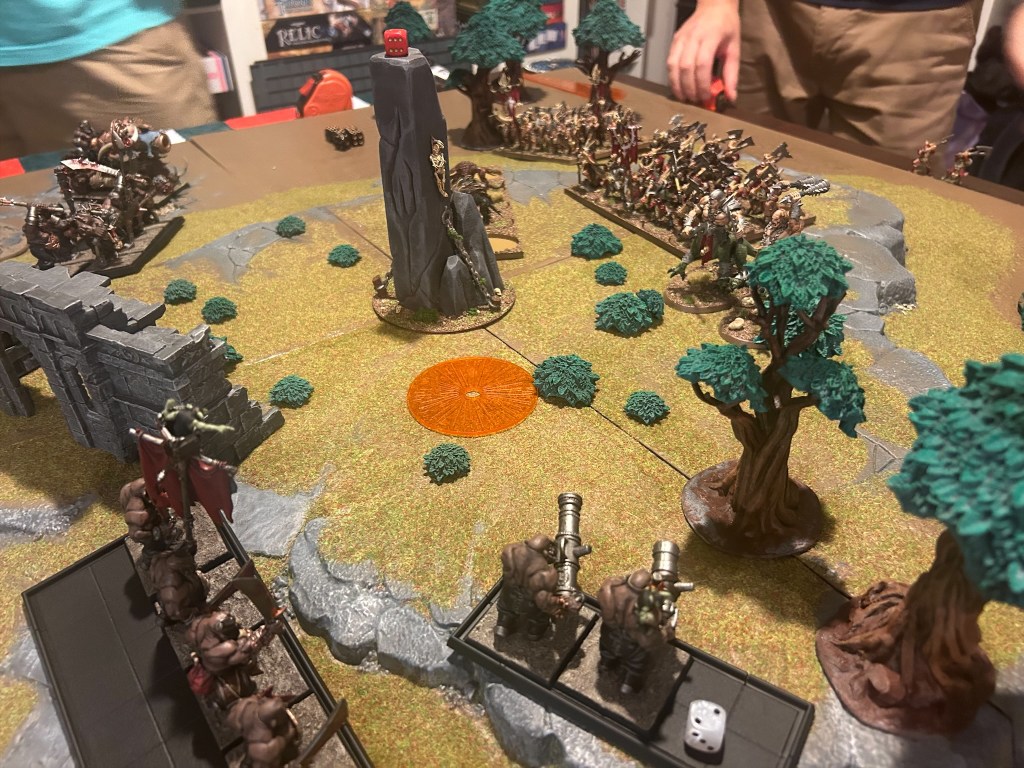
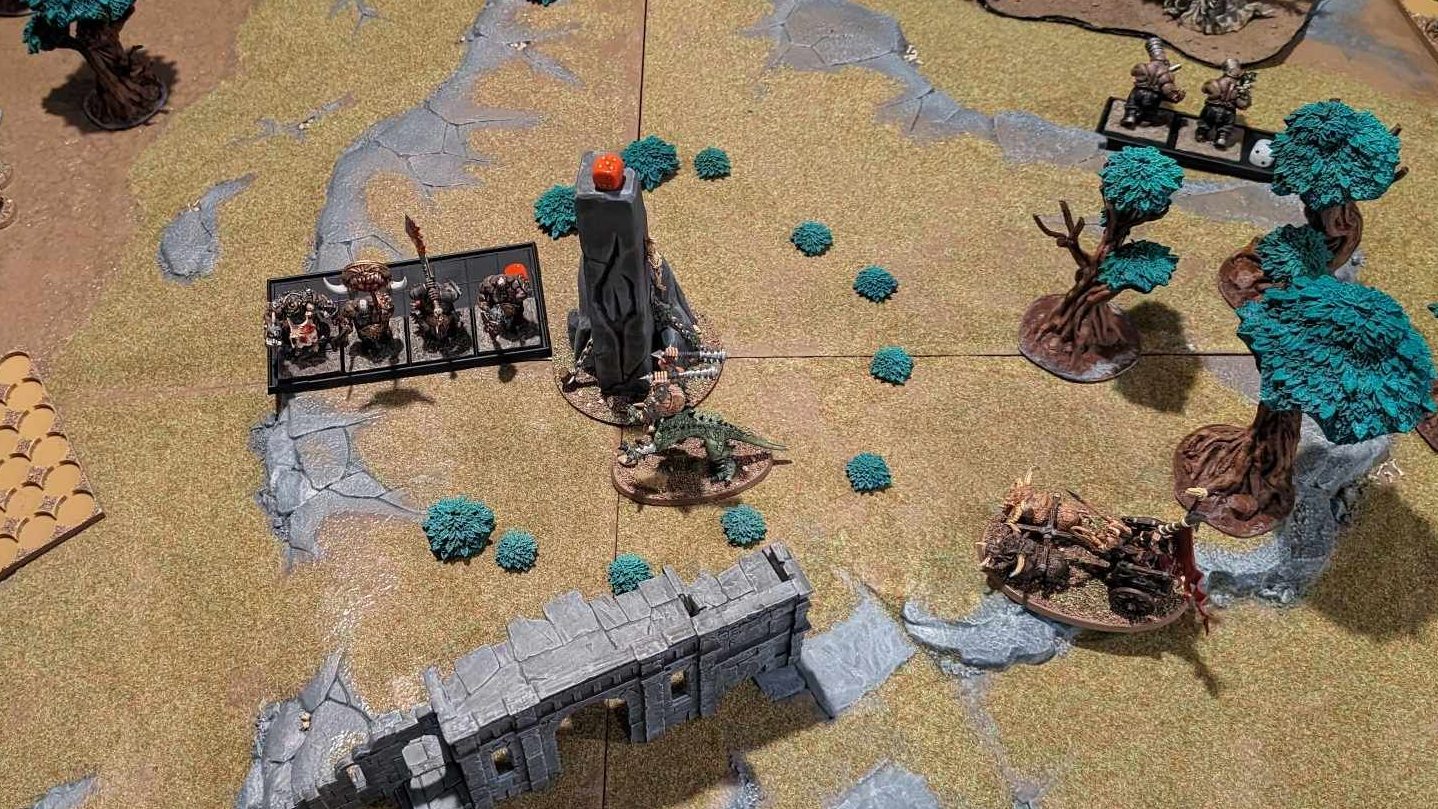
The battle was fought in a heavily wooded board, with the beast’s herdstone as the primary objective.
Things got very heated up in the area surrounding the herdstorne as both armies maneuvered to capture it.
Despite a desperate attempt by the beasts to reclaim their herdstone the Ogres won the day.
Hopefully you’ve enjoyed this longer than usual post! Plenty of gaming action in the coming months as this campaign gets played out, and I hope to be able to photograph most of it!
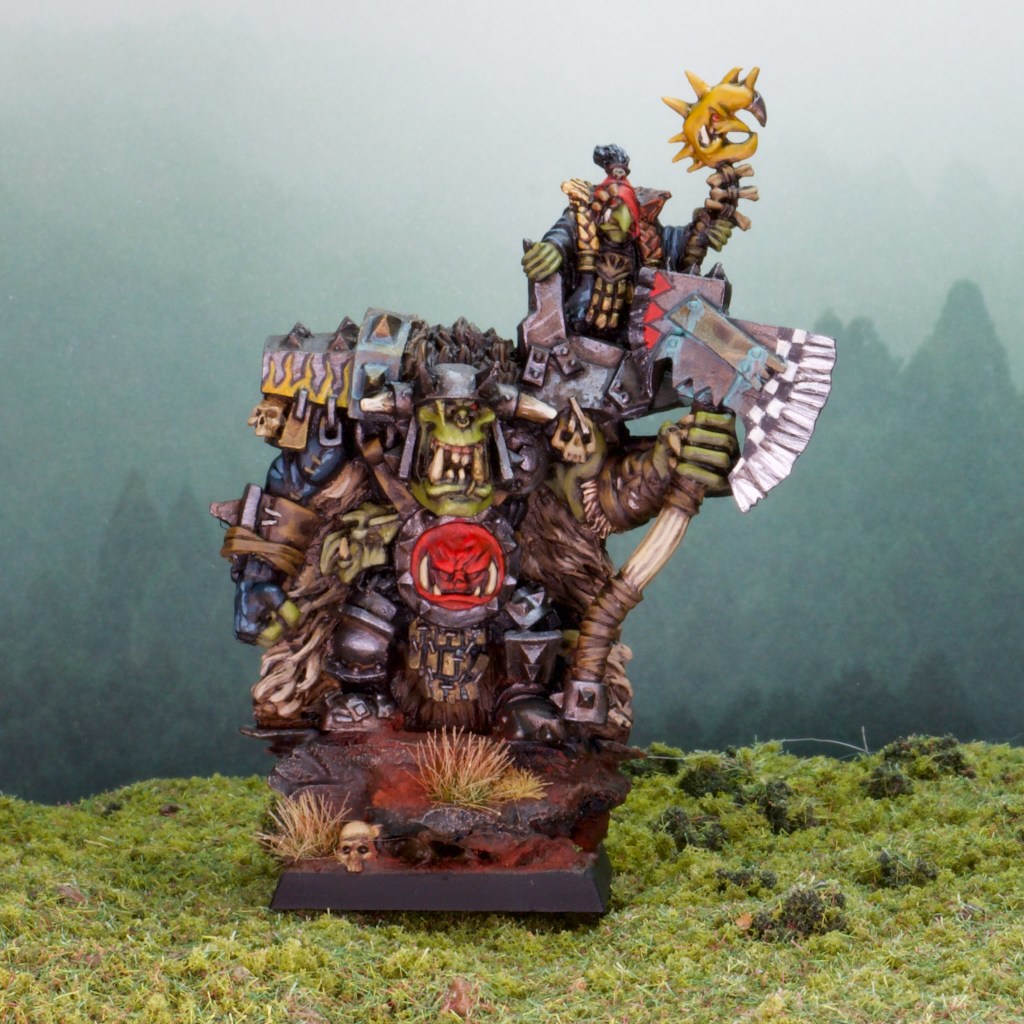
This week I have something else than Dwarfs for you, in fact something that Dwarfs really don’t like: a big green orc!
This model originally came with the limited edition version of the Warhammer Online video game. I never got the game but I did pick up this model at the time (can’t remember where from!). This orc is massive, much bigger than the average character model of orcs for the Warhammer fantasy universe, although probably in line with the Ork bosses in Warhammer 40,000 which are much bigger for some reason.
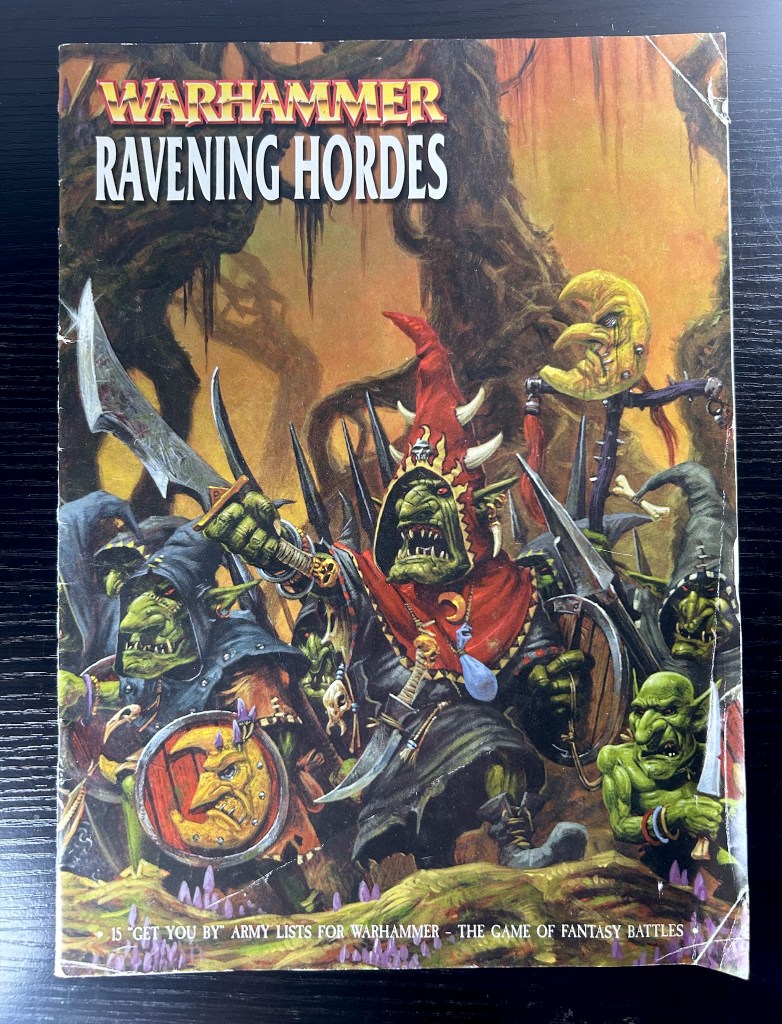
Regardless of the size, the model is packed with details and was really fun to paint. As this model will be leading my Orcs and Goblins army (another army!!?), I wanted to make sure he showed off the colours of the army: black, red, and yellow. These colours were not chosen at random, but rather they feature heavily in one of my favourite Warhammer arts of all time: the night goblin painting that graced the Night Goblin box for a while as well as the Ravening Hordes supplement for 6th edition. I’ve taken a photo of my copy you can see below for reference. I believe this is by Adrian Smith, who has done some of my favourite art for the setting.
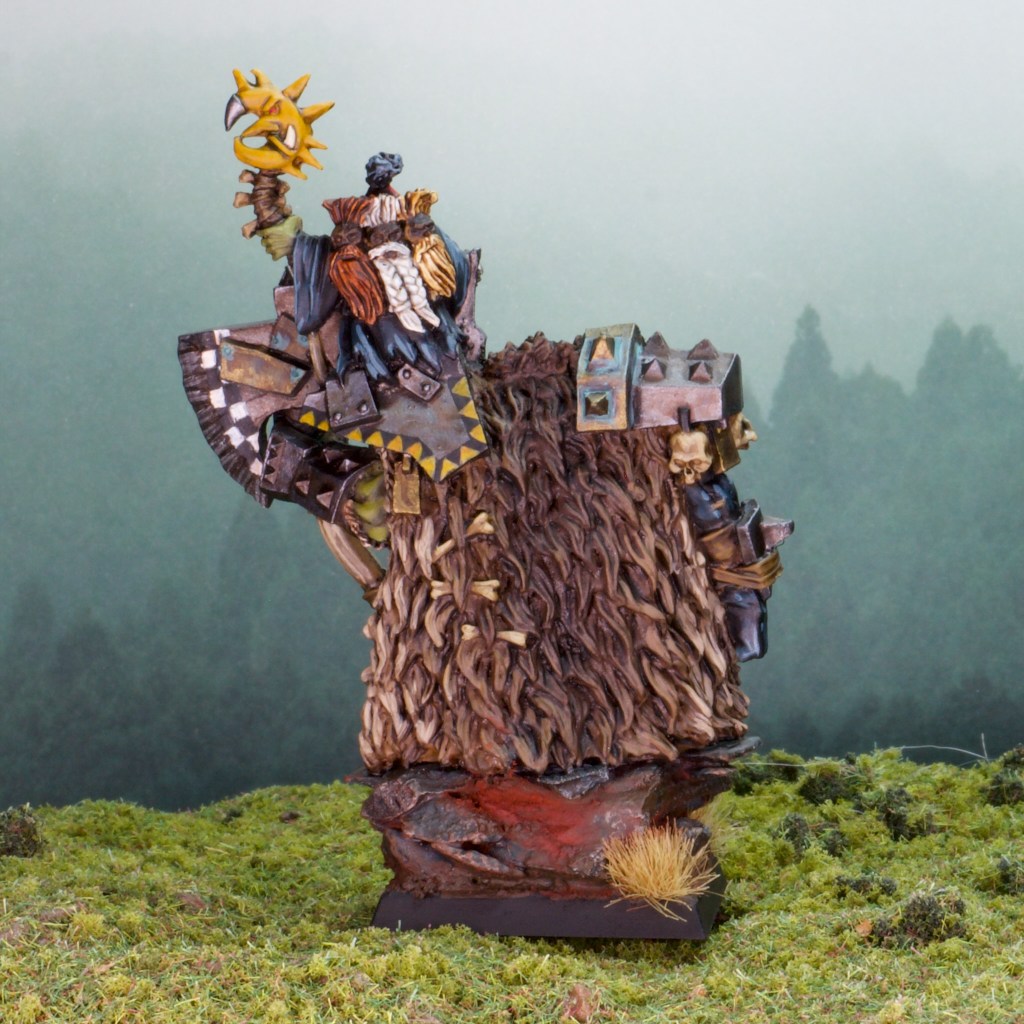
As well as the main colours, I decided to match the skin tone from the painting, which is a yellower green than I’ve used on orcs in the past (see my Orks for reference). This model of course is mostly covered in armour so I used the freehand on the armour to make use of those colours, with the goblin on his shoulder directly matching the colours of the Night Goblin champion in the painting.
As is usual now for the first model(s) of a new army, I write down my recipes so I don’t forget them. Hopefully they can be of use to you too.
Skin: Vallejo Game Color Cayman Green, GW Agrax Earthshade, Vallejo Game Color Cayman Green, Vallejo Model Color Green Yellow, Scale75 Sherwood Green
Leather: Vallejo Model Color Chocolate Brown, GW Agrax Eathshade, 50/50 Vallejo Model Color Chocolate Brown/Vallejo Model Color English Uniform, Vallejo Model Color English Uniform
Bone/Wood: Vallejo Model Color English Uniform, GW Agrax Eathshade, Vallejo Model Color English Uniform, 50/50 Vallejo Model Color English Uniform/AK Ivory, 25/75 Vallejo Model Color English Uniform/AK Ivory
Silver: Scale75 Black Metal, GW Agrax Eathshade, Scale75 Black Metal, Vallejo Game Air Silver (This last one just on blade edges)
Dark Bronze: Scale75 Decayed Metal, GW Agrax Earthshade, Scale75 Decayed Metal
Red: Vallejo Game Color Heavy Red, GW Agrax Earthshade, 50/50 Vallejo Game Color Heavy Red/Kimera “The Red”, Kimera “The Red”
Yellow: Vallejo Game Color Heavy Goldbrown, GW Agrax Earthshade, Vallejo Game Color Heavy Goldbrown, GW Contrast Imperial Fist
Black: Vallejo Model Colour Black, Vallejo Model Color Dark Sea Blue, 50/50 Vallejo Model Color Dark Sea Blue/AK Ivory
White: AK Ivory
Basing – Rocks: Vallejo Model Color Dark Sea Blue, Vallejo Model Color Light Sea Grey (Drybrush), GW Agrax Earthshade, Ammo Mig Medium Rust Pigment
Basing – Dirt: AK Muddy Ground Diorama Texture, Ammo Mig Medium Rust Pigment
I’m quite excited to paint Orcs/Orks again, the new release has made a lot of the older models for the range accessible again which is great news for someone nostalgic for the era of Warhammer in which they started, i.e. me!
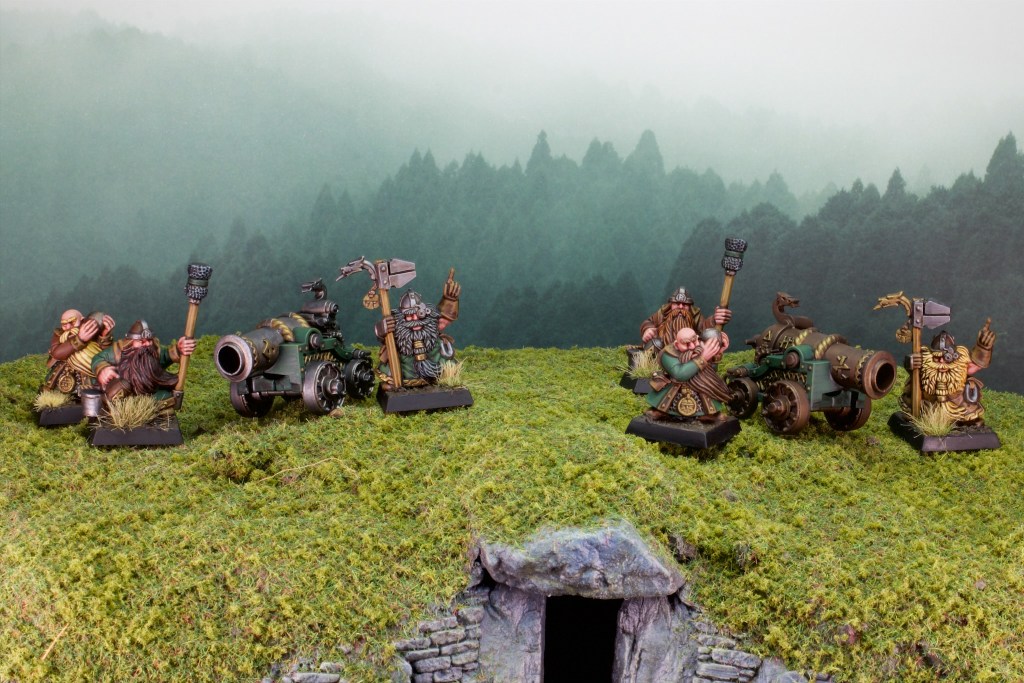
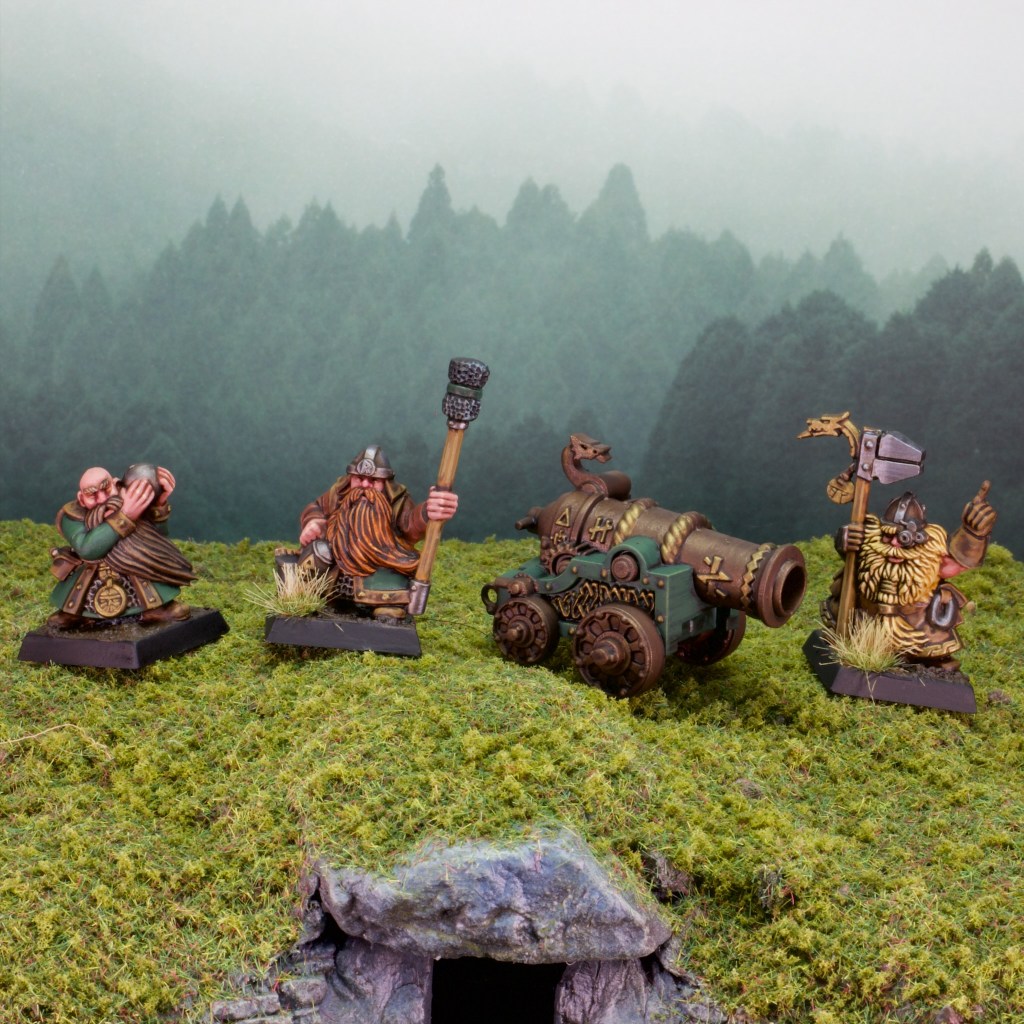
As I mentioned last week, we’re preparing for a siege game as the opening battle in our Border Princes campaign. Last week’s post covered the last of the defenders, and this week’s will cover the preparations I made to the attacking force: my Dwarfs!
As you can see in the photo above I decided that I needed more firepower! I painted two extra cannons this week to breach the gates of the fortifications, which is one of the main objectives of the scenario.
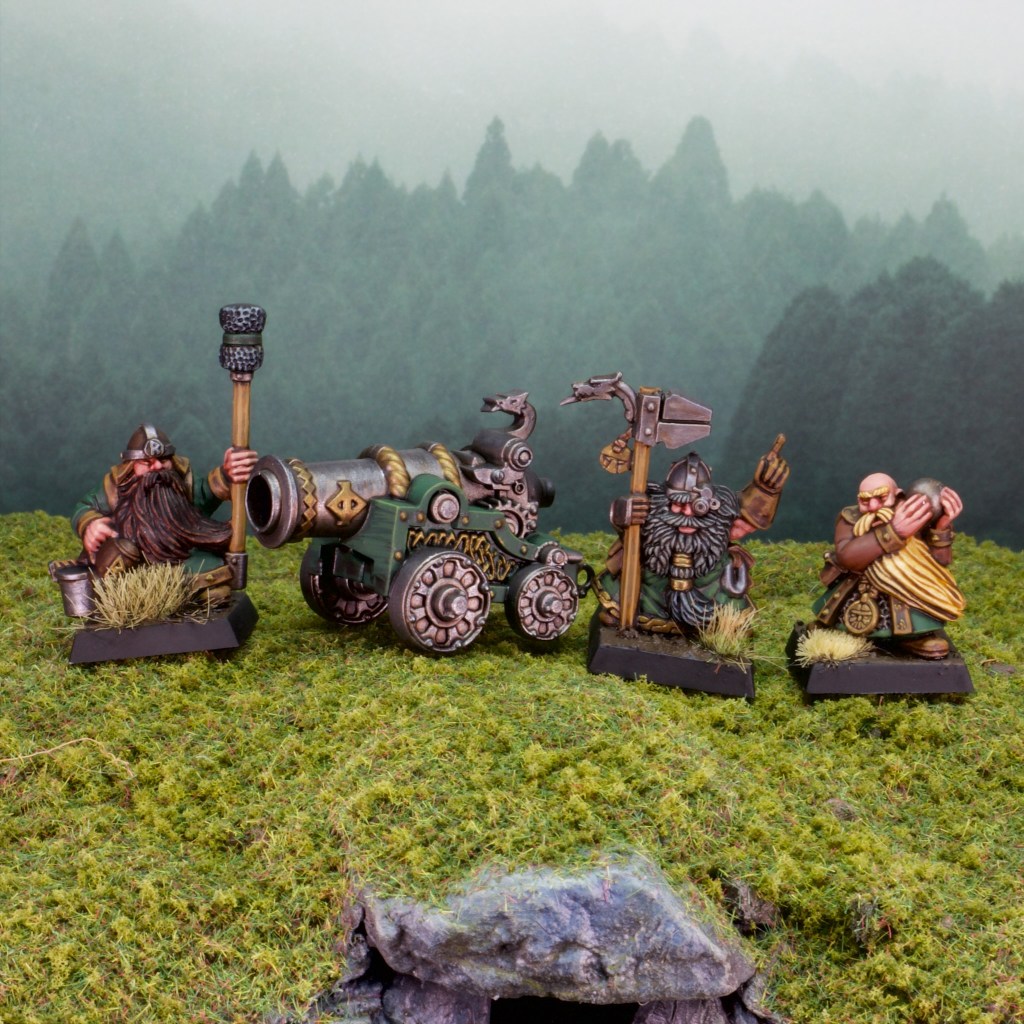
I painted the two cannons different colours to add a bit of variation to the models, considering this is the third of this cannon model I have in the army now. I picture dwarfs as being more artisanal craftspeople and therefore making the cannons as they see fit rather than follow a set pattern.
Of course the crews also being one piece models there is no variation in them, so once again I used colour to differentiate them, mostly through the beards but also by changing the colour of some of the clothes.
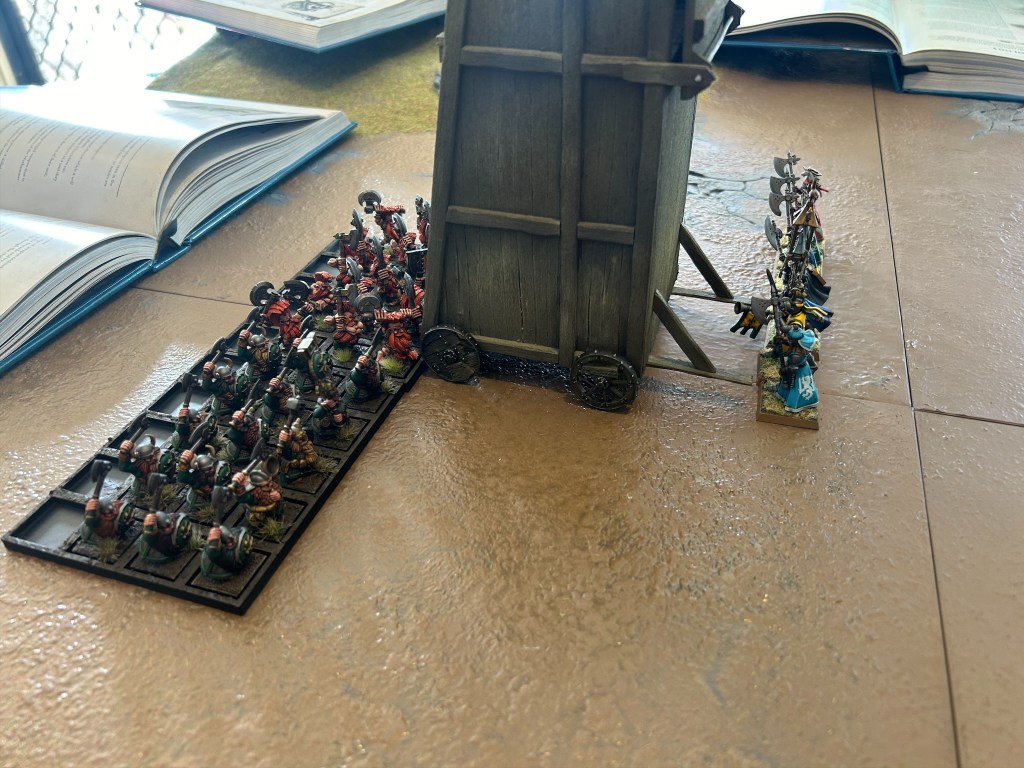
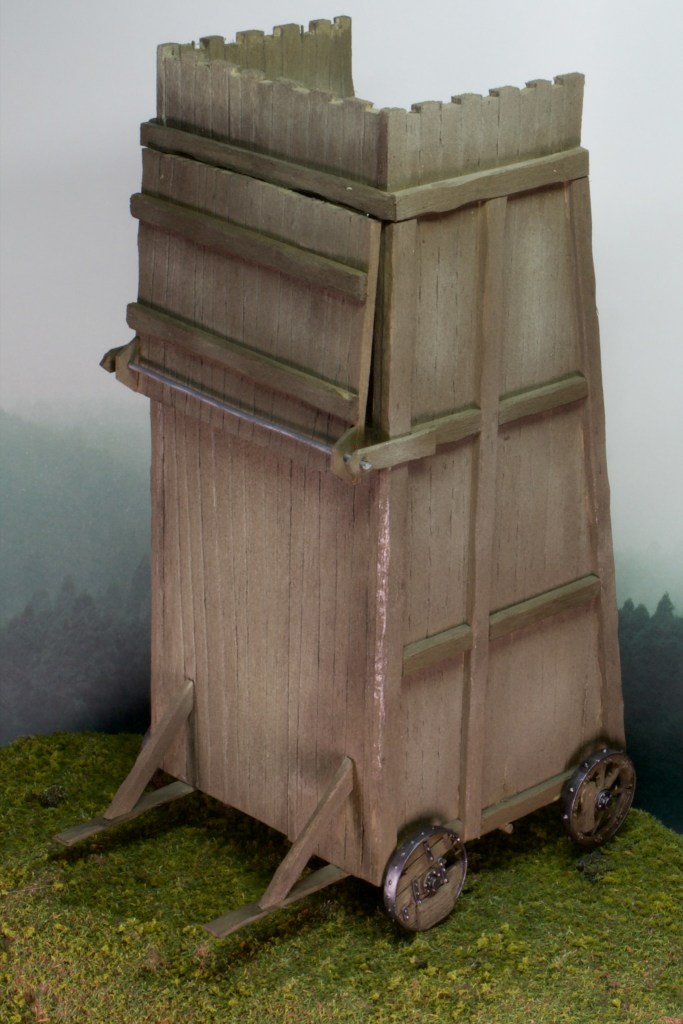
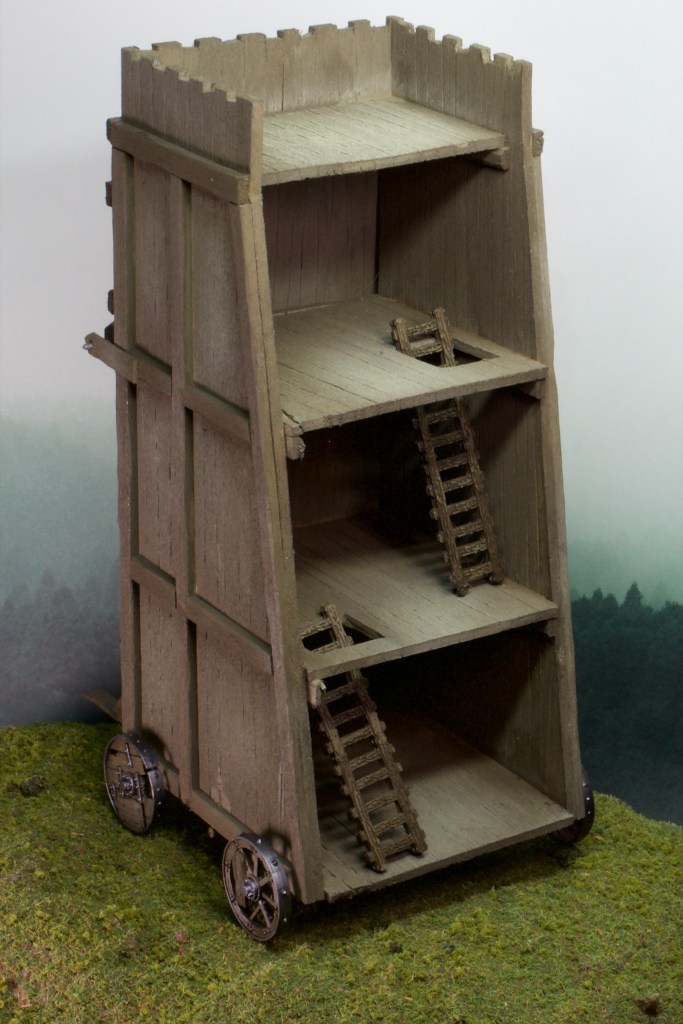
While the cannons attempt to breach the walls, I have another way to cross the walls: a siege tower!
I built this a while back and haven’t had the need until now to paint it. This siege game is the perfect excuse to get it finished and on the table!
The tower itself is built out of balsa wood, with the wheels from the Skaven warp lightning cannon kit. The ladders are 3D prints I did a long time ago for the This Is Not A Test games we were playing back in 2021. They ended up fitting rather nicely here!
I kept the tower rather faction agnostic so that it can be used for any siege game, it is probably less well constructed than Dwarfs would like, but much better constructed than Orcs could manage!
The platform at the front of course pivots, ready to come crashing down on some battlements and disgorge its occupants! I’m planning on filling it with dwarf Troll Slayers, so the above shot is probably a preview of the game to come!
The game is tomorrow and I’ll endeavour to take some photos that I’ll post here.
The walls of Malko need manning, for vengeful dwarfs are about! If you’ve been following the last year or so of posts on the blog you’ll know that I’ve been painting models and terrain for a Warhammer campaign set in the Border Princes region of the Old World. One of the armies I painted for this campaign is a small force of Bretonnians, not as a player controlled faction, but rather to act as a roadblock to players attempting to take the central map section: the town of Malko.
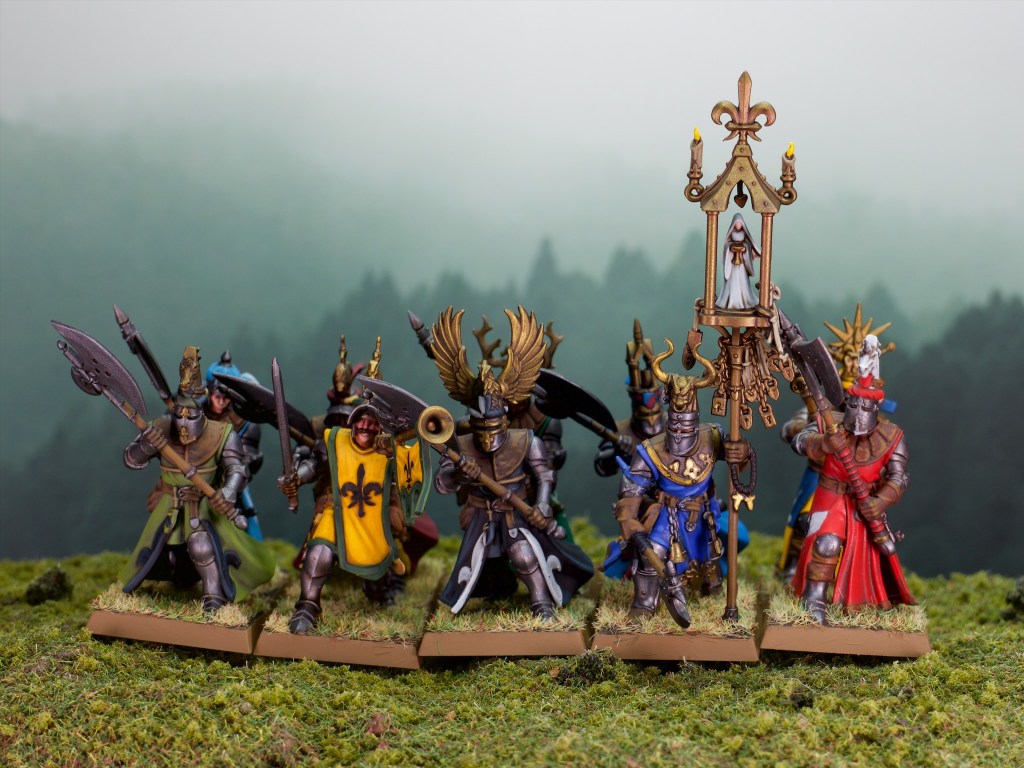
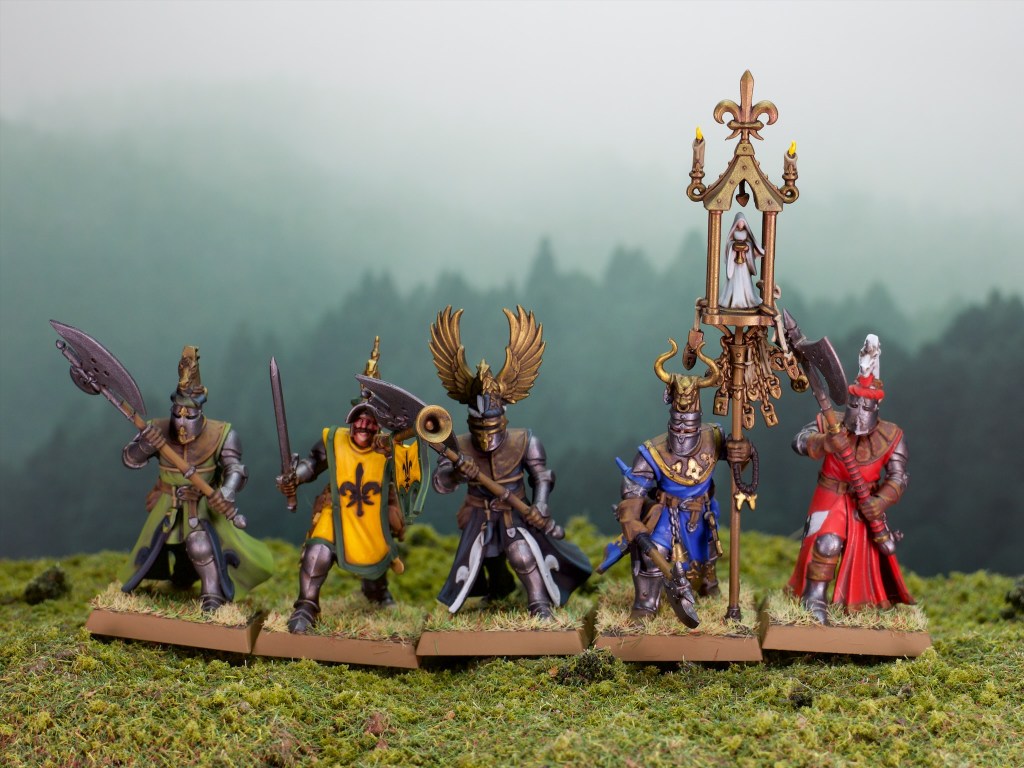
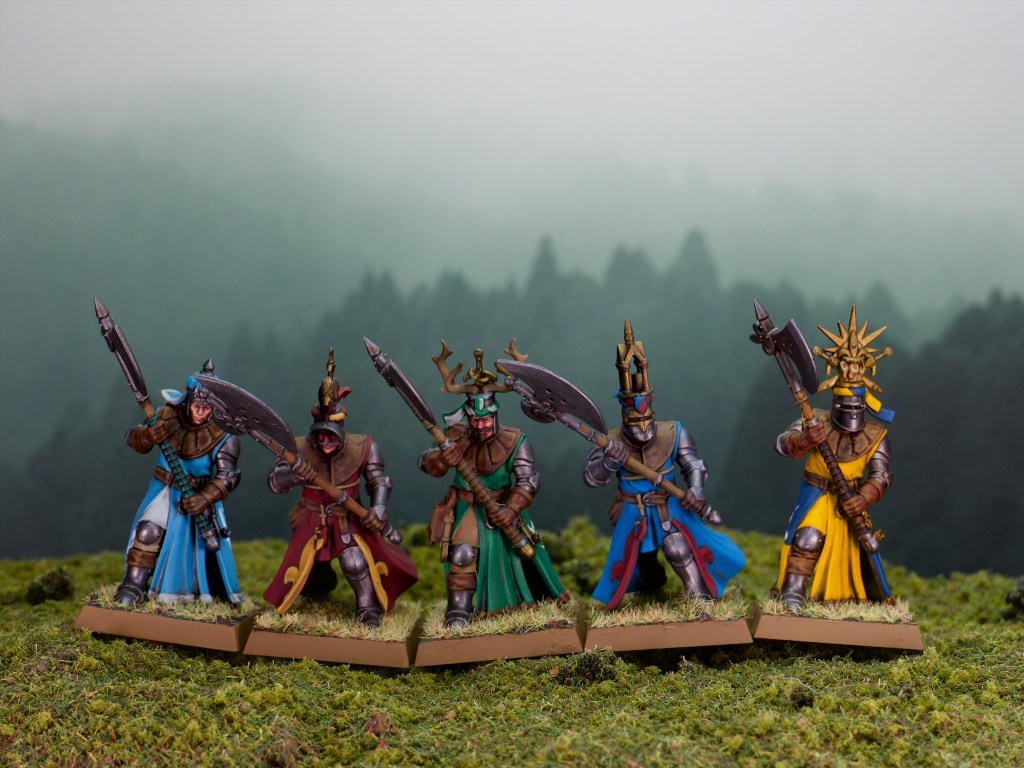
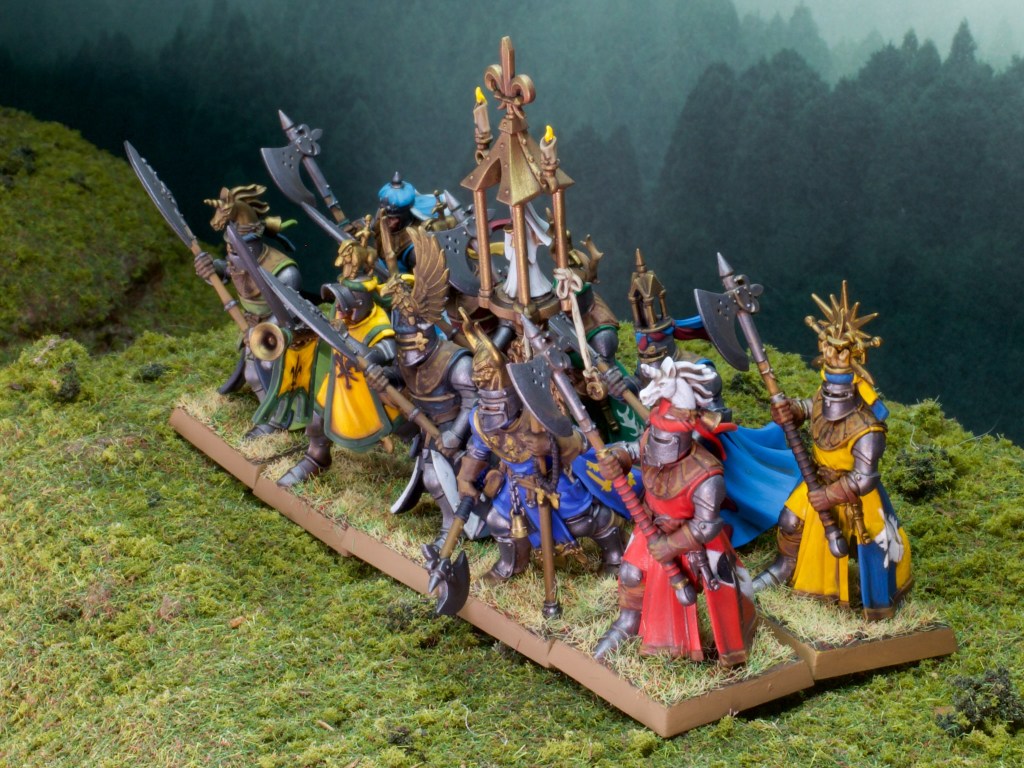
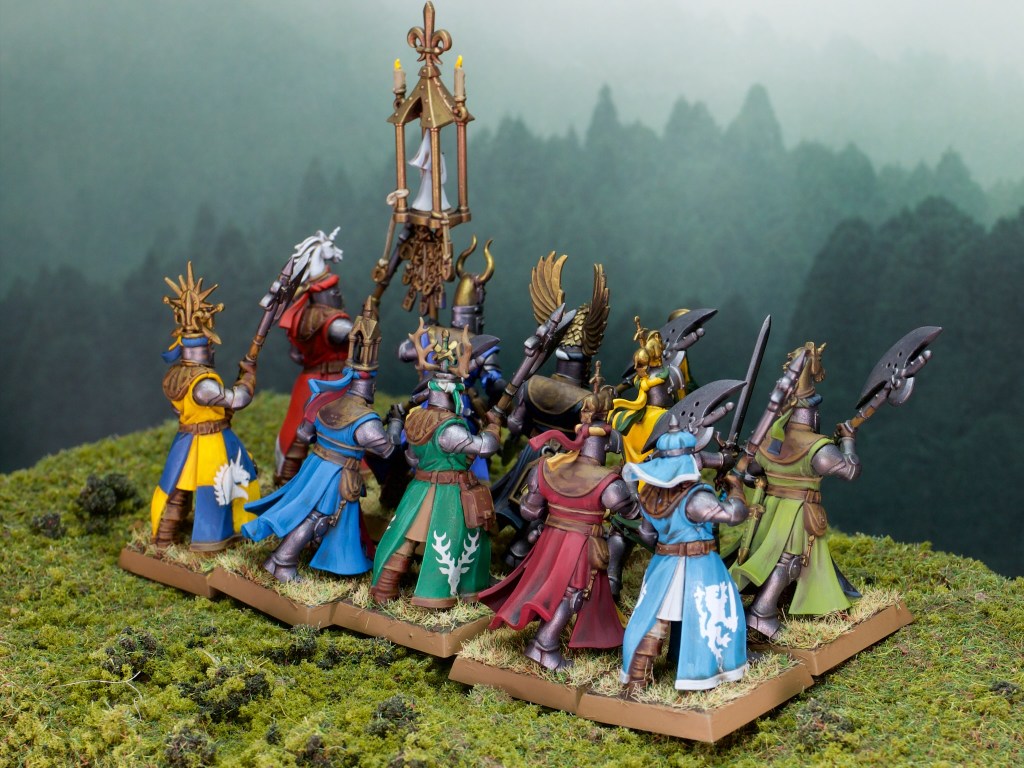
Alongside the new set of rules for Warhammer Old World an army list covering Bretonnian Exiles was released, which was both timely and very useful for adding flavour to this small army. The army list however requires the inclusion of a regiment of Knights of the Realm, either mounted or on foot. Horses not being particularly useful atop castle walls, I decided to opt for the foot version. With the new plastic foot knights kit being released a few weeks back (Australia has been getting delayed releases for all Old World stock unfortunately), I set about remedying my lack of knights.
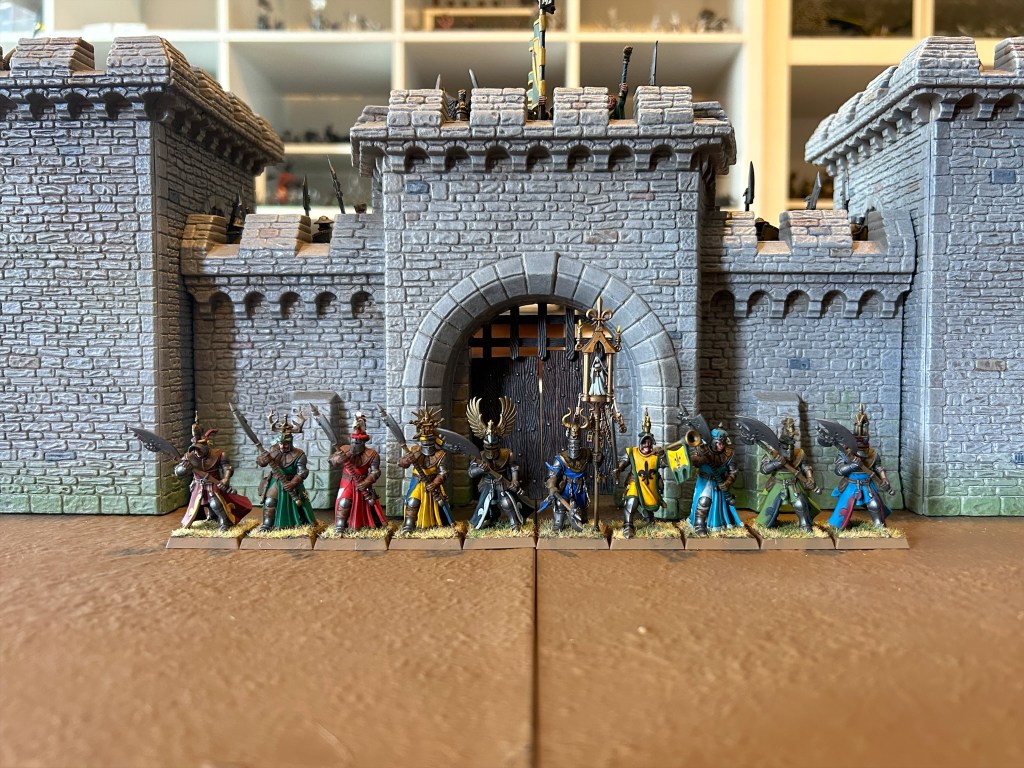
These new knights are very cool models (Those axes are monstrous though! Talk about heroic scale!), and were a) fun to put together, and b) fun to paint! They are quite tall compared to older models, and my poor general is definitely “petit” next to them.
The box art for these and the transfer sheet that came with the box are geared towards the uniform look that Games Workshop have been proposing for Bretonnians in this era of the Old World, where the knights wear the livery of their lord. I opted for the old style rainbow knights where the knights wear their own colours, and regiments look like bowls of skittles. I was helped along there by having an old Bretonnian transfer sheet which had a lot of different heraldry.
Needless to say there was no batch painting these, I painted them one by one which was rather fun and a lot less monotonous than usual unit paint although it was a lot slower. You might notice that there are two main bodies in the photos above (barring the command models that is). There are five distinct bodies in the kit, which are repeated four times for a total twenty knights. I’ve only painted half the box so far (enough for the campaign army, the other half will come when I take the army to 1000pts), and to avoid repeating colours on the same bodies I made sure I painted the knights with the same bodies next to each other. This makes these first ten a bit samey, but hopefully as a unit it’s not too noticeable.
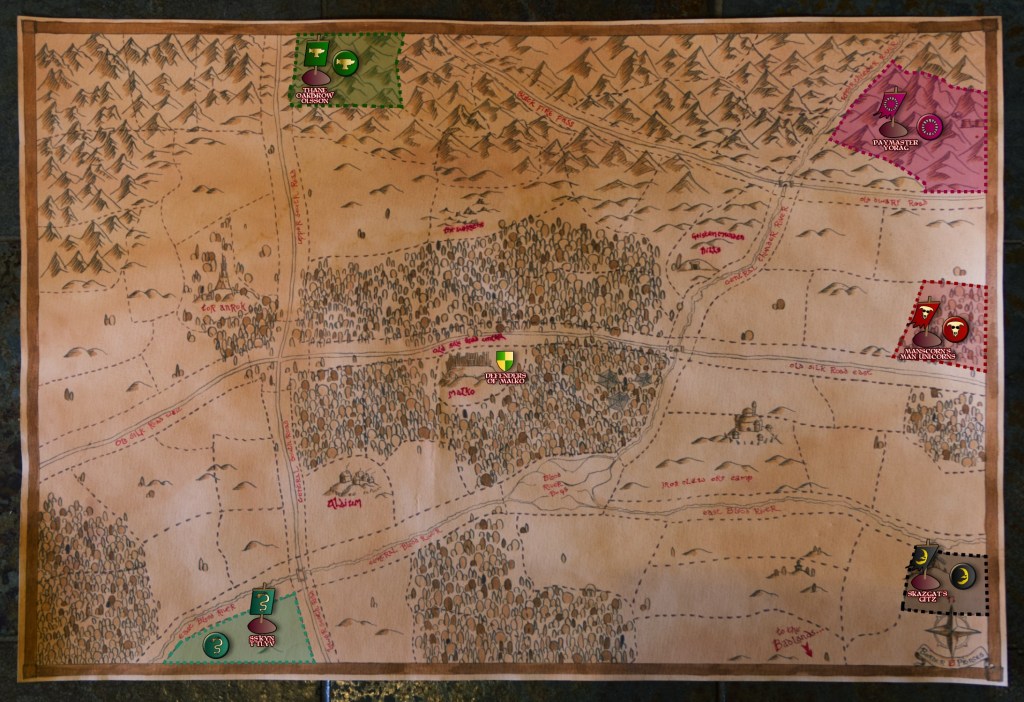
If you remember I opened this post with a mention of Dwarfs being about? This was not merely flavour, but a true representation of what is happening in the campaign. That’s right the campaign has finally started after all this preparation (just about a year’s worth!).
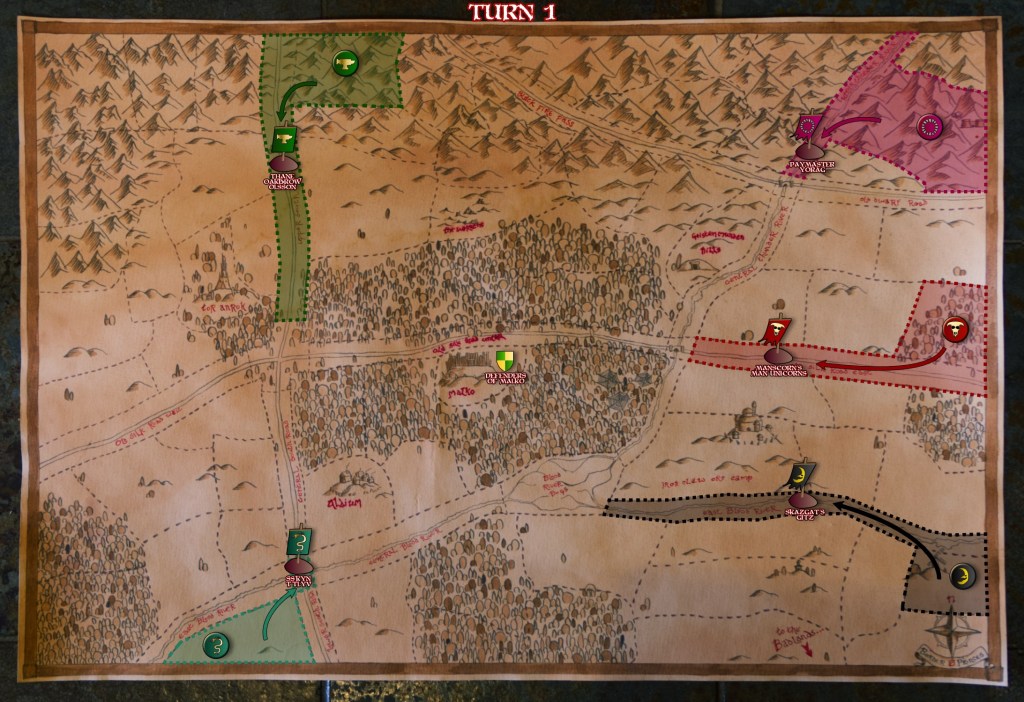
I’ve been recording the player’s moves on a digital version of the map that I drew way back in April 2023.
Starting Positions
There are five of us, using the following factions (clockwise from top left): Dwarfs (green), Ogres (magenta), Beastmen (red), Orcs and Goblins (black), and Lizardmen (teal).
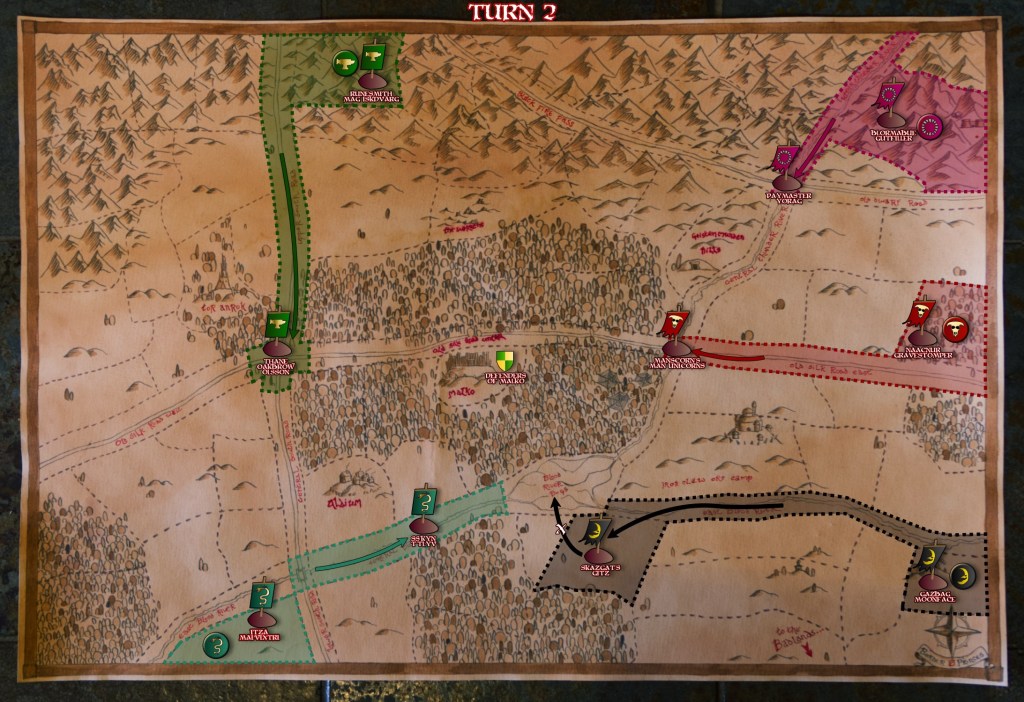
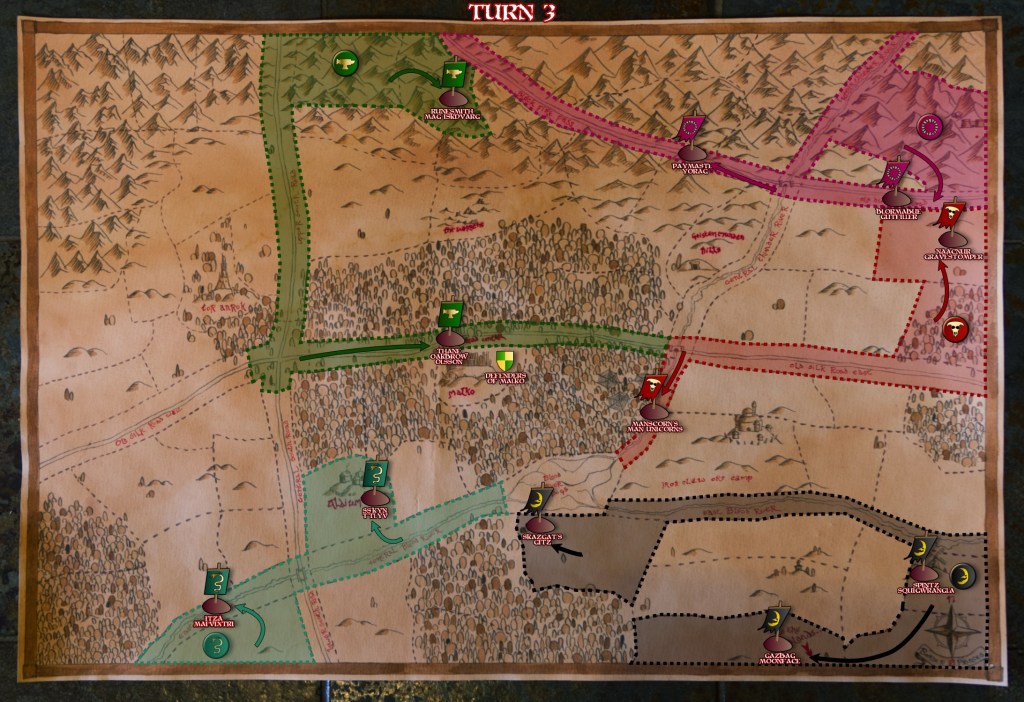
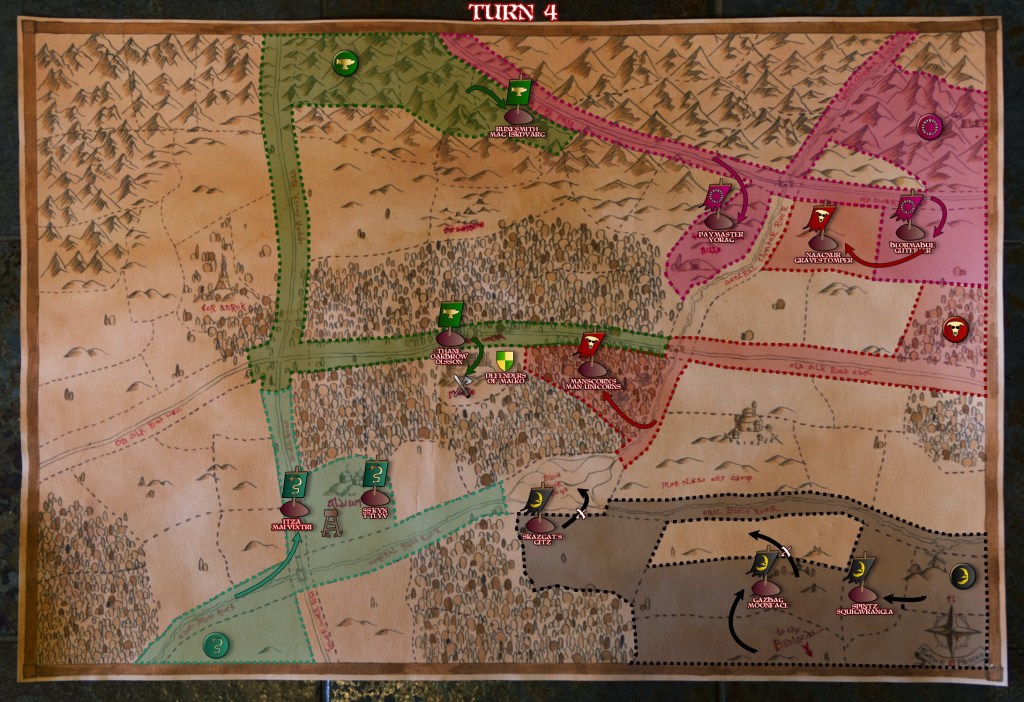
We’re up to turn four now, I’ve included the moves for turns one though four below.
Turn four is still in progress, because as you can see my Dwarfs have attacked Malko, and we need to play out that game, which was dependent on me getting these very knights painted. The campaign has been on hold since that happened, but now the knights are done we can resume!
I’m looking forwards to seeing these knights on the table, although I won’t be controilling them as one of the other campaign players will be playing them as my Dwarfs try to get into the city! Should be fun, and I’ll try to remember to take some photos of the game for the next post!
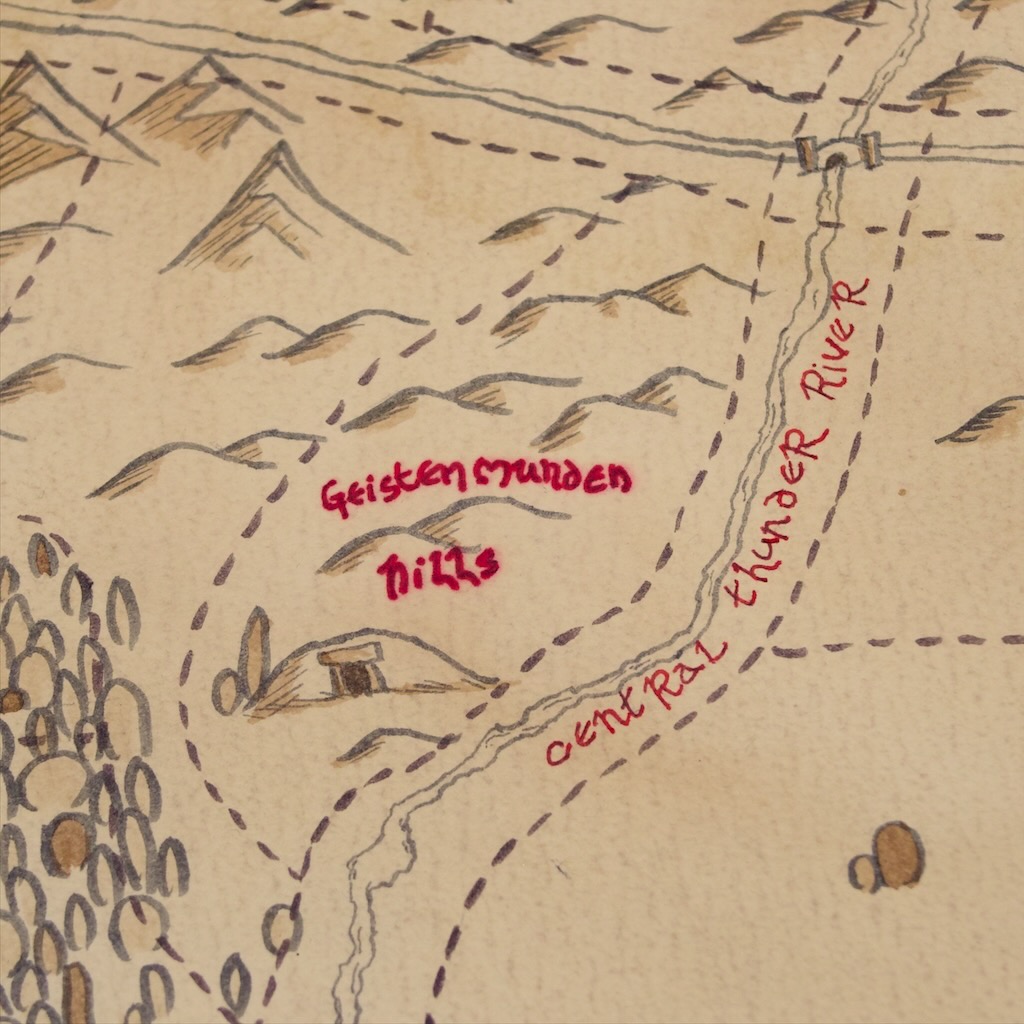
It’s been a fair while between posts, over a month in fact! Over this period I’ve been on holidays and busy with work so haven’t had much time to get things painted, but I’ve still been chipping away in the background. Here’s something I’ve been working on for a little while: a set of terrain for the Geistenmunden Hills area of the Border Princes campaign map.
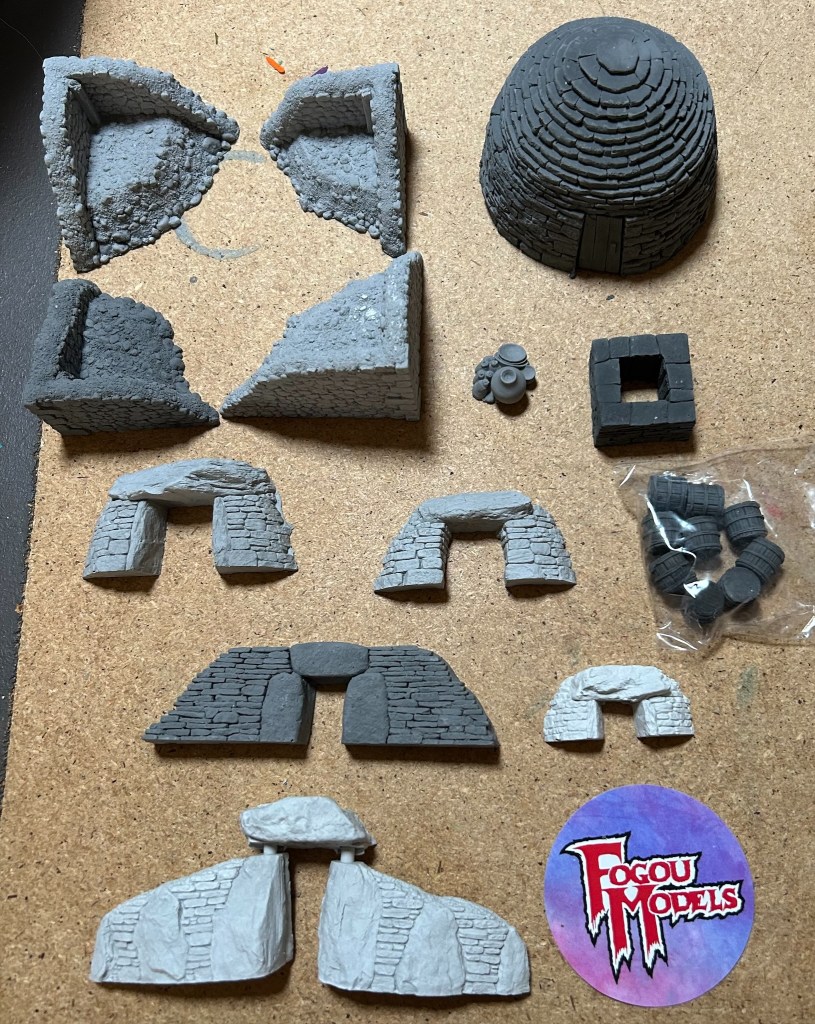
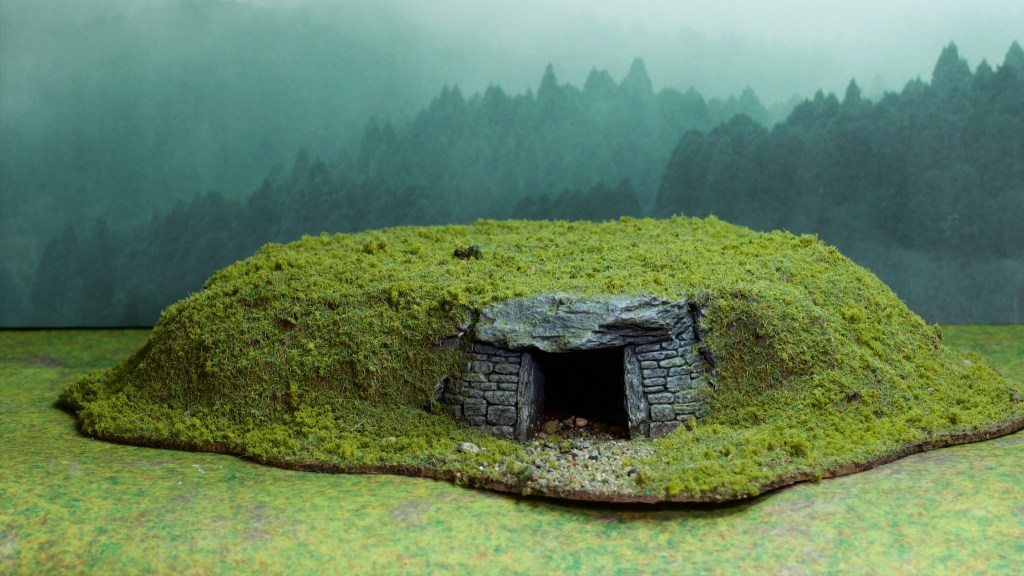
As you can see from the illustration, this is going to require some barrows! Luckily for me back over the Christmas break I’d ordered some terrain from https://www.fogoumodels.co.uk/ including a set of resin barrow entrances (well not so lucky, I ordered these for this very purpose!).
There are some other bits and bobs there that I’ll get to painting at some stage. Overall the quality of these models is excellent, the stone textures are really nice. I’d been waiting for an excuse to order from them for a while, and this was it!
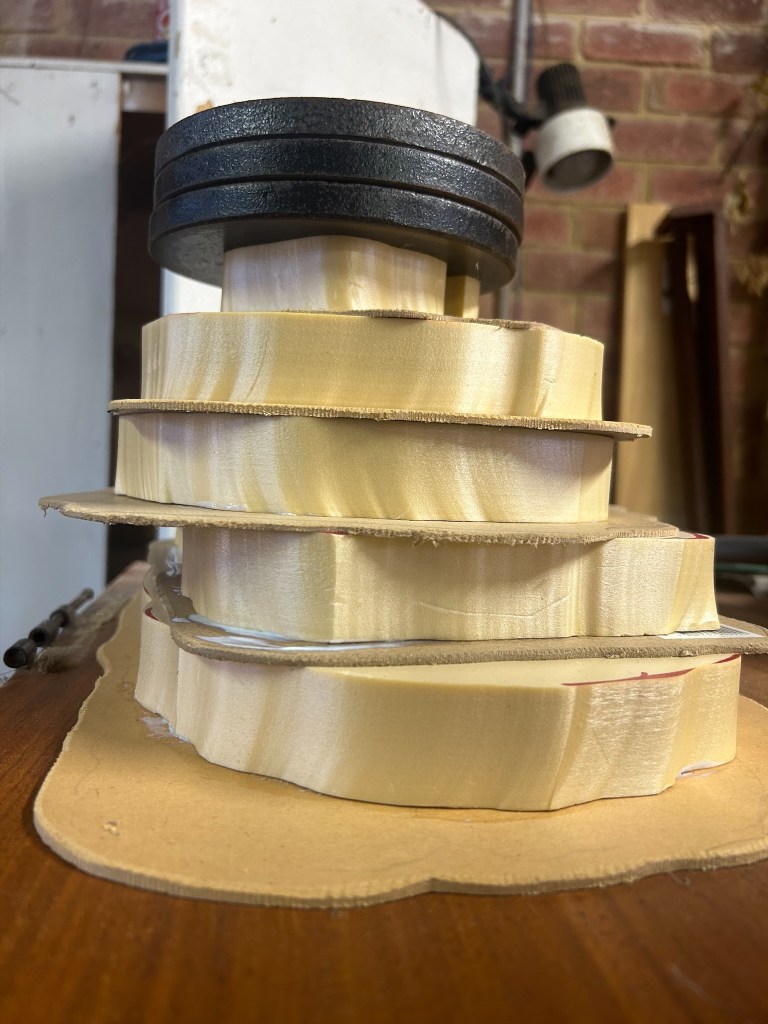
Entrances are all well and good, but they need some burial mounds attached to them, and that’s what I busied myself at next. I took some photos of the process so I thought I’d make this post a bit of a tutorial.
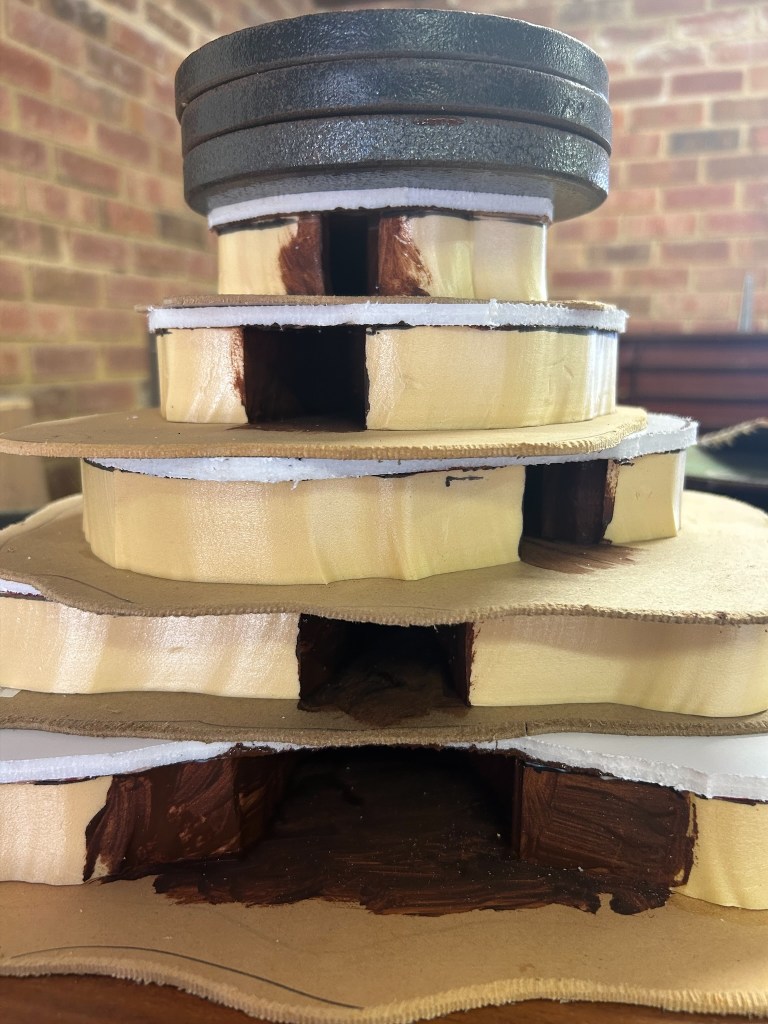
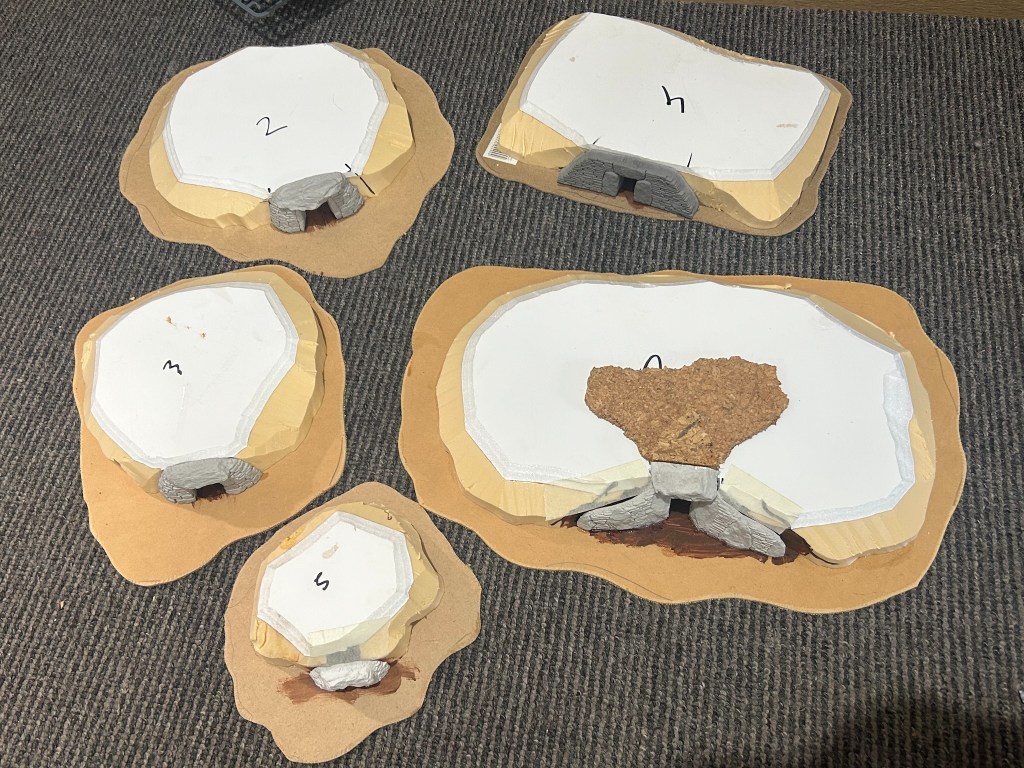
I started by cutting some rough shapes out of MDF for the bases and matching smaller shapes out of insulation foam to make the main shape of the hills. I also cut a notch out of each of the hills to make the tunnels behind the entrances. You can see said notch in the smallest hill at the top of the pile. I then covered the undersides of my foam shapes with PVA glue and glued them down, and weighed them down with some small weights.
Next step was to put a roof on my hills. For this I used foamcore cut to match the hills. I also glued this down with PVA glue, but before I did this I painted my “tunnels” with some dark brown paint as I wasn’t going to be able to get to these once the entrances were glued on.
Once the glue was dry (read a few months later!) I carved my hills using a snap blade/retractable blade knife, with a special focus on making sure the entrances lined up neatly with my hills. For the big hill the entrance was taller than my foam assembly so I added some cork pieces to create a gradient to match the entrance. I used masking tape to patch any gaps, and glued the entrances down to the MDF using super glue (watch the foam doing this, super glue melts it!).
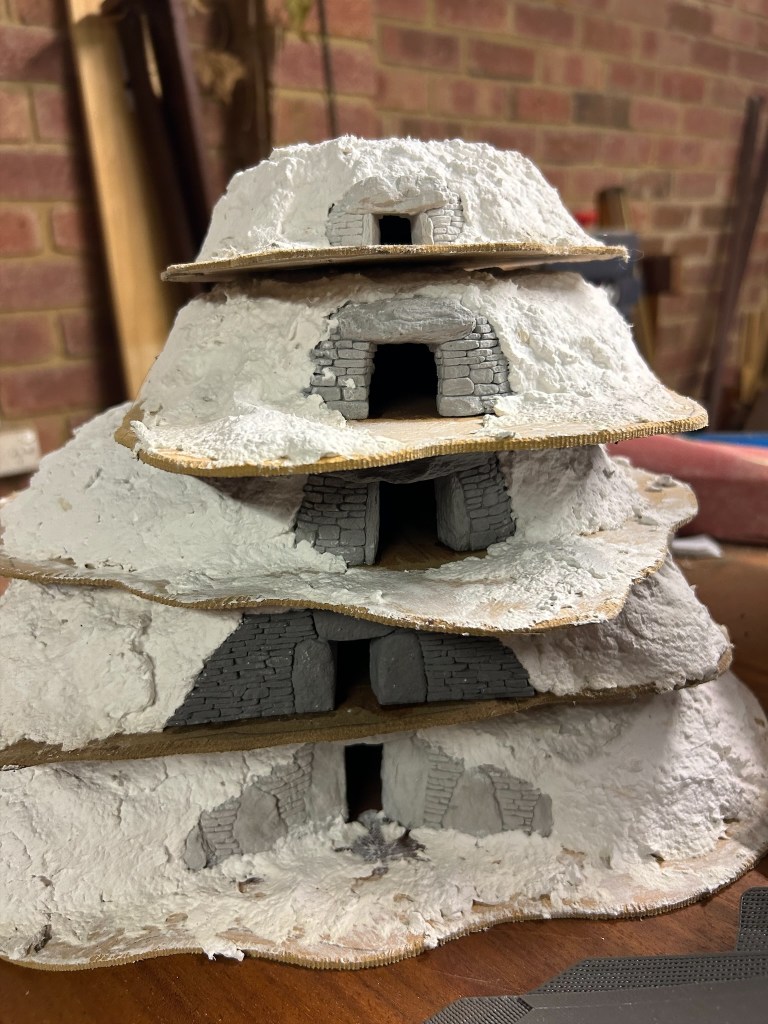
Following on from this I used Sculptamold (plaster with paper fiber mixed in) to cover the foam forms and blending in the entrances, taking care not to cover them up. This added some variation to the shapes and smoothed everything down, making them look much more like hills.
That’s it for the build side of things, now onto painting!
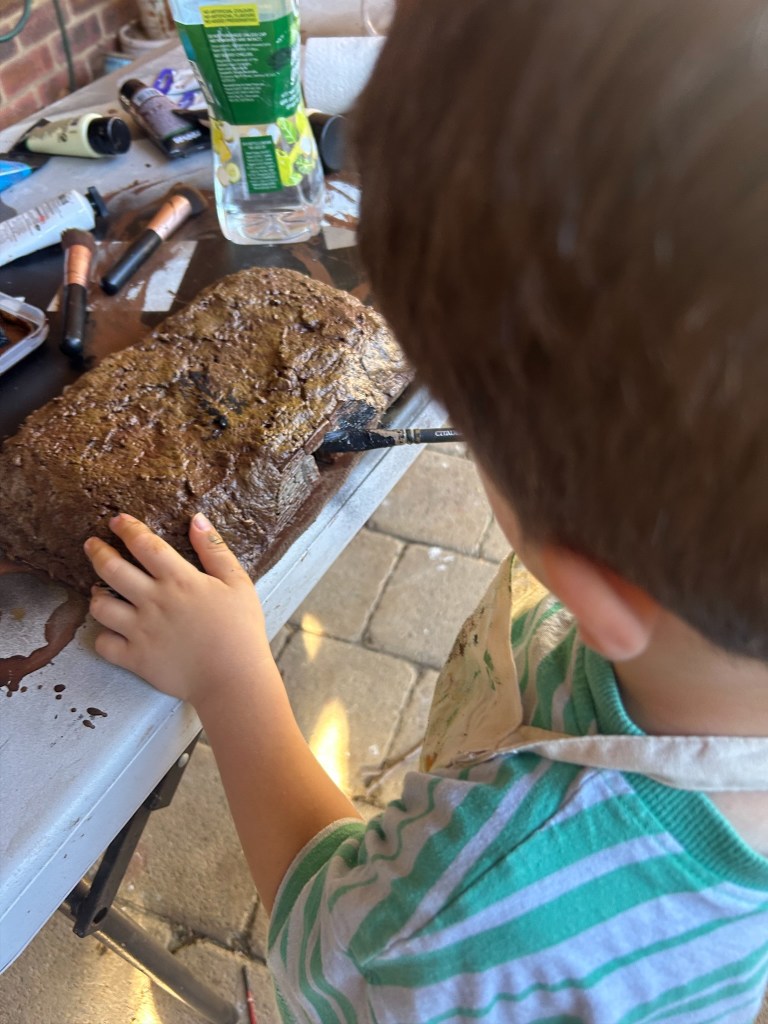
I don’t really have photos of the painting process apart from this one. I’m finding terrain has been a good fun way to get my son to join into the hobby side of things. He’s 3 and miniatures are a bit too small, but he’s fine getting some paint down on larger objects (including himself)!
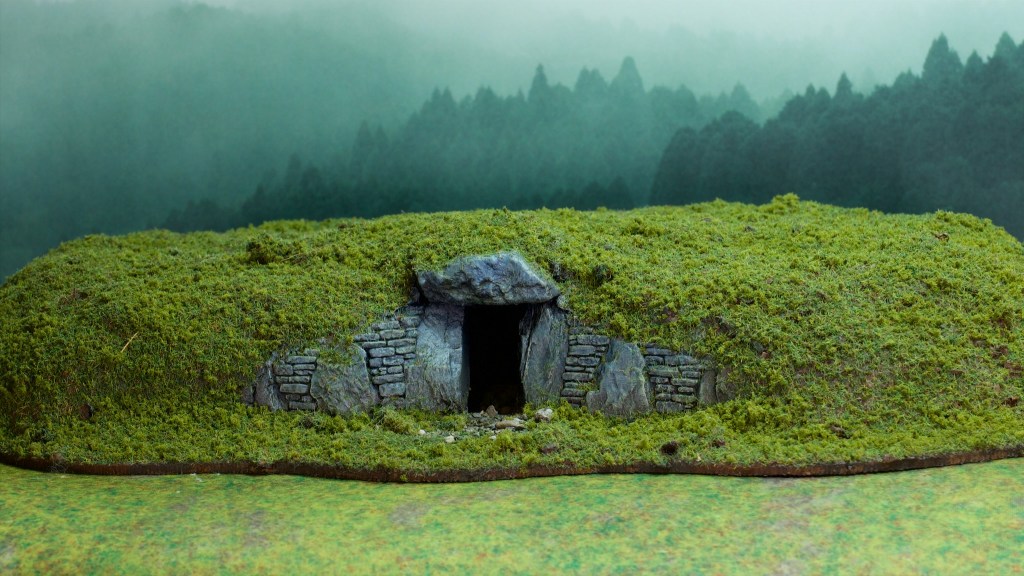
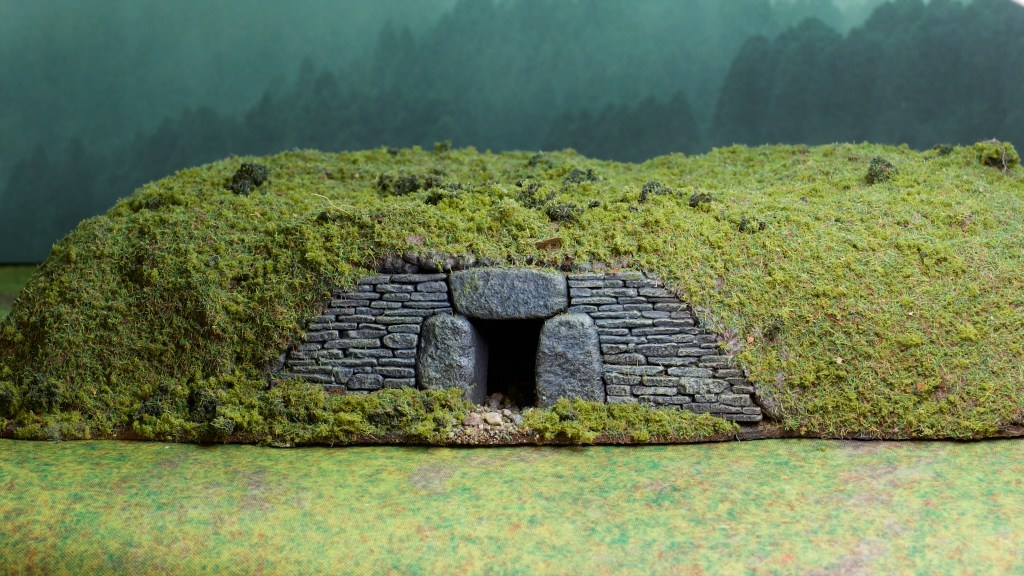
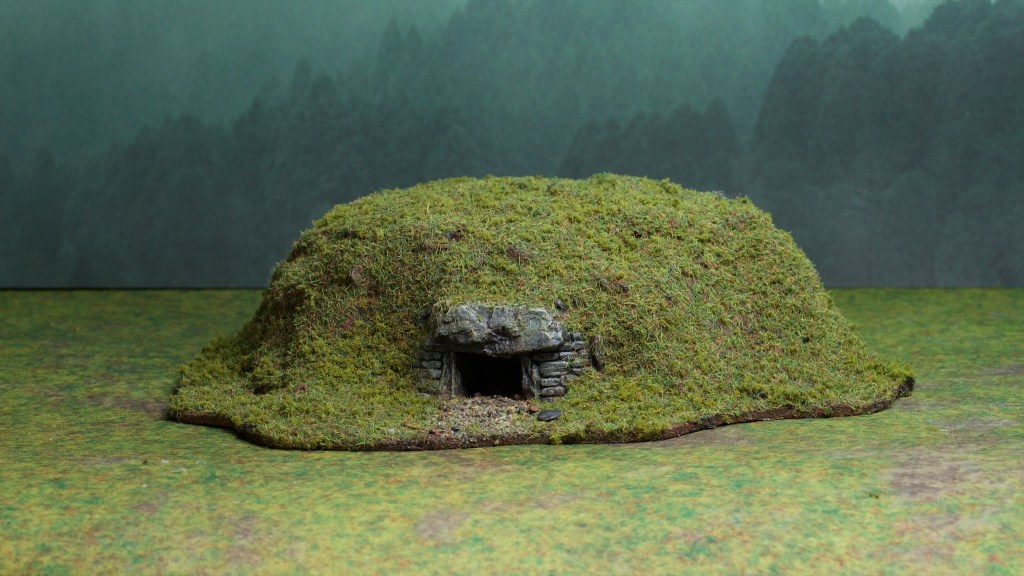
Once the base colours were down, I gave the entrances a few drybrushes of greys and some green and brown washes to add a bit of colour in there. Once that was done I covered them using the flock mix I’ve been playing with for a while, a mix of Woodland Scenics foams and GW static grass.
Here are the finished barrows:
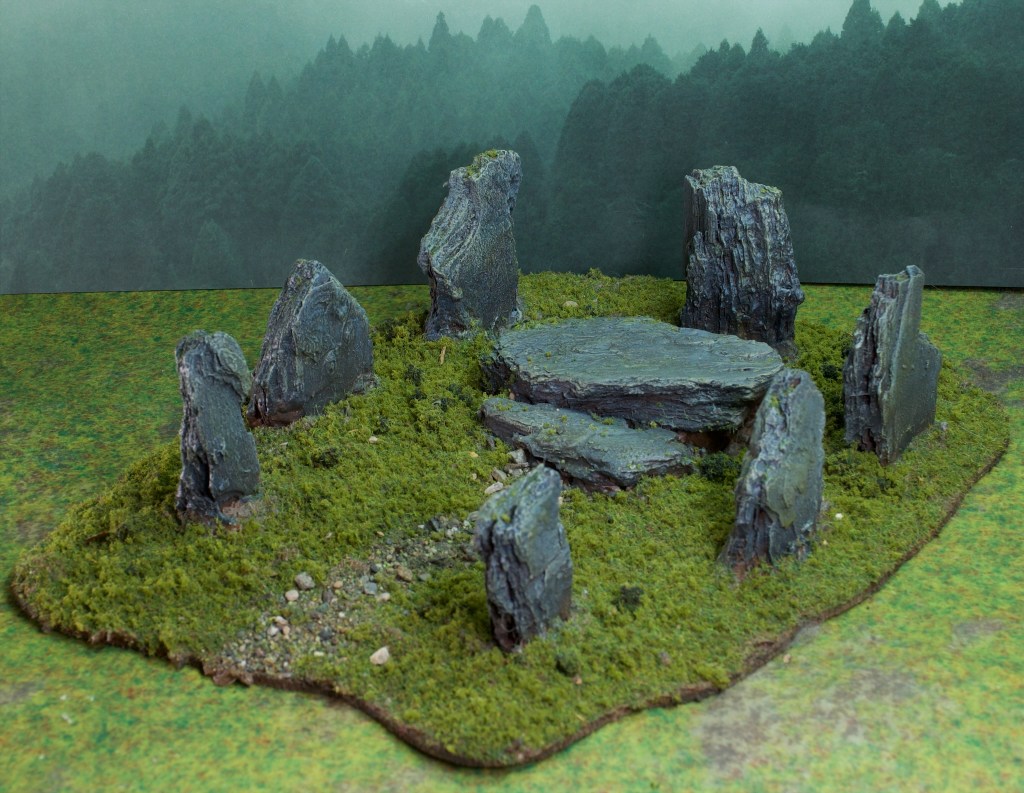
The Geistmunden Hills scenario calls for a piece of terrain to sit in the center of the board, and they suggest amongst other things a stone circle. This appealed to me, and I used some pine bark I had lying around to make an altar of sorts surrounded by standing stones. I painted these to match the stone of the barrows.
Overall here’s how these all fit on a 6ft x 4ft board:
These were lots of fun to put together, and I’m excited to use them in games. The motivation for these was this Warhammer campaign, but I can easily see using these for historicals or Middle-Earth games.
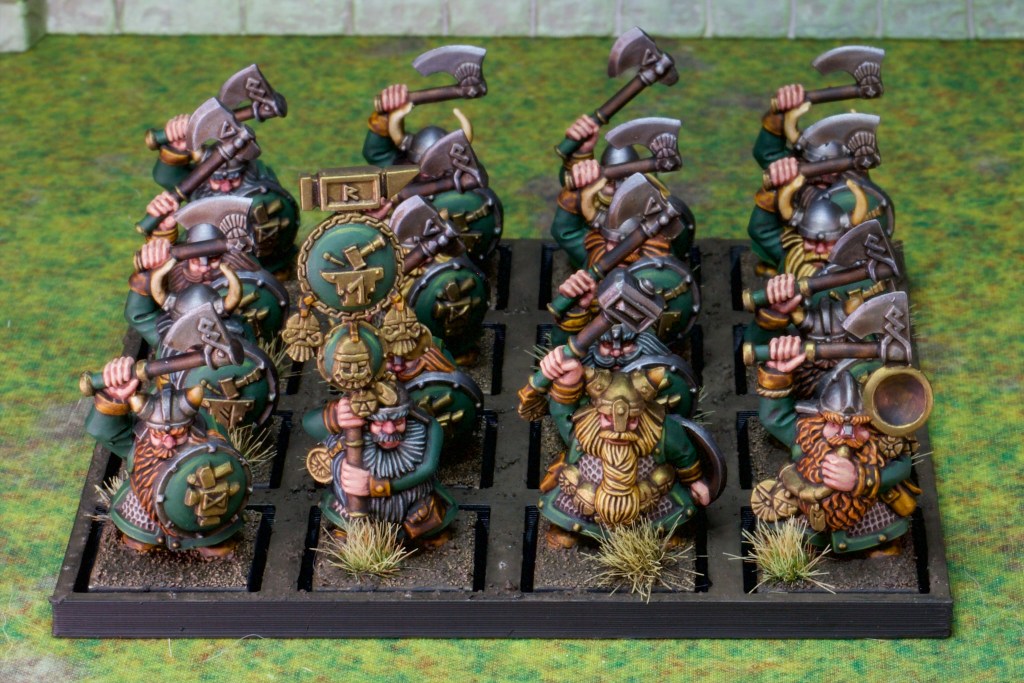
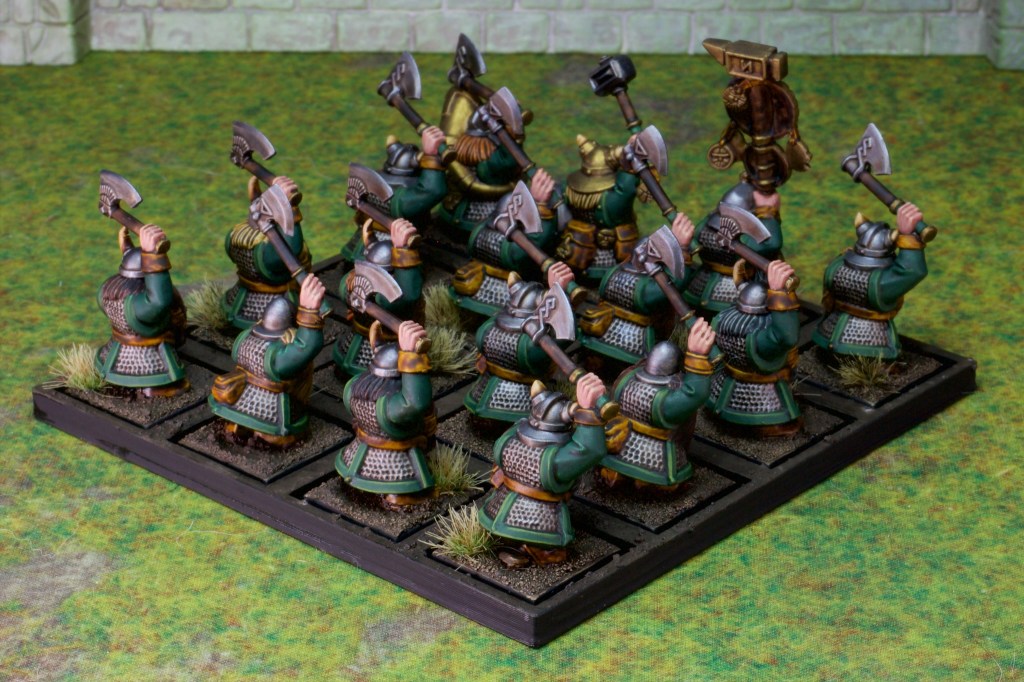
After all these diversions painting Wood Elves, I’m back in the realm of trusty axes with some more Dwarfs!
These are the old Battle for Skull Pass starter set models, which are quite basic one piece models (hence the flat poses!). The upside of this is detail on them is limited and they’re quite fast to paint.
Painting-wise there is nothing groundbreaking on these, still using the same recipe as the unit of Miners that kicked this all off. It’s quite a fast scheme and looks fine on the table!
A big part of the drive to get these models painted was to make this army legal under the newest ruleset. I was a bit light on core units, so a small block of warriors filled that void nicely.
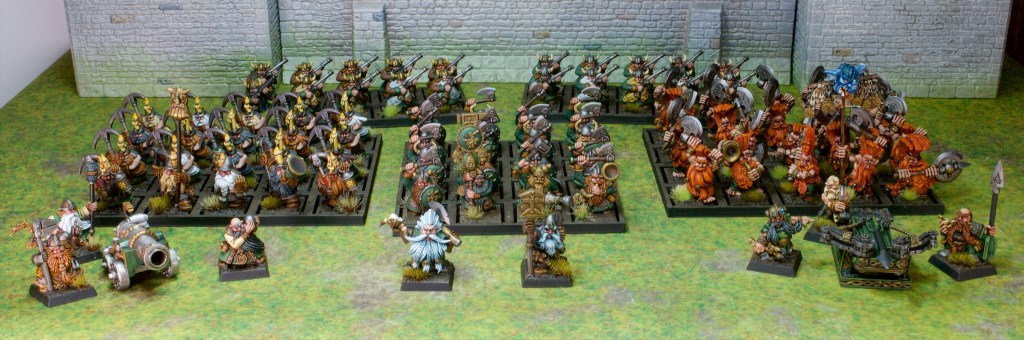
You may notice these are on a spaced out movement tray, while my previous units were close together. The new edition of the game has dwarfs sitting on 25mm bases rather than the classic 20mm, so rather than rebasing all these, I knocked up some movement trays in tinkercad that add the missing 5mm around the models and printed them on my filament printer. I did this for all my current units, which means it’s a good time for an army photo!
Having all this painted up gives me far more than I need for the campaign which means I’m good to go on that front which is very exciting!
I should have some terrain for the campaign done up soon, so I’d expect that to be the next post!